1 OpenCV 환경 준비
이 프로젝트는 opencv를 사용하여 그림을 읽고 처리해야 하므로 먼저 Java에서 실행되는 opencv의 구성을 구성해야 합니다.
먼저 opencv 공식 웹 사이트로 이동하여 opencv-4.6을 다운로드합니다: 다운로드하려면 여기를 클릭하고 다운로드 후 경로를 선택하여 설치를 완료하십시오.
이때 우리 Springboot 프로젝트의 resources 폴더 아래 lib 폴더 아래에 복사 opencv\build\java\x64를 opencv_java460.dll해주세요 C:\Windows\System32.D:\Tools\opencv\opencv\build\javaopencv-460.jar
이 기사에 필요한 ONNX 파일을 다운로드하려면 여기를 클릭 하십시오 .
JAVA는 제스처 인식 에 YOLOV7을 사용합니다 .OnnxRuntime 및 OpenCV를 사용하여 YoloV7 제스처 인식을 구현하려면 Java 로 이동하세요 . 프로젝트 코드는 프로젝트 홈페이지
에서 볼 수 있습니다 .
2 메이븐 구성
onnxruntime과 opencv의 두 종속성을 소개하십시오. systemPathopencv를 가져올 때 위에서 언급한 경로와 일치해야 합니다 opencv-460.jar.
<dependency>
    <groupId>com.microsoft.onnxruntime</groupId>
    <artifactId>onnxruntime</artifactId>
    <version>1.12.1</version>
</dependency>

<dependency>
    <groupId>org.opencv</groupId>
    <artifactId>opencv</artifactId>
    <version>4.6.0</version>
    <scope>system</scope>
    <systemPath>${project.basedir}/src/main/resources/lib/opencv-460.jar</systemPath>
</dependency>
3 유틸리티
3.1 레터박스.자바
이 클래스는 보폭 제약 조건이 충족되도록 이미지 크기 조정 및 패딩을 담당하고 매개변수를 기록합니다.
package cn.halashuo.yolov7.utils;

import org.opencv.core.Core;
import org.opencv.core.Mat;
import org.opencv.core.Size;
import org.opencv.imgproc.Imgproc;

public class Letterbox {


    private final Size newShape = new Size(1280, 1280);
    private final double[] color = new double[]{

    114,114,114};
    private final Boolean auto = false;
    private final Boolean scaleUp = true;
    private final Integer stride = 32;

    private double ratio;
    private double dw;
    private double dh;

    public double getRatio() {


        return ratio;
    }

    public double getDw() {


        return dw;
    }

    public Integer getWidth() {


        return (int) this.newShape.width;
    }

    public Integer getHeight() {


        return (int) this.newShape.height;
    }

    public double getDh() {


        return dh;
    }

    public Mat letterbox(Mat im) {

     // 调整图像大小和填充图像,使满足步长约束,并记录参数

        int[] shape = {

    im.rows(), im.cols()}; // 当前形状 [height, width]
        // Scale ratio (new / old)
        double r = Math.min(this.newShape.height / shape[0], this.newShape.width / shape[1]);
        if (!this.scaleUp) {

     // 仅缩小,不扩大(一起为了mAP)
            r = Math.min(r, 1.0);
        }
        // Compute padding
        Size newUnpad = new Size(Math.round(shape[1] * r), Math.round(shape[0] * r));
        double dw = this.newShape.width - newUnpad.width, dh = this.newShape.height - newUnpad.height; // wh 填充
        if (this.auto) {

     // 最小矩形
            dw = dw % this.stride;
            dh = dh % this.stride;
        }
        dw /= 2; // 填充的时候两边都填充一半,使图像居于中心
        dh /= 2;
        if (shape[1] != newUnpad.width || shape[0] != newUnpad.height) {

     // resize
            Imgproc.resize(im, im, newUnpad, 0, 0, Imgproc.INTER_LINEAR);
        }
        int top = (int) Math.round(dh - 0.1), bottom = (int) Math.round(dh + 0.1);
        int left = (int) Math.round(dw - 0.1), right = (int) Math.round(dw + 0.1);
        // 将图像填充为正方形
        Core.copyMakeBorder(im, im, top, bottom, left, right, Core.BORDER_CONSTANT, new org.opencv.core.Scalar(this.color));
        this.ratio = r;
        this.dh = dh;
        this.dw = dw;
        return im;
    }
}
3.2 Lable.java
이 클래스는 레이블의 이름을 기록하는 역할을 합니다. 모델에서 출력한 클래스가 좌표이고 각 좌표에 해당하는 클래스 이름이 여기에 있기 때문입니다. 동시에 관리의 편의를 위해 각 클래스 박스를 그릴 때 사용되는 색상도 이곳에서 랜덤하게 생성됩니다.
package cn.halashuo.yolov7.utils;

import java.util.Random;
import java.util.ArrayList;
import java.util.Arrays;
import java.util.List;
import java.util.Map;
import java.util.HashMap;

public class Lable {


    private List<String> names = new ArrayList<>(Arrays.asList(
            "person", "bicycle", "car", "motorcycle", "airplane", "bus", "train",
            "truck", "boat", "traffic light", "fire hydrant", "stop sign", "parking meter",
            "bench", "bird", "cat", "dog", "horse", "sheep", "cow", "elephant", "bear",
            "zebra", "giraffe", "backpack", "umbrella", "handbag", "tie", "suitcase",
            "frisbee", "skis", "snowboard", "sports ball", "kite", "baseball bat",
            "baseball glove", "skateboard", "surfboard", "tennis racket", "bottle",
            "wine glass", "cup", "fork", "knife", "spoon", "bowl", "banana", "apple",
            "sandwich", "orange", "broccoli", "carrot", "hot dog", "pizza", "donut",
            "cake", "chair", "couch", "potted plant", "bed", "dining table", "toilet",
            "tv", "laptop", "mouse", "remote", "keyboard", "cell phone", "microwave",
            "oven", "toaster", "sink", "refrigerator", "book", "clock", "vase", "scissors",
            "teddy bear", "hair drier", "toothbrush"));

    private Map<String, double[]> colors;

    public Lable() {


        this.colors = new HashMap<>();
        names.forEach(name->{


            Random random = new Random();
            double[] color = {

    random.nextDouble()*256, random.nextDouble()*256, random.nextDouble()*256};
            colors.put(name, color);
        });
    }

    public String getName(int clsId) {


        return names.get(clsId);
    }

    public double[] getColor(int clsId) {


        return colors.get(getName(clsId));
    }
}
3.3 ModelResult.java
모델 개체 인식 결과의 엔터티 클래스입니다.
package cn.halashuo.yolov7.utils;

import java.text.DecimalFormat;

public class ModelResult {


    private final Integer batchId;
    private final Float x0;
    private final Float y0;
    private final Float x1;
    private final Float y1;
    private final Integer clsId;
    private final Float score;

    public ModelResult(float[] x) {


        this.batchId = (int) x[0];
        this.x0 = x[1];
        this.y0 = x[2];
        this.x1 = x[3];
        this.y1 = x[4];
        this.clsId = (int) x[5];
        this.score = x[6];
    }

    public Integer getBatchId() {


        return batchId;
    }

    public Float getX0() {


        return x0;
    }

    public Float getY0() {


        return y0;
    }

    public Float getX1() {


        return x1;
    }

    public Float getY1() {


        return y1;
    }

    public Integer getClsId() {


        return clsId;
    }

    public String getScore() {


        DecimalFormat df = new DecimalFormat("0.00%");
        return df.format(this.score);
    }

    @Override
    public String toString() {


        return "物体: " +
                " \t batchId=" + batchId +
                " \t x0=" + x0 +
                " \t y0=" + y0 +
                " \t x1=" + x1 +
                " \t y1=" + y1 +
                " \t clsId=" + clsId +
                " \t score=" + getScore() +
                " \t ;";
    }
}
4 YoloV7.java
ONNX 파일 경로와 인식할 이미지 경로만 설정하면 됩니다. 필요한 경우 CUDA를 운영 환경으로 설정하여 FPS를 크게 높일 수도 있습니다.
package cn.halashuo.yolov7;

import ai.onnxruntime.OnnxTensor;
import ai.onnxruntime.OrtEnvironment;
import ai.onnxruntime.OrtException;
import ai.onnxruntime.OrtSession;
import cn.halashuo.yolov7.utils.Lable;
import cn.halashuo.yolov7.utils.Letterbox;
import cn.halashuo.yolov7.utils.ModelResult;
import org.opencv.core.*;
import org.opencv.highgui.HighGui;
import org.opencv.imgcodecs.Imgcodecs;
import org.opencv.imgproc.Imgproc;


import java.nio.FloatBuffer;
import java.util.Arrays;
import java.util.HashMap;

public class YOLO {


    static
    {


        //在使用OpenCV前必须加载Core.NATIVE_LIBRARY_NAME类,否则会报错
        System.loadLibrary(Core.NATIVE_LIBRARY_NAME);
    }

    public static void main(String[] args) throws OrtException {


        // 加载ONNX模型
        OrtEnvironment environment = OrtEnvironment.getEnvironment();
        OrtSession.SessionOptions sessionOptions = new OrtSession.SessionOptions();
        OrtSession session = environment.createSession("other\\yolov7-d6.onnx", sessionOptions);

        // 输出基本信息
        session.getInputInfo().keySet().forEach(x-> {


            try {


                System.out.println("input name = " + x);
                System.out.println(session.getInputInfo().get(x).getInfo().toString());
            } catch (OrtException e) {


                throw new RuntimeException(e);
            }
        });

        // 加载标签及颜色
        Lable lable = new Lable();

        // 读取 image
        Mat img = Imgcodecs.imread("other/test.jpg");
        Imgproc.cvtColor(img, img, Imgproc.COLOR_BGR2RGB);
        Mat image = img.clone();

        // 在这里先定义下框的粗细、字的大小、字的类型、字的颜色(按比例设置大小粗细比较好一些)
        int minDwDh = Math.min(img.width(), img.height());
        int thickness = minDwDh/333;
        double fontSize = minDwDh/1145.14;
        int fontFace = Imgproc.FONT_HERSHEY_SIMPLEX;
        Scalar fontColor = new Scalar(255, 255, 255);

        // 更改 image 尺寸
        Letterbox letterbox = new Letterbox();
        image = letterbox.letterbox(image);

        double ratio  = letterbox.getRatio();
        double dw = letterbox.getDw();
        double dh = letterbox.getDh();
        int rows  = letterbox.getHeight();
        int cols  = letterbox.getWidth();
        int channels = image.channels();


        // 将Mat对象的像素值赋值给Float[]对象
        float[] pixels = new float[channels * rows * cols];
        for (int i = 0; i < rows; i++) {


            for (int j = 0; j < cols; j++) {


                double[] pixel = image.get(j,i);
                for (int k = 0; k < channels; k++) {


                    // 这样设置相当于同时做了image.transpose((2, 0, 1))操作
                    pixels[rows*cols*k+j*cols+i] = (float) pixel[k]/255.0f;
                }
            }
        }

        // 创建OnnxTensor对象
        long[] shape = {

     1L, (long)channels, (long)rows, (long)cols };
        OnnxTensor tensor = OnnxTensor.createTensor(environment, FloatBuffer.wrap(pixels), shape);
        HashMap<String, OnnxTensor> stringOnnxTensorHashMap = new HashMap<>();
        stringOnnxTensorHashMap.put(session.getInputInfo().keySet().iterator().next(), tensor);

        // 运行模型
        OrtSession.Result output = session.run(stringOnnxTensorHashMap);

        // 得到结果
        float[][] outputData = (float[][]) output.get(0).getValue();
        Arrays.stream(outputData).iterator().forEachRemaining(x->{


            ModelResult modelResult = new ModelResult(x);
            System.out.println(modelResult);

            // 画框
            Point topLeft = new Point((modelResult.getX0()-dw)/ratio, (modelResult.getY0()-dh)/ratio);
            Point bottomRight = new Point((modelResult.getX1()-dw)/ratio, (modelResult.getY1()-dh)/ratio);
            Scalar color = new Scalar(lable.getColor(modelResult.getClsId()));
            Imgproc.rectangle(img, topLeft, bottomRight, color, thickness);

            // 框上写文字
            String boxName = lable.getName(modelResult.getClsId()) + ": " + modelResult.getScore();
            Point boxNameLoc = new Point((modelResult.getX0()-dw)/ratio, (modelResult.getY0()-dh)/ratio-3);
            Imgproc.putText(img, boxName, boxNameLoc, fontFace, fontSize, fontColor, thickness);

        });
        Imgproc.cvtColor(img, img, Imgproc.COLOR_RGB2BGR);
        // 保存图像
        // Imgcodecs.imwrite("C:\\Users\\pbh0612\\Desktop\\image.jpg", img);
        HighGui.imshow("Display Image", img);
        // 等待按下任意键继续执行程序
        HighGui.waitKey();
    }
}
작업 결과:
input name = images
TensorInfo(javaType=FLOAT,onnxType=ONNX_TENSOR_ELEMENT_DATA_TYPE_FLOAT,shape=[1, 3, 1280, 1280])
物体:  	 batchId=0 	 x0=373.3943 	 y0=659.8634 	 x1=553.5588 	 y1=1031.9065 	 clsId=0 	 score=95.59% 	 ;
物体:  	 batchId=0 	 x0=552.2209 	 y0=499.82382 	 x1=741.4096 	 y1=1041.5698 	 clsId=0 	 score=95.21% 	 ;
物体:  	 batchId=0 	 x0=814.59875 	 y0=606.4736 	 x1=1041.6691 	 y1=1027.655 	 clsId=0 	 score=95.14% 	 ;
物体:  	 batchId=0 	 x0=544.29016 	 y0=417.2976 	 x1=612.7943 	 y1=459.89227 	 clsId=29 	 score=92.77% 	 ;
物体:  	 batchId=0 	 x0=0.20257473 	 y0=862.7974 	 x1=18.631138 	 y1=1012.6624 	 clsId=0 	 score=37.05% 	 ;
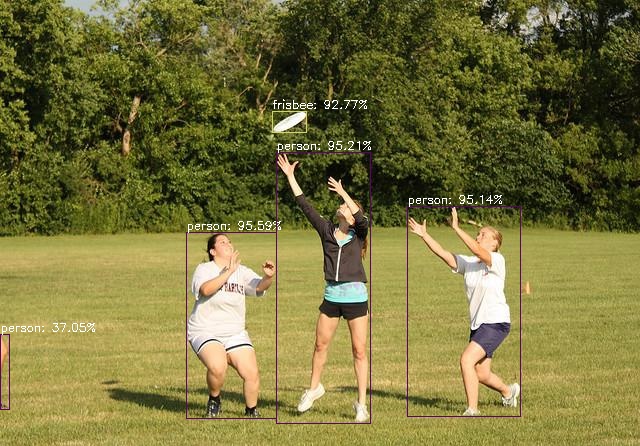
YOLOV7의 공식 모델로 훈련하고 onnx로 변환한 후 NMS 이후 얻은 탐지 결과가 통과되었습니다. 따라서 출력 차원은 n × 7 n\times 7 입니다.N×7 , 여기서n nn 최종적으로 얼마나 많은 물체가 감지되었는지를 나타내며
batchId: 어떤 사진(예시에서는 한 장의 사진만 업로드했으므로batchId0만 있음),x0: 왼쪽 상단의 x 좌표,y0: y 왼쪽 상단 모서리의 좌표,x1: 오른쪽 하단 모서리의 x 좌표,y1: 오른쪽 하단 모서리의 y 좌표,clsId: 범주,score신뢰 수준.
5 파이썬 코드
Python의 onnxruntime을 사용하여 직접 예측할 수도 있습니다. 코드는 다음과 같습니다.
import cv2
import random
import onnxruntime
import numpy as np
from PIL import Image

def letterbox(im, new_shape=(1280, 1280), color=(114, 114, 114), auto=True, scaleup=True, stride=32):
    # Resize and pad image while meeting stride-multiple constraints
    shape = im.shape[:2]  # current shape [height, width]
    if isinstance(new_shape, int):
        new_shape = (new_shape, new_shape)

    # Scale ratio (new / old)
    r = min(new_shape[0] / shape[0], new_shape[1] / shape[1])
    if not scaleup:  # only scale down, do not scale up (for better val mAP)
        r = min(r, 1.0)

    # Compute padding
    new_unpad = int(round(shape[1] * r)), int(round(shape[0] * r))
    dw, dh = new_shape[1] - new_unpad[0], new_shape[0] - new_unpad[1]  # wh padding

    if auto:  # minimum rectangle
        dw, dh = np.mod(dw, stride), np.mod(dh, stride)  # wh padding

    dw /= 2  # divide padding into 2 sides
    dh /= 2

    if shape[::-1] != new_unpad:  # resize
        im = cv2.resize(im, new_unpad, interpolation=cv2.INTER_LINEAR)
    top, bottom = int(round(dh - 0.1)), int(round(dh + 0.1))
    left, right = int(round(dw - 0.1)), int(round(dw + 0.1))
    im = cv2.copyMakeBorder(im, top, bottom, left, right, cv2.BORDER_CONSTANT, value=color)  # add border
    return im, r, (dw, dh)

names = ['person', 'bicycle', 'car', 'motorcycle', 'airplane', 'bus', 'train', 'truck', 'boat', 'traffic light',
         'fire hydrant', 'stop sign', 'parking meter', 'bench', 'bird', 'cat', 'dog', 'horse', 'sheep', 'cow',
         'elephant', 'bear', 'zebra', 'giraffe', 'backpack', 'umbrella', 'handbag', 'tie', 'suitcase', 'frisbee',
         'skis', 'snowboard', 'sports ball', 'kite', 'baseball bat', 'baseball glove', 'skateboard', 'surfboard',
         'tennis racket', 'bottle', 'wine glass', 'cup', 'fork', 'knife', 'spoon', 'bowl', 'banana', 'apple',
         'sandwich', 'orange', 'broccoli', 'carrot', 'hot dog', 'pizza', 'donut', 'cake', 'chair', 'couch',
         'potted plant', 'bed', 'dining table', 'toilet', 'tv', 'laptop', 'mouse', 'remote', 'keyboard', 'cell phone',
         'microwave', 'oven', 'toaster', 'sink', 'refrigerator', 'book', 'clock', 'vase', 'scissors', 'teddy bear',
         'hair drier', 'toothbrush']

colors = {

    name:[random.randint(0, 255) for _ in range(3)] for i,name in enumerate(names)}

# 读取onnx模型
cuda = False
providers = ['CUDAExecutionProvider', 'CPUExecutionProvider'] if cuda else ['CPUExecutionProvider']
session = onnxruntime.InferenceSession('yolov7-d6.onnx', providers=providers)
# 获取输入节点名称和形状
input_name = session.get_inputs()[0].name
input_shape = session.get_inputs()[0].shape
print(f"节点名称为 {

      input_name},形状为 {

      input_shape}")

img = cv2.imread('test.jpg')
img = cv2.cvtColor(img, cv2.COLOR_BGR2RGB)

image = img.copy()
image, ratio, dwdh = letterbox(image, auto=False)
image = image.transpose((2, 0, 1))
image = np.expand_dims(image, 0)
image = np.ascontiguousarray(image)

im = image.astype(np.float32)
im /= 255

outname = [i.name for i in session.get_outputs()]
inname = [i.name for i in session.get_inputs()]
inp = {

    inname[0]:im}

outputs = session.run(outname, inp)[0]

ori_images = [img.copy()]

for i, (batch_id, x0, y0, x1, y1, cls_id, score) in enumerate(outputs):
    image = ori_images[int(batch_id)]
    box = np.array([x0,y0,x1,y1])
    box -= np.array(dwdh*2)
    box /= ratio
    box = box.round().astype(np.int32).tolist()
    cls_id = int(cls_id)
    score = round(float(score),3)
    name = names[cls_id]
    color = colors[name]
    name += ' '+str(score)
    cv2.rectangle(image,box[:2],box[2:],color,2)
    cv2.putText(image,name,(box[0], box[1] - 2),cv2.FONT_HERSHEY_SIMPLEX,0.75,[225, 255, 255],thickness=2)

Image.fromarray(ori_images[0])