TinyPerson(NWPU VHR-10 또는 기타 동급) 데이터 세트 파일은 VOC 유형 xml 파일로 재작성됩니다.
Python 구현에 대한 코드
만들기 쉽지 않은데 엄지 척
기사 디렉토리
이 목표를 달성하기 위해서는 다음 두 가지가 필요합니다.
1. 사양에 따라 xml 파일을 작성합니다
. 2. TinyPerson의 Annotation 형식에 따라 xml 파일로 다시 작성합니다
. TinyPerson 데이터 세트가 부족할 때 해결되었습니다. 이 데이터 세트를 사용하여 작은 대상 감지를 테스트하는 더 많은 친구들이 이 데이터 세트를 더 편리하게 사용할 수 있기를 바랍니다.#)
XML 파일 읽기 및 쓰기
관련 모듈
from lxml import etree
from lxml.etree import Element,SubElement,tostring
XML 파일 읽기
path_xml='your_xml_path'
with open(path_xml,'r') as file:
	xml_str=file.read()
	#<class 'str'>
xml=etree.fromstring(xml_str)
#<class 'lxml.etree._Element'>

# 下一步只需把xml文件析成dict
xml 파일을 dict로 분석
def parse_xml_to_dict(xml):
    if len(xml) == 0:  # 遍历到底层,直接返回tag对应的信息
        return {

    xml.tag: xml.text}
    result = {

    }
    for child in xml:
        #print(child.text)
        child_result = parse_xml_to_dict(child)  # 递归遍历标签信息
        if child.tag != 'object':
            result[child.tag] = child_result[child.tag]
        else:
            if child.tag not in result:  # 因为object可能有多个,所以需要放入列表里
                result[child.tag] = []
            result[child.tag].append(child_result[child.tag])
    return {

    xml.tag: result}
XML 파일 작성
node_root=Element('annotation')#Element用来创建一个lxml.etree._Element类
node_folder=SubElement(node_root,'fold')#创建子类
node_folder.text='your xml file path'
node_object=SubElement(node_root,'object')
node_weight=SubElement(node_object,'weight')
node_wieght.text=256
node_height=SubElement(node_object,'height')
node_height.text=256
#当我们保存为xml文件时,只需要保存node_root即可
xml_byte=tostring(node_root)#虽然函数名为tostring但是得到的格式实际是bytes,可用type查看
with open('path you want to save','wb') as f:#此处需用wb,代表写入bytes,如果是'r'会报错
	f.write(xml_byte)
# 至此完成了xml的保存
또 다른 작성 방법이 있습니다.
import xml.dom.minidom
dom=minidom.Document()
annotation=dom.createElement('annotation')#创建根节点
dom.appendChild(annotation)#添加根节点
size=dom.createElement('size')
annotation.appendChild('size')

width=dom.createElement('width')
size.appendChild(width)
width_text=dom.createTextNode('256')
width.appendChild(width_text)

height=dom.createElement('height')
size.appendChild(height)
height_text=dom.createTextNode('256')
height.appendChild(height_text)

depth=dom.createElement('depth')
size.appendChild(depth)
depth_text=dom.createTextNode('3')
depth.appendChild(depth_text)
#至此便创建了一个dom文件,以下将其保存为xml并展示效果
with open(path,'w') as f:
	dom.writexml(f)#这么保存格式不好看,推荐:
	dom.writexml(f,indent='',addindent='\t',newl='\n',encoding='UTF-8')
효과는 그림과 같습니다.

xml 파일 수정
일반적으로 후속 수정이 필요할 수 있는 xml 파일을 작성합니다.
기존 노드의 값 수정
다음 코드는 xml 파일의 높이 및 너비 값을 높이, 너비로 수정합니다.
import xml.dom.minidom
dom=xml.dom.minidom.parse(path)
root=dom.documentElement
heights=root.getElementsByTagName('height')[0]
heights.firstChild.data=height
#print(height)

widths=root.getElementsByTagName('width')[0]
widths.firstChild.data=width
#print(width)
with open(path, 'w') as f:
    dom.writexml(f)
노드 추가
dom=xml.dom.minidom.parse(path)
root=dom.documentElement
node1=dom.createElement('node1')
root.appendChild(node1)#如此便在root下添加了一个子节点
name_text=dom.createTextNode('this is node1 of root')
node1.appendChild(name_text)#如此便在node1中添加了一个文本节点
TinyPerson 데이터 세트 전투
이 섹션의 목적: TinyPerson 데이터세트 주석을 읽고 위의 방법을 사용하여 xml 파일 작성
TinyPerson 데이터세트 주석 예시:
{“type”: “instance”, “annotations”: [{“ segmentation ”: [[1081.124389319407, 17.45930926910859, 1267.431666947439, 17.45930926910859, 1267.431666947439, 67.73270164492683, 1081.124389319407, 67.73270164492683]], “ bbox ”: [1081.124389319407, 17.45930926910859, 186.3072776280319, 50.27339237581825], " category_id ": 1, " area ": 9366.298870664552, " iscrowd ": 0, " image_id ": 0, " id ": 0, " 무시 ": 참, " 불확실 ": 거짓, " 로고 ": 참 , " in_dense_image ": 거짓},
다음은
다음 json 파일의 내용을 분석하기 위한 다음 {"segmentaion": #######}입니다.
segmentation은 인스턴스를 나타냅니다.
bbox는 GT의 x, y, 너비, 높이
image_id는 m번째 이미지
id를 나타냅니다. n번째 객체 (누적, 다음으로 사진이 잘려서 0으로 돌아가지 않음)
image_id에 해당하는 이미지 위치를 찾는 방법
다음 json 파일이 필요합니다.
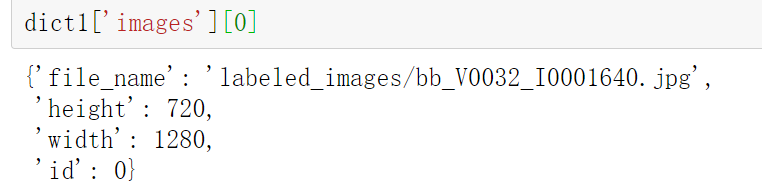
" 이미지 ": [{" 파일 이름 ": "labeled_images/bb_V0032_I0001640.jpg", " 높이 ": 720, " 너비 ": 1280, " id ": 0}, {" 파일 이름 ": "labeled_images/bb_V0014_I0002600.jpg", "높이": 1080, "너비": 1920, "id": 1},
이 json 파일에서 위의 id로 표시된 image_id를 분석할 수 있습니다. 이제 시작할 수 있습니다.
정보 얻기
VOC 형식으로 xml 파일을 작성
하려면 다음 정보가
필요 합니다
.
각 개체의 이름
, 높이 및 너비는 그림의 높이 및 너비입니다.
특별한 주의를 기울여야 하며, 위는 문자열 형식이어야 합니다(xmins 포함,
이 사진을 예로 들어, file_name, height , 너비, 거래 경로는 고유하게 결정될 수
있지만 각 dict1['annotations' ][0]에 대해 하나의 개체만 얻을 수 있으므로
'이미지'를 통해 작성하고 먼저 xml 파일을 작성한 다음 다음에 따라 수정할 수 있습니다. 객체는 매번 읽습니다(좋은 생각입니다)
파이썬 구현
import os
import json
from lxml import etree
from lxml.etree import Element,SubElement,tostring
from xml.dom import minidom
json_file=open('D:/CODE/data/tiny_set/tiny_set/annotations/tiny_set_train.json','r')
path1='D:/CODE/data/tiny_set/tiny_set/annotation'#path1代表生成annotations的位置
path2='D:/CODE/data/tiny_set/tiny_set/train/train'
dict1=json.load(json_file)#读取字典

#更改labeled_image文件夹中的图片名称(我个人习惯)
for i in range(746): # 746 = len(dict1['images'])
    file1=os.path.join(path2,dict1['images'][i]['file_name'])
    #file1=os.path.join(path2,'labeled_images',str(dict1['images'][i]['id'])+'.jpg')
    file2=os.path.join(path2,'labeled_images',str(dict1['images'][i]['id']).rjust(3,'0')+'.jpg')
    os.rename(file1,file2)

#在path1目录下创建xml文件
for i in range(746):
    annotation=Element('annotation')#Element用来创建一个lxml.etree._Element类
    folder=SubElement(annotation,'folder')#创建子类
    folder.text='tiny_set'

    filename=SubElement(annotation,'filename')
    filename.text=str(dict1['images'][i]['id'])+'.jpg'

    size=SubElement(annotation,'size')
    width=SubElement(size,'width')
    width.text=str(dict1['images'][i]['width'])
    height=SubElement(size,'height')
    height.text=str(dict1['images'][i]['height'])
    depth=SubElement(size,'depth')
    depth.text='3'

    xml_byte=tostring(annotation)#虽然函数名为tostring但是得到的格式实际是bytes,可用type查看
    file_path=os.path.join(path1,str(dict1['images'][i]['id']).rjust(3,'0')+'.xml')
    with open(file_path,'wb') as f:#此处需用wb,代表写入bytes,如果是'r'会报错
        f.write(xml_byte)

#根据每个object信息去修改xml文件
for i in range(len(dict1['annotations'])):
    img_id=str(dict1['annotations'][i]['image_id']).rjust(3,'0')
    xml_path=os.path.join(path1,img_id+'.xml')
    dom=minidom.parse(xml_path)
    annotation=dom.documentElement
    object_node=dom.createElement('object')
    annotation.appendChild(object_node)
    #为了省事,创建节点的代码写在一起
    name=dom.createElement('name')
    pose=dom.createElement('pose')
    truncated=dom.createElement('truncated')
    difficult=dom.createElement('difficule')
    bndbox=dom.createElement('bndbox')
    xmin=dom.createElement('xmin')
    ymin=dom.createElement('ymin')
    xmax=dom.createElement('xmax')
    ymax=dom.createElement('ymax')

    object_node.appendChild(name)
    object_node.appendChild(pose)
    object_node.appendChild(truncated)
    object_node.appendChild(difficult)
    object_node.appendChild(bndbox)
    bndbox.appendChild(xmin)
    bndbox.appendChild(ymin)
    bndbox.appendChild(xmax)
    bndbox.appendChild(ymax)

    obj_name=dict1['annotations'][i]['category_id']
    if obj_name==1:
        obj_name='sea_person'
    else:
        obj_name='earth_person'
    text=dom.createTextNode(obj_name)
    name.appendChild(text)

    text=dom.createTextNode('unspecified')
    pose.appendChild(text)

    text=dom.createTextNode('0')
    truncated.appendChild(text)

    obj_dif=dict1['annotations'][i]['ignore']
    if obj_dif:
        obj_dif='1'
    else:
        obj_dif='0'
    text=dom.createTextNode(obj_dif)
    difficult.appendChild(text)

    #x,y,weight,height

    bbox=dict1['annotations'][i]['bbox']
    half_w=bbox[2]
    half_h=bbox[3]
    text=dom.createTextNode(str(bbox[0]))
    xmin.appendChild(text)
    text=dom.createTextNode(str(bbox[1]))
    ymin.appendChild(text)
    text=dom.createTextNode(str(bbox[0]+half_w))
    xmax.appendChild(text)
    text=dom.createTextNode(str(bbox[1]+half_h))
    ymax.appendChild(text)

    #这几句代码的是为了打出来的格式好看。可以用一句dom.writexml(f)代替with:里面所有内容
    with open(xml_path, 'w') as f:
        if i==25287 :
            dom.writexml(f,indent='',addindent='\t',newl='\n',encoding='UTF-8')
        elif dict1['annotations'][i+1]['image_id'] != dict1['annotations'][i]['image_id'] :
            dom.writexml(f,indent='',addindent='\t',newl='\n',encoding='UTF-8')
        else:
            dom.writexml(f)
결과 보여줘
xml 파일 표시:
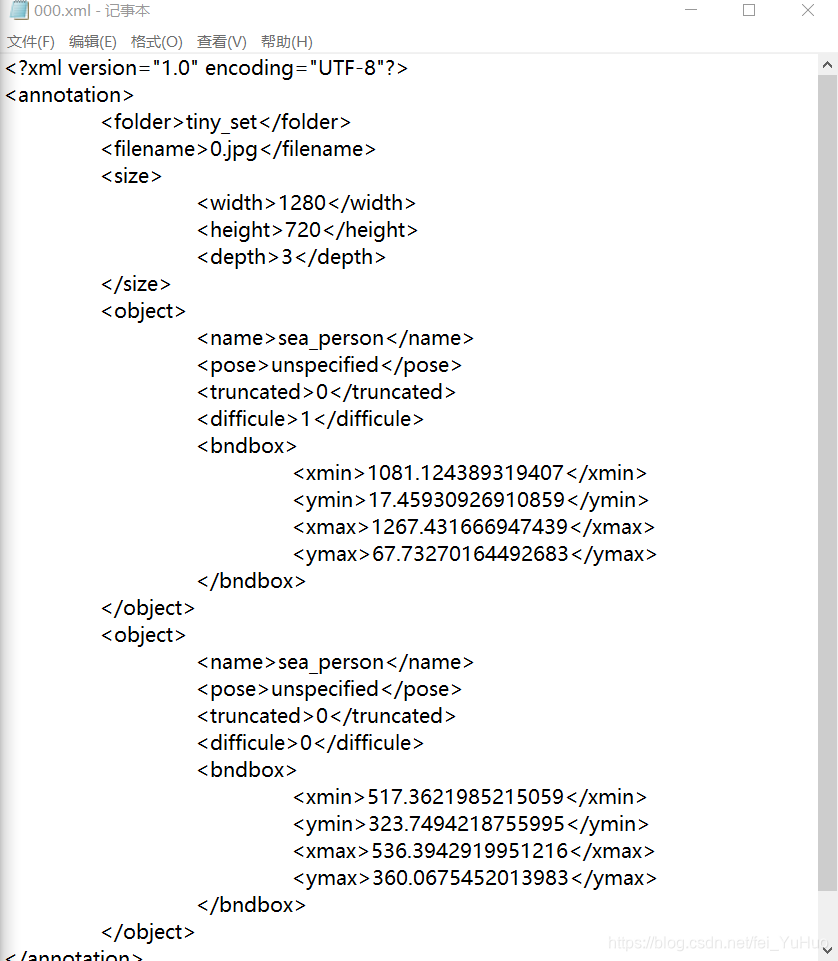
주석 효과 표시 다이어그램:

참조
https://blog.csdn.net/summer2day/article/details/83064727?utm_medium=distribute.pc_relevant.none-task-blog-2%7Edefault%7EBlogCommendFromMachineLearnPai2%7Edefault-4.control&dist_request_id=1619533822770_16111&depth_1-utm_source=distribute .pc_관련. 없음-태스크-블로그-2%7Edefault%7EBlogCommendFromMachineLearnPai2%7Edefault-4.control
https://www.cnblogs.com/wcwnina/p/7222180.html
https://blog.csdn.net/mingyang_wang/article/details/82912636
좋아요는 작가뿐만 아니라 독자에게도 의미 있는 것입니다.
시간을 거슬러 올라갈 수 있다면 나를 이끌어준 기사들이 분명 좋겠어