I. Introducción
La unión de imágenes (Image Stitching) es una tecnología que utiliza imágenes del mundo real para formar un espacio panorámico. Une varias imágenes en una imagen a gran escala o una panorámica de 360°, que puede considerarse como un caso especial de reconstrucción de escena. Planar homografía para asociación. La unión de imágenes tiene excelentes aplicaciones en los campos de la visión artificial, como la detección y el seguimiento de movimiento, la realidad aumentada, la mejora de la resolución, la compresión de video y la estabilización de imágenes.
La salida de la unión de imágenes es la unión de las dos imágenes de entrada .
1. Extracción de funciones : detecta puntos de funciones en la imagen de entrada.
2. Registro de imagen (Image Registration) : establece una correspondencia establecida entre imágenes para que puedan ser transformadas, comparadas y analizadas en un marco de referencia común.
3. Warping : reproyecte la imagen de una de las imágenes y coloque la imagen en un lienzo más grande.
4. Fusión de imágenes (combinación) : al cambiar el nivel de gris de la imagen cerca del borde, estos espacios se eliminan y se crea una imagen combinada para lograr una transición suave entre las imágenes. Los modos de fusión se utilizan para fusionar dos capas.
2. Método de implementación
Unión de imágenes basada en SURF
El uso del algoritmo SIFT para lograr la unión de imágenes es un método muy común, pero debido a que SIFT tiene una gran cantidad de cálculos, ya no es aplicable en ocasiones con requisitos de alta velocidad. Por lo tanto, su método mejorado SURF tiene una mejora significativa en la velocidad (la velocidad es 3 veces la de SIFT), por lo que todavía tiene mucho que hacer en el campo de la unión de imágenes. Aunque la precisión y la estabilidad de SURF no son tan buenas como las de SIFT, su capacidad integral sigue siendo superior. Los pasos principales de la costura se describen en detalle a continuación.
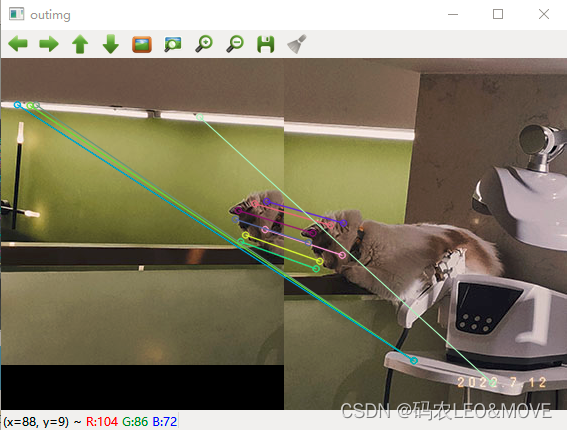
1. Extracción y coincidencia de puntos característicos
    //创建SURF对象
    //create 参数 海森矩阵阈值
    Ptr<SURF> surf;
    surf = SURF::create(800);

    //暴力匹配器
    BFMatcher matcher;

    vector<KeyPoint> key1, key2;
    Mat c, d;

    //寻找特征点
    surf->detectAndCompute(left, Mat(), key2, d);
    surf->detectAndCompute(right, Mat(), key1, c);

    //特征点对比 保存
    vector<DMatch>matches;

    //使用暴力匹配器匹配特征点 保存
    matcher.match(d, c, matches);

    //排序 从小到大
    sort(matches.begin(), matches.end());

    //保留最优的特征点收集
    vector<DMatch>good_matches;

    int ptrPoint = std::min(50, (int)(matches.size()*0.15));

    for(int i=0; i<ptrPoint; i++)
        good_matches.push_back(matches[i]);

    //最佳匹配的特征点连成一线
    Mat outimg;

    drawMatches(left, key2, right, key1, good_matches, outimg,
                Scalar::all(-1), Scalar::all(-1),
                vector<char>(), DrawMatchesFlags::NOT_DRAW_SINGLE_POINTS);

    imshow("outimg", outimg);
2. Registro de imágenes
De esta manera, se obtienen los conjuntos de puntos coincidentes de las dos imágenes a unir. A continuación, se realiza el registro de la imagen, es decir, las dos imágenes se convierten a las mismas coordenadas. Aquí, se necesita usar la función findHomography para obtener la matriz de transformación.
Sin embargo, cabe señalar que el conjunto de puntos que utiliza la función findHomography es de tipo Point2f, por lo que es necesario procesar el conjunto de puntos good_matches recién obtenido para convertirlo en un conjunto de puntos de tipo Point2f.
    //特征点配准
    vector<Point2f>imagepoint1, imagepoint2;
    for(int i=0; i<good_matches.size(); i++)
    {


        imagepoint1.push_back(key1[good_matches[i].trainIdx].pt);
        imagepoint2.push_back(key2[good_matches[i].queryIdx].pt);
    }
Después de las operaciones anteriores, use imagepoint1 y imagepoint2 para encontrar la matriz de transformación y realizar el registro de imágenes.
Vale la pena señalar que CV_RANSAC se selecciona en los parámetros de la función findHomography. Use el algoritmo RANSAC para continuar filtrando puntos de coincidencia confiables, lo que hace que la solución de puntos de coincidencia sea más precisa.
//透视转换
Mat homo = findHomography(imagepoint1, imagepoint2, CV_RANSAC);
imshow("homo", homo);
//右图四个顶点坐标转换计算
CalcCorners(homo, right);
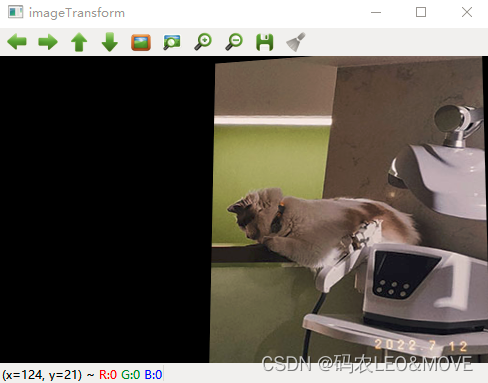
Mat imageTransform;
warpPerspective(right, imageTransform, homo,
Size(MAX(corners.right_top.x, corners.right_bottom.x), left.rows));
imshow("imageTransform", imageTransform);
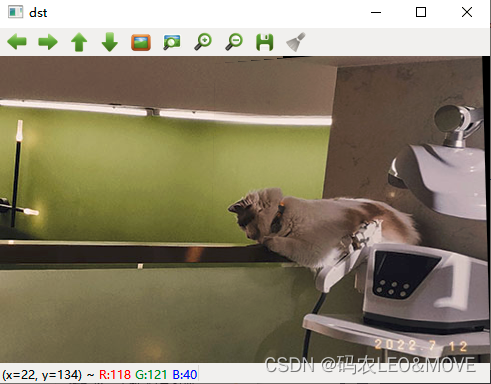
3. Copia de imagen
La idea de copiar es muy simple, solo copie la imagen de la izquierda directamente a la imagen de registro.
    int dst_width = imageTransform.cols;
    int dst_height = imageTransform.rows;

    Mat dst(dst_height, dst_width, CV_8UC3);
    dst.setTo(0);

    imageTransform.copyTo(dst(Rect(0, 0, imageTransform.cols, imageTransform.rows)));
    left.copyTo(dst(Rect(0, 0, left.cols, left.rows)));
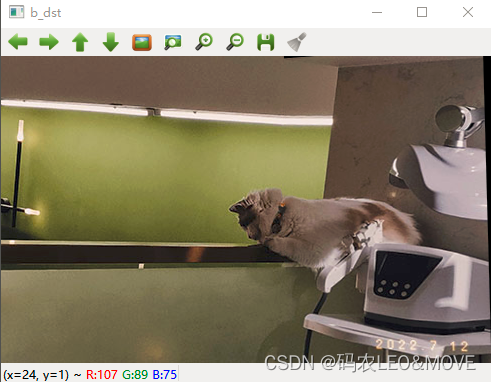
4. Fusión de imágenes (procesamiento de eliminación de grietas)
    OptimizeSeam(left, imageTransform, dst);
    imshow("dst", dst);

    waitKey(0);
//优化两图的连接处,使得拼接自然
void OptimizeSeam(Mat& img1, Mat& trans, Mat& dst)
{


    int start = MIN(corners.left_top.x, corners.left_bottom.x);//开始位置,即重叠区域的左边界

    double processWidth = img1.cols - start;//重叠区域的宽度
    int rows = dst.rows;
    int cols = img1.cols; //注意,是列数*通道数
    double alpha = 1;//img1中像素的权重
    for (int i = 0; i < rows; i++)
    {


        uchar* p = img1.ptr<uchar>(i);  //获取第i行的首地址
        uchar* t = trans.ptr<uchar>(i);
        uchar* d = dst.ptr<uchar>(i);
        for (int j = start; j < cols; j++)
        {


            //如果遇到图像trans中无像素的黑点,则完全拷贝img1中的数据
            if (t[j * 3] == 0 && t[j * 3 + 1] == 0 && t[j * 3 + 2] == 0)
            {


                alpha = 1;
            }
            else
            {


                //img1中像素的权重,与当前处理点距重叠区域左边界的距离成正比,实验证明,这种方法确实好
                alpha = (processWidth - (j - start)) / processWidth;
            }
            d[j * 3] = p[j * 3] * alpha + t[j * 3] * (1 - alpha);
            d[j * 3 + 1] = p[j * 3 + 1] * alpha + t[j * 3 + 1] * (1 - alpha);
            d[j * 3 + 2] = p[j * 3 + 2] * alpha + t[j * 3 + 2] * (1 - alpha);
        }
    }
}
3. Código completo
#include <iostream>
#include <opencv2/opencv.hpp>
#include <opencv2/highgui.hpp>
#include <opencv2/xfeatures2d.hpp>
#include <opencv2/calib3d.hpp>
#include <opencv2/imgproc.hpp>

using namespace std;
using namespace cv;
using namespace cv::xfeatures2d;

typedef struct
{


    Point2f left_top;
    Point2f left_bottom;
    Point2f right_top;
    Point2f right_bottom;
}four_corners_t;

four_corners_t corners;

void CalcCorners(const Mat& H, const Mat& src)
{


    double v2[] = {

     0, 0, 1 };//左上角
    double v1[3];//变换后的坐标值
    Mat V2 = Mat(3, 1, CV_64FC1, v2);  //列向量
    Mat V1 = Mat(3, 1, CV_64FC1, v1);  //列向量

    V1 = H * V2;
    //左上角(0,0,1)
    cout << "V2: " << V2 << endl;
    cout << "V1: " << V1 << endl;
    corners.left_top.x = v1[0] / v1[2];
    corners.left_top.y = v1[1] / v1[2];

    //左下角(0,src.rows,1)
    v2[0] = 0;
    v2[1] = src.rows;
    v2[2] = 1;
    V2 = Mat(3, 1, CV_64FC1, v2);  //列向量
    V1 = Mat(3, 1, CV_64FC1, v1);  //列向量
    V1 = H * V2;
    corners.left_bottom.x = v1[0] / v1[2];
    corners.left_bottom.y = v1[1] / v1[2];

    //右上角(src.cols,0,1)
    v2[0] = src.cols;
    v2[1] = 0;
    v2[2] = 1;
    V2 = Mat(3, 1, CV_64FC1, v2);  //列向量
    V1 = Mat(3, 1, CV_64FC1, v1);  //列向量
    V1 = H * V2;
    corners.right_top.x = v1[0] / v1[2];
    corners.right_top.y = v1[1] / v1[2];

    //右下角(src.cols,src.rows,1)
    v2[0] = src.cols;
    v2[1] = src.rows;
    v2[2] = 1;
    V2 = Mat(3, 1, CV_64FC1, v2);  //列向量
    V1 = Mat(3, 1, CV_64FC1, v1);  //列向量
    V1 = H * V2;
    corners.right_bottom.x = v1[0] / v1[2];
    corners.right_bottom.y = v1[1] / v1[2];

}

//优化两图的连接处,使得拼接自然
void OptimizeSeam(Mat& img1, Mat& trans, Mat& dst)
{


    int start = MIN(corners.left_top.x, corners.left_bottom.x);//开始位置,即重叠区域的左边界

    double processWidth = img1.cols - start;//重叠区域的宽度
    int rows = dst.rows;
    int cols = img1.cols; //注意,是列数*通道数
    double alpha = 1;//img1中像素的权重
    for (int i = 0; i < rows; i++)
    {


        uchar* p = img1.ptr<uchar>(i);  //获取第i行的首地址
        uchar* t = trans.ptr<uchar>(i);
        uchar* d = dst.ptr<uchar>(i);
        for (int j = start; j < cols; j++)
        {


            //如果遇到图像trans中无像素的黑点,则完全拷贝img1中的数据
            if (t[j * 3] == 0 && t[j * 3 + 1] == 0 && t[j * 3 + 2] == 0)
            {


                alpha = 1;
            }
            else
            {


                //img1中像素的权重,与当前处理点距重叠区域左边界的距离成正比,实验证明,这种方法确实好
                alpha = (processWidth - (j - start)) / processWidth;
            }
            d[j * 3] = p[j * 3] * alpha + t[j * 3] * (1 - alpha);
            d[j * 3 + 1] = p[j * 3 + 1] * alpha + t[j * 3 + 1] * (1 - alpha);
            d[j * 3 + 2] = p[j * 3 + 2] * alpha + t[j * 3 + 2] * (1 - alpha);
        }
    }
}

//计算配准图的四个顶点坐标
int main()
{


    Mat left = imread("A.jpg");
    Mat right =imread("B.jpg");

    imshow("left", left);
    imshow("right", right);

    //1.特征点提取和匹配
    //创建SURF对象
    //create 参数 海森矩阵阈值
    Ptr<SURF> surf;
    surf = SURF::create(800);

    //暴力匹配器
    BFMatcher matcher;

    vector<KeyPoint> key1, key2;
    Mat c, d;

    //寻找特征点
    surf->detectAndCompute(left, Mat(), key2, d);
    surf->detectAndCompute(right, Mat(), key1, c);

    //特征点对比 保存
    vector<DMatch>matches;

    //使用暴力匹配器匹配特征点 保存
    matcher.match(d, c, matches);

    //排序 从小到大
    sort(matches.begin(), matches.end());

    //保留最优的特征点收集
    vector<DMatch>good_matches;

    int ptrPoint = std::min(50, (int)(matches.size()*0.15));

    for(int i=0; i<ptrPoint; i++)
        good_matches.push_back(matches[i]);

    //最佳匹配的特征点连成一线
    Mat outimg;

    drawMatches(left, key2, right, key1, good_matches, outimg,
                Scalar::all(-1), Scalar::all(-1),
                vector<char>(), DrawMatchesFlags::NOT_DRAW_SINGLE_POINTS);

    imshow("outimg", outimg);

    //2.图像配准
    //特征点配准
    vector<Point2f>imagepoint1, imagepoint2;
    for(int i=0; i<good_matches.size(); i++)
    {


        imagepoint1.push_back(key1[good_matches[i].trainIdx].pt);
        imagepoint2.push_back(key2[good_matches[i].queryIdx].pt);
    }

    //透视转换
    Mat homo = findHomography(imagepoint1, imagepoint2, CV_RANSAC);

    imshow("homo", homo);

    //右图四个顶点坐标转换计算
    CalcCorners(homo, right);

    Mat imageTransform;
    warpPerspective(right, imageTransform, homo,
                    Size(MAX(corners.right_top.x, corners.right_bottom.x), left.rows));
    imshow("imageTransform", imageTransform);


    //3.图像拷贝
    int dst_width = imageTransform.cols;
    int dst_height = imageTransform.rows;

    Mat dst(dst_height, dst_width, CV_8UC3);
    dst.setTo(0);

    imageTransform.copyTo(dst(Rect(0, 0, imageTransform.cols, imageTransform.rows)));
    left.copyTo(dst(Rect(0, 0, left.cols, left.rows)));

    //4.优化拼接最终结果图,去除黑边
    OptimizeSeam(left, imageTransform, dst);
    imshow("dst", dst);

    waitKey(0);

    return 0;
}