Prefacio de estudio
Este artículo implementa el razonamiento rápido TensorRT del algoritmo Yolov7-OBB sin depender de torch2trtherramientas.
Descarga del código fuente
https://github.com/Egrt/yolov7-obb
Puedes pedir una estrella si te gusta.
Instalar TensorRT
1. Introducción a TensorRT
Enlace del sitio web oficial: https://developer.nvidia.com/tensorrt
NVIDIA ® TensorRT™ es un SDK para optimizar los modelos de aprendizaje profundo capacitados para habilitar la inferencia de alto rendimiento. TensorRT contiene un optimizador de inferencia de aprendizaje profundo para modelos de aprendizaje profundo capacitados y un tiempo de ejecución para la ejecución. Una vez que haya entrenado su modelo de aprendizaje profundo en un marco de su elección, TensorRT le permite ejecutarlo con mayor rendimiento y menor latencia.
Según la TensorRTpresentación oficial, TensorRTse trata de un SDK para el modelo entrenado , a través del cual se puede realizar un razonamiento de alto rendimiento en dispositivos NVIDIA. Entonces, TensorRTqué optimizaciones se realizarán en nuestro modelo entrenado, puede consultar TensorRTuna imagen en el sitio web oficial, como se muestra en la siguiente figura:
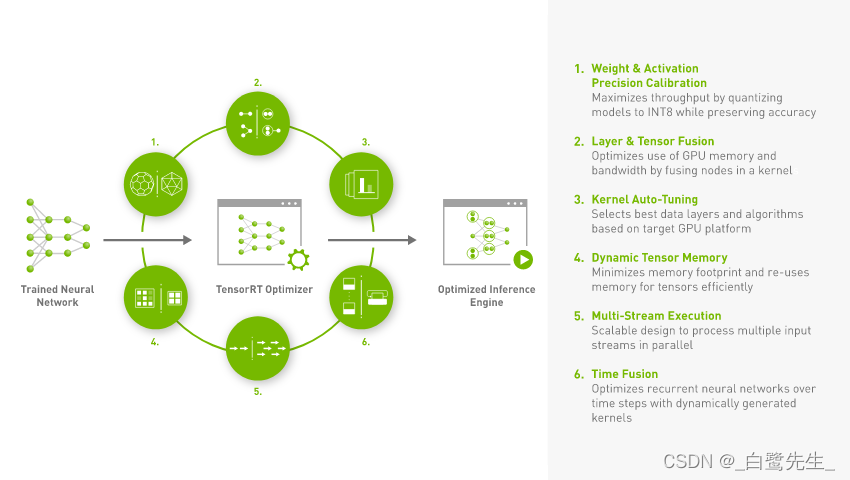
En resumen, hay principalmente 6 puntos de la siguiente manera:
Reduced Precision: Cuantifique el modelo en un tipo de datos deINT8oFP16(bajo la premisa de mantener la precisión sin cambios o ligeramente reducida), para mejorar la velocidad de inferencia del modelo.Layer and Tensor Fusion: Optimice la memoria y el ancho de banda de la GPU mediante la fusión de estructuras de varias capas (incluidas las horizontales y verticales).Kernel Auto-Tuning: seleccione la mejor capa de datos y el mejor algoritmo de acuerdo con la plataforma GPU utilizada actualmente.Dynamic Tensor Memory: Minimiza la huella de memoria y reutiliza de manera eficiente la memoria para tensores.Multi-Stream Execution: Procese múltiples flujos de entrada en paralelo usando un diseño escalable.Time Fusion: use núcleos generados dinámicamente para optimizar las redes RNN que cambian con el paso del tiempo.
2. Descarga TensorRT
Ingrese al sitio web oficial: https://developer.nvidia.com/nvidia-tensorrt-8x-download
para encontrar la versión correspondiente, elijo aquí:
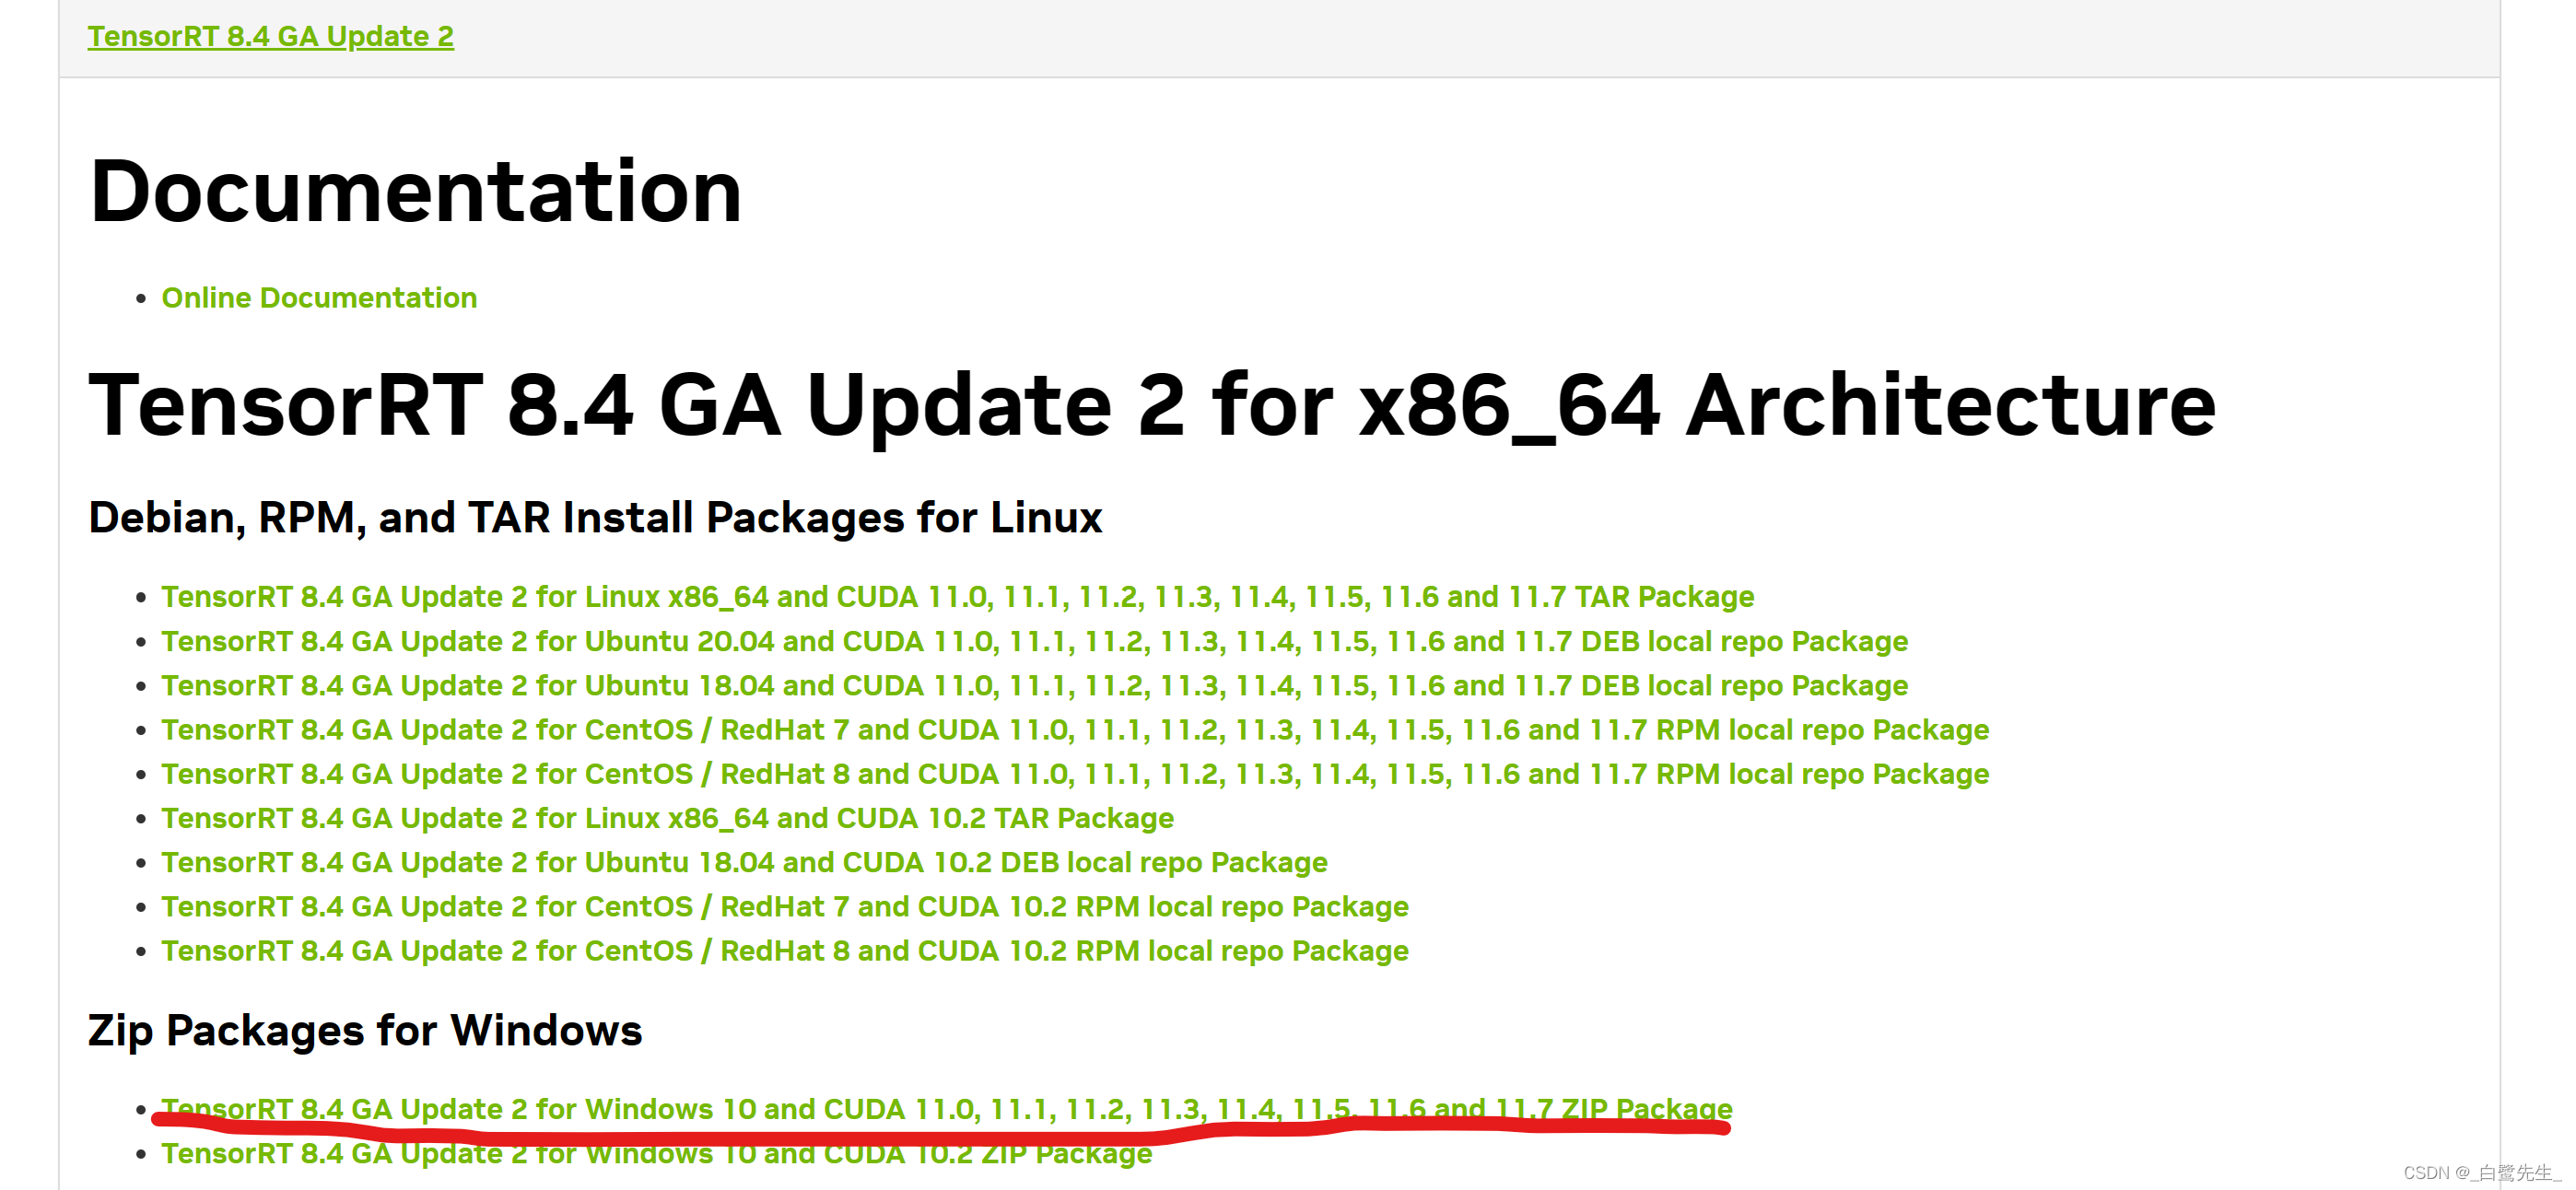
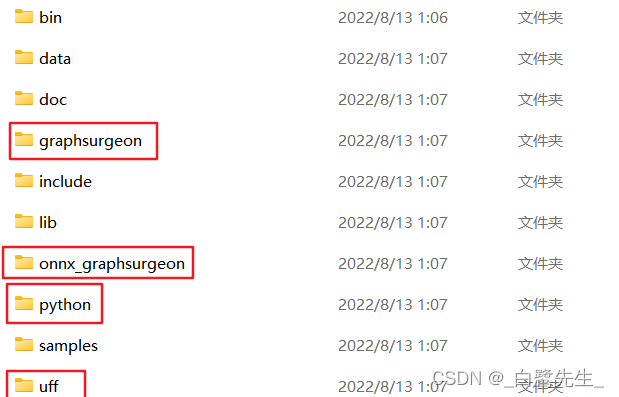
Descarga el archivo zip y descomprímelo.
3. Instalación de TensorRT
Complete los siguientes pasos en cualquier orden:
- Copie el contenido de TensorRT-8.4.3.1\bin en C:\Program Files\NVIDIA GPU Computing Toolkit\CUDA\v11.3\bin
- Copie la carpeta de inclusión de TensorRT a la carpeta de inclusión de CUDA
- Copie el archivo lib en la carpeta TensorRT-8.4.3.1\lib a la carpeta lib de CUDA y el archivo dll a la carpeta bin de CUDA
- Use pip install xxx.whl para instalar TensorRT-8.4.3.1 en la carpeta
como se muestra en la figura a continuación:

use python para verificar si la instalación se realizó correctamente.

Después de instalar la TensorRTbiblioteca pycuda, puede iniciar Yolov7-OBBla conversión del modelo.
conversión de modelo
Primero debe pthconvertir el modelo en ONNXel modelo y luego ONNXconvertir el modelo en engineel modelo.
Exportar modelo ONNX
Primero búsquelo en el directorio raíz del proyecto de yolov7-obb o yolov7-tiny-obb predict.py, modifique el modo en él export_onnx, y el archivo onnx exportado se encuentra enmodel_data/models.onnx
Exportar modelo de motor
A continuación, utilice el siguiente fragmento de código para ONNXconvertir el modelo en engineun modelo.
'''
Description:
Author: Egrt
Date: 2023-03-29 12:12:45
LastEditors: Egrt
LastEditTime: 2023-05-26 20:24:28
'''
import tensorrt as trt

def build_engine(onnx_file_path, engine_file_path, half=False):
    """Takes an ONNX file and creates a TensorRT engine to run inference with"""
    logger = trt.Logger(trt.Logger.INFO)
    builder = trt.Builder(logger)
    config = builder.create_builder_config()
    config.max_workspace_size = 4 * 1 << 30
    flag = (1 << int(trt.NetworkDefinitionCreationFlag.EXPLICIT_BATCH))
    network = builder.create_network(flag)
    parser = trt.OnnxParser(network, logger)
    if not parser.parse_from_file(str(onnx_file_path)):
        raise RuntimeError(f'failed to load ONNX file: {

      onnx_file_path}')
    half &= builder.platform_has_fast_fp16
    if half:
        config.set_flag(trt.BuilderFlag.FP16)
    with builder.build_engine(network, config) as engine, open(engine_file_path, 'wb') as t:
        t.write(engine.serialize())
    return engine_file_path

if __name__ =="__main__":
    onnx_path   = 'model_data/yolov7_obb.onnx'
    engine_path = 'model_data/yolov7_obb.engine'
    build_engine(onnx_path, engine_path, True)
Después de obtener el modelo del motor, debe usar numpyel preprocesamiento y el posprocesamiento para realizar la predicción:
Cambiar el tamaño de la imagen sin distorsionar
En primer lugar, es necesario realizar la no distorsión de la imagen resize. La versión de la guía B utiliza Imagela imagen de dibujo de clase y cv2la imagen de lectura. La conversión de los dos tipos de imagen conduce a un aumento en el consumo de tiempo del preprocesamiento y procesamiento posterior, que se fpsreduce significativamente. Por lo tanto, todo este artículo se basa en la implementación y la modificación cv2de la imagen sin distorsionar es la siguiente:resize
#---------------------------------------------------#
#   Image版本
#---------------------------------------------------#
def resize_image(image, size, letterbox_image):
    iw, ih  = image.size
    w, h    = size
    if letterbox_image:
        scale   = min(w/iw, h/ih)
        nw      = int(iw*scale)
        nh      = int(ih*scale)

        image   = image.resize((nw,nh), Image.BICUBIC)
        new_image = Image.new('RGB', size, (128,128,128))
        new_image.paste(image, ((w-nw)//2, (h-nh)//2))
    else:
        new_image = image.resize((w, h), Image.BICUBIC)
    return new_image
#---------------------------------------------------#
#   cv2版本
#---------------------------------------------------#
def resize_image(image, size, letterbox_image):
    ih, iw, _ = image.shape
    h, w = size
    if letterbox_image:
        scale = min(w/iw, h/ih)
        nw = int(iw * scale)
        nh = int(ih * scale)

        image = cv2.resize(image, (nw, nh), interpolation=cv2.INTER_CUBIC)
        new_image = np.zeros((h, w, 3), dtype=np.uint8)
        new_image[...] = 128
        new_image[(h-nh)//2:(h-nh)//2+nh, (w-nw)//2:(w-nw)//2+nw, :] = image
    else:
        new_image = cv2.resize(image, (w, h), interpolation=cv2.INTER_CUBIC)
    return new_image
resize_imageLa función acepta una imagen, un tamaño deseado y un valor booleano que indica si se debe manipular la imagen letterboxing. Si letterbox_imagees True, la función cambiará el tamaño de la imagen manteniendo su relación de aspecto y la pegará sobre una nueva imagen con un fondo gris, llenando cualquier espacio vacío. En caso letterbox_imageafirmativo False, la función simplemente cambia el tamaño de la imagen al tamaño deseado. Esta función utiliza cv2la biblioteca para cambiar el tamaño y pegar la imagen. Específicamente, usa resizeel método para cambiar el tamaño de la imagen, usa los ceros y los métodos de corte de matriz para crear una nueva imagen con un fondo gris y pega la imagen redimensionada en la nueva imagen.
descodificación
Para la parte de decodificación, la versión original se implementa usando torch, y este artículo se implementa usando numpy. Vale la pena señalar que debe torch.repeat()implementarse usando np.title()el método
supresión no máxima
La versión original de supresión no máxima se implementa usando una biblioteca compilada por cuda. Es más difícil de instalar y se puede usar en la parte de inferencia. Cabe señalar que el cv2.dnn.NMSBoxesRotated(bboxes, scores, conf_thres, nms_thres)formato del cuadro de rotación ingresado por esta función es ligeramente diferente de la versión de entrenamiento:
cv2.dnn.NMSBoxesRotatedes una OpenCVfunción en Realizar supresión no máxima (NMS) del marco giratorio. A diferencia del NMS tradicional, admite cajas giratorias, que se pueden usar para detectar objetos giratorios.
Los parámetros de entrada de esta función incluyen:
bboxesuna matriz numérica con una forma de (N, 5), cada fila representa un cuadro de rotación, incluidos cinco valores de (x, y, w, h, ángulo); una forma de (N
scores, ), cada elemento representa la puntuación del cuadro de número correspondiente;
score_threshold: un umbral de puntuación, el cuadro de número por debajo de este umbral se ignorará;
nms_threshold: un umbral de NMS, el cuadro de número por encima de este umbral se suprimirá; :
etaa Coeficiente de expansión, utilizado para ajustar el umbral de la relación de intersección en el algoritmo de supresión no máxima;
selected_indices: una matriz numpy con forma (N,) utilizada para almacenar el índice del cuadro de rotación conservado.
El resultado de esta función es una matriz numérica de forma (K,), donde K es el número de cuadros de número retenidos y
cada elemento representa el índice del cuadro de número correspondiente. Cabe señalar que el orden de los elementos en la matriz de salida puede ser diferente del orden de los elementos en la matriz de entrada, por lo que la matriz de entrada debe filtrarse de acuerdo con el orden en la matriz de salida.
Implementación original:
#------------------------------------------#
#   使用官方自带的非极大抑制会速度更快一些!
#   筛选出一定区域内,属于同一种类得分最大的框
#------------------------------------------#
_, keep = obb_nms(
    detections_class[:, :5],
    detections_class[:, 5] * detections_class[:, 6],
    nms_thres
)
max_detections = detections_class[keep]
Implementación de cv2
#------------------------------------------#
#   使用cv2.dnn.NMSBoxesRotated进行非极大抑制
#------------------------------------------#
bboxes  = [[[bbox[0], bbox[1]], [bbox[2], bbox[3]], bbox[4]* 180 / np.pi] for bbox in detections_class[:, :5]]
scores  = [float(score) for score in detections_class[:, 5] * detections_class[:, 6]]
indices = cv2.dnn.NMSBoxesRotated(bboxes, scores, conf_thres, nms_thres)
max_detections = detections_class[indices.flatten()]
El código de razonamiento tensorrt completo es el siguiente:
'''
Author: [egrt]
Date: 2023-03-26 09:39:21
LastEditors: Egrt
LastEditTime: 2023-03-29 14:06:57
Description:
'''
import colorsys
import numpy as np
import time
import tensorrt as trt
import pycuda.driver as cuda
import pycuda.autoinit
import cv2
def resize_image(image, size, letterbox_image):
ih, iw = image.shape[:2]
h, w = size
if letterbox_image:
scale = min(w/iw, h/ih)
nw = int(iw*scale)
nh = int(ih*scale)
image = cv2.resize(image, (nw,nh), interpolation=cv2.INTER_CUBIC)
new_image = 128 * np.ones((h, w, 3), dtype=np.uint8)
new_image[(h-nh)//2:(h-nh)//2+nh, (w-nw)//2:(w-nw)//2+nw, :] = image
else:
new_image = cv2.resize(image, (w, h), interpolation=cv2.INTER_CUBIC)
return new_image
def preprocess_input(image):
image /= 255.0
return image
class DecodeBox():
def __init__(self, anchors, num_classes, input_shape, anchors_mask = [[6,7,8], [3,4,5], [0,1,2]]):
super(DecodeBox, self).__init__()
self.anchors = anchors
self.num_classes = num_classes
self.bbox_attrs = 5 + num_classes
self.input_shape = input_shape
#-----------------------------------------------------------#
# 13x13的特征层对应的anchor是[142, 110],[192, 243],[459, 401]
# 26x26的特征层对应的anchor是[36, 75],[76, 55],[72, 146]
# 52x52的特征层对应的anchor是[12, 16],[19, 36],[40, 28]
#-----------------------------------------------------------#
self.anchors_mask = anchors_mask
def decode_box(self, inputs):
outputs = []
for i, input in enumerate(inputs):
#-----------------------------------------------#
# 输入的input一共有三个,他们的shape分别是
# batch_size = 1
# batch_size, 3 * (5 + 1 + 80), 20, 20
# batch_size, 255, 40, 40
# batch_size, 255, 80, 80
#-----------------------------------------------#
batch_size = input.shape[0]
input_height = input.shape[2]
input_width = input.shape[3]
#-----------------------------------------------#
# 输入为640x640时
# stride_h = stride_w = 32、16、8
#-----------------------------------------------#
stride_h = self.input_shape[0] / input_height
stride_w = self.input_shape[1] / input_width
#-------------------------------------------------#
# 此时获得的scaled_anchors大小是相对于特征层的
#-------------------------------------------------#
scaled_anchors = [(anchor_width / stride_w, anchor_height / stride_h) for anchor_width, anchor_height in self.anchors[self.anchors_mask[i]]]
#-----------------------------------------------#
# 输入的input一共有三个,他们的shape分别是
# batch_size, 3, 20, 20, 85
# batch_size, 3, 40, 40, 85
# batch_size, 3, 80, 80, 85
#-----------------------------------------------#
prediction = input.reshape(batch_size, len(self.anchors_mask[i]), self.bbox_attrs, input_height, input_width)
prediction = np.transpose(prediction, (0, 1, 3, 4, 2))
#-----------------------------------------------#
# 先验框的中心位置的调整参数
#-----------------------------------------------#
x = 1 / (1 + np.exp(-prediction[..., 0]))
y = 1 / (1 + np.exp(-prediction[..., 1]))
#-----------------------------------------------#
# 先验框的宽高调整参数
#-----------------------------------------------#
w = 1 / (1 + np.exp(-prediction[..., 2]))
h = 1 / (1 + np.exp(-prediction[..., 3]))
#-----------------------------------------------#
# 获得置信度,是否有物体
#-----------------------------------------------#
conf = 1 / (1 + np.exp(-prediction[..., 4]))
#-----------------------------------------------#
# 种类置信度
#-----------------------------------------------#
pred_cls = 1 / (1 + np.exp(-prediction[..., 5:]))
#----------------------------------------------------------#
# 生成网格,先验框中心,网格左上角
# batch_size,3,20,20
#----------------------------------------------------------#
grid_x = np.linspace(0, input_width - 1, input_width)
grid_x = np.tile(grid_x, (input_height, 1))
grid_x = np.tile(grid_x, (batch_size * len(self.anchors_mask[i]), 1, 1)).reshape(x.shape)
grid_y = np.linspace(0, input_height - 1, input_height)
grid_y = np.tile(grid_y, (input_width, 1)).T
grid_y = np.tile(grid_y, (batch_size * len(self.anchors_mask[i]), 1, 1)).reshape(y.shape)
scaled_anchors = np.array(scaled_anchors)
anchor_w = scaled_anchors[:, 0:1]
anchor_h = scaled_anchors[:, 1:2]
anchor_w = np.tile(anchor_w, (batch_size, 1)).reshape(1, -1, 1)
anchor_w = np.tile(anchor_w, (1, 1, input_height * input_width)).reshape(w.shape)
anchor_h = np.tile(anchor_h, (batch_size, 1)).reshape(1, -1, 1)
anchor_h = np.tile(anchor_h, (1, 1, input_height * input_width)).reshape(h.shape)
#----------------------------------------------------------#
# 利用预测结果对先验框进行调整
# 首先调整先验框的中心,从先验框中心向右下角偏移
# 再调整先验框的宽高。
# x 0 ~ 1 => 0 ~ 2 => -0.5, 1.5 => 负责一定范围的目标的预测
# y 0 ~ 1 => 0 ~ 2 => -0.5, 1.5 => 负责一定范围的目标的预测
# w 0 ~ 1 => 0 ~ 2 => 0 ~ 4 => 先验框的宽高调节范围为0~4倍
# h 0 ~ 1 => 0 ~ 2 => 0 ~ 4 => 先验框的宽高调节范围为0~4倍
#----------------------------------------------------------#
pred_boxes = np.zeros(prediction[..., :4].shape, dtype='float32')
pred_boxes[..., 0] = x * 2. - 0.5 + grid_x
pred_boxes[..., 1] = y * 2. - 0.5 + grid_y
pred_boxes[..., 2] = (w * 2) ** 2 * anchor_w
pred_boxes[..., 3] = (h * 2) ** 2 * anchor_h
#----------------------------------------------------------#
# 将输出结果归一化成小数的形式
#----------------------------------------------------------#
_scale = np.array([input_width, input_height, input_width, input_height]).astype('float32')
output = np.concatenate((pred_boxes.reshape(batch_size, -1, 4) / _scale, conf.reshape(batch_size, -1, 1),
pred_cls.reshape(batch_size, -1, self.num_classes)), -1)
output = np.concatenate((pred_boxes.reshape(batch_size, -1, 4) / _scale, conf.reshape(batch_size, -1, 1),
pred_cls.reshape(batch_size, -1, self.num_classes)), -1)
outputs.append(output)
return outputs
def non_max_suppression(self, prediction, num_classes, input_shape, image_shape, letterbox_image, conf_thres=0.5, nms_thres=0.4):
#----------------------------------------------------------#
# prediction [batch_size, num_anchors, 85]
#----------------------------------------------------------#
output = [None for _ in range(len(prediction))]
for i, image_pred in enumerate(prediction):
#----------------------------------------------------------#
# 对种类预测部分取max。
# class_conf [num_anchors, 1] 种类置信度
# class_pred [num_anchors, 1] 种类
#----------------------------------------------------------#
class_conf = np.max(image_pred[:, 5:5 + num_classes], axis=1, keepdims=True)
class_pred = np.argmax(image_pred[:, 5:5 + num_classes], axis=1)
class_pred = np.expand_dims(class_pred, axis=1)
#----------------------------------------------------------#
# 利用置信度进行第一轮筛选
#----------------------------------------------------------#
conf_mask = (image_pred[:, 4] * class_conf[:, 0] >= conf_thres).squeeze()
#----------------------------------------------------------#
# 根据置信度进行预测结果的筛选
#----------------------------------------------------------#
image_pred = image_pred[conf_mask]
class_conf = class_conf[conf_mask]
class_pred = class_pred[conf_mask]
if not image_pred.shape[0]:
continue
#-------------------------------------------------------------------------#
# detections [num_anchors, 8]
# 8的内容为:x, y, w, h, angle, obj_conf, class_conf, class_pred
#-------------------------------------------------------------------------#
detections = np.concatenate((image_pred[:, :5], class_conf, class_pred), 1)
#------------------------------------------#
# 获得预测结果中包含的所有种类
#------------------------------------------#
unique_labels = np.unique(detections[:, -1])
for c in unique_labels:
#------------------------------------------#
# 获得某一类得分筛选后全部的预测结果
#------------------------------------------#
detections_class = detections[detections[:, -1] == c]
#------------------------------------------#
# 使用cv2.dnn.NMSBoxesRotated进行非极大抑制
#------------------------------------------#
bboxes = [[bbox[0], bbox[1], bbox[2], bbox[3]] for bbox in detections_class[:, :4]]
scores = [float(score) for score in detections_class[:, 4] * detections_class[:, 5]]
indices = cv2.dnn.NMSBoxes(bboxes, scores, conf_thres, nms_thres)
max_detections = detections_class[indices.flatten()]
# Add max detections to outputs
output[i] = max_detections if output[i] is None else np.concatenate((output[i], max_detections))
if output[i] is not None:
output[i][:, :4] = self.yolo_correct_boxes(output[i], input_shape, image_shape, letterbox_image)
return output
def yolo_correct_boxes(self, output, input_shape, image_shape, letterbox_image):
#-----------------------------------------------------------------#
# 把y轴放前面是因为方便预测框和图像的宽高进行相乘
#-----------------------------------------------------------------#
box_xy = output[..., 0:2]
box_wh = output[..., 2:4]
box_yx = box_xy[..., ::-1]
box_hw = box_wh[..., ::-1]
input_shape = np.array(input_shape)
image_shape = np.array(image_shape)
if letterbox_image:
#-----------------------------------------------------------------#
# 这里求出来的offset是图像有效区域相对于图像左上角的偏移情况
# new_shape指的是宽高缩放情况
#-----------------------------------------------------------------#
new_shape = np.round(image_shape * np.min(input_shape/image_shape))
offset = (input_shape - new_shape)/2./input_shape
scale = input_shape/new_shape
box_yx = (box_yx - offset) * scale
box_hw *= scale
box_xy = box_yx[:, ::-1]
box_hw = box_wh[:, ::-1]
boxes = np.concatenate([box_xy, box_wh], axis=-1)
boxes[:, [0, 2]] *= image_shape[1]
boxes[:, [1, 3]] *= image_shape[0]
return boxes
class YOLO(object):
_defaults = {
#--------------------------------------------------------------------------#
# 使用自己训练好的模型进行预测一定要修改model_path和classes_path!
# model_path指向logs文件夹下的权值文件,classes_path指向model_data下的txt
#
# 训练好后logs文件夹下存在多个权值文件,选择验证集损失较低的即可。
# 验证集损失较低不代表mAP较高,仅代表该权值在验证集上泛化性能较好。
# 如果出现shape不匹配,同时要注意训练时的model_path和classes_path参数的修改
#--------------------------------------------------------------------------#
"model_path" : 'model_data/yolov7-tiny.engine',
#---------------------------------------------------------------------#
# 输入图片的大小,必须为32的倍数。
#---------------------------------------------------------------------#
"input_shape" : [640, 640],
#---------------------------------------------------------------------#
# 只有得分大于置信度的预测框会被保留下来
#---------------------------------------------------------------------#
"confidence" : 0.5,
#---------------------------------------------------------------------#
# 非极大抑制所用到的nms_iou大小
#---------------------------------------------------------------------#
"nms_iou" : 0.3,
}
@classmethod
def get_defaults(cls, n):
if n in cls._defaults:
return cls._defaults[n]
else:
return "Unrecognized attribute name '" + n + "'"
#---------------------------------------------------#
# 初始化YOLO
#---------------------------------------------------#
def __init__(self, **kwargs):
self.__dict__.update(self._defaults)
for name, value in kwargs.items():
setattr(self, name, value)
self._defaults[name] = value
#---------------------------------------------------#
# 获得种类和先验框的数量
#---------------------------------------------------#
self.class_names = ['car', 'truck', 'van', 'bus', 'pedestrian']
self.num_classes = len(self.class_names)
self.anchors_mask = [[6, 7, 8], [3, 4, 5], [0, 1, 2]]
self.anchors = np.array([[ 12, 16],[ 19, 36],[ 40, 28],
[ 36, 75],[ 76, 55],[ 72, 146],
[142, 110],[192, 243],[459, 401]])
self.num_anchors = 9
self.bbox_util = DecodeBox(self.anchors, self.num_classes, (self.input_shape[0], self.input_shape[1]), self.anchors_mask)
#---------------------------------------------------#
# 画框设置不同的颜色
#---------------------------------------------------#
hsv_tuples = [(x / self.num_classes, 1., 1.) for x in range(self.num_classes)]
self.colors = list(map(lambda x: colorsys.hsv_to_rgb(*x), hsv_tuples))
self.colors = list(map(lambda x: (int(x[0] * 255), int(x[1] * 255), int(x[2] * 255)), self.colors))
self.generate()
#---------------------------------------------------#
# 生成模型
#---------------------------------------------------#
def generate(self):
#---------------------------------------------------#
# 建立yolo模型,载入yolo模型的权重
#---------------------------------------------------#
engine = self.load_engine(self.model_path)
self.context = engine.create_execution_context()
self.inputs, self.outputs, self.bindings = [], [], []
self.stream = cuda.Stream()
for binding in engine:
size = engine.get_binding_shape(binding)
dtype = trt.nptype(engine.get_binding_dtype(binding))
host_mem = np.empty(size, dtype=dtype)
host_mem = np.ascontiguousarray(host_mem)
device_mem = cuda.mem_alloc(host_mem.nbytes)
self.bindings.append(int(device_mem))
if engine.binding_is_input(binding):
self.inputs.append({
'host': host_mem, 'device': device_mem})
else:
self.outputs.append({
'host': host_mem, 'device': device_mem})
def load_engine(self, engine_path):
TRT_LOGGER = trt.Logger(trt.Logger.ERROR)
with open(engine_path, 'rb') as f, trt.Runtime(TRT_LOGGER) as runtime:
return runtime.deserialize_cuda_engine(f.read())
def forward(self, img):
self.inputs[0]['host'] = np.ravel(img)
# transfer data to the gpu
for inp in self.inputs:
cuda.memcpy_htod_async(inp['device'], inp['host'], self.stream)
# run inference
self.context.execute_async_v2(
bindings=self.bindings,
stream_handle=self.stream.handle)
# fetch outputs from gpu
for out in self.outputs:
cuda.memcpy_dtoh_async(out['host'], out['device'], self.stream)
# synchronize stream
self.stream.synchronize()
return [out['host'] for out in self.outputs]
#---------------------------------------------------#
# 检测图片
#---------------------------------------------------#
def detect_image(self, image):
#---------------------------------------------------#
# 计算输入图片的高和宽
#---------------------------------------------------#
image_shape = np.array(np.shape(image)[0:2])
#---------------------------------------------------------#
# 在这里将图像转换成RGB图像,防止灰度图在预测时报错。
# 代码仅仅支持RGB图像的预测,所有其它类型的图像都会转化成RGB
#---------------------------------------------------------#
image = cv2.cvtColor(image, cv2.COLOR_BGR2RGB)
image_data = resize_image(image, (self.input_shape[1], self.input_shape[0]), True)
#---------------------------------------------------------#
# 添加上batch_size维度
# h, w, 3 => 3, h, w => 1, 3, h, w
#---------------------------------------------------------#
image_data = np.expand_dims(np.transpose(preprocess_input(np.array(image_data, dtype='float32')), (2, 0, 1)), 0)
#---------------------------------------------------------#
# 将图像输入网络当中进行预测!
#---------------------------------------------------------#
outputs = self.forward(image_data)[::-1]
outputs = self.bbox_util.decode_box(outputs)
#---------------------------------------------------------#
# 将预测框进行堆叠,然后进行非极大抑制
#---------------------------------------------------------#
results = self.bbox_util.non_max_suppression(np.concatenate(outputs, axis=1), self.num_classes, self.input_shape,
image_shape, True, conf_thres = self.confidence, nms_thres = self.nms_iou)
if results[0] is None:
return image
top_label = np.array(results[0][:, 6], dtype = 'int32')
top_conf = results[0][:, 4] * results[0][:, 5]
top_boxes = results[0][:, :4]
#---------------------------------------------------------#
# 图像绘制
#---------------------------------------------------------#
for i, c in list(enumerate(top_label)):
predicted_class = self.class_names[int(c)]
box = top_boxes[i]
score = top_conf[i]
xc, yc, w, h = box.astype('int32')
left, top, right, bottom = int(xc-w/2), int(yc-h/2), int(xc+w/2), int(yc+h/2)
cv2.rectangle(image, (left, top), (right, bottom), self.colors[int(c)], thickness=2)
label = '{} {:.2f}'.format(predicted_class, score)
cv2.putText(image, label, (left, top-10), cv2.FONT_HERSHEY_SIMPLEX, 1, self.colors[int(c)], thickness=1)
image = cv2.cvtColor(image, cv2.COLOR_RGB2BGR)
return image
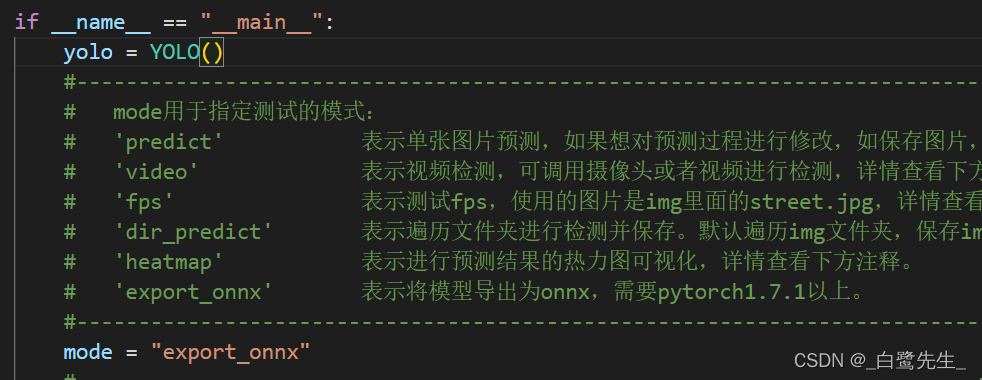
if __name__=='__main__':
yolo = YOLO()
#----------------------------------------------------------------------------------------------------------#
# mode用于指定测试的模式:
# 'predict' 表示单张图片预测,如果想对预测过程进行修改,如保存图片,截取对象等,可以先看下方详细的注释
# 'video' 表示视频检测,可调用摄像头或者视频进行检测,详情查看下方注释。
# 'fps' 表示测试fps,使用的图片是img里面的street.jpg,详情查看下方注释。
# 'dir_predict' 表示遍历文件夹进行检测并保存。默认遍历img文件夹,保存img_out文件夹,详情查看下方注释。
#----------------------------------------------------------------------------------------------------------#
mode = "video"
#----------------------------------------------------------------------------------------------------------#
# video_path 用于指定视频的路径,当video_path=0时表示检测摄像头
# 想要检测视频,则设置如video_path = "xxx.mp4"即可,代表读取出根目录下的xxx.mp4文件。
# video_save_path 表示视频保存的路径,当video_save_path=""时表示不保存
# 想要保存视频,则设置如video_save_path = "yyy.mp4"即可,代表保存为根目录下的yyy.mp4文件。
# video_fps 用于保存的视频的fps
#
# video_path、video_save_path和video_fps仅在mode='video'时有效
# 保存视频时需要ctrl+c退出或者运行到最后一帧才会完成完整的保存步骤。
#----------------------------------------------------------------------------------------------------------#
video_path = "D:/Notebook/traffic-ai/dataset/video-03.mp4"
video_save_path = ""
video_fps = 25.0
#----------------------------------------------------------------------------------------------------------#
# test_interval 用于指定测量fps的时候,图片检测的次数。理论上test_interval越大,fps越准确。
# fps_image_path 用于指定测试的fps图片
#
# test_interval和fps_image_path仅在mode='fps'有效
#----------------------------------------------------------------------------------------------------------#
test_interval = 100
fps_image_path = "img/test.jpg"
#-------------------------------------------------------------------------#
# dir_origin_path 指定了用于检测的图片的文件夹路径
# dir_save_path 指定了检测完图片的保存路径
#
# dir_origin_path和dir_save_path仅在mode='dir_predict'时有效
#-------------------------------------------------------------------------#
dir_origin_path = "img/"
dir_save_path = "img_out/"
if mode == "predict":
'''
1、如果想要进行检测完的图片的保存,利用r_image.save("img.jpg")即可保存,直接在predict.py里进行修改即可。
2、如果想要获得预测框的坐标,可以进入yolo.detect_image函数,在绘图部分读取top,left,bottom,right这四个值。
3、如果想要利用预测框截取下目标,可以进入yolo.detect_image函数,在绘图部分利用获取到的top,left,bottom,right这四个值
在原图上利用矩阵的方式进行截取。
4、如果想要在预测图上写额外的字,比如检测到的特定目标的数量,可以进入yolo.detect_image函数,在绘图部分对predicted_class进行判断,
比如判断if predicted_class == 'car': 即可判断当前目标是否为车,然后记录数量即可。利用draw.text即可写字。
'''
while True:
img = input('Input image filename:')
try:
image = cv2.imread(img)
except:
print('Open Error! Try again!')
continue
else:
r_image = yolo.detect_image(image)
cv2.imshow('result', r_image)
c = cv2.waitKey(0)
elif mode == "video":
capture = cv2.VideoCapture(video_path)
if video_save_path!="":
fourcc = cv2.VideoWriter_fourcc(*'XVID')
size = (int(capture.get(cv2.CAP_PROP_FRAME_WIDTH)), int(capture.get(cv2.CAP_PROP_FRAME_HEIGHT)))
out = cv2.VideoWriter(video_save_path, fourcc, video_fps, size)
ref, frame = capture.read()
if not ref:
raise ValueError("未能正确读取摄像头(视频),请注意是否正确安装摄像头(是否正确填写视频路径)。")
fps = 0.0
while(True):
t1 = time.time()
# 读取某一帧
ref, frame = capture.read()
if not ref:
break
# 进行检测
frame = yolo.detect_image(frame)
fps = ( fps + (1./(time.time()-t1)) ) / 2
print("fps= %.2f"%(fps))
frame = cv2.putText(frame, "fps= %.2f"%(fps), (0, 40), cv2.FONT_HERSHEY_SIMPLEX, 1, (0, 255, 0), 2)
cv2.imshow("video",frame)
c= cv2.waitKey(1) & 0xff
if video_save_path!="":
out.write(frame)
if c==27:
capture.release()
break
print("Video Detection Done!")
capture.release()
if video_save_path!="":
print("Save processed video to the path :" + video_save_path)
out.release()
cv2.destroyAllWindows()
elif mode == "fps":
img = cv2.imread(fps_image_path)
tact_time = yolo.get_FPS(img, test_interval)
print(str(tact_time) + ' seconds, ' + str(1/tact_time) + 'FPS, @batch_size 1')
elif mode == "dir_predict":
import os
from tqdm import tqdm
img_names = os.listdir(dir_origin_path)
for img_name in tqdm(img_names):
if img_name.lower().endswith(('.bmp', '.dib', '.png', '.jpg', '.jpeg', '.pbm', '.pgm', '.ppm', '.tif', '.tiff')):
image_path = os.path.join(dir_origin_path, img_name)
image = cv2.imread(image_path)
r_image = yolo.detect_image(image)
if not os.path.exists(dir_save_path):
os.makedirs(dir_save_path)
r_image.save(os.path.join(dir_save_path, img_name.replace(".jpg", ".png")), quality=95, subsampling=0)
else:
raise AssertionError("Please specify the correct mode: 'predict', 'video', 'fps', 'dir_predict'.")
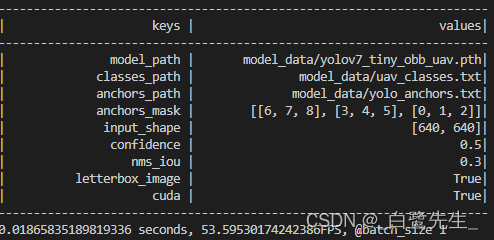
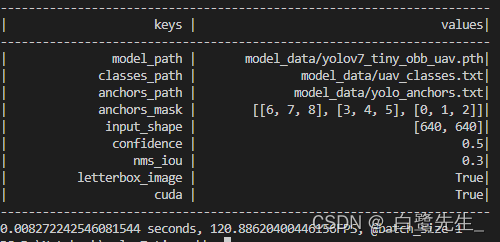
Comparación de resultados
La velocidad de inferencia del modelo final se compara de la siguiente manera:
los fps antes de la conversión son 53, y los fps después de la conversión son 120. El aumento de velocidad es significativo, se reduce mAP del 98% al 97,75%, con poco impacto.
| nombre del modelo | Conjunto de entrenamiento | equipo de prueba | fps | mapa |
|---|---|---|---|---|
| Yolov7-Tiny-OBB | tren UAV-ROD | Valor UAV-ROD | 53 | 98,00% |
| Yolov7-Tiny-OBB-TRT | tren UAV-ROD | Valor UAV-ROD | 120 | 97,75% |