Inhaltsverzeichnis
3. Update-Funktion hinzugefügt
5. Schnittstellendokumentation
1. Vorbereitungen
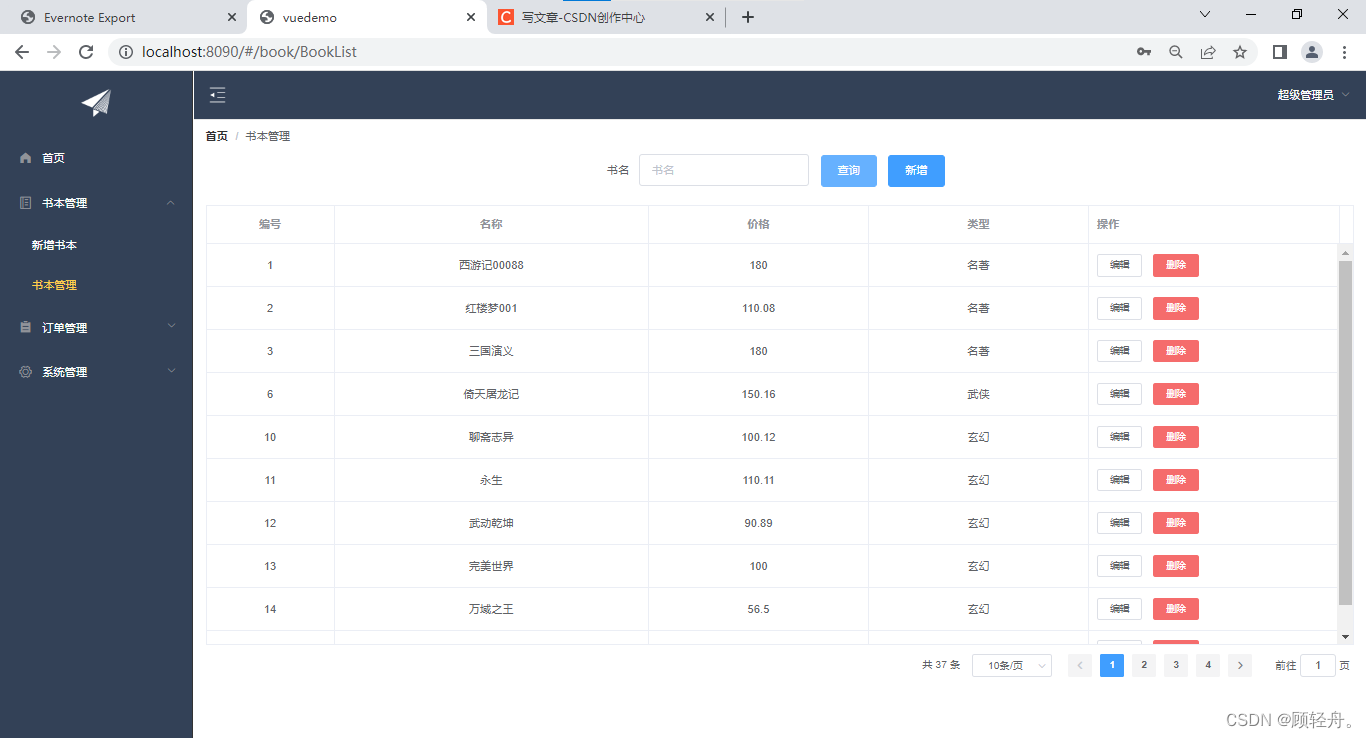
Hintergrunddienstschnittstelle, Hinzufügen, Löschen, Ändern und Überprüfen von Vorgängen in Büchern
2. Popup
Rufen Sie die offizielle Website von ElementUi auf, suchen Sie das Dialogfeld Dialog, Sie können auf die Implementierung von "Dialog of Nested Forms" verweisen.
Dieser Schritt implementiert zunächst die Front-End-Logik des Pop-up-Fensters und ruft nicht den Hintergrund-Schnittstellendienst für tatsächliche Geschäftsvorgänge auf.
Buchliste.vue
<!--
弹出窗口:增加和修改书本信息共用一个弹出窗口,需要根据用户的选择动态的设置弹出窗口的标题
:tile  通过绑定值的方式设置dialog的标题
:visible.sync  控制弹出窗口的显示或隐藏,.sync同步修饰符
@close="closeBookForm",设置窗口关闭时调用的处理函数,可用于清空表单
:model="bookForm":用于定义表单对应的model,具体model的定义可见data部分。
v-show="optiontype == 'update'" 通过操作类型控制是否显示书本编号字段,如果当前操作类型为
       新增,则不用显示,书本编号在数据表中是自增的。
:label-width="formLabelWidth" 统一定义标签的宽度。
:style="{width: formEleWidth}"  统一定义form元素的宽度。
-->
<el-dialog :title="dialogName" :visible.sync="dialogFormVisible" @close="closeBookForm" width="500px">
  <el-form :model="bookForm">
    <el-form-item v-show="optiontype == 'update'" label="编号" :label-width="formLabelWidth">
      <el-input v-model="bookForm.id" autocomplete="off" :style="{width: formEleWidth}"></el-input>
    </el-form-item>
    <el-form-item label="书名" :label-width="formLabelWidth">
      <el-input v-model="bookForm.bookname" autocomplete="off" :style="{width: formEleWidth}"></el-input>
    </el-form-item>
    <el-form-item label="价格" :label-width="formLabelWidth">
      <el-input v-model="bookForm.price" autocomplete="off" :style="{width: formEleWidth}"></el-input>
    </el-form-item>
    <el-form-item label="类型" :label-width="formLabelWidth">
      <el-select v-model="bookForm.booktype" placeholder="选择类型" :style="{width:formEleWidth}">
        <el-option label="名著" value="mz"></el-option>
        <el-option label="小说" value="xs"></el-option>
      </el-select>
    </el-form-item>
  </el-form>
  <div slot="footer" class="dialog-footer">
    <el-button @click="dialogFormVisible = false">取 消</el-button>
    <el-button type="primary" @click="dialogFormVisible = false">确 定</el-button>
  </div>
</el-dialog>
Fügen Sie der Datentabelle Funktionsverbindungen "Bearbeiten" und "Löschen" hinzu. (In der offiziellen Element-ui-Demo -> Tabellenkomponente gibt es Beispiele dafür, wie Schaltflächen wie Löschen, Bearbeiten usw. hinzugefügt werden.)
    <!--表格-->
    <el-table :data="books" style="width: 100%;" :border="true" max-height="530">
      <el-table-column prop="id" label="编号" min-width="40" align="center"></el-table-column>
      <el-table-column prop="bookname" label="名称" min-width="100" align="center"></el-table-column>
      <el-table-column prop="price" label="价格" min-width="70" align="center"></el-table-column>
      <el-table-column prop="booktype" label="类型" min-width="70" align="center"></el-table-column>
      <!-- “编辑”“删除”功能连接 -->
      <el-table-column label="操作">
        <!--
        在<template>上使用特殊的slot-scope 特性,可以接收传递给插槽的prop
        slot-scope:类似将每一行的row对象封装到槽中,之后直接从scope中获取
        row对象信息和行索引index信息即可
        -->
        <template slot-scope="scope">
          <el-button size="mini" @click="handleEdit(scope.row)">编辑</el-button>
          <el-button size="mini" type="danger" @click="handleDelete(scope.row)">删除</el-button>
        </template>
      </el-table-column>
    </el-table>
Skriptabschnitt:
export default {
name: 'BookList',
data: function() {
return {
bookname: '',
books: [],
total: 0,
rows: 10,
page: 1,
//控制对话框是否显示,默认是隐藏状态
dialogFormVisible: false,
//统一控制标签的宽度
formLabelWidth: '40px',
//统一控制表单元素的宽度
formEleWidth: '400px',
//对话框标题,默认为新增,如果是点击修改按钮打开对话框,则标题应为修改。
dialogName:'新增书本',
//操作类型,默认为添加,如果是点击修改打开对话框,则操作类类型应变为修改
//该变量用于控制是否显示书本编号字段,当操作类型为新增时不需显示(书本编号数据表字段为自增)
//当操作类型为修改时,需要显示。
optiontype: 'add',
//定义表单对应的model
bookForm: {
id: '',
bookname: '',
price:null,
booktype: ''
}
}
},
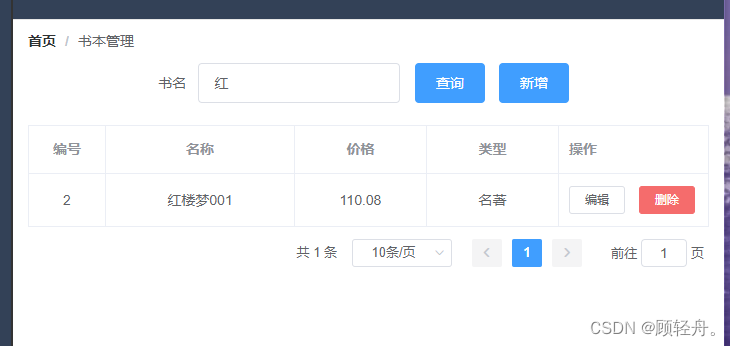
methods: {
qry: function() {
let url = this.axios.urls.BOOKMSG_BOOKINFO_REQ;
this.axios.post(url, {
bookname: this.bookname,
page: this.page,
rows: this.rows
}).then(resp => {
console.log(resp);
this.books = resp.data.data;
this.total = resp.data.total;
}).catch(error => {
console.log(error);
});
},
//当每页显示的记录数发生变化时,设置当前页码为1,执行查询。
handleSizeChange: function(rows) {
this.rows = rows;
this.page = 1;
this.qry();
},
//当前页码发生变化时,执行查询
handleCurrentChange: function(page) {
this.page = page;
this.qry();
},
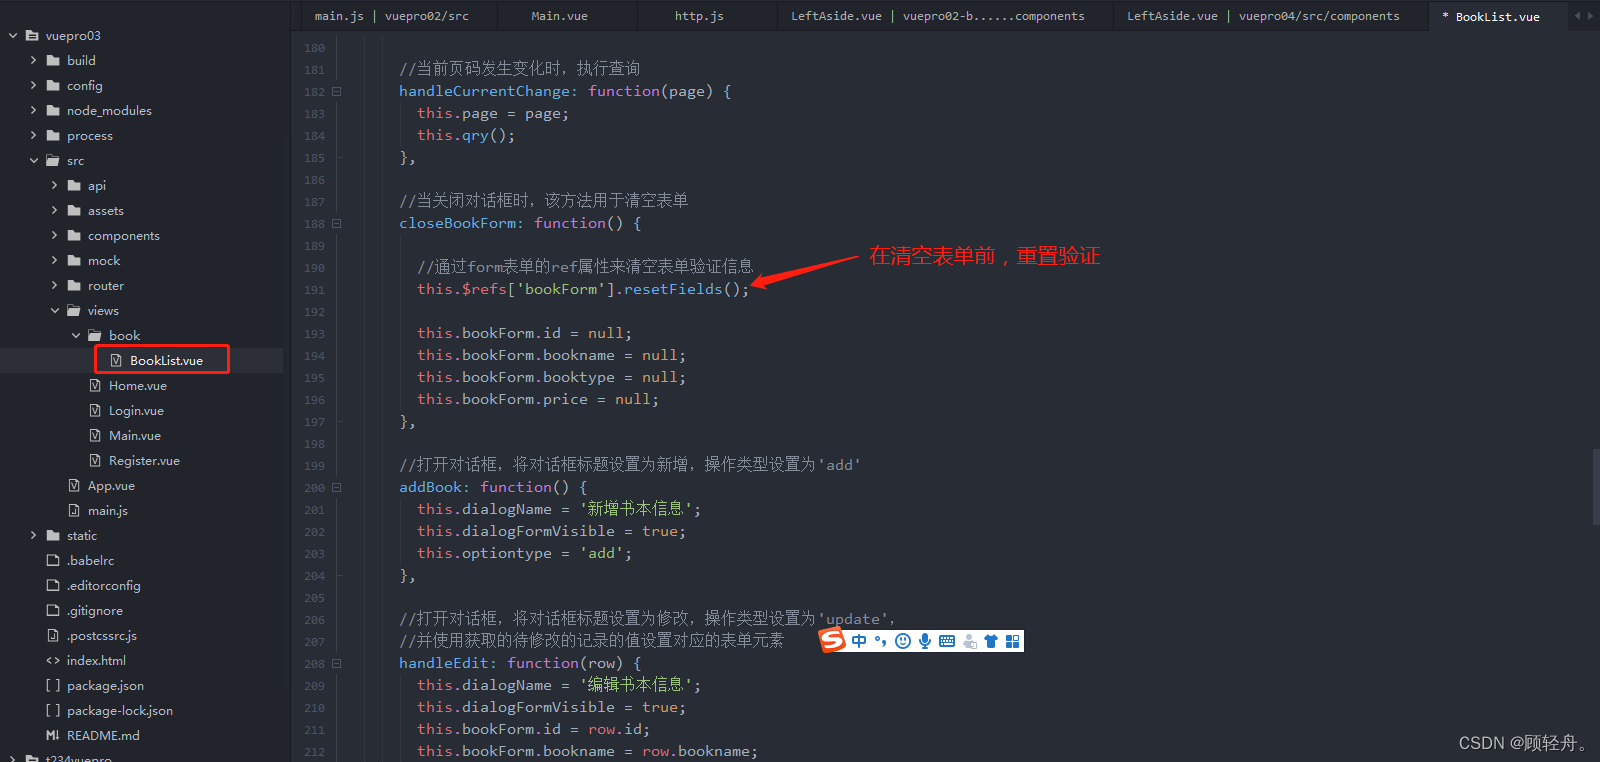
//当关闭对话框时,该方法用于清空表单
closeBookForm: function() {
this.bookForm.id=null;
this.bookForm.bookname = null;
this.bookForm.booktype = null;
this.bookForm.price = null;
},
//打开对话框,将对话框标题设置为新增,操作类型设置为'add'
addBook: function() {
this.dialogName = '新增书本信息';
this.dialogFormVisible = true;
this.optiontype = 'add';
},
//打开对话框,将对话框标题设置为修改,操作类型设置为'update',
//并使用获取的待修改的记录的值设置对应的表单元素
handleEdit: function(row) {
this.dialogName = '编辑书本信息';
this.dialogFormVisible = true;
this.bookForm.id=row.id;
this.bookForm.bookname = row.bookname;
this.bookForm.booktype = row.booktype;
this.bookForm.price = row.price;
this.optiontype = 'update';
},
//删除书本记录
handleDelete: function(row) {
console.log("dele = " + row);
}
}
}
3. Update-Funktion hinzugefügt
1) Fügen Sie die Konfiguration der Hintergrundschnittstelle in action.js hinzu . Bei der Projektierung dem eigentlichen eigenen Projekt folgen, nicht kopieren
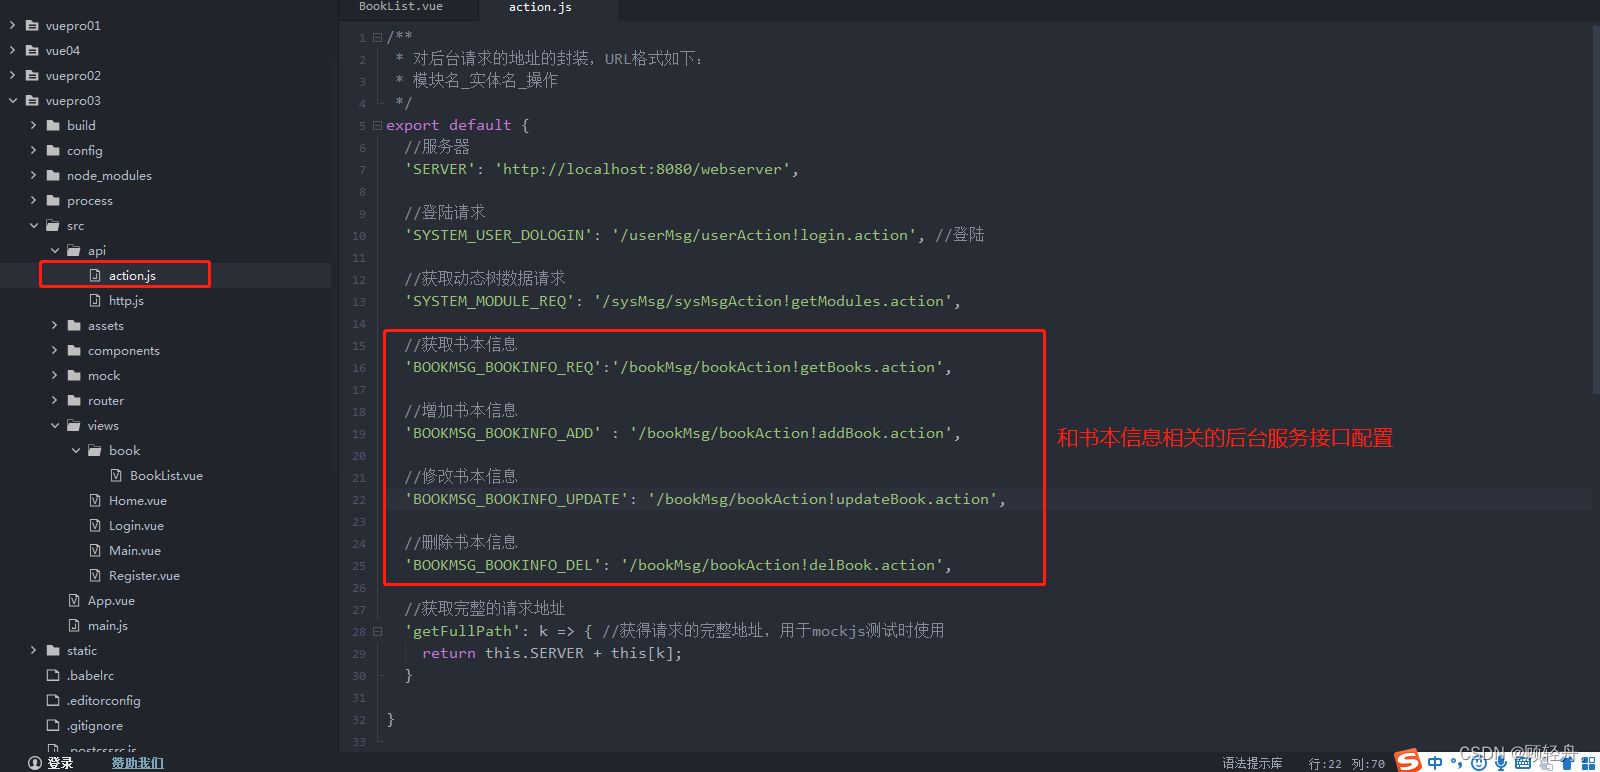
   //获取书本信息
  'BOOKMSG_BOOKINFO_REQ':'/bookMsg/bookAction!getBooks.action',

  //增加书本信息
  'BOOKMSG_BOOKINFO_ADD' : '/bookMsg/bookAction!addBook.action',

  //修改书本信息
  'BOOKMSG_BOOKINFO_UPDATE': '/bookMsg/bookAction!updateBook.action',

  //删除书本信息
  'BOOKMSG_BOOKINFO_DEL': '/bookMsg/bookAction!delBook.action',

  //VUEX 异步请求后台数据
  'VUE_ASYN_REQ':'/userMsg/vueAsynAction!asynAction.action',
2) Rufen Sie die Schnittstelle am Frontend auf, stellen Sie vor dem Aufruf sicher, dass die Hintergrundschnittstelle normal verwendet werden kann
Abbildung 1:
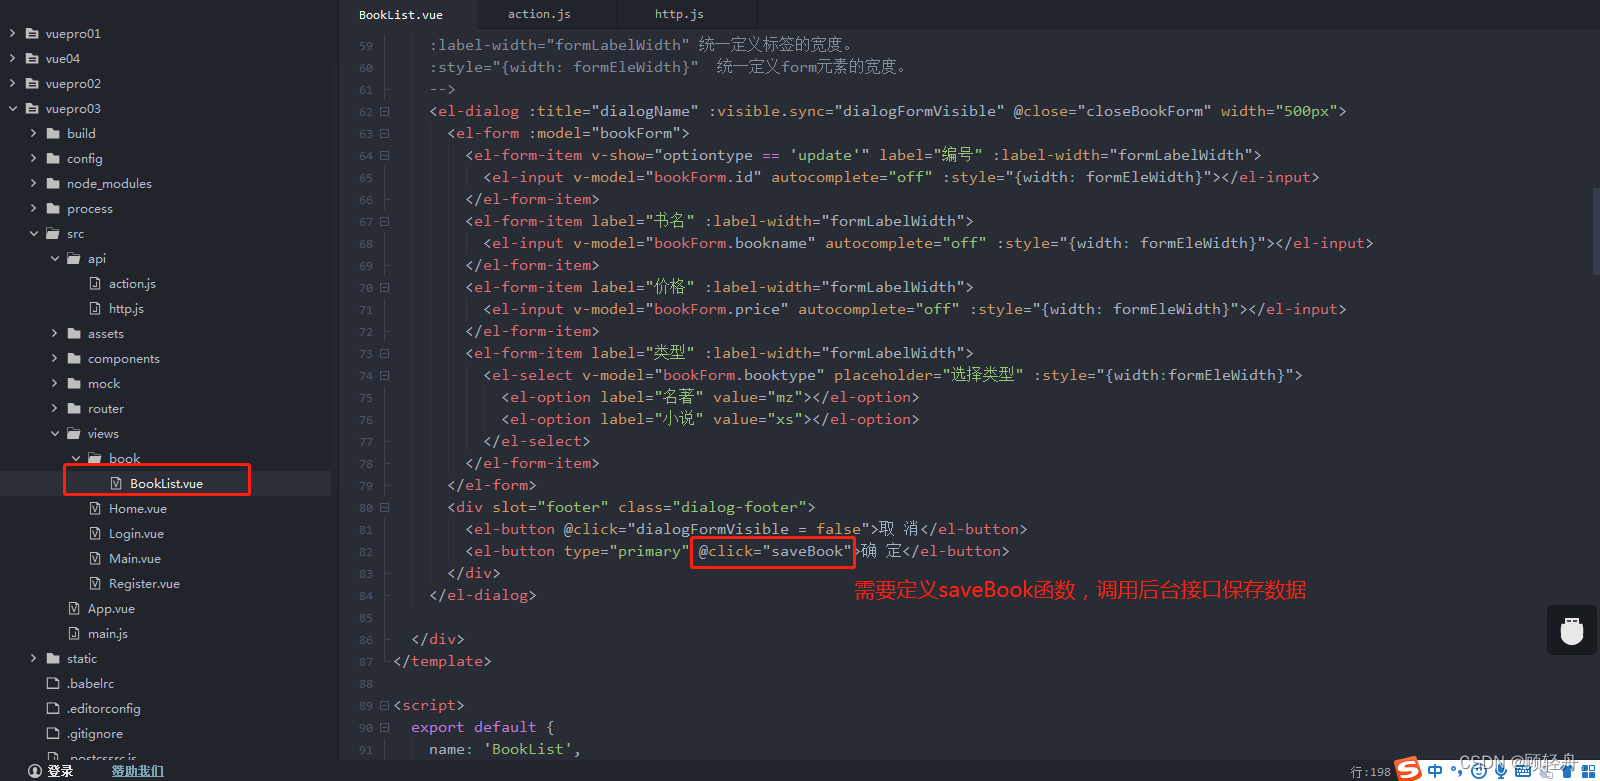
Abbildung II:
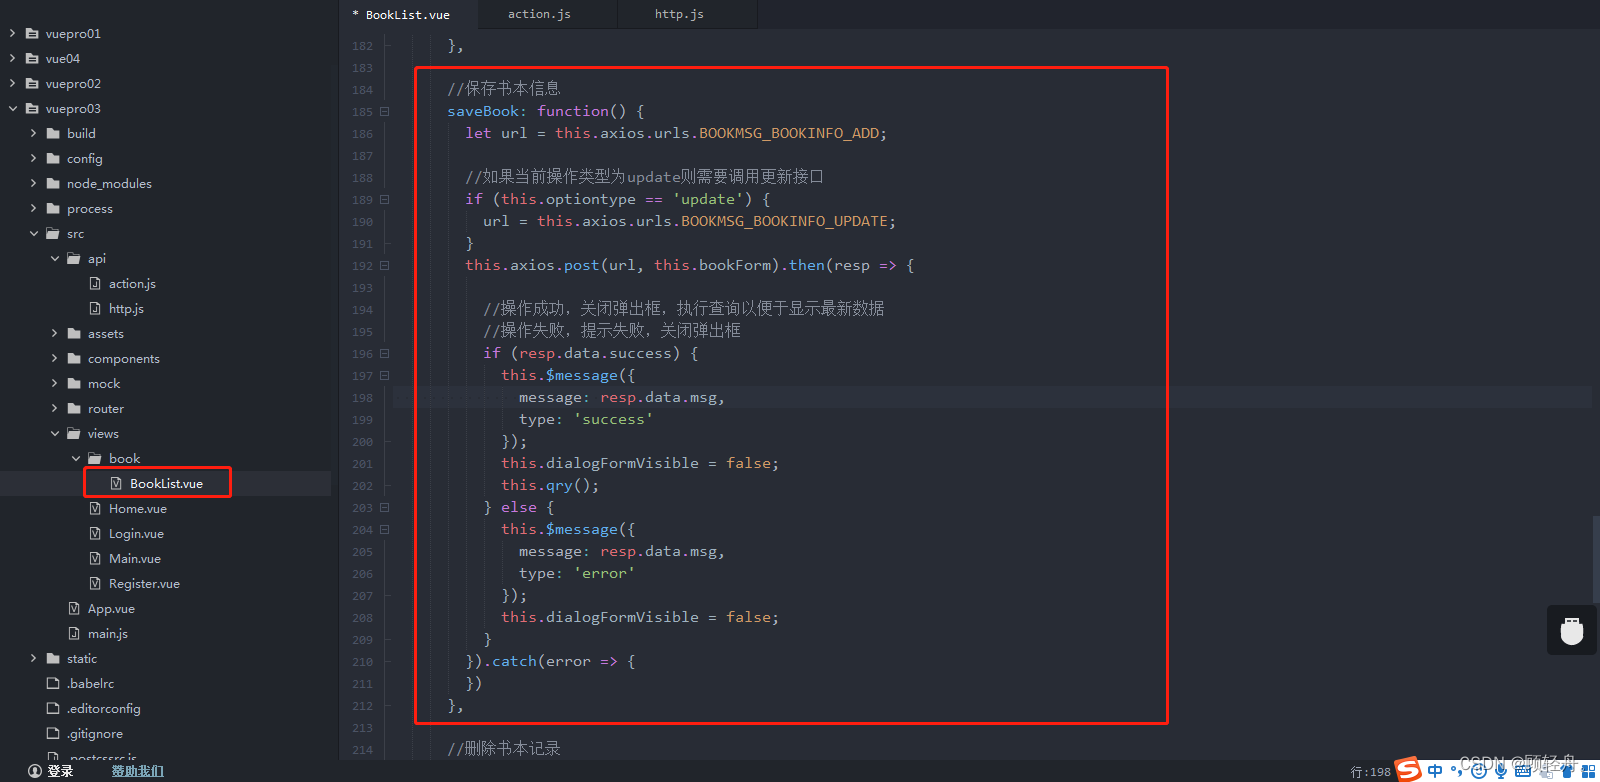
      //保存书本信息
      saveBook: function() {
        let url = this.axios.urls.BOOKMSG_BOOKINFO_ADD;

        //如果当前操作类型为update则需要调用更新接口
        if (this.optiontype == 'update') {
          url = this.axios.urls.BOOKMSG_BOOKINFO_UPDATE;
        }
        this.axios.post(url, this.bookForm).then(resp => {

          //操作成功,关闭弹出框,执行查询以便于显示最新数据
          //操作失败,提示失败,关闭弹出框
          if (resp.data.success) {
            this.$message({
              message: resp.data.msg,
              type: 'success'
            });
            this.dialogFormVisible = false;
            this.qry();
          } else {
            this.$message({
              message: resp.data.msg,
              type: 'error'
            });
            this.dialogFormVisible = false;
          }
        }).catch(error => {
        })
      },
4. Löschfunktion
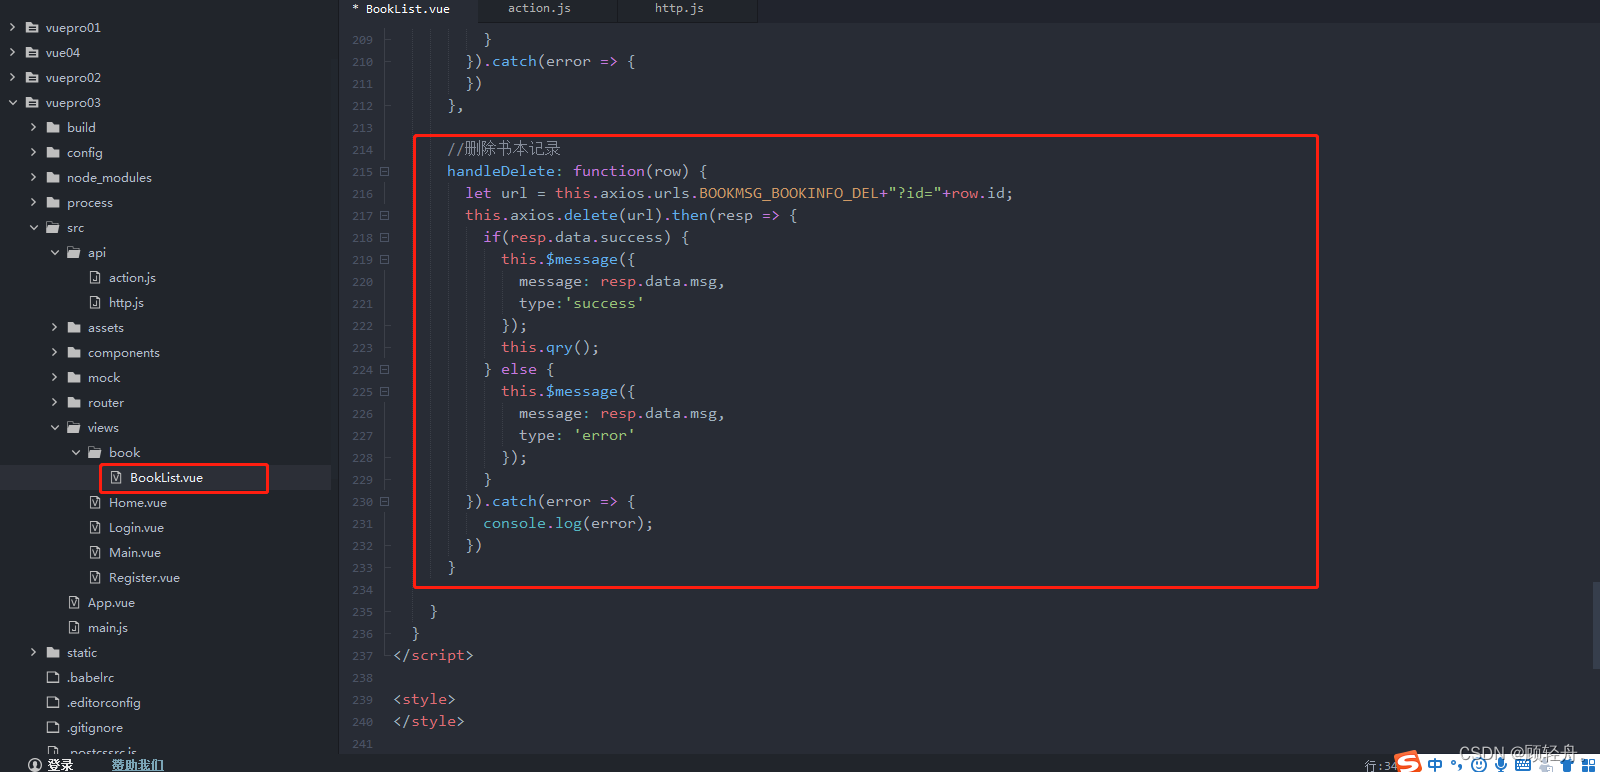
      //删除书本记录
      handleDelete: function(row) {
        let url = this.axios.urls.BOOKMSG_BOOKINFO_DEL+"?id="+row.id;
        this.axios.delete(url).then(resp => {
          if(resp.data.success) {
            this.$message({
              message: resp.data.msg,
              type:'success'
            });
            this.qry();
          } else {
            this.$message({
              message: resp.data.msg,
              type: 'error'
            });
          }
        }).catch(error => {
          console.log(error);
        })
      }
Vor dem Löschen müssen Sie den Benutzer bitten, zu bestätigen, ob er gelöscht werden soll.Für diese Funktion parametrieren Sie bitte das offizielle Dokument von element-ui selbst.
5. Formularvalidierung
Schauen Sie sich den Formularabschnitt des offiziellen Dokuments von Element-ui an
Abbildung 1: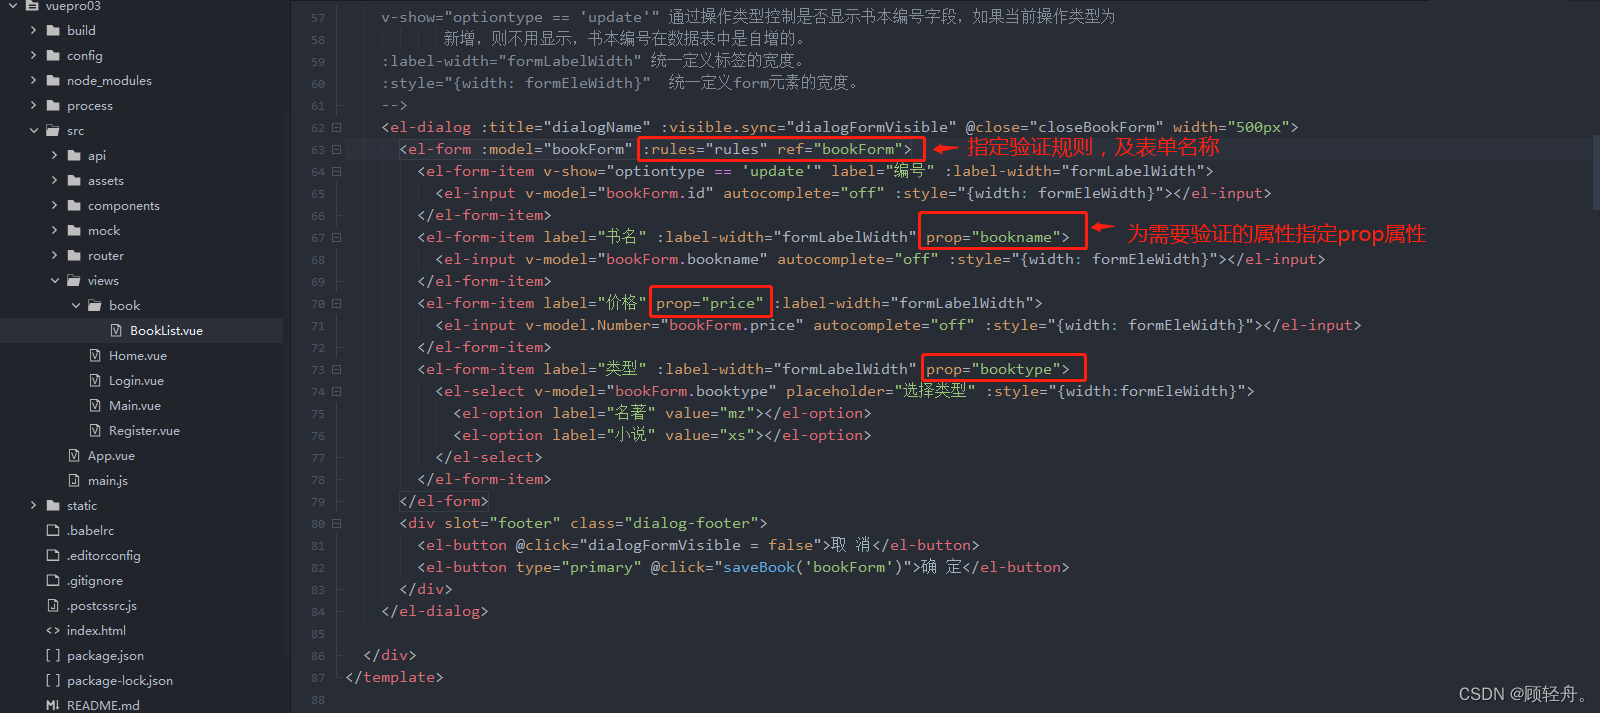
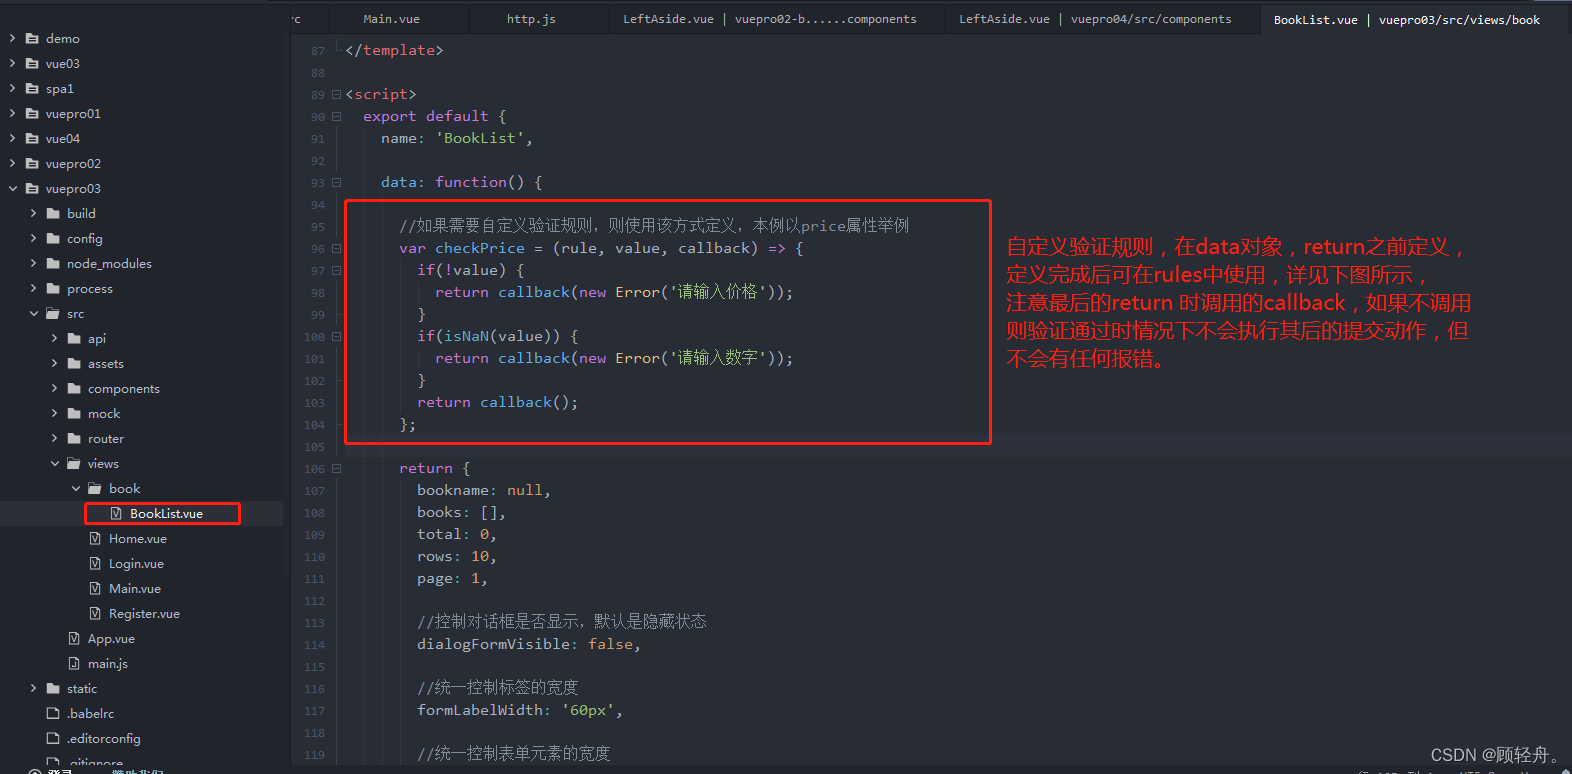
Wenn Sie die Validierungsregeln anpassen müssen, wird die Verwendung in der folgenden Abbildung gezeigt:
Abbildung 2
        //定义表单验证规则,validatePrice为自定义验证函数,在下文有具体定义
        rules: {
          bookname: [
            {required: true, message: '请输入书本名', trigger: 'blur'}
          ],
          price: [
            {required: true, validator: validatePrice, trigger: 'blur' }
          ],
          booktype: [
            {required: true, message: '请输入书本类型', trigger: 'blur'}
          ]
        }
Definition der Funktion validatePrice:
      //用于验证订单金额
      var validatePrice = (rule, value, callback) => {
        if(!value){
          callback(new Error('请输入订单金额'));
        } else if (isNaN(value)) {
          callback(new Error('请输入数字值'));
        } else {
          callback();
        }
      }
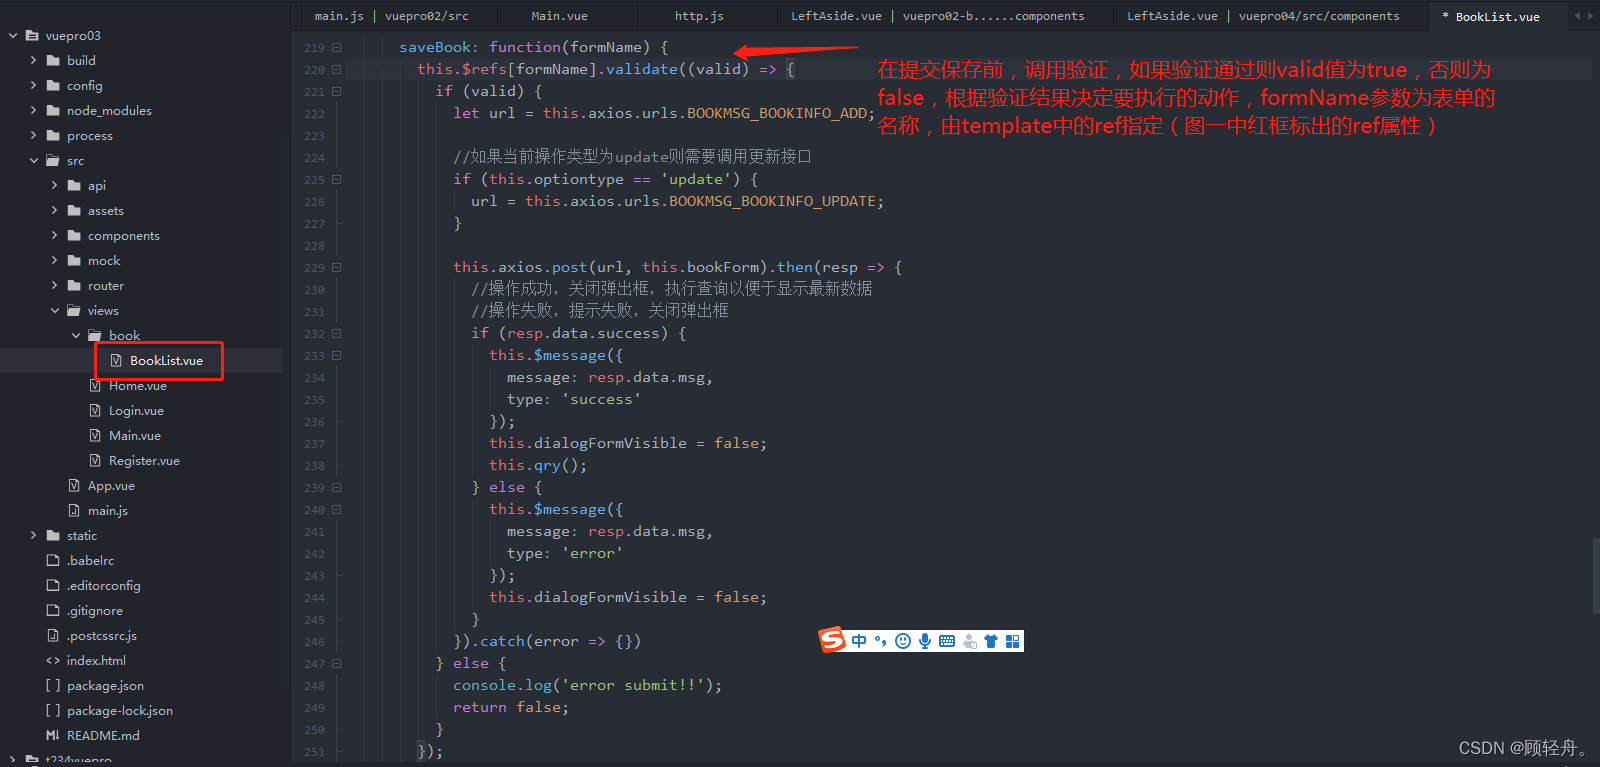
Formularvalidierung :
      //保存书本信息
      saveBook: function(formName) {
        let url = this.axios.urls.BOOKMSG_BOOKINFO_ADD;

        //调用表单验证
        this.$refs[formName].validate((valid) => {
          //如果当前操作类型为update则需要调用更新接口
          if (this.optiontype == 'update') {
            url = this.axios.urls.BOOKMSG_BOOKINFO_UPDATE;
          }
          this.axios.post(url, this.bookForm).then(resp => {

            //操作成功,关闭弹出框,执行查询以便于显示最新数据
            //操作失败,提示失败,关闭弹出框
            if (resp.data.success) {
              this.$message({
                message: resp.data.msg,
                type: 'success'
              });
              this.dialogFormVisible = false;
              this.qry();
            } else {
              this.$message({
                message: resp.data.msg,
                type: 'error'
              });
              this.dialogFormVisible = false;
            }
          }).catch(error => {
          })
        });
      },
Definieren Sie Validierungsregeln und Regel
Abbildung 3

Anrufbestätigung , Abbildung 4
Löschen Sie die Formularvalidierungsinformationen über das Attribut ref des Formulars form , Abbildung 5
5. Schnittstellendokumentation
Die grundlegenden Elemente, die das Schnittstellendokument enthalten muss:
Schnittstellenadresse:
Anforderungsmethode: get/post/put/delete usw.
Anforderungsbeispiel: Geben Sie ein Beispiel für den Aufruf
Anforderungsparameter: Geben Sie den Anforderungsparameter und den Speicherort an, z. B. URL, Formulardaten, Body Raw usw .
Rückgabeparameter:
Richtig: Geben Sie die zurückgegebenen json-Daten
an. Fehler: Geben Sie die Codes und Bedeutungen verschiedener Fehler an