kafka学习目录:kafka目录
文章目录
五、Kafka 监控
5.1 Kafka Eagle
5.1、什么是Kafka Eagle
Kafka Eagle is open source visualization and management software. It allows you to query, visualize, alert on, and explore your metrics no matter where they are stored. In plain English, it provides you with tools to turn your kafka cluster data into beautiful graphs and visualizations.
Kafka Eagle是开源可视化和管理软件。它允许您查询、可视化、提醒和探索您的指标,无论它们存储在哪里。简单地说,它为您提供了将kafka集群数据转换为漂亮的图形和可视化的工具。
一个运行在Tomcat的Web应用。
5.2、安装与运行
5.2.1、在Linux上安装与运行
1.修改 kafka 启动命令
修改 kafka-server-start.sh 命令中
if [ "x$KAFKA_HEAP_OPTS" = "x" ]; then
 export KAFKA_HEAP_OPTS="-Xmx1G -Xms1G"
fi
为
if [ "x$KAFKA_HEAP_OPTS" = "x" ]; then
 export KAFKA_HEAP_OPTS="-server -Xms2G -Xmx2G -XX:PermSize=128m
-XX:+UseG1GC -XX:MaxGCPauseMillis=200 -XX:ParallelGCThreads=8 -
XX:ConcGCThreads=5 -XX:InitiatingHeapOccupancyPercent=70"
 export JMX_PORT="9999"
 #export KAFKA_HEAP_OPTS="-Xmx1G -Xms1G"
fi
注意:修改之后在启动 Kafka 之前要分发之其他节点
2.上传压缩包 kafka-eagle-bin-1.3.7.tar.gz 到集群/opt/software 目录
3.解压到本地
[atguigu@hadoop102 software]$ tar -zxvf kafka-eagle-bin1.3.7.tar.gz
4.进入刚才解压的目录
[atguigu@hadoop102 kafka-eagle-bin-1.3.7]$ ll
总用量 82932
-rw-rw-r--. 1 atguigu atguigu 84920710 8 月 13 23:00 kafka-eagleweb-1.3.7-bin.tar.gz
5.将 kafka-eagle-web-1.3.7-bin.tar.gz 解压至/opt/module
[atguigu@hadoop102 kafka-eagle-bin-1.3.7]$ tar -zxvf kafka-eagleweb-1.3.7-bin.tar.gz -C /opt/module/
6.修改名称
[atguigu@hadoop102 module]$ mv kafka-eagle-web-1.3.7/ eagle
7.给启动文件执行权限
[atguigu@hadoop102 eagle]$ cd bin/
[atguigu@hadoop102 bin]$ ll
总用量 12
-rw-r--r--. 1 atguigu atguigu 1848 8 月 22 2017 ke.bat
-rw-r--r--. 1 atguigu atguigu 7190 7 月 30 20:12 ke.sh
[atguigu@hadoop102 bin]$ chmod 777 ke.sh
8.修改配置文件
######################################
# multi zookeeper&kafka cluster list
######################################
kafka.eagle.zk.cluster.alias=cluster1
cluster1.zk.list=hadoop102:2181,hadoop103:2181,hadoop104:2181
######################################
# kafka offset storage
######################################
cluster1.kafka.eagle.offset.storage=kafka
######################################
# enable kafka metrics
######################################
kafka.eagle.metrics.charts=true
kafka.eagle.sql.fix.error=false
######################################
# kafka jdbc driver address
######################################
kafka.eagle.driver=com.mysql.jdbc.Driver
kafka.eagle.url=jdbc:mysql://hadoop102:3306/ke?useUnicode=true&ch
aracterEncoding=UTF-8&zeroDateTimeBehavior=convertToNull
kafka.eagle.username=root
kafka.eagle.password=000000
9.添加环境变量
export KE_HOME=/opt/module/eagleexport PATH=$PATH:$KE_HOME/bin
注意:source /etc/profile
10.启动
[atguigu@hadoop102 eagle]$ bin/ke.sh start... ...... ...******************************************************************** Kafka Eagle Service has started success.* Welcome, Now you can visit 'http://192.168.9.102:8048/ke'* Account:admin ,Password:123456******************************************************************** <Usage> ke.sh [start|status|stop|restart|stats] </Usage>* <Usage> https://www.kafka-eagle.org/ </Usage>*******************************************************************[atguigu@hadoop102 eagle]$
注意:启动之前需要先启动 ZK 以及 KAFKA
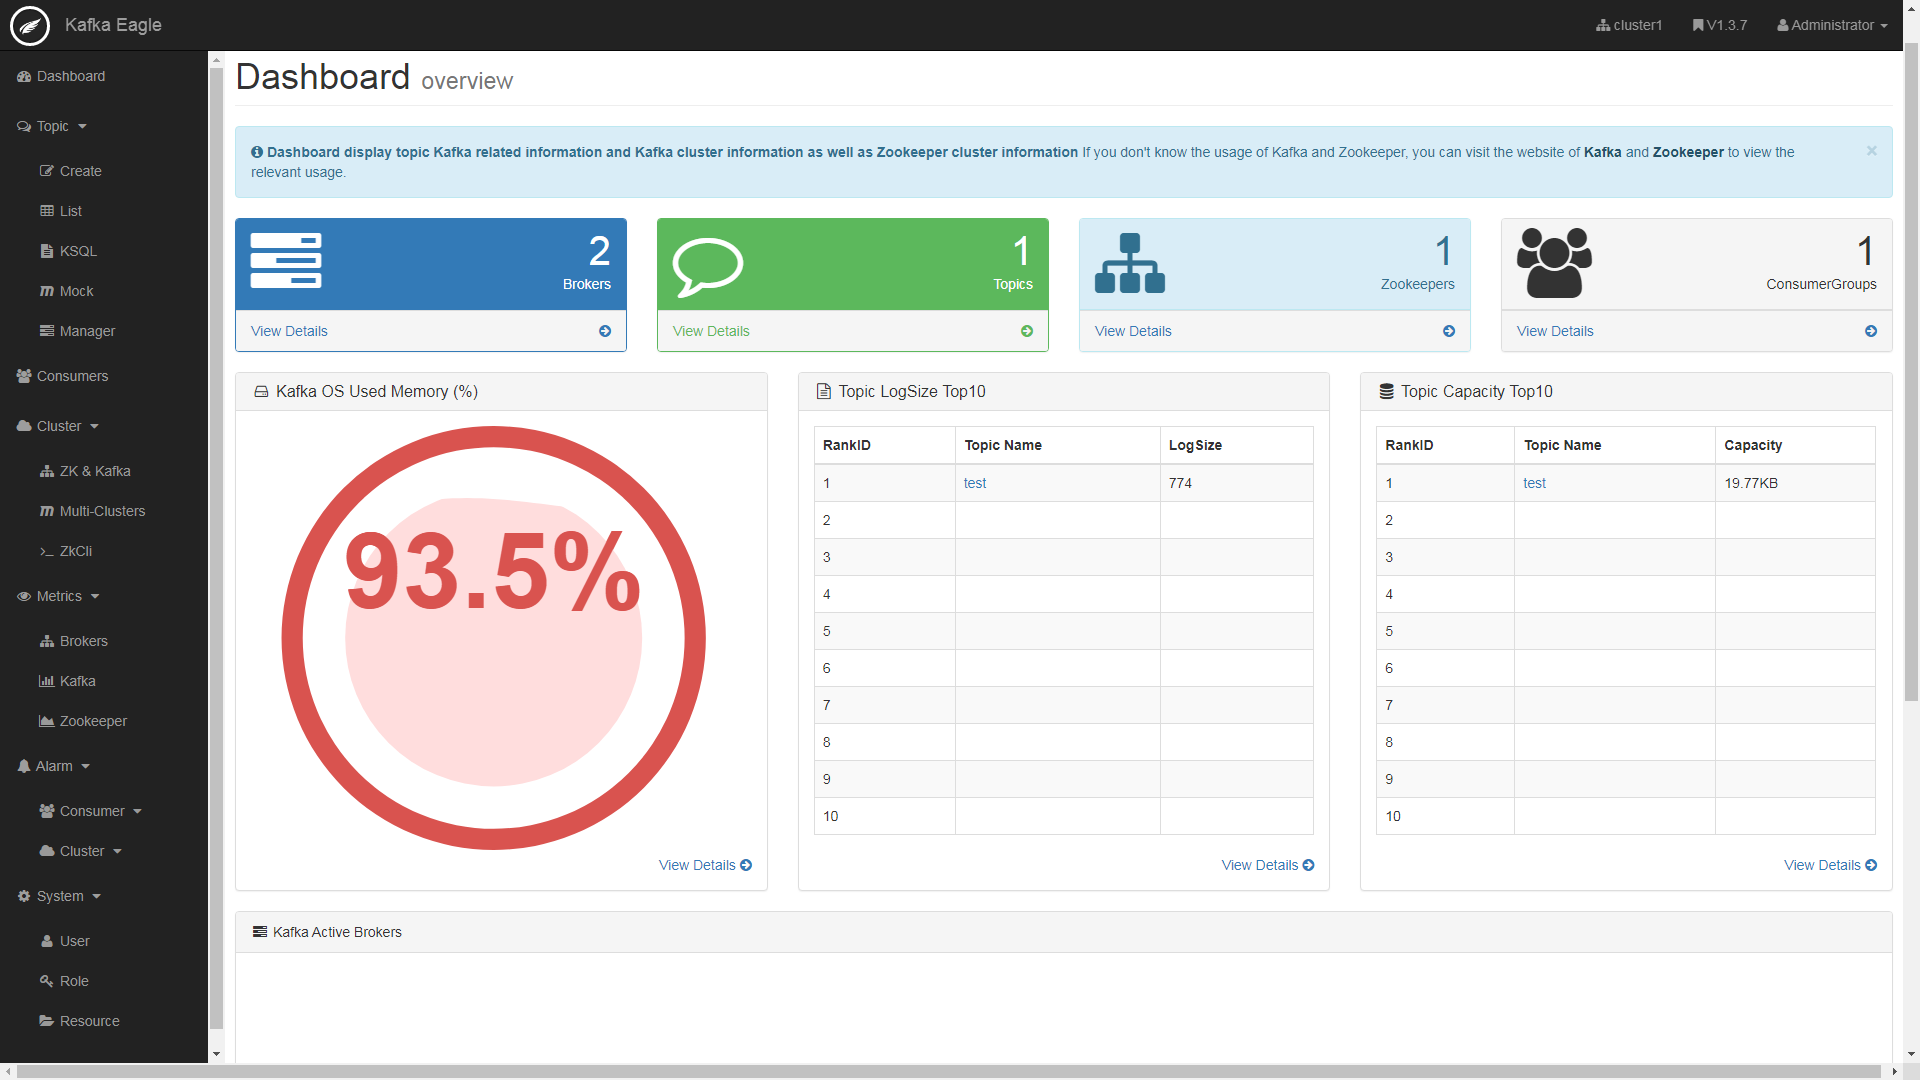
11.登录页面查看监控数据
http://192.168.9.102:8048/ke

5.2.2、在Windows上安装与运行
- 安装JDK,设置环境变量时,路径最好不要带空格,否则,后序运行ke.bat抛异常。若路径必须带有空格,可以通过小技巧,让ke.bat成功运行。这个技巧是:若你的
JAVA_HOME的变量值为C:\Program Files\Java\jdk1.8.0_161,则将其改成C:\progra~1\Java\jdk1.8.0_161。 - 到Kafka Eagle下载页面下载安装包。也可在网盘下载,链接在本文首部
- 解压安装包,然后设置环境变量
KE_HOME,其值如C:\Kafka\kafka-eagle-web-1.3.7。若想打开cmd输入命令ke.bat运行Kafka Eagle,在PATH环境变量的值头添加%KE_HOME%\bin; - 修改配置文件
%KE_HOME%\conf\system-config.properties - (可选)Kafka Server的JVM调参,用文本编辑器打开
%KAFKA_HOME%\bin\windows\kafka-server-start.bat,其中的set KAFKA_HEAP_OPTS=-Xmx1G -Xms1G改为set KAFKA_HEAP_OPTS=-server -Xms2G -Xmx2G -XX:PermSize=128m -XX:+UseG1GC -XX:MaxGCPauseMillis=200 -XX:ParallelGCThreads=8 -XX:ConcGCThreads=5 -XX:InitiatingHeapOccupancyPercent=70
####################################### multi zookeeper&kafka cluster list######################################<---设置ZooKeeper的IP地址kafka.eagle.zk.cluster.alias=cluster1cluster1.zk.list=localhost:2181####################################### zk client thread limit######################################kafka.zk.limit.size=25####################################### kafka eagle webui port######################################kafka.eagle.webui.port=8048####################################### kafka offset storage######################################cluster1.kafka.eagle.offset.storage=kafka#cluster2.kafka.eagle.offset.storage=zk####################################### enable kafka metrics######################################<---metrics.charts从false改成truekafka.eagle.metrics.charts=truekafka.eagle.sql.fix.error=false####################################### kafka sql topic records max######################################kafka.eagle.sql.topic.records.max=5000####################################### alarm email configure######################################kafka.eagle.mail.enable=falsekafka.eagle.mail.sa=alert_sa@163.comkafka.eagle.mail.username=alert_sa@163.comkafka.eagle.mail.password=mqslimczkdqabbbhkafka.eagle.mail.server.host=smtp.163.comkafka.eagle.mail.server.port=25####################################### alarm im configure#######################################kafka.eagle.im.dingding.enable=true#kafka.eagle.im.dingding.url=https://oapi.dingtalk.com/robot/send?access_token=#kafka.eagle.im.wechat.enable=true#kafka.eagle.im.wechat.token=https://qyapi.weixin.qq.com/cgi-bin/gettoken?corpid=xxx&corpsecret=xxx#kafka.eagle.im.wechat.url=https://qyapi.weixin.qq.com/cgi-bin/message/send?access_token=#kafka.eagle.im.wechat.touser=#kafka.eagle.im.wechat.toparty=#kafka.eagle.im.wechat.totag=#kafka.eagle.im.wechat.agentid=####################################### delete kafka topic token######################################kafka.eagle.topic.token=keadmin####################################### kafka sasl authenticate######################################cluster1.kafka.eagle.sasl.enable=falsecluster1.kafka.eagle.sasl.protocol=SASL_PLAINTEXTcluster1.kafka.eagle.sasl.mechanism=PLAINcluster1.kafka.eagle.sasl.jaas.config=org.apache.kafka.common.security.plain.PlainLoginModule required username="admin" password="kafka-eagle";#cluster2 在此没有用到,将其注释掉#cluster2.kafka.eagle.sasl.enable=false#cluster2.kafka.eagle.sasl.protocol=SASL_PLAINTEXT#cluster2.kafka.eagle.sasl.mechanism=PLAIN#cluster2.kafka.eagle.sasl.jaas.config=org.apache.kafka.common.security.plain.PlainLoginModule required username="admin" password="kafka-eagle";####################################### kafka jdbc driver address######################################kafka.eagle.driver=org.sqlite.JDBC#将url设置在本地kafka.eagle.url=jdbc:sqlite:/C:/Kafka/kafka-eagle-web-1.3.7/db/ke.db#进入系统需要用到的账号与密码kafka.eagle.username=rootkafka.eagle.password=123456
- 运行
- 运行ZooKeeper
- 运行Kafka集群,另外运行kafka server前,需设置JMX_PORT,否则Kafka Eagle 后台提示连接失败。执行命令行
set JMX_PORT=9999 & start bin\windows\kafka-server-start.bat config\server.properties设置JMX_PORT且运行Kafkaserver。在单节点开启Kafka集群,小心端口号冲突。 - 点击
%KE_HOME%\bin\ke.bat,运行Kafka Eagle。 - 打开浏览器,在地址栏输入
http://localhost:8048/ke/,然后在登录页面,输入在配置文件%KE_HOME%\conf\system-config.properties设置的账号与密码。 - 登录成功,便可进入Kafka Eagle