Documentos involucrados en el proyecto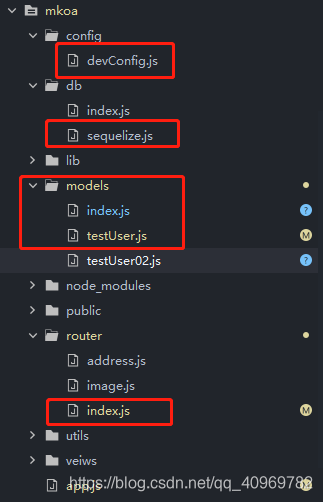
El primer paso es configurar devConfig.js bajo la configuración de archivo básica de la base de datos de su proyecto (el nombre aquí no es importante, puede basarse en su situación real)
var devConfig = {


	environment: 'dev',
	data:{


		host: 'localhost',// 主机名
		username: 'root', // 用户名
		password: '123456',
		port: '3306', // 端口号,MySQL默认3306
		database: 'testnode',// 使用哪个数据库
		dialect:'mysql'
	}

};

module.exports = devConfig;
La segunda parte es configurar la parte pública Sequelize del archivo sequelize.js (el nombre no es importante aquí, de acuerdo con su situación real)
dos formas de escribir, la siguiente es la escritura del modelo extendido
const {

     Sequelize, DataTypes, Model } = require('sequelize');
const {

    sequelize} = require("../db/sequelize.js");

class testUser extends Model {


	//扩展函数
}

testUser.init({


  // 定义模型属性
  firstName: {


    type: DataTypes.STRING, 		//数据类型
    allowNull: false,  				//不允许为空
	validate: {

    						//验证规则
	      is: ["^[a-z]+$",'i'],     // 只允许字母
	}
  },
  lastName: {


    type: DataTypes.STRING,
    // allowNull 默认为 true
	defaultValue: "Doe"  //默认值
  }
}, {


  //模型参数
  sequelize, // 我们需要传递连接实例
  modelName: 'testUser' ,		// 我们需要选择模型名称
  freezeTableName: true,		//,不自动将所有传递的模型名称(define的第一个参数)转换为复数
  //timestamps: true, 			// 启用时间戳!
  //createdAt: false,  			//不想要 createdAt
  //updatedAt: 'updateTimestamp'// 想要 updatedAt 但是希望名称叫做 updateTimestamp
});

testUser.sync({

     force: false }) //注意:如果表已经存在,使用`force:true`将删除该表

// console.log(testUser === sequelize.models.testUser); // true 定义的模型是类本身

module.exports = testUser; //特别注意踩坑
El siguiente es el método de escritura del modelo no extendido (los dos métodos de escritura son equivalentes)
const {

     Sequelize, DataTypes } = require('sequelize');
const {

    sequelize} = require("../db/sequelize.js");

const testUser = sequelize.define('testUser', {


  // 模型属性
  firstName: {


    type: DataTypes.STRING,
    allowNull: false
  },
  lastName: {


    type: DataTypes.STRING
    // allowNull 默认为 true
  }
}, {


  // 模型参数
  sequelize, 				// 我们需要传递连接实例
  modelName: 'testUser' ,	// 我们需要选择模型名称
  freezeTableName: true,	//不自动将所有传递的模型名称(define的第一个参数)转换为复数
});
testUser.sync({

     force: false })

console.log(testUser === sequelize.models.User); // true

module.exports = testUser;
El archivo del enrutador index.js es para uso específico
const {

     testUser } = require("../models/index.js");
const koaRouter = require('koa-router');
const router = koaRouter();

router.post('/index', async (ctx, next) => {


	//插入数据
	// .build({

    firstName:'jonn'}).save() 也可写作.create({

    firstName:'jonn'})
	testUser.build({

    firstName:'jonn'}).save().then(res=>{


		console.log(JSON.stringify(res))
	}).catch(err=>{


		console.log(err.toString())
	})
	//修改数据
	// const isUpdata = await testUser.update({


	//     'firstName': 'testUpdatee'
	// }, {


	//     'where': {

     'id': 16 }
	// });
	// if(isUpdata){


	// 	const allData = await testUser.findAll();
	// 	if(allData){


	// 		console.log(JSON.stringify(allData))
	// 	}
	// 	data={

    msg:'成功', data:allData}
	// 	ctx.body=data
	// }
	//删除数据
	const isDelete = await testUser.destroy({


	    'where': {

    'id': 19}
	})
	console.log(isDelete+'111')
	if(isDelete){


		const allData = await testUser.findAll();
		if(allData){


			console.log(JSON.stringify(allData))
		}
		data={

    msg:'成功', data:allData}
		ctx.body=data
	}

	//模型查询全部
	// const allData = await testUser.findAll();
	// if(allData){


	// 	console.log(JSON.stringify(allData))
	//}
	// //模型分页查询
	// const allData = await testUser.findAll({

     offset: pageNo*pagesize, limit: pagesize });
	// if(allData){


	// 	console.log(JSON.stringify(allData))
	// }
	// //条件查询
	// const allData = await testUser.findAll({

     offset: pageNo*pagesize, limit: pagesize });
	// if(allData){


	// 	console.log(JSON.stringify(allData))
	// }

	// // 搜索特定属性 - 使用哈希
	// const allData = await testUser.findAll({

     where: {

     name: 'A Project' } }).then(projects => {


	//   // allData 将是一个具有指定 name 的 Project 实例数组
	// })
	// // 在特定范围内进行搜索
	// const allData = await testUser.findAll({

     where: {

     id: [1,2,3] } }).then(projects => {


	//   // allData 将是一系列具有 id 1,2 或 3 的项目
	//   // 这实际上是在做一个 IN 查询
	// })
	// // 搜索已知的ids
	// const allData = await testUser.findByPk(123).then(project => {


	//   // allData 将是 Project的一个实例,并具有在表中存为 id 123 条目的内容.
	//   // 如果没有定义这样的条目,你将获得null
	// })
	// // 搜索属性
	// const allData = await testUser.findOne({

     where: {

    title: 'aProject'} }).then(project => {


	//   // allData 将是 Projects 表中 title 为 'aProject'  的第一个条目 || null
	// })
	// //组合查询
	// const allData = await testUser.findOne({


	//   where: {

    title: 'aProject'},
	//   attributes: ['id', ['name', 'title']]
	// }).then(project => {


	//   // allData 将是 Projects 表中 title 为 'aProject'  的第一个条目 || null
	//   // allData .get('title') 将包含 project 的 name
	// })


	// data={

    msg:'成功', data:allData}
	// ctx.body=data
});
Con esto concluye la configuración y el uso básicos de Sequelize.
Además, las reglas del método de verificación están integradas y configuradas manualmente
validate: {


      is: /^[a-z]+$/i,          // 匹配这个 RegExp
      is: ["^[a-z]+$",'i'],     // 与上面相同,但是以字符串构造 RegExp
      not: /^[a-z]+$/i,         // 不匹配 RegExp
      not: ["^[a-z]+$",'i'],    // 与上面相同,但是以字符串构造 RegExp
      isEmail: true,            // 检查 email 格式 ([email protected])
      isUrl: true,              // 检查 url 格式 (http://foo.com)
      isIP: true,               // 检查 IPv4 (129.89.23.1) 或 IPv6 格式
      isIPv4: true,             // 检查 IPv4 格式 (129.89.23.1)
      isIPv6: true,             // 检查 IPv6 格式
      isAlpha: true,            // 只允许字母
      isAlphanumeric: true,     // 将仅允许使用字母数字,因此 '_abc' 将失败
      isNumeric: true,          // 只允许数字
      isInt: true,              // 检查有效的整数
      isFloat: true,            // 检查有效的浮点数
      isDecimal: true,          // 检查任何数字
      isLowercase: true,        // 检查小写
      isUppercase: true,        // 检查大写
      notNull: true,            // 不允许为空
      isNull: true,             // 只允许为空
      notEmpty: true,           // 不允许空字符串
      equals: 'specific value', // 仅允许 'specific value'
      contains: 'foo',          // 强制特定子字符串
      notIn: [['foo', 'bar']],  // 检查值不是这些之一
      isIn: [['foo', 'bar']],   // 检查值是其中之一
      notContains: 'bar',       // 不允许特定的子字符串
      len: [2,10],              // 仅允许长度在2到10之间的值
      isUUID: 4,                // 只允许 uuid
      isDate: true,             // 只允许日期字符串
      isAfter: "2011-11-05",    // 仅允许特定日期之后的日期字符串
      isBefore: "2011-11-05",   // 仅允许特定日期之前的日期字符串
      max: 23,                  // 仅允许值 <= 23
      min: 23,                  // 仅允许值 >= 23
      isCreditCard: true,       // 检查有效的信用卡号

      // 自定义验证器的示例:
      isEven(value) {


        if (parseInt(value) % 2 !== 0) {


          throw new Error('Only even values are allowed!');
        }
      }
      isGreaterThanOtherField(value) {


        if (parseInt(value) <= parseInt(this.otherField)) {


          throw new Error('Bar must be greater than otherField.');
        }
      }
Los métodos de operación específicos y el conocimiento profundo del modelo (como: otras consultas, clasificación, asociaciones) pueden ser consultados por usted mismo.