Tabla de contenido
Descripción
El módulo lanzador es un archivo jar vacío, que solo proporciona administración de dependencias auxiliares Estas dependencias se pueden usar para ensamblaje automático u otras bibliotecas de clases;
Reducción de nombre:
Denominación oficial:
-
Prefijo: spring-boot-starter-xxx
-
Por ejemplo: spring-boot-starter-web ...
Nomenclatura personalizada:
-
arranque-arranque-primavera-xxx
-
Por ejemplo: mybatis-spring-boot-starter
Escribe un lanzador
1. Cree un nuevo proyecto vacío spring-boot-starter-diy en IDEA
2. Cree un nuevo módulo Maven ordinario: kuang-spring-boot-starter
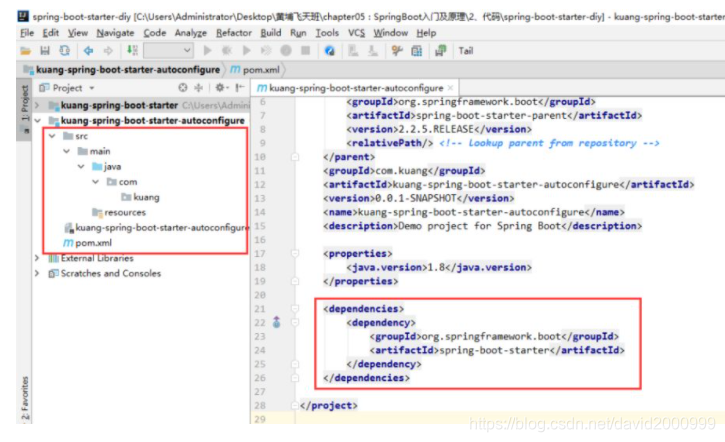
3. Cree un nuevo módulo Springboot: kuang-spring-boot-starter-autoconfigure
4. ¡Importa la dependencia de autoconfigure en nuestro motor de arranque!
<!-- 启动器 -->
<dependencies>
    <!--  引入自动配置模块 -->
    <dependency>
        <groupId>com.kuang</groupId>
        <artifactId>kuang-spring-boot-starter-autoconfigure</artifactId>
        <version>0.0.1-SNAPSHOT</version>
    </dependency>
</dependencies>
5. Elimina todos los archivos redundantes del proyecto de autoconfiguración ¡Solo queda un iniciador en el Pom, que es la configuración básica de todos los iniciadores!
6. Escribe tu propio servicio
package com.kuang;

public class HelloService {


    HelloProperties helloProperties;

    public HelloProperties getHelloProperties() {


        return helloProperties;
    }

    public void setHelloProperties(HelloProperties helloProperties) {


        this.helloProperties = helloProperties;
    }

    public String sayHello(String name){


        return helloProperties.getPrefix() + name + helloProperties.getSuffix();
    }

}
7, escriba la clase de configuración HelloProperties
package com.kuang;

import org.springframework.boot.context.properties.ConfigurationProperties;

// 前缀 kuang.hello
@ConfigurationProperties(prefix = "kuang.hello")
public class HelloProperties {


    private String prefix;
    private String suffix;

    public String getPrefix() {


        return prefix;
    }

    public void setPrefix(String prefix) {


        this.prefix = prefix;
    }

    public String getSuffix() {


        return suffix;
    }

    public void setSuffix(String suffix) {


        this.suffix = suffix;
    }
}
8. Escriba nuestra clase de configuración automática e inyecte beans, ¡pruebe!
package com.kuang;

import org.springframework.beans.factory.annotation.Autowired;
import org.springframework.boot.autoconfigure.condition.ConditionalOnWebApplication;
import org.springframework.boot.context.properties.EnableConfigurationProperties;
import org.springframework.context.annotation.Bean;
import org.springframework.context.annotation.Configuration;

@Configuration
@ConditionalOnWebApplication //web应用生效
@EnableConfigurationProperties(HelloProperties.class)
public class HelloServiceAutoConfiguration {


    @Autowired
    HelloProperties helloProperties;

    @Bean
    public HelloService helloService(){


        HelloService service = new HelloService();
        service.setHelloProperties(helloProperties);
        return service;
    }

}
9. Escriba sus propias META-INF \ spring.factories en recursos
# Auto Configure
org.springframework.boot.autoconfigure.EnableAutoConfiguration=\
com.kuang.HelloServiceAutoConfiguration
10. Una vez completada la escritura, se puede instalar en el almacén de maven.
prueba
1. Cree un nuevo proyecto SpringBoot
2. Importar nuestro propio lanzador
<dependency>
    <groupId>com.kuang</groupId>
    <artifactId>kuang-spring-boot-starter</artifactId>
    <version>1.0-SNAPSHOT</version>
</dependency>
3. ¡Escriba un HelloController para probar nuestra propia interfaz escrita!
package com.kuang.controller;

@RestController
public class HelloController {


    @Autowired
    HelloService helloService;

    @RequestMapping("/hello")
    public String hello(){


        return helloService.sayHello("zxc");
    }

}
4. Escriba el archivo de configuración application.properties
kuang.hello.prefix="ppp"
kuang.hello.suffix="sss"
5. Inicie el proyecto para probar y el resultado será exitoso.