Persona ReID
La reidentificación de personas (reidentificación de personas) es actualmente un tema de investigación muy candente y de vanguardia en el campo de la visión por computadora de aprendizaje profundo. En los últimos años, se han publicado muchos artículos sobre ReID y muchos de código abierto en Internet. Aquí los guiaré Ejecute una vez un proyecto de código abierto reid basado en el método detect + reid.
1. Artículos de referencia:
https://blog.csdn.net/ruotianxia/article/details/78540082
https://blog.csdn.net/weixin_36697338/article/details/82918049
https://blog.csdn.net/HUXINY/article/details/ 83990628 (Esto es mío. El proyecto se implementa sobre la base de fast-rcnn. La estructura y el código de fast-rcnn son muy similares a los de rapid-rcnn, y muchas cosas se pueden cambiar de acuerdo con él)
2. Dirección del proyecto
Aprendizaje de funciones de identificación y detección conjunta para búsqueda de personas
https://github.com/ShuangLI59/person_search
3. Preparación
Instalar openmpi 1.10.7
Debido a que solo uso el entorno operativo de la CPU, no se requiere GPU, por lo que la instalación normal está bien. (Lo aprendí cuando openmpi estaba en la computación en la nube. El nombre completo de MPI es interfaz de paso de mensajes, que es el entorno de software básico para la comunicación entre nodos. Proporciona API para la comunicación y sincronización entre procesos relacionados. Es una gran cosa para la computación paralela) Para la
instalación, consulte el siguiente artículo:
https://www.xuebuyuan.com/3225420.html
Descarga el caffemodel entrenado
Si no desea volver a abrir los datos de entrenamiento, puede usar el modelo de caffe que se proporciona en la siguiente dirección (debe pasar por alto, puede descargarlo en mi CSND si no quiere ir), porque el entrenamiento del entorno de la CPU es lento hasta la muerte.
https://drive.google.com/open?id=0B67_d0rLRTQYbVFENlVjdXRSWVE
https://download.csdn.net/download/huxiny/10787167
4. Descarga y compila la búsqueda de personas
Copiar proyecto
git clone --recursive https://github.com/ShuangLI59/person_search.git
Modificar varios archivos
Este proyecto se ha reescrito para fastRcnn. La estructura de ingeniería es muy similar a la de QuickRCNN. Necesita utilizar el entorno de CPU, que es similar a los cambios de QuickRCNN.
①. Modifique el archivo person_search / lib / setup.py, de la siguiente manera:
(comente el contenido en # SOLO CPU)
# --------------------------------------------------------
# Fast R-CNN
# Copyright (c) 2015 Microsoft
# Licensed under The MIT License [see LICENSE for details]
# Written by Ross Girshick
# --------------------------------------------------------

import os
from os.path import join as pjoin
from setuptools import setup
from distutils.extension import Extension
from Cython.Distutils import build_ext
import subprocess
import numpy as np

def find_in_path(name, path):
    "Find a file in a search path"
    # Adapted fom
    # http://code.activestate.com/recipes/52224-find-a-file-given-a-search-path/
    for dir in path.split(os.pathsep):
        binpath = pjoin(dir, name)
        if os.path.exists(binpath):
            return os.path.abspath(binpath)
    return None


def locate_cuda():
    """Locate the CUDA environment on the system

    Returns a dict with keys 'home', 'nvcc', 'include', and 'lib64'
    and v在这里插入代码片alues giving the absolute path to each directory.

    Starts by looking for the CUDAHOME env variable. If not found, everything
    is based on finding 'nvcc' in the PATH.
    """

    # first check if the CUDAHOME env variable is in use
    if 'CUDAHOME' in os.environ:
        home = os.environ['CUDAHOME']
        nvcc = pjoin(home, 'bin', 'nvcc')
    else:
        # otherwise, search the PATH for NVCC
        default_path = pjoin(os.sep, 'usr', 'local', 'cuda', 'bin')
        nvcc = find_in_path('nvcc', os.environ['PATH'] + os.pathsep + default_path)
        if nvcc is None:
            raise EnvironmentError('The nvcc binary could not be '
                'located in your $PATH. Either add it to your path, or set $CUDAHOME')
        home = os.path.dirname(os.path.dirname(nvcc))

    cudaconfig = {'home':home, 'nvcc':nvcc,
                  'include': pjoin(home, 'include'),
                  'lib64': pjoin(home, 'lib64')}
    for k, v in cudaconfig.iteritems():
        if not os.path.exists(v):
            raise EnvironmentError('The CUDA %s path could not be located in %s' % (k, v))

    return cudaconfig
# ONLY CPU
#CUDA = locate_cuda()


# Obtain the numpy include directory.  This logic works across numpy versions.
try:
    numpy_include = np.get_include()
except AttributeError:
    numpy_include = np.get_numpy_include()

def customize_compiler_for_nvcc(self):
    """inject deep into distutils to customize how the dispatch
    to gcc/nvcc works.

    If you subclass UnixCCompiler, it's not trivial to get your subclass
    injected in, and still have the right customizations (i.e.
    distutils.sysconfig.customize_compiler) run on it. So instead of going
    the OO route, I have this. Note, it's kindof like a wierd functional
    subclassing going on."""

    # tell the compiler it can processes .cu
    self.src_extensions.append('.cu')

    # save references to the default compiler_so and _comple methods
    default_compiler_so = self.compiler_so
    super = self._compile

    # now redefine the _compile method. This gets executed for each
    # object but distutils doesn't have the ability to change compilers
    # based on source extension: we add it.
    def _compile(obj, src, ext, cc_args, extra_postargs, pp_opts):
        if os.path.splitext(src)[1] == '.cu':
            # use the cuda for .cu files
            # ONLY CPU
            #self.set_executable('compiler_so', CUDA['nvcc'])
            # use only a subset of the extra_postargs, which are 1-1 translated
            # from the extra_compile_args in the Extension class
            postargs = extra_postargs['nvcc']
        else:
            postargs = extra_postargs['gcc']

        super(obj, src, ext, cc_args, postargs, pp_opts)
        # reset the default compiler_so, which we might have changed for cuda
        self.compiler_so = default_compiler_so

    # inject our redefined _compile method into the class
    self._compile = _compile


# run the customize_compiler
class custom_build_ext(build_ext):
    def build_extensions(self):
        customize_compiler_for_nvcc(self.compiler)
        build_ext.build_extensions(self)


ext_modules = [
    Extension(
        "utils.cython_bbox",
        ["utils/bbox.pyx"],
        extra_compile_args={'gcc': ["-Wno-cpp", "-Wno-unused-function"]},
        include_dirs = [numpy_include]
    ),
    Extension(
        "nms.cpu_nms",
        ["nms/cpu_nms.pyx"],
        extra_compile_args={'gcc': ["-Wno-cpp", "-Wno-unused-function"]},
        include_dirs = [numpy_include]
    ),
    # ONLY CPU
    #Extension('nms.gpu_nms',
    #    ['nms/nms_kernel.cu', 'nms/gpu_nms.pyx'],
    #    library_dirs=[CUDA['lib64']],
    #    libraries=['cudart'],
    #    language='c++',
    #    runtime_library_dirs=[CUDA['lib64']],
        # this syntax is specific to this build system
        # we're only going to use certain compiler args with nvcc and not with
        # gcc the implementation of this trick is in customize_compiler() below
    #    extra_compile_args={'gcc': ["-Wno-unused-function"],
    #                        'nvcc': ['-arch=sm_35',
    #                                 '--ptxas-options=-v',
    #                                 '-c',
    #                                 '--compiler-options',
    #                                 "'-fPIC'"]},
    #    include_dirs = [numpy_include, CUDA['include']]
    #),
]

setup(
    name='fast_rcnn',
    ext_modules=ext_modules,
    # inject our custom trigger
    cmdclass={'build_ext': custom_build_ext},
)
②. Modifique el contenido del archivo person_search / lib / fast_rcnn / nms_wrapper.py, de la siguiente manera:
# --------------------------------------------------------
# Fast R-CNN
# Copyright (c) 2015 Microsoft
# Licensed under The MIT License [see LICENSE for details]
# Written by Ross Girshick
# --------------------------------------------------------

from fast_rcnn.config import cfg
#from nms.gpu_nms import gpu_nms
from nms.cpu_nms import cpu_nms

def nms(dets, thresh, force_cpu=False):
    """Dispatch to either CPU or GPU NMS implementations."""

    if dets.shape[0] == 0:
        return []
    #if cfg.USE_GPU_NMS and not force_cpu:
    #    return gpu_nms(dets, thresh, device_id=cfg.GPU_ID)
    else:
        return cpu_nms(dets, thresh)
Utilice cmake para generar makefile, compilar y ejecutar en orden
cd caffe
mkdir build
cd build
sudo cmake .. -DUSE_MPI=ON
sudo make
sudo make install
Compilar lib
cd lib
sudo make
Coloca el modelo
Cree utput / psdb_train / resnet50 / en el directorio raíz del proyecto y
coloque el resnet50_iter_50000.caffemodel entrenado en esta ruta
5. Ejecute la demostración
cd tools
python2.7 demo.py --gpu -1
Los siguientes son los problemas y las soluciones encontrados al ejecutar la demostración.
ImportError: No module named mpi4py
Solución: instale mpi4py
python2.7 -m ipip install mpi4py
Error de ruta
Solución:
cambie algunas rutas de demo.py en person_search / tools / a rutas absolutas.
Cambie el valor predeterminado de -gpu a -1 (CPU en ejecución) para facilitar la ejecución de comandos.
Se informó un error que indica que no se pudo encontrar caffemodel y que la ruta se especificó claramente.
Motivo: la ruta es demasiado larga. Cambie a una ruta más corta.
Encuentre la respuesta en este artículo:
https://blog.csdn.net/u013541799/article/details/60583262
No olvide cambiar la ruta de query_img y gallery_imgs a ruta absoluta
Aparece el error IOError: no se puede escribir en modo RGBA como JPEG
porque las imágenes jpg no admiten imágenes RGBA (A es transparencia), así que simplemente guarde la imagen en formato png.
A continuación se muestra mi archivo person_search / tools / demo.py modificado:
import _init_paths

import argparse
import time
import os
import sys
import os.path as osp
from glob import glob

import numpy as np
import matplotlib as mpl
import matplotlib.pyplot as plt
import caffe
from mpi4py import MPI

from fast_rcnn.test_probe import demo_exfeat
from fast_rcnn.test_gallery import demo_detect
from fast_rcnn.config import cfg, cfg_from_file, cfg_from_list


def main(args):
    if args.cfg_file is not None:
        cfg_from_file(args.cfg_file)
    if args.set_cfgs is not None:
        cfg_from_list(args.set_cfgs)

    # Setup caffe
    if args.gpu >= 0:
        caffe.mpi_init()
        caffe.set_mode_gpu()
        caffe.set_device(cfg.GPU_ID)
    else:
        caffe.mpi_init()
        caffe.set_mode_cpu()

    # Get query image and roi
    query_img = '/home/pzs/husin/Person-reid/person_search/demo/query.jpg'
    query_roi = [0, 0, 466, 943]  # [x1, y1, x2, y2]

    # Extract feature of the query person
    net = caffe.Net(args.probe_def, '/home/pzs/husin/Person-reid/resnet50_iter_50000.caffemodel', caffe.TEST)
    query_feat = demo_exfeat(net, query_img, query_roi)
    del net  # Necessary to release cuDNN conv static workspace

    # Get gallery images
    gallery_imgs = sorted(glob('/home/pzs/husin/Person-reid/person_search/demo/gallery*.jpg'))

    # Detect and extract feature of persons in each gallery image
    net = caffe.Net(args.gallery_def, '/home/pzs/husin/Person-reid/resnet50_iter_50000.caffemodel', caffe.TEST)

    # Necessary to warm-up the net, otherwise the first image results are wrong
    # Don't know why. Possibly a bug in caffe's memory optimization.
    # Nevertheless, the results are correct after this warm-up.
    demo_detect(net, query_img)

    for gallery_img in gallery_imgs:
        print gallery_img, '...'
        boxes, features = demo_detect(net, gallery_img,
                                      threshold=args.det_thresh)
        if boxes is None:
            print gallery_img, 'no detections'
            continue
        # Compute pairwise cosine similarities,
        #   equals to inner-products, as features are already L2-normed
        similarities = features.dot(query_feat)

        # Visualize the results
        fig, ax = plt.subplots(figsize=(16, 9))
        ax.imshow(plt.imread(gallery_img))
        #husin add
        #plt.show()
        plt.axis('off')
        for box, sim in zip(boxes, similarities):
            x1, y1, x2, y2, _ = box
            ax.add_patch(
                plt.Rectangle((x1, y1), x2 - x1, y2 - y1,
                              fill=False, edgecolor='#4CAF50', linewidth=3.5))
            ax.add_patch(
                plt.Rectangle((x1, y1), x2 - x1, y2 - y1,
                              fill=False, edgecolor='white', linewidth=1))
            ax.text(x1 + 5, y1 - 18, '{:.2f}'.format(sim),
                    bbox=dict(facecolor='#4CAF50', linewidth=0),
                    fontsize=20, color='white')
        plt.tight_layout()
        #fig.savefig(gallery_img.replace('gallery', 'result'))
        fig.savefig('/home/pzs/husin/Person-reid/person_search/demo/result.png')
        plt.show()
        plt.close(fig)
    del net


if __name__ == '__main__':
    parser = argparse.ArgumentParser(description='Person Search Demo')
    parser.add_argument('--gpu',
                        help='GPU id to be used, -1 for CPU. Default: 0',
                        type=int, default=-1)
    parser.add_argument('--gallery_def',
                        help='prototxt file defining the gallery network',
                        default='/home/pzs/husin/Person-reid/person_search/models/psdb/resnet50/eval_gallery.prototxt')
    parser.add_argument('--probe_def',
                        help='prototxt file defining the probe network',
                        default='/home/pzs/husin/Person-reid/person_search/models/psdb/resnet50/eval_probe.prototxt')
    parser.add_argument('--net', dest='caffemodel',
                        help='path to trained caffemodel',
                        default='/home/pzs/husin/Person-reid/person_search/output/psdb_train/resnet50/resnet50_iter_50000.caffemodel')
    parser.add_argument('--det_thresh',
                        help="detection score threshold to be evaluated",
                        type=float, default=0.75)
    parser.add_argument('--cfg', dest='cfg_file',
                        help='optional config file',
                        default='/home/pzs/husin/Person-reid/person_search/experiments/cfgs/resnet50.yml')
    parser.add_argument('--set', dest='set_cfgs',
                        help='set config keys', default=None,
                        nargs=argparse.REMAINDER)
    args = parser.parse_args()
    main(args)
resultado de la operación
Se producirán un total de 5 imágenes, esta es la primera:
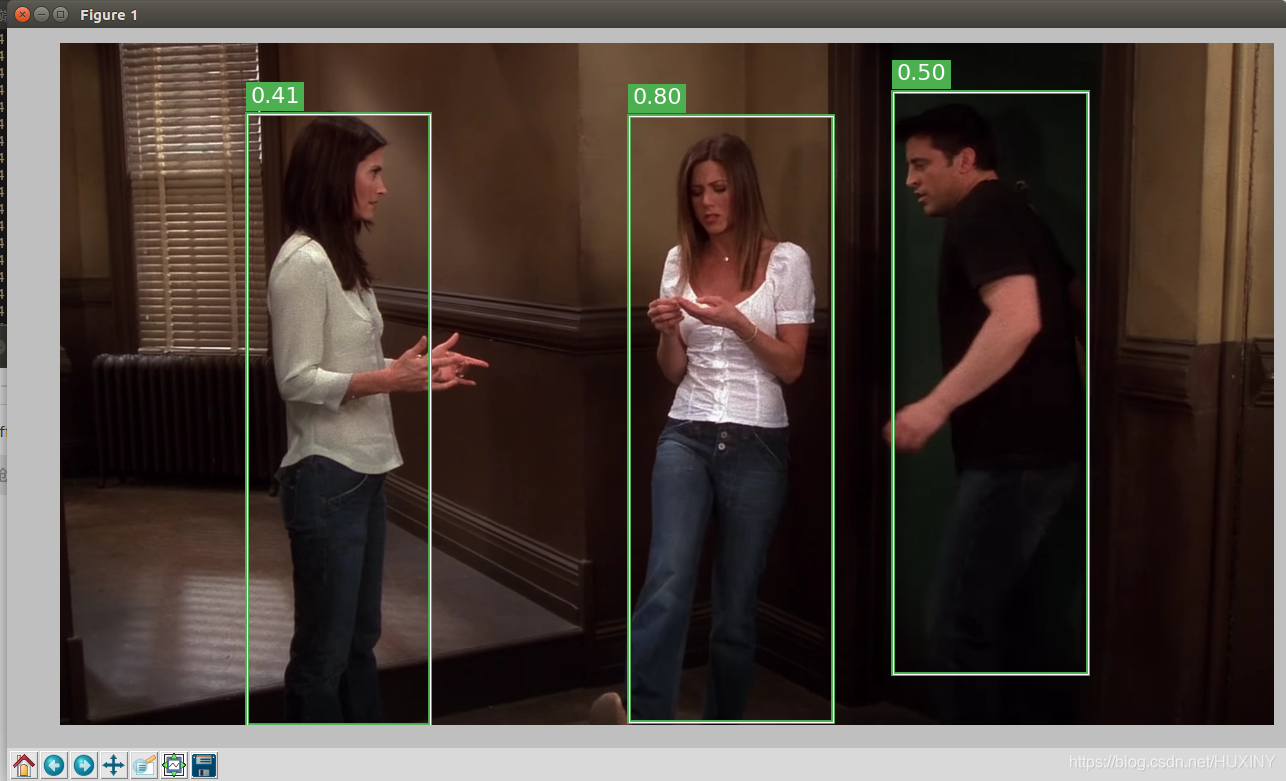
A continuación, escribiré un artículo sobre el análisis de código demo.py.
Publicidad Senior
Haz un anuncio para ti aquí . El estudiante de último año recoge
el diseño de graduación por computadora en persona:
interesado q746876041