xlwt write Excel files
First, the basic concept
In Excel mainly related to three concepts: Workbooks, Sheets, Cells. Wherein excel sheet is a Workbook; Sheet worksheet is a page table; Cell is a simple grid. Usually read and write Excel substantially three steps as follows: Open Workbook, positioning Sheet, operation Cell. Read and write the following points were introduced a few common approach of python.
Second, write Excel
Here we use a case study to demonstrate the process of Python written in Excel. A simulated student information, student information is written to an Excel file.
- Import library xlwt
import xlwt
If not, then you can use the library xlwt pip import the library:
pip install xlwt
- Obtaining a Workbook, set the encoding set is "UTF-8"
work_book = xlwt.Workbook(encoding="UTF-8")
- Generating a Sheet in the Workbooks
worksheet = work_book.add_sheet(sheet_name)
- The record is written into the cell
# row 代表行,col代表列,data代表要填写的内容
worksheet.write(row, col, data)
- Save the file in the Save Workbook
work_book.save(self.filename)
Third, set the style
However, in the actual scene, far more than the production of Excel data is written so simple, sometimes in order to achieve beautiful, it involves complex table style. E.g:
- Set the font, font size, font color, text placement, bold, italic, etc.
- Merged cell are consolidated, combined column region merging and
- Set the background color
- Set the properties of the border
- Provided line width
Let us one by one to demonstrate how to set this table style
- Set the font
style = xlwt.XFStyle()  # 初始化样式
font = xlwt.Font()  # 为样式创建字体
font.name = "黑体"  # 设置字体为“黑体”,默认是“Arial”
font.height = 100   # 设置字体大小为100,默认是200
font.bold = True    # 字体是否加粗
font.underline = True # 下划线
font.italic = True    # 斜体字
style.font = font     # 设置样式
worksheet.write(row, col, data, style)  # 写入数据是带上样式
- Merged cell are consolidated, combined column region merging and
# 合并从(0,0)单元格到(0,2)单元格,及合并第一行的3个单元格
worksheet.write_merge(0, 0, 0, 2, "hello world")
# 行合并,并带有其他样式
worksheet.write_merge(0, 0, 0, 2, "hello world",style)
# 合并从(0,0)单元格到(2,0)单元格,及合并第一列的3个单元格
worksheet.write_merge(0, 0, 2, 0, "hello world")
# 合并从(0,0)单元格到(2,2)单元格,及合并第一行的3*3共9个单元格区域
worksheet.write_merge(0, 0, 2, 2, "hello world")
- Set the background color
pattern = xlwt.Pattern()  # 一个实例化的样式类
pattern.pattern = xlwt.Pattern.SOLID_PATTERN  # 固定的样式
pattern.pattern_fore_colour = xlwt.Style.colour_map['yellow']  # 背景颜色
style.pattern = pattern
worksheet.write(row, col, data, style)  # 写入数据是带上样式
- Set the properties of the border
borders = xlwt.Borders()  # 为样式创建边框,默认没有边框
borders.left = 1    # 设置左边框宽度为1
borders.right = 1
borders.top = 1
borders.bottom = 1
style.borders = borders
worksheet.write(row, col, data, style)  # 写入数据是带上样式
- Provided line width
# 设置列的宽度
worksheet.col(i).width = 150 * 30
Fourth, real
Here we demonstrate an actual case, use the form below xlwt library written information:
Complete code demonstrates:
# -*- coding: utf-8 -*-
# 写excel
import xlwt
class WriteExcel:
# 初始化
def __init__(self, filename, sheet_name):
self.work_book = xlwt.Workbook(encoding="UTF-8")
self.worksheet = self.work_book.add_sheet(sheet_name)
self.filename = filename
self.row = 0
# 保存Excel
def save(self):
self.work_book.save(self.filename)
# 设置样式
def set_style(self, name, height, bold=False, format_str='', align='center'):
style = xlwt.XFStyle() # 初始化样式
font = xlwt.Font() # 为样式创建字体
font.name = name # 字体
font.bold = bold
font.height = height
borders = xlwt.Borders() # 为样式创建边框
borders.left = 1
borders.right = 1
borders.top = 1
borders.bottom = 1
alignment = xlwt.Alignment() # 设置排列
if align == 'center':
alignment.horz = xlwt.Alignment.HORZ_CENTER
alignment.vert = xlwt.Alignment.VERT_CENTER
elif align == 'left':
alignment.horz = xlwt.Alignment.HORZ_LEFT
alignment.vert = xlwt.Alignment.VERT_BOTTOM
else:
alignment.horz = xlwt.Alignment.HORZ_RIGHT
alignment.vert = xlwt.Alignment.VERT_BOTTOM
style.font = font
style.borders = borders
style.num_format_str = format_str
style.alignment = alignment
return style
# 设置标题的格式
def set_title_style(self):
return self.set_style('黑体', 300, bold=True, format_str='')
# 设置表头的格式
def set_head_style(self):
head_style = self.set_style('Times New Roman', 220, bold=True, format_str='')
pattern = xlwt.Pattern() # 一个实例化的样式类
pattern.pattern = xlwt.Pattern.SOLID_PATTERN # 固定的样式
pattern.pattern_fore_colour = xlwt.Style.colour_map['yellow'] # 背景颜色
head_style.pattern = pattern
return head_style
# 设置明细行的格式
def set_default_style(self):
return self.set_style('Times New Roman', 200, bold=False, format_str='', align='right')
# 添加标题
def add_title(self, title):
self.worksheet.write_merge(0, 0, 0, 2, title, self.set_title_style())
self.row += 1
# 写入文件头
def add_head(self, key, value):
# 向单元格中写入内容
self.worksheet.write(self.row, 0, key)
self.worksheet.write(self.row, 1, value)
self.row += 1
# 写入明细
def add_list(self, table_head, table_detail):
self.row += 1
for i, value in enumerate(table_head):
self.worksheet.write(self.row, i, value, self.set_head_style())
self.worksheet.col(i).width = 150 * 30
for rows in table_detail:
self.row += 1
for i, key in enumerate(rows):
self.worksheet.write(self.row, i, rows[key], self.set_default_style())
if __name__ == "__main__":
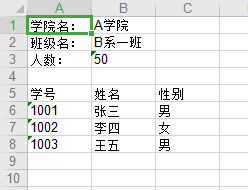
list_head = ["学号", "姓名", "性别"]
list_detail = [{"student_id": "1001", "name": "张三", "sex": "男"},
{"student_id": "1002", "name": "李四", "sex": "女"},
{"student_id": "1003", "name": "王五", "sex": "男"}]
writeExcel = WriteExcel("writeExcel.xlsx", "学生信息")
writeExcel.add_title("XX班级学生信息表")
writeExcel.add_head("学院名:", "A学院")
writeExcel.add_head("班级名:", "B系一班")
writeExcel.add_head("人数:", "50")
writeExcel.add_list(list_head, list_detail)
writeExcel.save()
Run the code as follows:

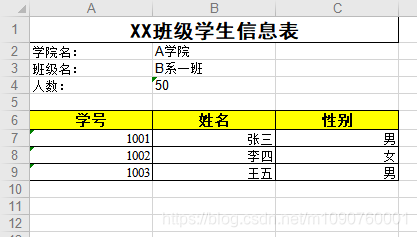
Table reads as follows:
V. Related Links
The following links can also understand Python other related content, we hope the relevant content can help. Thank you!
Link 1: Python combat: Python read Excel files
