Mysql master-slave replication Comments
The most common cluster scheme

一、MySQL Replication
Allowing the master copy (also called copy AB) to copy data from a MySQL database server (master) to one or more MySQL database server (the server).
复制是异步的 从站不需要永久连接以接收来自主站的更新。
Depending on the configuration, you can copy all databases, or even selected database database selected tables.
MySQL replication advantages include:
- Scale solution - from the load distribution between a plurality of stations to improve performance. In this environment, all writes and updates must be performed on the master server. However, it can be read from one or more devices. The model can improve the write performance (because the master device is designed to update), while significantly increasing the reading speed from more devices.
- Data Security - since data is copied to the slave, and the replication process can be suspended from the station, it may not damage the corresponding master data backup services running on the slave.
- Analysis - can be created on the primary server real-time data and information analysis can be performed from the server without affecting the performance of the primary server.
- Remote data distribution - can be used to create a local copy of the replicated data for remote sites without the need for permanent access to the main server.
Replication of principle

Provided that the primary server as the database server role must turn on the binary log
- Any modification of the main server through their own will above
I/O tread(I / O threads) is stored in binary logBinary loginside. - A server also starts from the above
I/O thread, by arranging the username and password to connect to the primary server requesting a read binary logs above, and then to read a binary log written to the localRealy log(relay log) inside. - 从服务器上面同时开启一个
SQL thread定时检查 Realy
log(这个文件也是二进制的),如果发现有更新立即把更新的内容在本机的数据库上面执行一遍。
需要注意的是:
- 每个从服务器都会收到主服务器二进制日志的全部内容的副本。
- 从服务器设备负责决定应该执行二进制日志中的哪些语句。
- 除非另行指定,否则主从二进制日志中的所有事件都在从站上执行。
- 如果需要,可以将从服务器配置为仅处理一些特定数据库或表的事件。
重要: 无法将主服务器配置为仅记录特定事件。
每个从站(从服务器)都会记录二进制日志坐标:
文件名
文件中它已经从主站读取和处理的位置。
由于每个从服务器都分别记录了自己当前处理二进制日志中的位置,因此可以断开从服务器的连接,重新连接然后恢复继续处理。
一主多从
如果一主多从的话,这时主库既要负责写又要负责为几个从库提供二进制日志。此时可以稍做调整,将二进制日志只给某一从,这一从再开启二进制日志并将自己的二进制日志再发给其它从。或者是干脆这个从不记录只负责将二进制日志转发给其它从,这样架构起来性能可能要好得多,而且数据之间的延时应该也稍微要好一些。工作原理图如下:

关于二进制日志
mysqld将数字扩展名附加到二进制日志基本名称以生成二进制日志文件名。每次服务器创建新日志文件时,该数字都会增加,从而创建一系列有序的文件。每次启动或刷新日志时,服务器都会在系列中创建一个新文件。服务器还会在当前日志大小达到max_binlog_size参数设置的大小后自动创建新的二进制日志文件 。二进制日志文件可能会比max_binlog_size使用大型事务时更大, 因为事务是以一个部分写入文件,而不是在文件之间分割。
为了跟踪已使用的二进制日志文件, mysqld还创建了一个二进制日志索引文件,其中包含所有使用的二进制日志文件的名称。默认情况下,它具有与二进制日志文件相同的基本名称,并带有扩展名.index。在mysqld运行时,不应手动编辑此文件。
二进制日志文件通常表示包含数据库事件的单个编号文件。
二进制日志 表示含编号的二进制日志文件集加上索引文件。
SUPER 权限的用户可以使用SET sql_log_bin=0语句禁用其当前环境下自己的语句的二进制日志记录
二、rhel7.3下mysql的主从复制配置
实现Mysql数据库主从复制需要进行的配置:
主服务器:
    开启二进制日志
    配置唯一的server-id
    获得master二进制日志文件名及位置
    创建一个用于slave和master通信的用户账号
从服务器:
	 配置唯一的server-id
     使用master分配的用户账号读取master二进制日志
	 启用slave服务
此实验需要两台虚拟机:
| 虚拟机名称 | ip | 作用 |
|---|---|---|
| server1 | 172.25.63.1 | 主数据库服务器 |
| server2 | 172.25.63.2 | 从数据库服务器 |
1.主数据库(server1)配置
<1>下载mysql5.7安装包,并解压

<2>安装需要的软件包,即安装mysql服务

<3>编辑mysql的主配置文件/etc/my.cnf

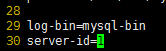
其中log-bin对应的日志名随便给;server-id对应的数字也随便给,只是一般从1开始。
#在最后写入
#启动mysql二进制日志,即数据同步语句,从数据库会一条一条的执行这些语句
#服务器唯一标识
<4>开启数据库,查看原始密码


<5>进行数据库安全初始化(登陆密码为查看到的原始密码)——如果不进行初始化,进入数据库是不能进行任何操作的,所以要进行安全初始化。
#修改密码,我的秘密为[email protected]
#注意这里设置新密码时,密码是有要求的,要求为:数字+大小写字母+特殊字符,且超过8位。这是因为该数据库版本开启了密码检测插件,密码太过简单会报错。
#第一个选项敲回车,其余选项全都敲y
<6>以root用户及刚刚安全初始化设置的密码,登陆数据库

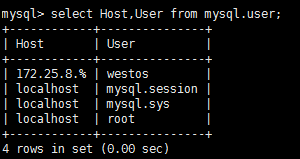
<7>创建有复制权限的帐号,并查看该帐号是否创建成功。
#可创建从数据库的masterbackup用户和权限
##*.*表示所有数据库的所有表。
##172.25.8.%表示172.25.8网段,即0-255的IP都可以访问主服务器,正式环境请配置指定从服务器IP。
##若将172.25.8.%该为%,则表示任何IP均可作为从数据库来访问主服务器。

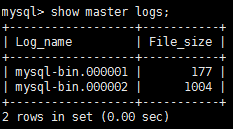
<8>查看主库状态:可以看到当前记录日志的日志文件名和Position号。
也可以查看主机的日志,主机的server-id,主机的二进制日志是否开启
#查看主库的状态

#查看主机的日志
#查看本机的server-id
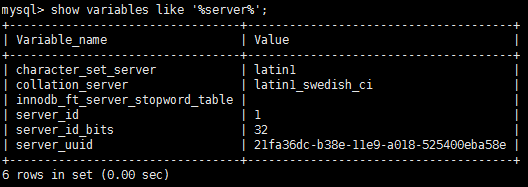
#查看本机的二进制日志是否开启


其中mysql-bin.0000001日志位于/var/lib/mysql目录下,

且文件类型为日志,所以要利用mysqlbinlog命令来查看。
命令有三种,看到的内容都是一样的。第一种:mysqlbinlog binlog.000001;第二种: mysqlbinlog binlog.000001 -v v;
第三种:mysqlbinlog binlog.00001 --base64-output=DECODE-ROWS(其中–base64-output参数是通过mysqlbinlog --help | grep out 得到的)

2.从数据库的配置
<1>从主库那拷贝需要的安装包,并安装,即安装mysql服务


<2>编辑/etc/my.cnf文件
#在最后一行写入

#服务器唯一标识,如果有多个从服务器,每个服务器的server-id不能重复,跟IP一样是唯一标识,如果你没设置server-id或者设置为0,则从服务器不会连接到主服务器。因为主库是1,所以这里不能写1,要和主库不同,习惯上顺序是递增的,所以我这里写2

<3>开启数据库,查看原始密码,并进行数据库安全初始化(登陆密码为查看到的原始密码)

修改完密码后,第一个选项敲直接回车,后面的选项全都敲y

<4>查看主库的授权用户是否设置成功

切记:此处查看之后,必须退出来,否则就是在主库操作了。
<5>设定从库,将主库与从库连接起来,并开启从库

log_file 和 log_pos 在master 中用 show master status; 查看

<6>查看从库状态
也可以查看主机的server-id,主机的二进制日志是否开启

如果Slave_IO_Running和Slave_SQL_Running都为yes,则表示正常
3.主从测试:
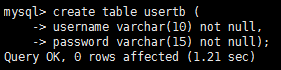
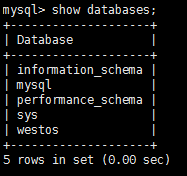
1.在主库端建立库westos和表usertb,并插入信息

#创建数据库westos


#创建表usertb
#查看表usertb的结构

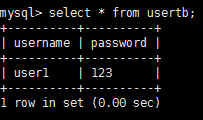
#向表usertb中插入信息

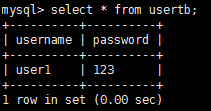
#查看表usertb的信息
值的注意的是:
(1)主库的Position号是会发生改变的

(2)server1(主库)重启一次mysqld服务,二进制日志的名字会变一次
2. View the end from the library if there is content created in the master library

conclusion:
As seen from the library of content with the main library, it represents the main building from the success of database replication.
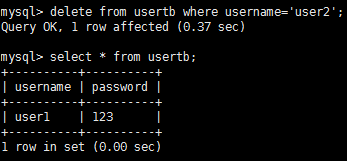
Note that the value is: Content written to the main library gets from the library, of course, you can write content from the library, but does not synchronize to the master library.
server2 (from the library):

server1(主库select * from usertb;):
In order not to affect subsequent experiments, the insertion of the data is deleted from the library, from the library to ensure that the main library and the data are consistent