This article is in the "under Docker, two minutes speed experience Nacos Configuration Center" a text of the sequel, in front of us to quickly build Nacos distribution center, and runs a springboot application to use the services of the distribution center today to study the details of this springboot application, learning springboot how to use the application configuration service Nacos center;
Series link
Here is the "Spring Cloud Alibaba combat series" of all the articles address:
- "Under Docker, two minutes speed experience Nacos" ;
- "Nacos environment developed at Docker" ;
- "Under Docker, two minutes speed experience Nacos Configuration Center" ;
- "Under Docker Nacos Configuration Application Development" ;
Environmental Information
- Operating System: CentOS Linux release 7.6.1810
- Docker:1.13.1, build b2f74b2/1.13.1
- docker-compose:1.24.1, build 4667896
- jdk:1.8.0_191
- maven:3.6.0
Source download
If you do not intend to write code, you can also download the source code from this combat on GitHub, address and link information in the following table:
| name | link | Remark |
|---|---|---|
| Project Home | https://github.com/zq2599/blog_demos | The project's home page on GitHub |
| git repository address (https) | https://github.com/zq2599/blog_demos.git | The project's source code repository address, https protocol |
| git repository address (ssh) | [email protected]:zq2599/blog_demos.git | The project's source code repository address, ssh protocol |
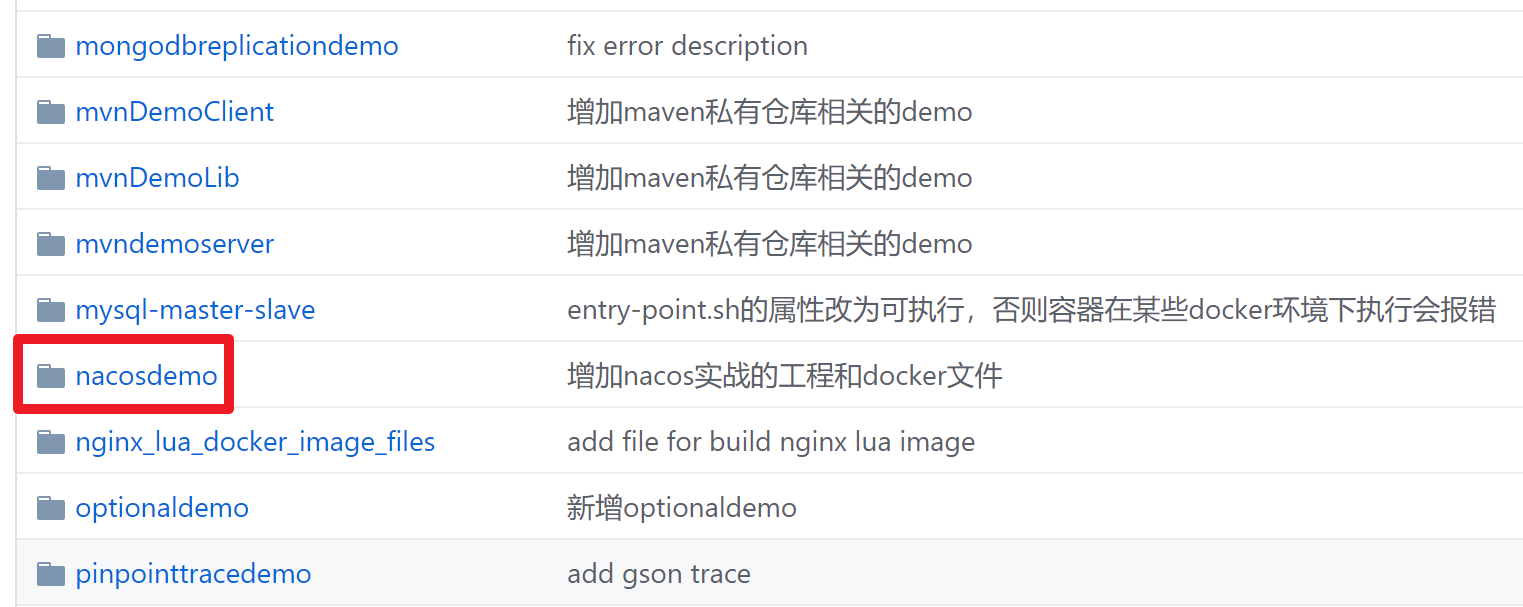
The plurality git project folders, application nacosdemo chapter in the folder, as shown, nacosdemo folder configdemo herein below is an item corresponding to the source:

springboot Application Development
- Based maven created called nacosdemo of springboot application, pom.xml as follows:
<?xml version="1.0" encoding="UTF-8"?>
<project xmlns="http://maven.apache.org/POM/4.0.0" xmlns:xsi="http://www.w3.org/2001/XMLSchema-instance"
         xsi:schemaLocation="http://maven.apache.org/POM/4.0.0 http://maven.apache.org/xsd/maven-4.0.0.xsd">
    <parent>
        <artifactId>nacosdemo</artifactId>
        <groupId>com.bolingcavalry</groupId>
        <version>1.0-SNAPSHOT</version>
    </parent>
    <modelVersion>4.0.0</modelVersion>
    <artifactId>configdemo</artifactId>

    <name>configdemo</name>
    <description>Demo project for Spring Boot</description>

    <properties>
        <java.version>1.8</java.version>
    </properties>

    <dependencies>
        <dependency>
            <groupId>org.springframework.boot</groupId>
            <artifactId>spring-boot-starter-web</artifactId>
        </dependency>

        <dependency>
            <groupId>org.springframework.cloud</groupId>
            <artifactId>spring-cloud-starter-alibaba-nacos-config</artifactId>
        </dependency>
    </dependencies>

    <build>
        <plugins>
            <plugin>
                <groupId>org.springframework.boot</groupId>
                <artifactId>spring-boot-maven-plugin</artifactId>
            </plugin>
            <!--使用jib插件-->
            <plugin>
                <groupId>com.google.cloud.tools</groupId>
                <artifactId>jib-maven-plugin</artifactId>
                <version>1.3.0</version>
                <configuration>
                    <!--from节点用来设置镜像的基础镜像,相当于Docerkfile中的FROM关键字-->
                    <from>
                        <!--使用openjdk官方镜像,tag是8u201-jdk-alpine3.9,表示镜像的操作系统是alpine3.9,装好了jdk8u201-->
                        <image>openjdk:8u201-jdk-alpine3.9</image>
                    </from>
                    <to>
                        <!--镜像名称和tag,使用了mvn内置变量${project.artifactId}和${project.version}-->
                        <image>bolingcavalry/nacos${project.artifactId}:${project.version}</image>
                    </to>
                    <!--容器相关的属性-->
                    <container>
                        <!--jvm内存参数-->
                        <jvmFlags>
                            <jvmFlag>-Xms1g</jvmFlag>
                            <jvmFlag>-Xmx1g</jvmFlag>
                        </jvmFlags>
                        <!--要暴露的端口-->
                        <ports>
                            <port>8080</port>
                        </ports>
                        <useCurrentTimestamp>true</useCurrentTimestamp>
                    </container>
                </configuration>
            </plugin>
        </plugins>
    </build>
</project>
Pom.xml file has the above-described two points to note:
. A dependency added Spring-Cloud-Starter-alibaba-config-nacos ;
. To generate docker image B,
- In the src \ main \ resources in this directory, the original application.properties are deleted or application.yml clean, leaving only a named bootstrap.properites file contents are as follows:
#应用名
spring.application.name=config-demo

#nacos配置中心的地址和端口,"nacos"是docker-compose.yml中的nacos容器名
spring.cloud.nacos.config.server-addr=nacos:8848

#配置的分组
spring.cloud.nacos.config.group=BOLING_CAVALRY

#对应配置文件的ID,如果没有这个配置,就按照应用名称"config-demo"去nacos上寻找
spring.cloud.nacos.config.prefix=my-nacos-config

#配置文件的扩展名,这里使用yaml
spring.cloud.nacos.config.file-extension=yaml
- Create a startup class ConfigdemoApplication.java, add a comment EnableDiscoveryClient:
package com.bolingcavalry.configdemo;

import org.springframework.boot.SpringApplication;
import org.springframework.boot.autoconfigure.SpringBootApplication;
import org.springframework.cloud.client.discovery.EnableDiscoveryClient;

@SpringBootApplication
@EnableDiscoveryClient
public class ConfigdemoApplication {

    public static void main(String[] args) {
        SpringApplication.run(ConfigdemoApplication.class, args);
    }
}
- Creating a Controller class ConfigController.java, for providing an http service, content returned from the configuration information, if they can use to configure the service Nacos provided here should return the contents configured on Nacos:
package com.bolingcavalry.configdemo.controller;

import org.springframework.beans.factory.annotation.Value;
import org.springframework.cloud.context.config.annotation.RefreshScope;
import org.springframework.web.bind.annotation.RequestMapping;
import org.springframework.web.bind.annotation.RestController;

import java.text.SimpleDateFormat;
import java.util.Date;

/**
 * @Description: 提供web服务的controller
 * @author: willzhao E-mail: [email protected]
 * @date: 2019/08/18 18:23
 */
@RestController
@RefreshScope
public class ConfigController {

    @Value("${bolingcavalry.desc:desc from code}")
    private String desc;

    @RequestMapping("/test")
    public String test(){
        return desc + new SimpleDateFormat(" [yyyy-mm-dd  HH:mm:ss]").format(new Date());
    }
}
Note that the above code is two:
. A RefreshScope Annotations for configuration information change immediately after the synchronization point;
B from the value of the variable desc @Value annotations, if unable to obtain a value corresponding to "bolingcavalry.desc" from Nacos, desc's. the default value is "desc from code";
- These are the source of all configdemo in pom.xml directory execute the following command, you can build docker mirror, into the local repository:
mvn compile jib:dockerBuild
- The image pushed to hub.docker.com, so that everyone can download to use this image:
docker push bolingcavalry/nacosconfigdemo:1.0-SNAPSHOT
Now the image file is ready, the next container to do layout;
Container arrangement
Create a docker-compose.yml file, as shown below, nacos us in the previous chapter has been introduced, is made nacos server mirroring, config-demo is just to build good springboot application image:
version: '2'
services:
  nacos:
    image: bolingcavalry/nacosserver:0.0.1
    container_name: nacos
    restart: unless-stopped
    ports:
    - '8848:8848'
  config-demo:
    image: bolingcavalry/nacosconfigdemo:1.0-SNAPSHOT
    container_name: config-demo
    restart: unless-stopped
    depends_on:
    - nacos
    ports:
    - '8080:8080'
So far, source code and configuration on a combat required on all introductions, when you begin to configure nacos service development, I hope this article will give you some reference.
