Vue installation
Vue is a front-end framework developed in China, is widely used in the country, I recently learned something related to the front frame, so he chose vue this framework, to share some of the following questions about the installation process and we encountered and solutions.
Node.Js installation
To install Vue, we must first install node.js (Note: use node.js install Vue, must node.js version 6.0.0 and above the job). Attached below node.js Download: https: //nodejs.org/en/
as shown below: You can download the latest version on the right, the left can also download the stable version
all the way next fool installation Once you have downloaded, and then configure the environment variables on it.

Vue installation
Now install node.js which are generally installed automatically npm. After installing node.js into the command line on the page, the shortcut key Windows + R, type cmd enter, as shown below:
First, enter the command: npm install -g cnpm --registry=https://registry.npm.taobao.orgiSelect the image to download and install NPM Taobao (Taobao because NPM mirror is made in China, up more quickly download want to know details, please refer shown https://npm.taobao.org/) as shown below
and then enter the command cnpm install -g vue-clito install Vue, as shown below:
after installation is complete, you can view information of vue:


Problems encountered during installation: Node.Js version is too low
如果是之前就已经安装过node.js的小伙伴安装Vue时要注意node.js的版本,如果版本过低会出现如下情况:
这时需要我们去更新node.js的版本,node.js下载地址前面已经提供了,下载之后重新安装,注意安装目录要覆盖之前的安装目录,与环境变量中的目录一致。
安装好后输入命令node -v可查看当前的node版本。
由于Windows不支持n模块,所以只能自己下载新版本并重新安装,如果电脑支持n模块的小伙伴可以直接在命令行中通过命令进行更新,这里就不详细讲了。

项目创建于运行
安装好Vue之后就可以开始我们的vue之旅了,首先要在命令行中创建一个自己项目:
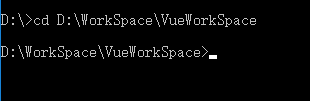
第一步:确定一个文件夹用于保存自己的项目:我创建了一个名为VueWorkSpace的文件夹用于保存自己的项目。
第二步:在命令行中cd 进入该文件夹cd D:\WorkSpace\VueWorkSpace
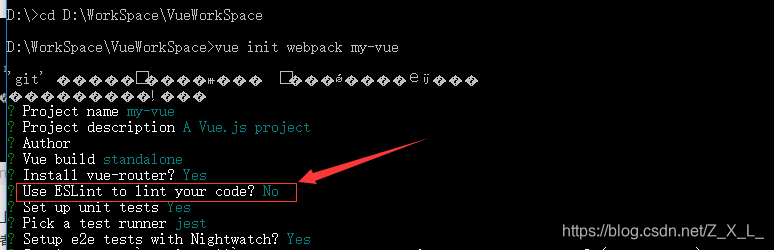
第三步:输入命令vue init webpack my-vue创建一个项目,其中“my-vue”是自己的项目的名字后面也可以指定。在下图中箭头所指处可以输入项目的名字,可以跟命令中的不一样,以此处为准。
输入名称后回车,也可以不管直接回车,名字就是上面命令中的名字。回车后又会出现下面几个问题,除了下图中标注出来的以外都可以自己编辑或者直接回车不管他。
上图中箭头指出来的那一项最好选择N,因为这一项是选择检查代码以及报错的,如果选择Y,那么在代码中即使你只敲错了一个空格,他也会报错,很难受。创建好后如下图所示:
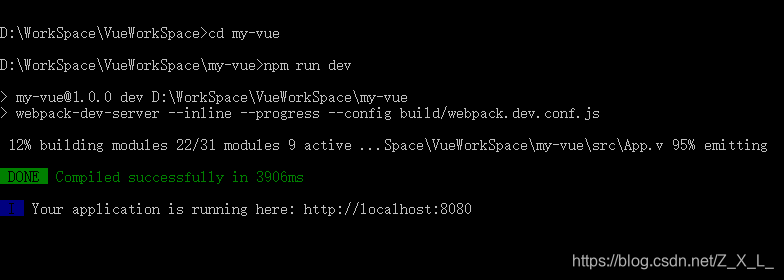
第四步:进入自己创建的项目目录下,运行自己的项目:
输入命令:cd my-vue进入自己的项目的目录,其中"my-vue"是自己的项目名。
输入命令:npm run dev运行自己的项目。
这样我们创建的项目就运行起了。


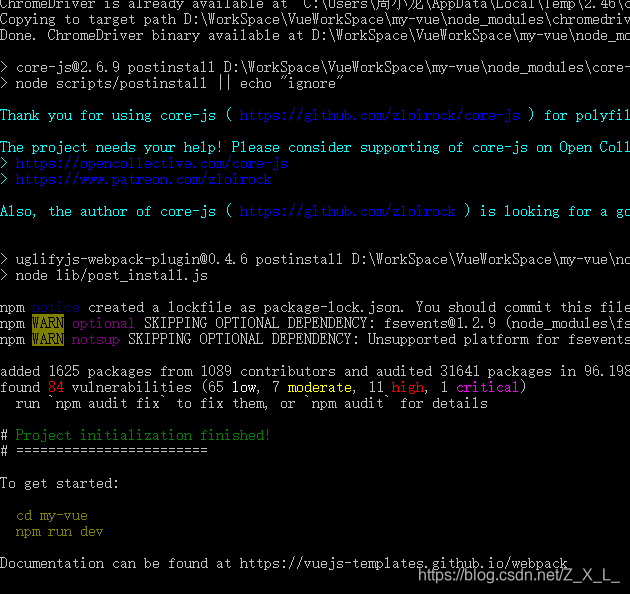
安装Vue中的问题:ChromeDriver不可用
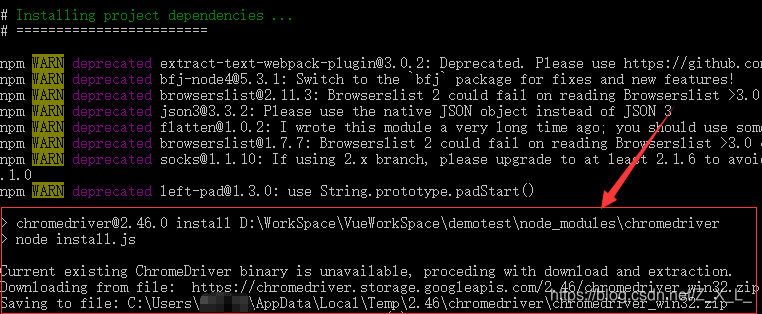
在执行命令 vue init webpack my-vue时可能会出现下面的问题:
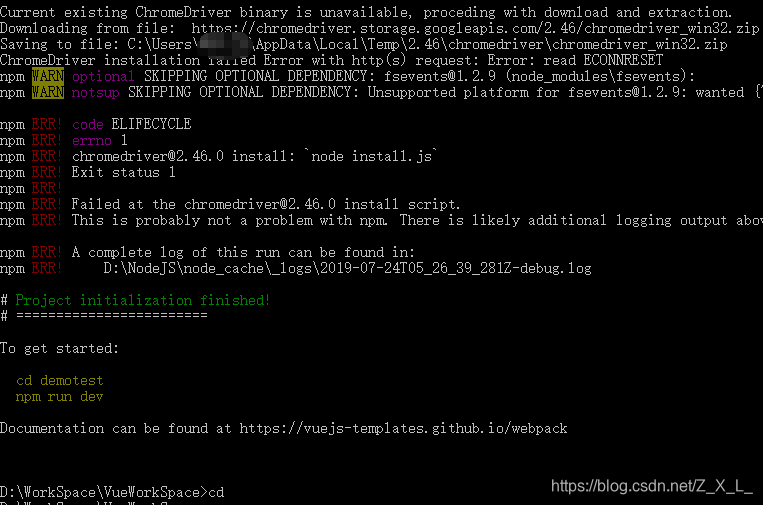
显示ChromeDriver不可用,这时你可以去下载对应版本的Chromedriver并保存到上图中最后一行指定的目录中,也可以不管他,因为命令运行到这里时如果出现这个问题会在这里停留几分钟,如果不管他,他还是会继续执行创建项目,并且会报错,但项目还是能成功创建。如下图所示:
这时我们通过cd 进入我们创建的项目目录下,执行命令cnpm install或者npm install安装依赖,如果创建过程中没有报错可以省略这一步。然后执行npm run dev运行项目。
最后
总之我遇到的问题目前就这些,还有其他问题的小伙伴可以去其他地方找找看。
上面提到的创建项目的方法是比较全面的一种,还有另一种创建项目的方法,这种方法创建的项目更简单一些,项目中的文件也没有前一个方法的多,在一些轻量级的项目中更为方便,这种方法的命令是vue init webpack-simple my-vue(my-vue为项目名)。这种方法比较简单,而且不用选择前一种方法中的检查代码的那个选项,只要一路回车下来就行了。
