About QSS
QSS is called Qt Style Sheets Qt style sheets, it is a mechanism for the appearance of a custom control provided by Qt, and it has css3 similar syntax, or in a sense it can be said is that certain css3 Patent of the subset.
Their appearance Qt controls sometimes difficult to meet our needs, this time generally have two common solutions, the first is to achieve self-drawn by rewriting paintEvent, the most flexible in this way, however, to learn and use the cost is the highest; qss other is used, expressed by the appearance qss control widgets. The power of qss that it is not only easy to learn, but powerful, custom components can also provide good support.
The basic selector
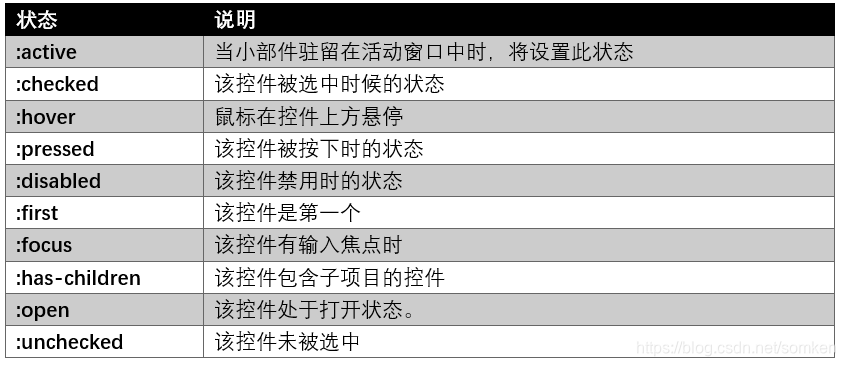
Pseudo-state selector
Examples
Explanation
By using a basic example demonstrates basic qss, and for people with css based is very easy to use
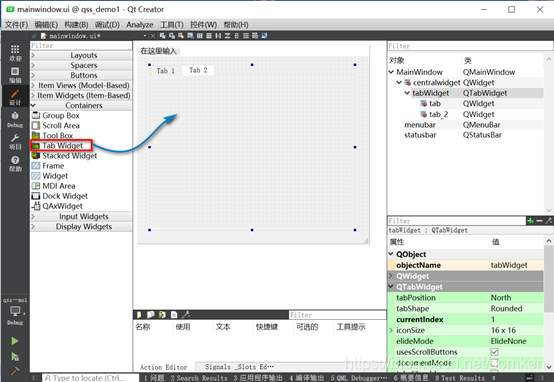
New Project
Create a Qt Widgets Application project, add a tabWidget control on the form, and then modify the code to add about mainwindow.cpp component on the form.
mainwindow.cpp code is as follows:
#include "mainwindow.h"
#include "ui_mainwindow.h"
#include <QDebug>
#include <QLabel>
#include <QLineEdit>
#include <QPushButton>
#include <QRadioButton>
#include <QCheckBox>
#include <QStandardItemModel>
#include <QTableView>
#include <QVBoxLayout>

MainWindow::MainWindow(QWidget *parent)
    : QMainWindow(parent)
    , ui(new Ui::MainWindow)
{
    ui->setupUi(this);
    ui->tabWidget->clear();//清空选项卡
setCentralWidget(ui->tabWidget);

    QWidget *tab1=new QWidget(this);
    QWidget *tab2=new QWidget(this);
    //--------------------------------------------------
    QTableView  *tableView = new QTableView;
    //提供了用于存储自定义数据的通用模型
    QStandardItemModel *model = new QStandardItemModel(5,4);
    model->setHeaderData(0,Qt::Horizontal,tr("第一季度"));
    model->setHeaderData(1,Qt::Horizontal,tr("第二季度"));
    model->setHeaderData(2,Qt::Horizontal,tr("第三季度"));
    model->setHeaderData(3,Qt::Horizontal,tr("第四季度"));
    //循环插入数据
    for(int row=0;row<5;row++)
    {
        model->insertRows(row,1); //插入一行
        model->setData(model->index(row,0), qrand()%1000+1000); //插入第一列 插入一个1000-2000的随机数
        model->setData(model->index(row,1), qrand()%1000+1000);
        model->setData(model->index(row,2), qrand()%1000+1000);
        model->setData(model->index(row,3), qrand()%1000+1000);
    }
    tableView->setAutoScroll(true);//自动滚动条
    tableView->resizeColumnsToContents(); //根据内容调整大小

    tableView->setModel(model); //使用
    QVBoxLayout *vLayout = new QVBoxLayout();
    vLayout->addWidget(tableView);
    tab1->setLayout(vLayout);

    //--------------------------------------------------

    QGridLayout *layout = new QGridLayout;
    layout->addWidget( new QPushButton("我的按钮"), 0, 0);
    layout->addWidget( new QPushButton("我的按钮"), 0, 1);
    layout->addWidget( new QPushButton("我的按钮"), 0, 2);
    layout->addWidget( new QPushButton("我的按钮"), 0, 3);

    layout->addWidget( new QRadioButton("程序员"), 1, 0);
    layout->addWidget( new QRadioButton("设计"), 1, 1);
    layout->addWidget( new QRadioButton("测试"), 1, 2);
    layout->addWidget( new QRadioButton("文档"), 1, 3);

    layout->addWidget( new QCheckBox("音乐"), 2, 0);
    layout->addWidget( new QCheckBox("电影"), 2, 1);
    layout->addWidget( new QCheckBox("游戏"), 2, 2);
    layout->addWidget( new QCheckBox("睡觉"), 2, 3);

    for (int i = 3; i < 7; ++i) {
        QLabel *label = new QLabel(tr("第 %1 行:").arg(i + 1));
        QLineEdit *lineEdit = new QLineEdit;
        layout->addWidget(label , i + 1, 0);
        layout->addWidget(lineEdit, i + 1, 1);
    }
    tab2->setLayout(layout);
    //--------------------------------------------------------

    ui->tabWidget->setTabPosition(QTabWidget::North);//设置选项卡的位置东南西北,默认在北
    ui->tabWidget->addTab(tab1,tr("销售"));//在后面添加选项卡
    ui->tabWidget->insertTab(1,tab2,QIcon(":/images/present.ico"),tr("其他控件"));//插入带图标的选项卡
    ui->tabWidget->setTabIcon(0,QIcon(":/images/hot.ico"));//设置选项卡图标
    ui->tabWidget->setMovable(true);
    ui->tabWidget->setTabToolTip(1,tr("一些组件"));//鼠标悬停弹出提示
    ui->tabWidget->usesScrollButtons();//选项卡滚动
}
MainWindow::~MainWindow()
{
    delete ui;
}
Add QSS resources
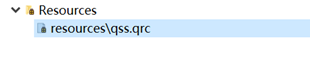
1. Create a directory for the project under the name "resource" folder
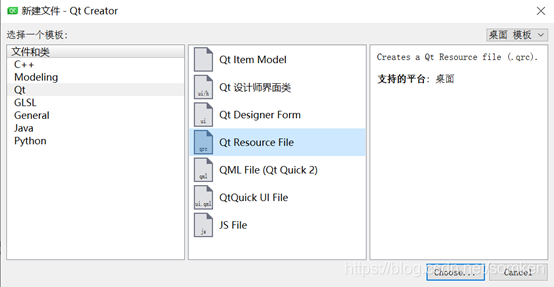
under 2. Create a resource file in Qt creater Qt Resource File, you can click the "Browse" button, open the directory where the project, select the "resource" folder. Enter the resource name may be "qss" click "Next" -> click "Finish."
3. Add .qss file.
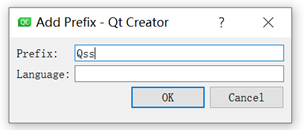
Right "* .qrc" -> select "add prefix" -> in the pop-up window, enter "/ Qss". After the operation is complete, the next corresponding "resource" directory created "Qss" folder, and create an extended named ".qss" within the folder.
4. The corresponding "resource" directory created "Qss" folder, and create an extended named "style.qss" files within the folder.
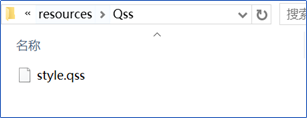
style.qss code is as follows:
/* 控件的背景 */
.QWidget {
   background-color: beige;
}

QToolBar {
    background-color: beige;
}

QDialog, QFileDialog {
    background-color: beige;
}

QTabWidget::pane { /* 选项卡小部件框架 */
    border-top: 2px solid #C2C7CB;
}

QTabWidget::tab-bar {
    left: 5px; /* 向右移动 5px */
}

QTabBar, QTabWidget {
    background-color: beige;
}
QTabBar::tab {
     background: qlineargradient(x1: 0, y1: 0, x2: 0, y2: 1,
                                 stop: 0 #E1E1E1, stop: 0.4 #DDDDDD,
                                 stop: 0.5 #D8D8D8, stop: 1.0 #D3D3D3);
     border: 1px solid darkkhaki;
     border-bottom-color: #C2C7CB; /*与窗格颜色相同 */
     border-top-left-radius: 4px;
     border-top-right-radius: 4px;
     min-width: 8ex;
     padding: 2px;
 }
QTabBar::tab:selected, QTabBar::tab:hover {
    background: qlineargradient(x1: 0, y1: 0, x2: 0, y2: 1,
                                stop: 0 #fafafa, stop: 0.4 #f4f4f4,
                                stop: 0.5 #e7e7e7, stop: 1.0 #fafafa);
}

QTabBar::tab:selected {
    border-color: #9B9B9B;
    border-bottom-color: #C2C7CB; /* 与窗格颜色相同 */
}

QTabBar::tab:!selected {
    margin-top: 2px; /* 使未选定的选项卡看起来更小 */
}

/* 不错的Windows XP风格的密码字符. */
QLineEdit[echoMode="2"] {
    lineedit-password-character: 9679;
}

QHeaderView::section {
     background-color: qlineargradient(x1:0, y1:0, x2:0, y2:1,
                                       stop:0 #616161, stop: 0.5 #505050,
                                       stop: 0.6 #434343, stop:1 #656565);
     color: white;
     padding-left: 4px;
     border: 1px solid #6c6c6c;
 }

 QHeaderView::section:checked
 {
     background-color: red;
 }


/* 我们为按钮提供最小宽度和最小高度
使它们看起来优雅,不受文本宽度的影响。 */
QPushButton {
    background-color: palegoldenrod;
    border-width: 2px;
    border-color: darkkhaki;
    border-style: solid;
    border-radius: 5;
    padding: 3px;
    min-width: 9ex;
    min-height: 2.5ex;
}

QPushButton:hover {
   background-color: khaki;
}

/* 增加填充,这样当按下按钮时文本会移动。 */
QPushButton:pressed {
    padding-left: 5px;
    padding-top: 5px;
    background-color: #d0d67c;
}

QLabel, QAbstractButton {
    font: bold;
}

/* 用棕色标记强制字段。 */
.mandatory {
    color: brown;
}

/* 状态栏上的粗体文本看起来很糟糕。 */
QStatusBar QLabel {
   font: normal;
}

QStatusBar::item {
    border-width: 1;
    border-color: darkkhaki;
    border-style: solid;
    border-radius: 2;
}

QStackedWidget, QComboBox, QLineEdit, QSpinBox, QTextEdit, QListView, QWebView, QTreeView, QHeaderView {
    background-color: cornsilk;
    selection-color: #0a214c;
    selection-background-color: #C19A6B;
}

QListView {
    show-decoration-selected: 1;
}

QListView::item:hover {
    background-color: wheat;
}

/* 在填充中保留1个像素空间。当得到焦点时,就消除填充并扩大边界。
    看起来像物品在发光。 */
QLineEdit, QFrame {
    border-width: 1px;
    padding: 1px;
    border-style: solid;
    border-color: darkkhaki;
    border-radius: 5px;
}

/* 消除填充并增加边框。 */
QLineEdit:focus, QFrame:focus {
    border-width: 3px;
    padding: 0px;
}

/* QLabel控件  */
QLabel {
    border: none;
    padding: 0;
    background: none;
}

/*  QLabel 上的 QToolTip提示  */
QToolTip {
    border: 2px solid darkkhaki;
    padding: 5px;
    border-radius: 3px;
    opacity: 200;
}

/* 悬停时背景颜色改变*/
QRadioButton:hover, QCheckBox:hover {
    background-color: wheat;
}

/* 对话框的按钮遵循Windows样式 */
QDialogButtonBox {
    button-layout: 0;
}
Application qss style on the form
Modify the main.cpp
#include "mainwindow.h"

#include <QApplication>
#include <QFile>
#include <QDebug>

int main(int argc, char *argv[])
{
    QApplication a(argc, argv);

    //加载qss文件
    QFile qssFile(":/Qss/style.qss");
    qssFile.open(QFile::ReadOnly); //以只读方式打开
    if(qssFile.isOpen())
    {
        QString qss = QLatin1String(qssFile.readAll());
        qApp->setStyleSheet(qss);
        qssFile.close();
    }
    else
    {
        qDebug() << "无法打开文件";
    }


    MainWindow w;
    w.show();
    return a.exec();
}
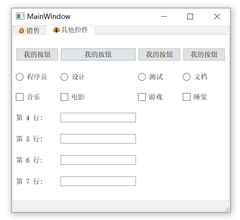
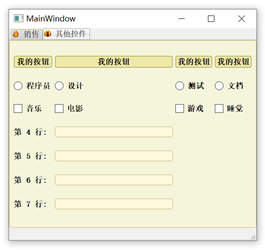
Comparing operating results
Not used before Styles