Whim, spend one hour to install the software to write code + review api, familiar with the way a wave wms
Strengthen again cognitive ability wms elements not get wfs strong, be fine
Original link (Reprinted declare @ Autumn is cold blog Park / know almost / B station / csdn / Small Box): https://www.cnblogs.com/onsummer/p/12178830.html
Whim, this machine apart from postgresql / postgis installed the 4326 and released several Guangdong coordinate data, installed node environment, the other nothing ready.
Suddenly I wanted to use ol6 + node environment + parcel package, publish and implement postgis data geoserver end is returned to the point of clicking administrative information.
Analyze requirements:
- Need to geoserver → decomposition step, need to install tomcat, need to enable cross-domain, needs to be installed geoserver war package
- Some need to be familiar ol6 api
- Need to be familiar geoserver + release and related concepts wms services
1. Install tomcat
Download tomcat9_windows_64bit.gz, extract the bin. Configure the new port is 8095, get rid of unnecessary under webapps app.
Using windows service way to start tomcat.
2. Install geoserver
Download the latest version 2.16.x war package, thrown under webapps, automatic decompression (Do not delete the war unzip the package !!!)
If you do not start up, please wait a minute, or manually restart the tomcat service. Manual restart will "stopping" that card for a while, waiting on the line.
3. Enable cross-domain
In geoserver.war unpacked app directory to find the WEB-INF folder, find the web.xml, CORS find the filter and filter-map labels, annotation solution are:
 、
、

If these two configuration is more than 2.15 geoserver, there is a default in the web.xml file comments.
In the lib directory under WEB-INF directory, add two war package:

Both the war package should correspond with tomcat version, specifically I do not know, my two and tomcat9 is adapted.
At this point you can reboot tomcat service (insurance purposes).
4. openlayers 6 related api
map and view objects must be familiar with.
In the present embodiment, layers are used WMS service ol / layer / Tile, the data source is used ol / layer / Image.
5. node environment syntax + parcel packing + es6
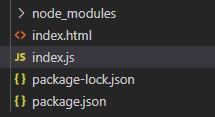
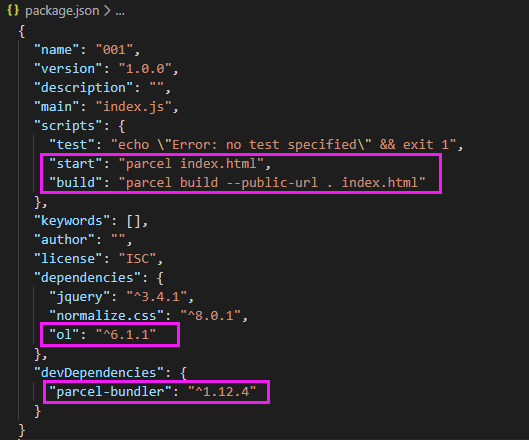
Project directory and package information.
html code (file: index.html):
 1 <!DOCTYPE html>
 2 <html lang="en">
 3 <head>
 4     <meta charset="UTF-8">
 5     <meta name="viewport" content="width=device-width, initial-scale=1.0">
 6     <meta http-equiv="X-UA-Compatible" content="ie=edge">
 7     <title>001 WMS</title>
 8     <link rel="stylesheet" href="./node_modules/ol/ol.css">
 9     <style>
10         html, body, #mainframe {
11             height: 100%;
12         }
13         #mapframe {
14             width: 100%;
15             height: 100%;
16         }
17     </style>
18 </head>
19 <body>
20     <div id="mainframe">
21         <div id="topframe"> <!-- 这个div暂时无用 -->
22         </div>
23         <div id="mapframe">
24
25         </div>
26     </div>
27     <script src="./index.js"></script>
28 </body>
29 </html>
js代码(文件:index.js):
 1 import 'normalize.css'
 2 import {Map, View} from 'ol'
 3 import TileLayer from 'ol/layer/Tile'
 4 import WMSSource from 'ol/source/ImageWMS'
 5 import WMSLayer from 'ol/layer/Image'
 6 import OSM from 'ol/source/OSM'
 7
 8 var gzWms = new WMSSource({
 9     url: "http://localhost:8095/geoserver/c_GuangdongBase/wms", // 是工作区的URL+/wms
10     params: {
11         layers: "c_GuangdongBase:province_gd" // layers参数是"工作区:图层名1, 工作区:图层名2, ...",而不是"数据源:图层名, ..."
12     },
13     serverType: "geoserver",
14     crossOrigin: "anonymous"
15 })
16
17 var gzWmsLayer = new WMSLayer({
18     source: gzWms,
19     opacity: 0.5 // 设置透明度必须是0~1之间,我写50没有半透明效果
20 })
21
22 var gzView = new View({
23     center: [113.23, 23.10],
24     projection: "EPSG:4326", // Projection类的另一种写法:“ProjectionLike”字符串,EPSG必须大写,冒号后必须没有空格
25     zoom: 10
26 })
27
28 var olmap = new Map({
29     target: 'mapframe',
30     layers: [
31         new TileLayer({
32             source: new OSM()
33         }),
34         gzWmsLayer
35     ],
36     view: gzView
37 })
38
39 olmap.on('click', function (evt) {
40     console.log(evt.coordinate);
41     let infoUrl = gzWms.getFeatureInfoUrl(evt.coordinate, gzView.getResolution(), "EPSG:4326", {
42         INFO_FORMAT: 'text/html',
43         QUERY_LAYERS: 'c_GuangdongBase:province_gd'
44     })
45     if (infoUrl) {
46         fetch(infoUrl)
47         .then(res=>res.text())
48         .then(data=>console.log(data))
49     }
50 })
在index.html所在目录下运行npm start即可
6. 发布服务
使用admin/geoserver默认账户密码登录geoserver页面(localhost:你tomcat的端口/geoserver)
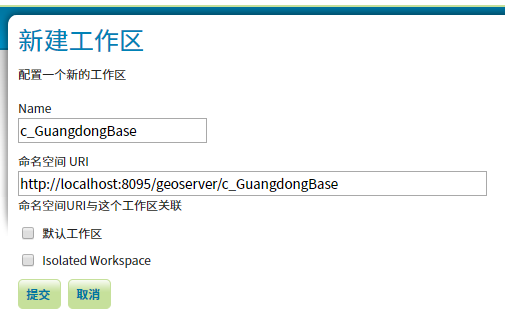
①创建工作区(workspace的概念,使用名称:c_GuangdongBase)
②在此工作区上新建数据存储(数据源)
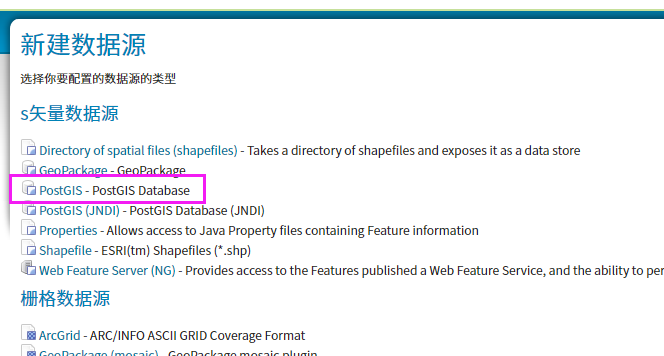
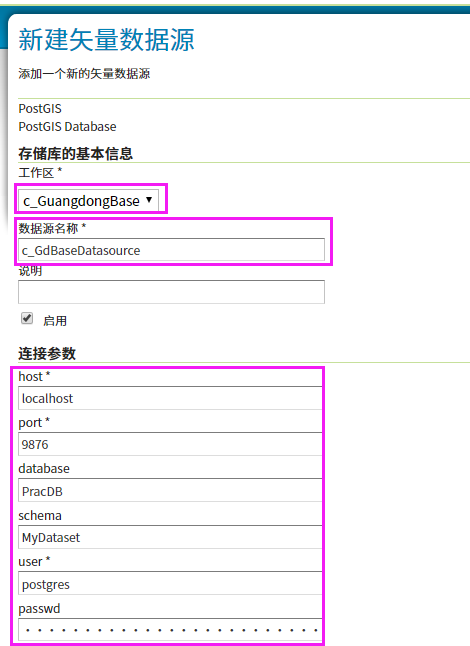
其中,工作区必选选刚才创建那个;
数据存储名称,自己填;
连接参数。主机名、端口指的是postgresql的。
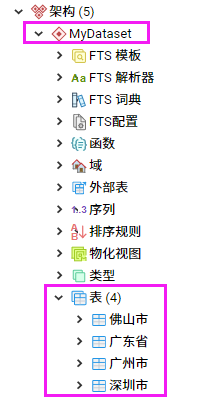
database是指postgis数据库名称,schema是该数据库下需要发布的某个数据集(直译是模式,但是我觉得叫数据集更好)
user和password是指这个数据库的登录名称和密码。


③发布数据源图层
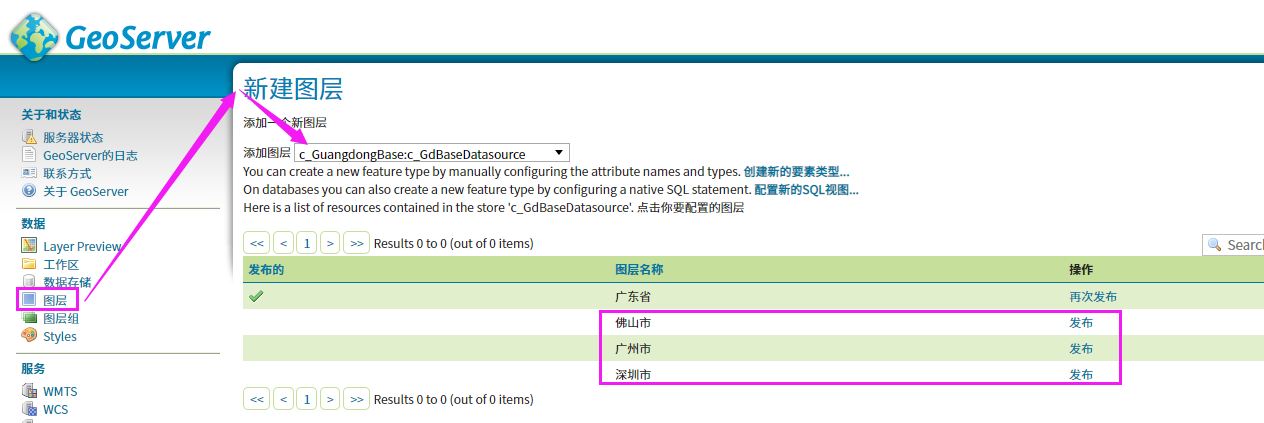
从刚刚创建的数据源里发布图层。
发布的时候计算一下四至范围,选一下style即可。
网上发布的资料很多,不说多了。
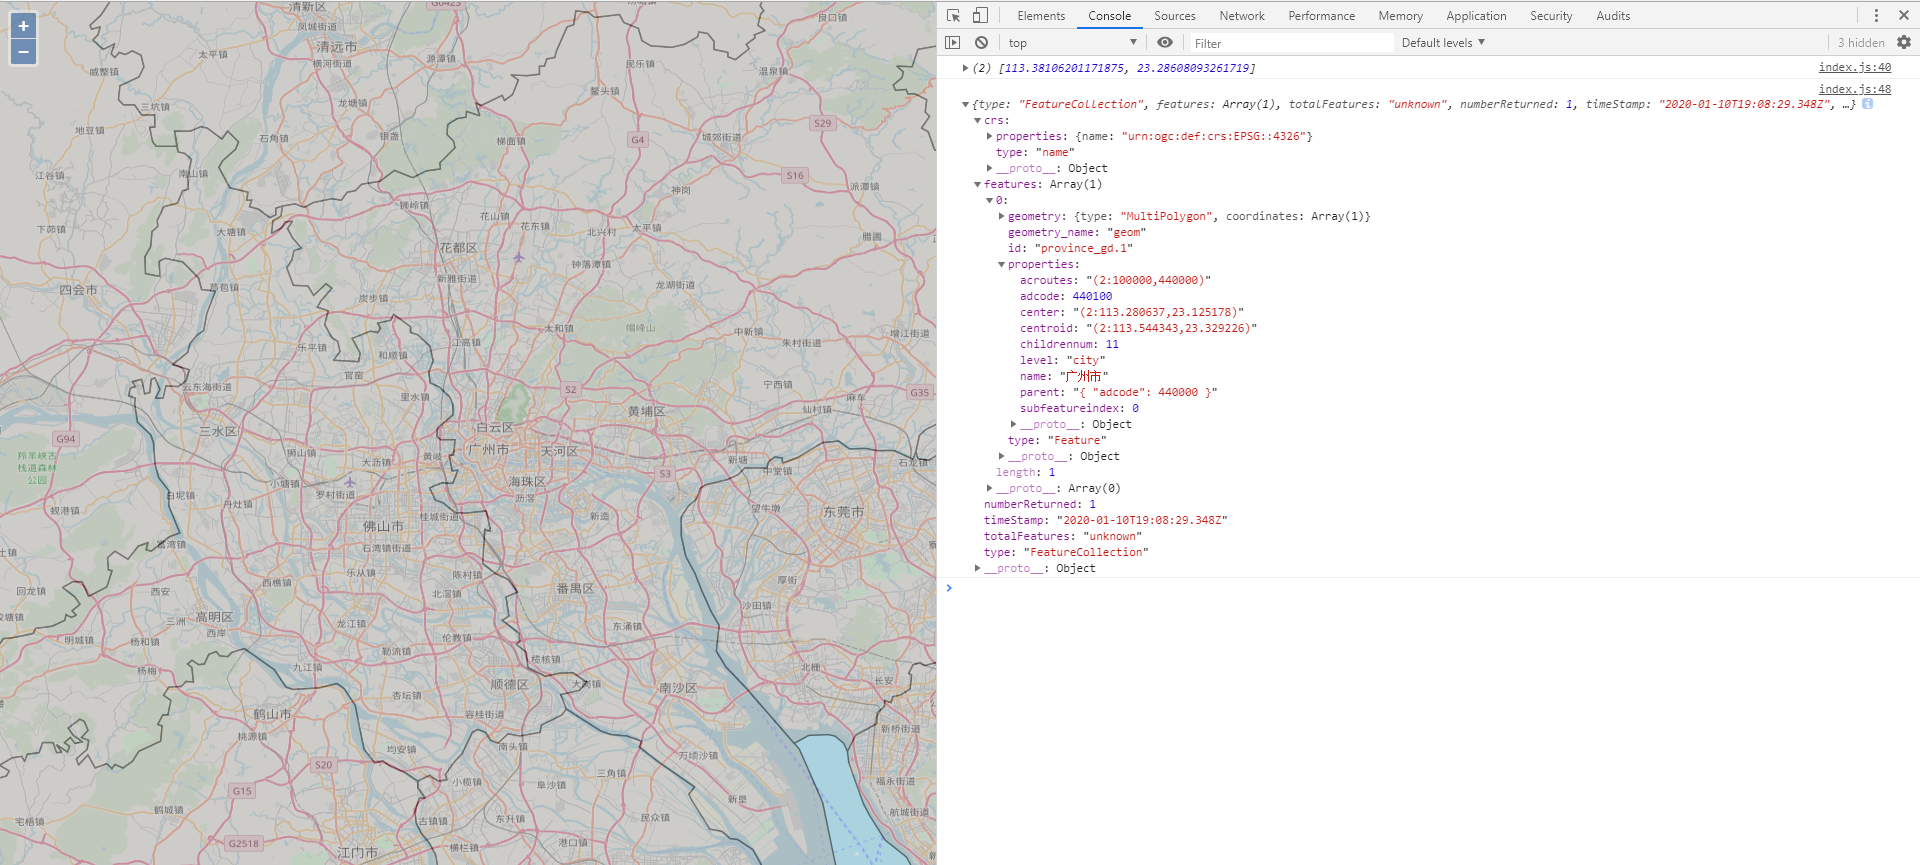
7. 前端访问效果
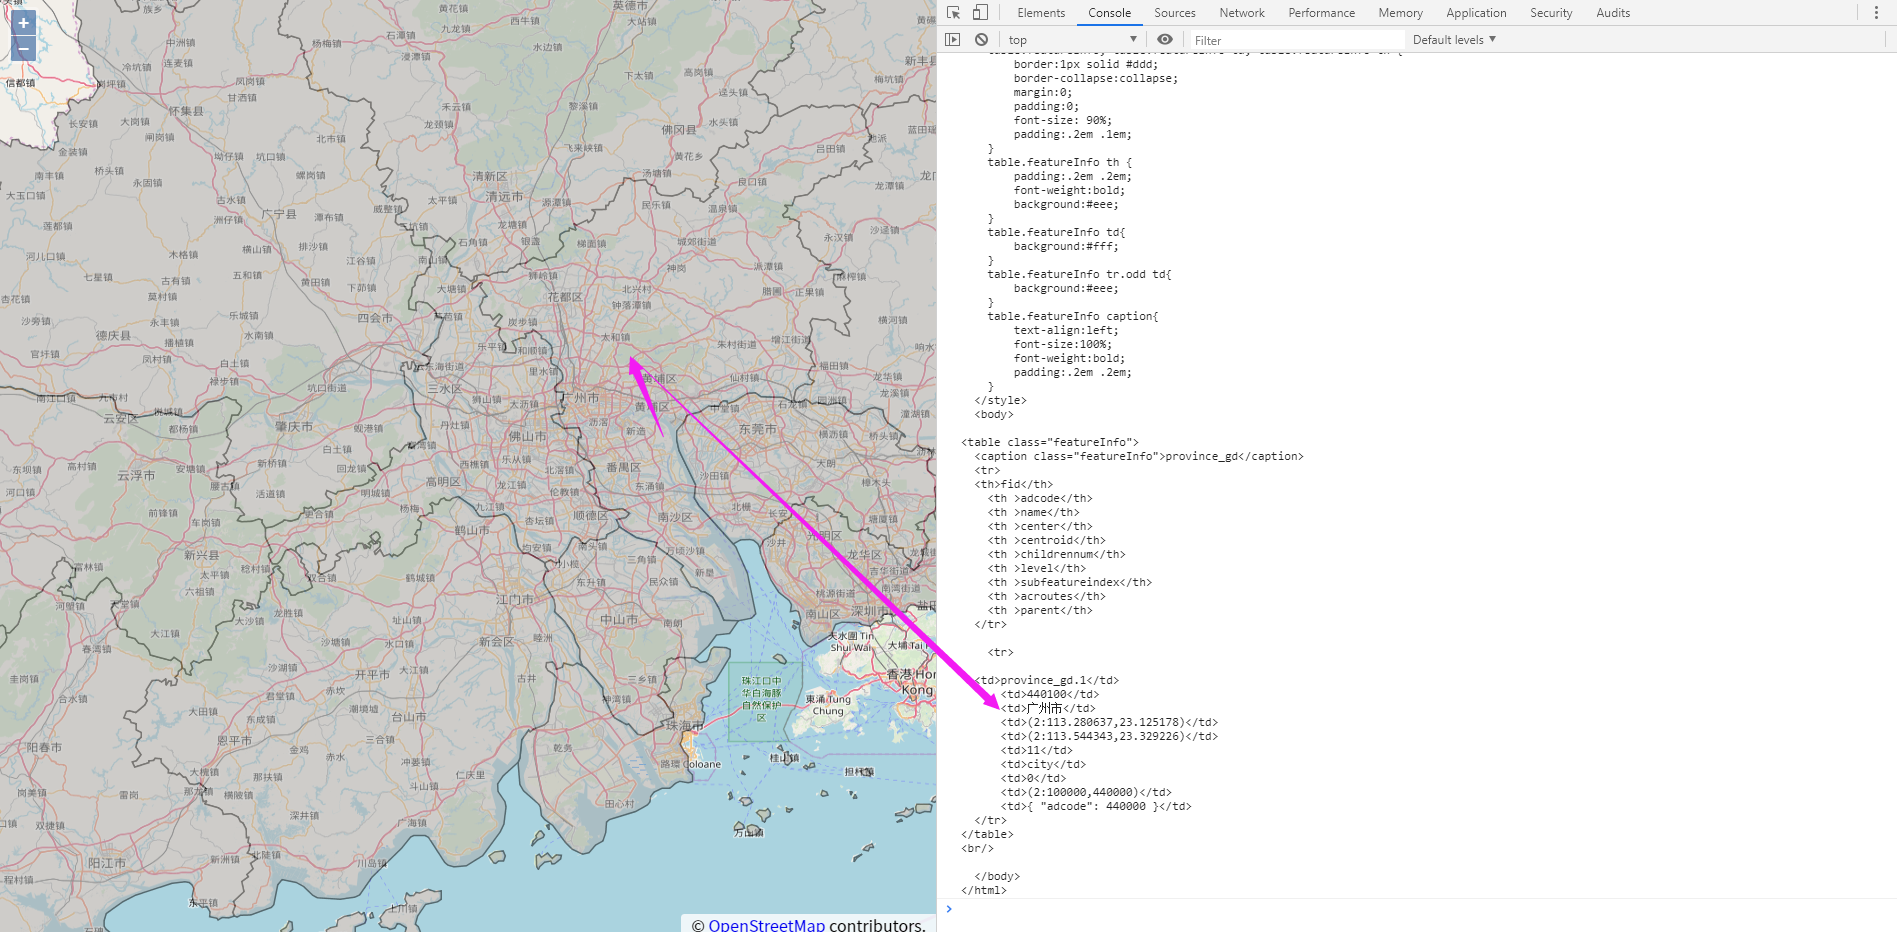
因为是直接返回html的文本格式我没有处理,所以有点难看。
有需要的可以更改getFeaturesInfoUrl里的params参数里的格式参数


效果如图:
大功告成!睡觉去