A, LVM Introduction
When we manage Linux disk, often encounter such a situation. When the initial planning of the Linux disk, we give a partition dividing the amount of disk space used for a period of time, we found a lack of planning disk space, this time how to do? We are sure to find a way to expansion, find a disk partition, format, and mount, and then copy the data to the newly added disk, and then uninstall the original disk, we usually do so. As a result, although to achieve the purpose of expansion, but time-consuming; if the second expansion, space is not enough, we have to repeat the above steps; if the allocated disk space is too large, use a long time to find that it will never use so much space, this time it is not going to adjust, listening to feel very cumbersome. This time you certainly do not want to have that kind can be mounted on a plate, we use some management tools, disk space can be adjusted online, so there is time saving, but also to achieve flexibility to manage disks. Dui, lvm have such a function.
LVM (logical volume manager) the logical volume management, capacity management file which elastically system works LVM is one or more underlying devices organized into blocks of a logical device, the logical device can be added or removed in the future other logical partitions to the device in order to achieve the flexibility to manage disks.
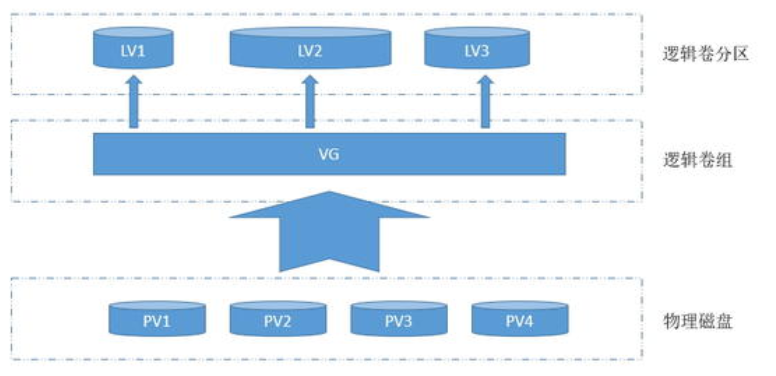
PV: physical volume (physical volume); physical volume refers to a hard disk partition or device (e.g., RAID) having the same function from a logical disk partition, are the basic storage logical blocks LVM, but basic physical storage medium (e.g., partition , disk, etc.) compare, but contains management parameters associated with LVM
VG: volume group (volume group) LVM volume group non-LVM system similar to the physical hard disk, in particular physical volumes, LVM may create one or more partitions (logical volumes) in the volume group, LVM volume group by one or more a physical volumes
LV: logical volume (logical volume) LVM's logical volume is similar to non-LVM system hard disk partition, you can create a file system on the logical volume.
LVM is a fragmentary disk partition (PV) are combined into a larger disk (VG), and then divided into partitions of different sizes (LV) of the large disk (VG) according to need, these small partitions (LV) is dynamically expand and shrink, which is LVM logical volume management process. The so-called big LVM disk is to integrate into many PV VG, then the maximum number of large disk capacity up to it? We know that the data stored in the file system, which is the smallest unit of a block (block), but among the smallest unit of data storage in LVM is PE, PE functions in the same block of the same role, need to be aware that the size of PE LVM is used by default 4M, and the LVM VG can contain up to 65,534 PE, that is the default LVM VG will be 4 × 65534M / 1024M = 256G, so the PE size determines the maximum capacity of the VG, of course, we can specify when you create the VG PE size, which determines the size of the VG.
Two, LVM achieve
1) preparation few hard disk or partition to simulate PV
[root@test-centos7-node1 ~]# lsblk
NAME   MAJ:MIN RM  SIZE RO TYPE MOUNTPOINT
sda      8:0    0   50G  0 disk
├─sda1   8:1    0    2G  0 part /boot
├─sda2   8:2    0    2G  0 part [SWAP]
└─sda3   8:3    0   46G  0 part /
sdb      8:16   0   50G  0 disk
sr0     11:0    1  792M  0 rom
[root@test-centos7-node1 ~]# fdisk /dev/sdb
Welcome to fdisk (util-linux 2.23.2).

Changes will remain in memory only, until you decide to write them.
Be careful before using the write command.

Device does not contain a recognized partition table
Building a new DOS disklabel with disk identifier 0x6180123f.

Command (m for help): p

Disk /dev/sdb: 53.7 GB, 53687091200 bytes, 104857600 sectors
Units = sectors of 1 * 512 = 512 bytes
Sector size (logical/physical): 512 bytes / 512 bytes
I/O size (minimum/optimal): 512 bytes / 512 bytes
Disk label type: dos
Disk identifier: 0x6180123f

   Device Boot      Start         End      Blocks   Id  System

Command (m for help): n
Partition type:
   p   primary (0 primary, 0 extended, 4 free)
   e   extended
Select (default p): p
Partition number (1-4, default 1):
First sector (2048-104857599, default 2048):
Using default value 2048
Last sector, +sectors or +size{K,M,G} (2048-104857599, default 104857599): +10G
Partition 1 of type Linux and of size 10 GiB is set

Command (m for help): p

Disk /dev/sdb: 53.7 GB, 53687091200 bytes, 104857600 sectors
Units = sectors of 1 * 512 = 512 bytes
Sector size (logical/physical): 512 bytes / 512 bytes
I/O size (minimum/optimal): 512 bytes / 512 bytes
Disk label type: dos
Disk identifier: 0x6180123f

   Device Boot      Start         End      Blocks   Id  System
/dev/sdb1            2048    20973567    10485760   83  Linux

Command (m for help): t
Selected partition 1
Hex code (type L to list all codes): 8e
Changed type of partition 'Linux' to 'Linux LVM'

Command (m for help): n
Partition type:
   p   primary (1 primary, 0 extended, 3 free)
   e   extended
Select (default p): p
Partition number (2-4, default 2):
First sector (20973568-104857599, default 20973568):
Using default value 20973568
Last sector, +sectors or +size{K,M,G} (20973568-104857599, default 104857599): +10G
Partition 2 of type Linux and of size 10 GiB is set

Command (m for help): t
Partition number (1,2, default 2):
Hex code (type L to list all codes): 8e
Changed type of partition 'Linux' to 'Linux LVM'

Command (m for help): n
Partition type:
   p   primary (2 primary, 0 extended, 2 free)
   e   extended
Select (default p): p
Partition number (3,4, default 3):
First sector (41945088-104857599, default 41945088):
Using default value 41945088
Last sector, +sectors or +size{K,M,G} (41945088-104857599, default 104857599): +10G
Partition 3 of type Linux and of size 10 GiB is set

Command (m for help): t
Partition number (1-3, default 3):
Hex code (type L to list all codes): 8e
Changed type of partition 'Linux' to 'Linux LVM'

Command (m for help): p

Disk /dev/sdb: 53.7 GB, 53687091200 bytes, 104857600 sectors
Units = sectors of 1 * 512 = 512 bytes
Sector size (logical/physical): 512 bytes / 512 bytes
I/O size (minimum/optimal): 512 bytes / 512 bytes
Disk label type: dos
Disk identifier: 0x6180123f

   Device Boot      Start         End      Blocks   Id  System
/dev/sdb1            2048    20973567    10485760   8e  Linux LVM
/dev/sdb2        20973568    41945087    10485760   8e  Linux LVM
/dev/sdb3        41945088    62916607    10485760   8e  Linux LVM

Command (m for help): w
The partition table has been altered!

Calling ioctl() to re-read partition table.
Syncing disks.
[root@test-centos7-node1 ~]# lsblk
NAME   MAJ:MIN RM  SIZE RO TYPE MOUNTPOINT
sda      8:0    0   50G  0 disk
├─sda1   8:1    0    2G  0 part /boot
├─sda2   8:2    0    2G  0 part [SWAP]
└─sda3   8:3    0   46G  0 part /
sdb      8:16   0   50G  0 disk
├─sdb1   8:17   0   10G  0 part
├─sdb2   8:18   0   10G  0 part
└─sdb3   8:19   0   10G  0 part
sr0     11:0    1  792M  0 rom
[root@test-centos7-node1 ~]#
Description: This is used to simulate the hard disk partition as PV, point to note here is that we've saved your partition, there may be different than the problem is that we do not see partition finished with lsblk partition, partition information can be used to synchronize partprobe . centos6 use partx -a / dev / sdb to add partitions to synchronize memory, if you delete a partition, you need to perform partx -d -nr # / dev / sdb sdb This command means to delete the partition information from / dev / sdb in # partition information, and synchronization into memory. There is also need to pay attention to is the type of thing we want to choose the partition 8e Linux LVM representation
2) loading the package lvm2
[root@test-centos7-node1 ~]# lvs
-bash: lvs: command not found
[root@test-centos7-node1 ~]# yum info  lvm2
Loaded plugins: fastestmirror
Loading mirror speeds from cached hostfile
 * base: mirrors.aliyun.com
 * extras: mirrors.aliyun.com
 * updates: mirrors.aliyun.com
Available Packages
Name        : lvm2
Arch        : x86_64
Epoch       : 7
Version     : 2.02.185
Release     : 2.el7_7.2
Size        : 1.3 M
Repo        : updates/7/x86_64
Summary     : Userland logical volume management tools
URL         : http://sources.redhat.com/lvm2
License     : GPLv2
Description : LVM2 includes all of the support for handling read/write operations on
            : physical volumes (hard disks, RAID-Systems, magneto optical, etc.,
            : multiple devices (MD), see mdadm(8) or even loop devices, see
            : losetup(8)), creating volume groups (kind of virtual disks) from one
            : or more physical volumes and creating one or more logical volumes
            : (kind of logical partitions) in volume groups.

[root@test-centos7-node1 ~]# yum install lvm2 -y
Loaded plugins: fastestmirror
Loading mirror speeds from cached hostfile
 * base: mirrors.aliyun.com
 * extras: mirrors.aliyun.com
 * updates: mirrors.aliyun.com
Resolving Dependencies
--> Running transaction check
---> Package lvm2.x86_64 7:2.02.185-2.el7_7.2 will be installed
--> Processing Dependency: lvm2-libs = 7:2.02.185-2.el7_7.2 for package: 7:lvm2-2.02.185-2.el7_7.2.x86_64
--> Processing Dependency: device-mapper-persistent-data >= 0.7.0-0.1.rc6 for package: 7:lvm2-2.02.185-2.el7_7.2.x86_64
--> Processing Dependency: liblvm2app.so.2.2(Base)(64bit) for package: 7:lvm2-2.02.185-2.el7_7.2.x86_64
--> Processing Dependency: libdevmapper.so.1.02(DM_1_02_141)(64bit) for package: 7:lvm2-2.02.185-2.el7_7.2.x86_64
--> Processing Dependency: libdevmapper-event.so.1.02(Base)(64bit) for package: 7:lvm2-2.02.185-2.el7_7.2.x86_64
--> Processing Dependency: liblvm2app.so.2.2()(64bit) for package: 7:lvm2-2.02.185-2.el7_7.2.x86_64
--> Processing Dependency: libdevmapper-event.so.1.02()(64bit) for package: 7:lvm2-2.02.185-2.el7_7.2.x86_64
--> Running transaction check
---> Package device-mapper-event-libs.x86_64 7:1.02.158-2.el7_7.2 will be installed
---> Package device-mapper-libs.x86_64 7:1.02.140-8.el7 will be updated
--> Processing Dependency: device-mapper-libs = 7:1.02.140-8.el7 for package: 7:device-mapper-1.02.140-8.el7.x86_64
---> Package device-mapper-libs.x86_64 7:1.02.158-2.el7_7.2 will be an update
---> Package device-mapper-persistent-data.x86_64 0:0.8.5-1.el7 will be installed
---> Package lvm2-libs.x86_64 7:2.02.185-2.el7_7.2 will be installed
--> Processing Dependency: device-mapper-event = 7:1.02.158-2.el7_7.2 for package: 7:lvm2-libs-2.02.185-2.el7_7.2.x86_64
--> Running transaction check
---> Package device-mapper.x86_64 7:1.02.140-8.el7 will be updated
---> Package device-mapper.x86_64 7:1.02.158-2.el7_7.2 will be an update
---> Package device-mapper-event.x86_64 7:1.02.158-2.el7_7.2 will be installed
--> Finished Dependency Resolution

Dependencies Resolved

============================================================================================================================
 Package                                   Arch               Version                             Repository           Size
============================================================================================================================
Installing:
 lvm2                                      x86_64             7:2.02.185-2.el7_7.2                updates             1.3 M
Installing for dependencies:
 device-mapper-event                       x86_64             7:1.02.158-2.el7_7.2                updates             190 k
 device-mapper-event-libs                  x86_64             7:1.02.158-2.el7_7.2                updates             189 k
 device-mapper-persistent-data             x86_64             0.8.5-1.el7                         base                423 k
 lvm2-libs                                 x86_64             7:2.02.185-2.el7_7.2                updates             1.1 M
Updating for dependencies:
 device-mapper                             x86_64             7:1.02.158-2.el7_7.2                updates             294 k
 device-mapper-libs                        x86_64             7:1.02.158-2.el7_7.2                updates             322 k

Transaction Summary
============================================================================================================================
Install  1 Package  (+4 Dependent packages)
Upgrade             ( 2 Dependent packages)

Total download size: 3.8 M
Downloading packages:
Delta RPMs disabled because /usr/bin/applydeltarpm not installed.
(1/7): device-mapper-event-1.02.158-2.el7_7.2.x86_64.rpm                                             | 190 kB  00:00:00
(2/7): device-mapper-event-libs-1.02.158-2.el7_7.2.x86_64.rpm                                        | 189 kB  00:00:00
(3/7): device-mapper-libs-1.02.158-2.el7_7.2.x86_64.rpm                                              | 322 kB  00:00:00
(4/7): lvm2-2.02.185-2.el7_7.2.x86_64.rpm                                                            | 1.3 MB  00:00:00
(5/7): device-mapper-1.02.158-2.el7_7.2.x86_64.rpm                                                   | 294 kB  00:00:00
(6/7): lvm2-libs-2.02.185-2.el7_7.2.x86_64.rpm                                                       | 1.1 MB  00:00:00
(7/7): device-mapper-persistent-data-0.8.5-1.el7.x86_64.rpm                                          | 423 kB  00:00:00
----------------------------------------------------------------------------------------------------------------------------
Total                                                                                       4.3 MB/s | 3.8 MB  00:00:00
Running transaction check
Running transaction test
Transaction test succeeded
Running transaction
  Updating   : 7:device-mapper-1.02.158-2.el7_7.2.x86_64                                                                1/9
  Updating   : 7:device-mapper-libs-1.02.158-2.el7_7.2.x86_64                                                           2/9
  Installing : 7:device-mapper-event-libs-1.02.158-2.el7_7.2.x86_64                                                     3/9
  Installing : 7:device-mapper-event-1.02.158-2.el7_7.2.x86_64                                                          4/9
  Installing : 7:lvm2-libs-2.02.185-2.el7_7.2.x86_64                                                                    5/9
  Installing : device-mapper-persistent-data-0.8.5-1.el7.x86_64                                                         6/9
  Installing : 7:lvm2-2.02.185-2.el7_7.2.x86_64                                                                         7/9
Created symlink from /etc/systemd/system/sysinit.target.wants/lvm2-lvmpolld.socket to /usr/lib/systemd/system/lvm2-lvmpolld.socket.
  Cleanup    : 7:device-mapper-1.02.140-8.el7.x86_64                                                                    8/9
  Cleanup    : 7:device-mapper-libs-1.02.140-8.el7.x86_64                                                               9/9
  Verifying  : 7:device-mapper-libs-1.02.158-2.el7_7.2.x86_64                                                           1/9
  Verifying  : 7:device-mapper-1.02.158-2.el7_7.2.x86_64                                                                2/9
  Verifying  : device-mapper-persistent-data-0.8.5-1.el7.x86_64                                                         3/9
  Verifying  : 7:lvm2-2.02.185-2.el7_7.2.x86_64                                                                         4/9
  Verifying  : 7:lvm2-libs-2.02.185-2.el7_7.2.x86_64                                                                    5/9
  Verifying  : 7:device-mapper-event-1.02.158-2.el7_7.2.x86_64                                                          6/9
  Verifying  : 7:device-mapper-event-libs-1.02.158-2.el7_7.2.x86_64                                                     7/9
  Verifying  : 7:device-mapper-1.02.140-8.el7.x86_64                                                                    8/9
  Verifying  : 7:device-mapper-libs-1.02.140-8.el7.x86_64                                                               9/9

Installed:
  lvm2.x86_64 7:2.02.185-2.el7_7.2

Dependency Installed:
  device-mapper-event.x86_64 7:1.02.158-2.el7_7.2             device-mapper-event-libs.x86_64 7:1.02.158-2.el7_7.2
  device-mapper-persistent-data.x86_64 0:0.8.5-1.el7          lvm2-libs.x86_64 7:2.02.185-2.el7_7.2

Dependency Updated:
  device-mapper.x86_64 7:1.02.158-2.el7_7.2                  device-mapper-libs.x86_64 7:1.02.158-2.el7_7.2

Complete!
[root@test-centos7-node1 ~]#
Description: This package is not installed on the system to minimize the installation of the system default, so we need to create LVM is available on the packaging
3) Creating PV
[root@test-centos7-node1 ~]# pvcreate /dev/sdb{1,2,3}
  Physical volume "/dev/sdb1" successfully created.
  Physical volume "/dev/sdb2" successfully created.
  Physical volume "/dev/sdb3" successfully created.
[root@test-centos7-node1 ~]# pvscan
  PV /dev/sdb1                      lvm2 [10.00 GiB]
  PV /dev/sdb3                      lvm2 [10.00 GiB]
  PV /dev/sdb2                      lvm2 [10.00 GiB]
  Total: 3 [30.00 GiB] / in use: 0 [0   ] / in no VG: 3 [30.00 GiB]
[root@test-centos7-node1 ~]# pvs
  PV         VG Fmt  Attr PSize  PFree
  /dev/sdb1     lvm2 ---  10.00g 10.00g
  /dev/sdb2     lvm2 ---  10.00g 10.00g
  /dev/sdb3     lvm2 ---  10.00g 10.00g
[root@test-centos7-node1 ~]# pvdisplay
  "/dev/sdb1" is a new physical volume of "10.00 GiB"
  --- NEW Physical volume ---
  PV Name               /dev/sdb1
  VG Name
  PV Size               10.00 GiB
  Allocatable           NO
  PE Size               0
  Total PE              0
  Free PE               0
  Allocated PE          0
  PV UUID               MsszES-YPdm-YGQl-7rgg-B6gX-Q4xu-T8m1gz

  "/dev/sdb3" is a new physical volume of "10.00 GiB"
  --- NEW Physical volume ---
  PV Name               /dev/sdb3
  VG Name
  PV Size               10.00 GiB
  ALLOCATABLE NO
  PE Size               0
  Total PE              0
  Free PE               0
  Allocated PE          0
  PV UUID               BMMx8p-zu9O-ns61-G9DU-iKMR-NmZO-crCjlR

  "/dev/sdb2" is a new physical volume of "10.00 GiB"
  --- NEW Physical volume ---
  PV Name               /dev/sdb2
  VG Name
  PV Size               10.00 GiB
  Allocatable           NO
  PE Size               0
  Total PE              0
  Free PE               0
  Allocated PE          0
  PV UUID               LPynpW-twlu-fxwg-OlCT-jA2A-R5UI-fvqWLj

[root@test-centos7-node1 ~]#
Description: pvcreate command represents the creation of PV followed hard disk or partition device file, pvscan command role is to search for any disk system which has the property of PV, PV pvcreate property is through the creation of disk too, pvs brief is to look at the situation pv, pvdisplay view details of pv. Of course we have to remove a piece of disk, not allowed to have the PV properties, can pvremove + disk device file path
[root@test-centos7-node1 ~]# pvremove /dev/sdb3
  Labels on physical volume "/dev/sdb3" successfully wiped.
[root@test-centos7-node1 ~]# pvs
  PV         VG Fmt  Attr PSize  PFree
  /dev/sdb1     lvm2 ---  10.00g 10.00g
  /dev/sdb2     lvm2 ---  10.00g 10.00g
[root@test-centos7-node1 ~]#
Description: The premise is that it does not remove the pv removed before doing any VG which otherwise can not be removed
4) Create a VG
[root@test-centos7-node1 ~]# pvs
  PV         VG Fmt  Attr PSize  PFree
  /dev/sdb1     lvm2 ---  10.00g 10.00g
  /dev/sdb2     lvm2 ---  10.00g 10.00g
[root@test-centos7-node1 ~]# pvcreate /dev/sdb3
  Physical volume "/dev/sdb3" successfully created.
[root@test-centos7-node1 ~]# pvs
  PV         VG Fmt  Attr PSize  PFree
  /dev/sdb1     lvm2 ---  10.00g 10.00g
  /dev/sdb2     lvm2 ---  10.00g 10.00g
  /dev/sdb3     lvm2 ---  10.00g 10.00g
[root@test-centos7-node1 ~]# vgcreate test -s 8M /dev/sdb{1,2,3}
  Volume group "test" successfully created
[root@test-centos7-node1 ~]# vgs
  VG   #PV #LV #SN Attr   VSize   VFree
  test   3   0   0 wz--n- <29.98g <29.98g
[root@test-centos7-node1 ~]# vgscan
  Reading volume groups from cache.
  Found volume group "test" using metadata type lvm2
[root@test-centos7-node1 ~]# vgdisplay
  --- Volume group ---
  VG Name               test
  System ID
  Format                lvm2
  Metadata Areas        3
  Metadata Sequence No  1
  VG Access             read/write
  VG Status             resizable
  MAX LV                0
  Cur LV                0
  Open LV               0
  Max PV                0
  Cur PV                3
  Act PV                3
  VG Size               <29.98 GiB
  PE Size               8.00 MiB
  Total PE              3837
  Alloc PE / Size       0 / 0
  Free  PE / Size       3837 / <29.98 GiB
  VG UUID               31vxAP-L5jb-8Yxm-25m2-LdD0-ee8R-sdTjum

[root@test-centos7-node1 ~]# vgreduce test /dev/sdb3
  Removed "/dev/sdb3" from volume group "test"
[root@test-centos7-node1 ~]# vgs
  VG   #PV #LV #SN Attr   VSize  VFree
  test   2   0   0 wz--n- 19.98g 19.98g
[root@test-centos7-node1 ~]# vgcreate test2 /dev/sdb3
  Volume group "test2" successfully created
[root@test-centos7-node1 ~]# vgs
  VG    #PV #LV #SN Attr   VSize   VFree
  test    2   0   0 wz--n-  19.98g  19.98g
  test2   1   0   0 wz--n- <10.00g <10.00g
[root@test-centos7-node1 ~]# vgdisplay test2
  --- Volume group ---
  VG Name               test2
  System ID
  Format                lvm2
  Metadata Areas        1
  Metadata Sequence No  1
  VG Access             read/write
  VG Status             resizable
  MAX LV                0
  Cur LV                0
  Open LV               0
  Max PV                0
  Cur PV                1
  Act PV                1
  VG Size               <10.00 GiB
  PE Size               4.00 MiB
  Total PE              2559
  Alloc PE / Size       0 / 0
  Free  PE / Size       2559 / <10.00 GiB
  VG UUID               rc94SP-JAlk-63Rw-n5xz-qB0d-grnT-ItrMvT

[root@test-centos7-node1 ~]# vgremove test2
  Volume group "test2" successfully removed
[root@test-centos7-node1 ~]# vgs
  VG   #PV #LV #SN Attr   VSize  VFree
  test   2   0   0 wz--n- 19.98g 19.98g
[root@test-centos7-node1 ~]#
Description: The same vgcreate VG represents the creation of usage format which is vgcreate VGNAME [option] -s wherein the storage device represents the size of the specified path of PE, VGNAME VG represents the name, a description that the system can not specify the name of the name of an existing VG the same; brief information on the vgs View all VG system, vgscan search system above if there is VG, vgdisplay view details about all VG, of course, this is only one example, we can also specify the details of a VG view in the back, only you need to specify its name to VG; vg there are many commands related to the role of which is to remove vgreduce PV in the VG, vgremove role is to remove a VG, these two commands need to be specified later operated in the name of VG
5) Creating LV
[root@test-centos7-node1 ~]# lvs
[root@test-centos7-node1 ~]# lvcreate -L 2G -n aaa test
  Logical volume "aaa" created.
[root@test-centos7-node1 ~]# lvcreate -L 3G -n bbb test
  Logical volume "bbb" created.
[root@test-centos7-node1 ~]# lvs
  LV   VG   Attr       LSize Pool Origin Data%  Meta%  Move Log Cpy%Sync Convert
  aaa  test -wi-a----- 2.00g
  bbb  test -wi-a----- 3.00g
[root@test-centos7-node1 ~]# lvscan
  ACTIVE            '/dev/test/aaa' [2.00 GiB] inherit
  ACTIVE            '/dev/test/bbb' [3.00 GiB] inherit
[root@test-centos7-node1 ~]# lvdisplay
  --- Logical volume ---
  LV Path                /dev/test/aaa
  LV Name                aaa
  VG Name                test
  LV UUID                R9weh0-D85B-rMcW-oYSM-dAQb-gIQh-RXxITP
  LV Write Access        read/write
  LV Creation host, time test-centos7-node1, 2020-01-06 09:05:23 -0500
  LV Status              available
  # open                 0
  LV Size                2.00 GiB
  Current LE             256
  Segments               1
  Allocation             inherit
  Read ahead sectors     auto
  - currently set to     8192
  Block device           253:0

  --- Logical volume ---
  LV Path                /dev/test/bbb
  LV Name                bbb
  VG Name                test
  LV UUID                LYwvZj-ogpf-nwtF-mja6-xwwl-A24W-BslJOu
  LV Write Access        read/write
  LV Creation host, time test-centos7-node1, 2020-01-06 09:05:34 -0500
  LV Status              available
  # open                 0
  LV Size                3.00 GiB
  Current LE             384
  Segments               1
  Allocation             inherit
  Read ahead sectors     auto
  - currently set to     8192
  Block device           253:1

[root@test-centos7-node1 ~]# lvresize -L +4G /dev/test/aaa
  Size of logical volume test/aaa changed from 2.00 GiB (256 extents) to 6.00 GiB (768 extents).
  Logical volume test/aaa successfully resized.
[root@test-centos7-node1 ~]# lvs
  LV   VG   Attr       LSize Pool Origin Data%  Meta%  Move Log Cpy%Sync Convert
  aaa  test -wi-a----- 6.00g
  bbb  test -wi-a----- 3.00g
[root@test-centos7-node1 ~]# lvresize -L -1G /dev/test/bbb
  WARNING: Reducing active logical volume to 2.00 GiB.
  THIS MAY DESTROY YOUR DATA (filesystem etc.)
Do you really want to reduce test/bbb? [y/n]: y
  Size of logical volume test/bbb changed from 3.00 GiB (384 extents) to 2.00 GiB (256 extents).
  Logical volume test/bbb successfully resized.
[root@test-centos7-node1 ~]# lvs
  LV   VG   Attr       LSize Pool Origin Data%  Meta%  Move Log Cpy%Sync Convert
  aaa  test -wi-a----- 6.00g
  bbb  test -wi-a----- 2.00g
[root@test-centos7-node1 ~]# lvreduce -L 3G /dev/test/aaa
  WARNING: Reducing active logical volume to 3.00 GiB.
  THIS MAY DESTROY YOUR DATA (filesystem etc.)
Do you really want to reduce test/aaa? [y/n]: y
  Size of logical volume test/aaa changed from 6.00 GiB (768 extents) to 3.00 GiB (384 extents).
  Logical volume test/aaa successfully resized.
[root@test-centos7-node1 ~]# lvs
  LV   VG   Attr       LSize Pool Origin Data%  Meta%  Move Log Cpy%Sync Convert
  aaa  test -wi-a----- 3.00g
  bbb  test -wi-a----- 2.00g
[root@test-centos7-node1 ~]# lvreduce -L -1G /dev/test/aaa
  WARNING: Reducing active logical volume to 2.00 GiB.
  THIS MAY DESTROY YOUR DATA (filesystem etc.)
Do you really want to reduce test/aaa? [y/n]: y
  Size of logical volume test/aaa changed from 3.00 GiB (384 extents) to 2.00 GiB (256 extents).
  Logical volume test/aaa successfully resized.
[root@test-centos7-node1 ~]# lvs
  LV   VG   Attr       LSize Pool Origin Data%  Meta%  Move Log Cpy%Sync Convert
  aaa  test -wi-a----- 2.00g
  bbb  test -wi-a----- 2.00g
[root@test-centos7-node1 ~]# lvremove /dev/test/bbb
Do you really want to remove active logical volume test/bbb? [y/n]: y
  Logical volume "bbb" successfully removed
[root@test-centos7-node1 ~]# lvs
  LV   VG   Attr       LSize Pool Origin Data%  Meta%  Move Log Cpy%Sync Convert
  aaa  test -wi-a----- 2.00g
[root@test-centos7-node1 ~]#
Description: lvcreate command role is to create the LV where -L represents the size of the designated LV, -n represents the name lv with the last name of VG, LV represents the creation from the VG; lvs command role is to look at all lv brief information system; lvdisplay View details LV, behind can be expressed with the name of VG to see all the details on the specified LV VG; lvreduce command role is reduced LV in the designated space, if the specified size is negative as -3M indicate reduced if the specified 3M is reduced to 3M 3M said, need to pay attention to this, there is this command specifies the size can not be specified in a similar + 4M; lvresize effect of this command is to adjust the capacity of LV size, this command specifies resize + means increase in number, - indicates reduce the number of, if not adjusted +/- represents the path to the specified size, lvresize and lvreduce behind these two commands are lv with the corresponding device (the device paths in fact not true, is soft connection path to the device), it can not be specified name; lvremove command role is to delete the specified LV, if you specify a name vg, remove all LV on the VG, if need be deleted In addition to a need to specify the corresponding LV device path.
Lvm this has been achieved, can directly follow format, and then use the mount
[root@test-centos7-node1 ~]# vgs
  VG   #PV #LV #SN Attr   VSize  VFree
  test   2   0   0 wz--n- 19.98g 19.98g
[root@test-centos7-node1 ~]# lvcreate -l 100%FREE -n xxx test
WARNING: xfs signature detected on /dev/test/xxx at offset 0. Wipe it? [y/n]: y
  Wiping xfs signature on /dev/test/xxx.
  Logical volume "xxx" created.
[root@test-centos7-node1 ~]# lvs
  LV   VG   Attr       LSize  Pool Origin Data%  Meta%  Move Log Cpy%Sync Convert
  xxx  test -wi-a----- 19.98g
[root@test-centos7-node1 ~]# mkfs.xfs -f /dev/test/xxx
meta-data=/dev/test/xxx          isize=512    agcount=4, agsize=1309696 blks
         =                       sectsz=512   attr=2, projid32bit=1
         =                       crc=1        finobt=0, sparse=0
data     =                       bsize=4096   blocks=5238784, imaxpct=25
         =                       sunit=0      swidth=0 blks
naming   =version 2              bsize=4096   ascii-ci=0 ftype=1
log      =internal log           bsize=4096   blocks=2560, version=2
         =                       sectsz=512   sunit=0 blks, lazy-count=1
realtime =none                   extsz=4096   blocks=0, rtextents=0
[root@test-centos7-node1 ~]# lsblk
NAME         MAJ:MIN RM  SIZE RO TYPE MOUNTPOINT
sda            8:0    0   50G  0 disk
├─sda1         8:1    0    2G  0 part /boot
├─sda2         8:2    0    2G  0 part [SWAP]
└─sda3         8:3    0   46G  0 part /
sdb            8:16   0   50G  0 disk
├─sdb1         8:17   0   10G  0 part
│ └─test-xxx 253:0    0   20G  0 lvm
├─sdb2         8:18   0   10G  0 part
│ └─test-xxx 253:0    0   20G  0 lvm
└─sdb3         8:19   0   10G  0 part
sr0           11:0    1  792M  0 rom
[root@test-centos7-node1 ~]# mount /dev/test/xxx /mnt
[root@test-centos7-node1 ~]# df -h
Filesystem            Size  Used Avail Use% Mounted on
/dev/sda3              46G  1.6G   45G   4% /
devtmpfs              1.9G     0  1.9G   0% /dev
tmpfs                 1.9G     0  1.9G   0% /dev/shm
tmpfs                 1.9G  8.6M  1.9G   1% /run
tmpfs                 1.9G     0  1.9G   0% /sys/fs/cgroup
/dev/sda1             2.0G  135M  1.9G   7% /boot
tmpfs                 378M     0  378M   0% /run/user/0
/dev/mapper/test-xxx   20G   33M   20G   1% /mnt
[root@test-centos7-node1 ~]#
Third, the expansion LV
1) Create PV, and added to the VG
[root@test-centos7-node1 ~]# pvs
  PV         VG   Fmt  Attr PSize PFree
  /dev/sdb1  test lvm2 a--  9.99g    0
  /dev/sdb2  test lvm2 a--  9.99g    0
[root@test-centos7-node1 ~]# vgdisplay
  --- Volume group ---
  VG Name               test
  System ID
  Format                lvm2
  Metadata Areas        2
  Metadata Sequence No  28
  VG Access             read/write
  VG Status             resizable
  MAX LV                0
  Cur LV                1
  Open LV               1
  Max PV                0
  Cur PV                2
  Act PV                2
  VG Size               19.98 GiB
  PE Size               8.00 MiB
  Total PE              2558
  Alloc PE / Size       2558 / 19.98 GiB
  Free  PE / Size       0 / 0
  VG UUID               31vxAP-L5jb-8Yxm-25m2-LdD0-ee8R-sdTjum

[root@test-centos7-node1 ~]#
Note: The above information can be seen from the size of the VG is 19.98G i.e. the size of two PV. Now we create a new pv, then added in vg
[root@test-centos7-node1 ~]# pvs
  PV         VG   Fmt  Attr PSize PFree
  /dev/sdb1  test lvm2 a--  9.99g    0
  /dev/sdb2  test lvm2 a--  9.99g    0
[root@test-centos7-node1 ~]# pvcreate  /dev/sdb3
  Physical volume "/dev/sdb3" successfully created.
[root@test-centos7-node1 ~]# pvs
  PV         VG   Fmt  Attr PSize  PFree
  /dev/sdb1  test lvm2 a--   9.99g     0
  /dev/sdb2  test lvm2 a--   9.99g     0
  /dev/sdb3       lvm2 ---  10.00g 10.00g
[root@test-centos7-node1 ~]# vgs
  VG   #PV #LV #SN Attr   VSize  VFree
  test   2   1   0 wz--n- 19.98g    0
[root@test-centos7-node1 ~]# vgextend test /dev/sdb3
  Volume group "test" successfully extended
[root@test-centos7-node1 ~]# vgs
  VG   #PV #LV #SN Attr   VSize   VFree
  test   3   1   0 wz--n- <29.98g 9.99g
[root@test-centos7-node1 ~]# vgdisplay
  --- Volume group ---
  VG Name               test
  System ID
  Format                lvm2
  Metadata Areas        3
  Metadata Sequence No  31
  VG Access             read/write
  VG Status             resizable
  MAX LV                0
  Cur LV                1
  Open LV               1
  Max PV                0
  Cur PV                3
  Act PV                3
  VG Size               <29.98 GiB
  PE Size               8.00 MiB
  Total PE              3837
  Alloc PE / Size       2558 / 19.98 GiB
  Free  PE / Size       1279 / 9.99 GiB
  VG UUID               31vxAP-L5jb-8Yxm-25m2-LdD0-ee8R-sdTjum

[root@test-centos7-node1 ~]#
Description: vgextend action command is to assign to the specified pv the VG, VG to specify its name, path pv specify which device
2) The newly added VG of PE added to xxx LV in
[root@test-centos7-node1 ~]# vgs
  VG   #PV #LV #SN Attr   VSize   VFree
  test   3   1   0 wz--n- <29.98g 9.99g
[root@test-centos7-node1 ~]# lvs
  LV   VG   Attr       LSize  Pool Origin Data%  Meta%  Move Log Cpy%Sync Convert
  xxx  test -wi-ao---- 19.98g
[root@test-centos7-node1 ~]# lvdisplay
  --- Logical volume ---
  LV Path                /dev/test/xxx
  LV Name                xxx
  VG Name                test
  LV UUID                ihOo41-gh1L-eSHK-iLXY-UGfF-J6uI-UmVWhF
  LV Write Access        read/write
  LV Creation host, time test-centos7-node1, 2020-01-06 10:00:08 -0500
  LV Status              available
  # open                 1
  LV Size                19.98 GiB
  Current LE             2558
  Segments               2
  Allocation             inherit
  Read ahead sectors     auto
  - currently set to     8192
  Block device           253:0

[root@test-centos7-node1 ~]# lvextend -l +100%FREE /dev/test/xxx
  Size of logical volume test/xxx changed from 19.98 GiB (2558 extents) to <29.98 GiB (3837 extents).
  Logical volume test/xxx successfully resized.
[root@test-centos7-node1 ~]# lvs
  LV   VG   Attr       LSize   Pool Origin Data%  Meta%  Move Log Cpy%Sync Convert
  xxx  test -wi-ao---- <29.98g
[root@test-centos7-node1 ~]# lvdisplay
  --- Logical volume ---
  LV Path                /dev/test/xxx
  LV Name                xxx
  VG Name                test
  LV UUID                ihOo41-gh1L-eSHK-iLXY-UGfF-J6uI-UmVWhF
  LV Write Access        read/write
  LV Creation host, time test-centos7-node1, 2020-01-06 10:00:08 -0500
  LV Status              available
  # open                 1
  LV Size                <29.98 GiB
  Current LE             3837
  Segments               3
  Allocation             inherit
  Read ahead sectors     auto
  - currently set to     8192
  Block device           253:0

[root@test-centos7-node1 ~]# vgs
  VG   #PV #LV #SN Attr   VSize   VFree
  test   3   1   0 wz--n- <29.98g    0
[root@test-centos7-node1 ~]# lsblk
NAME         MAJ:MIN RM  SIZE RO TYPE MOUNTPOINT
sda            8:0    0   50G  0 disk
├─sda1         8:1    0    2G  0 part /boot
├─sda2         8:2    0    2G  0 part [SWAP]
└─sda3         8:3    0   46G  0 part /
sdb            8:16   0   50G  0 disk
├─sdb1         8:17   0   10G  0 part
│ └─test-xxx 253:0    0   30G  0 lvm  /mnt
├─sdb2         8:18   0   10G  0 part
│ └─test-xxx 253:0    0   30G  0 lvm  /mnt
└─sdb3         8:19   0   10G  0 part
  └─test-xxx 253:0    0   30G  0 lvm  /mnt
sr0           11:0    1  792M  0 rom
[root@test-centos7-node1 ~]# df -h
Filesystem            Size  Used Avail Use% Mounted on
/dev/sda3              46G  1.6G   45G   4% /
devtmpfs              1.9G     0  1.9G   0% /dev
tmpfs                 1.9G     0  1.9G   0% /dev/shm
tmpfs                 1.9G  8.6M  1.9G   1% /run
tmpfs                 1.9G     0  1.9G   0% /sys/fs/cgroup
/dev/sda1             2.0G  135M  1.9G   7% /boot
tmpfs                 378M     0  378M   0% /run/user/0
/dev/mapper/test-xxx   20G   33M   20G   1% /mnt
[root@test-centos7-node1 ~]#
Note: You can see lvs in space have been added to, lvextend command role is to specify VG in the space to the specified lv, the above example is to add all the free space in the VG to / dev / test / xxx in of course there is also the case in the spare space VG, lvresize we can use to adjust the size of lv; after the above information we can see the new space added to the VG and lv, df to see mount points in space but did not increase, then we will synchronize files by resize2fs system to increase space.
[root@test-centos7-node1 ~]# resize2fs /dev/test/xxx
resize2fs 1.42.9 (28-Dec-2013)
resize2fs: Bad magic number in super-block while trying to open /dev/test/xxx
Couldn't find valid filesystem superblock.
[root@test-centos7-node1 ~]# df -h
Filesystem            Size  Used Avail Use% Mounted on
/dev/sda3              46G  1.6G   45G   4% /
devtmpfs              1.9G     0  1.9G   0% /dev
tmpfs                 1.9G     0  1.9G   0% /dev/shm
tmpfs                 1.9G  8.6M  1.9G   1% /run
tmpfs                 1.9G     0  1.9G   0% /sys/fs/cgroup
/dev/sda1             2.0G  135M  1.9G   7% /boot
tmpfs                 378M     0  378M   0% /run/user/0
/dev/mapper/test-xxx   20G   33M   20G   1% /mnt
[root@test-centos7-node1 ~]#
Description: It seems that with this command does not work, because the command file system for resize2fs ext series, xfs need to adjust xfs_growfs
[root@test-centos7-node1 ~]# xfs_growfs /dev/test/xxx
meta-data=/dev/mapper/test-xxx   isize=512    agcount=4, agsize=1309696 blks
         =                       sectsz=512   attr=2, projid32bit=1
         =                       crc=1        finobt=0 spinodes=0
data     =                       bsize=4096   blocks=5238784, imaxpct=25
         =                       sunit=0      swidth=0 blks
naming   =version 2              bsize=4096   ascii-ci=0 ftype=1
log      =internal               bsize=4096   blocks=2560, version=2
         =                       sectsz=512   sunit=0 blks, lazy-count=1
realtime =none                   extsz=4096   blocks=0, rtextents=0
data blocks changed from 5238784 to 7858176
[root@test-centos7-node1 ~]# df -h
Filesystem            Size  Used Avail Use% Mounted on
/dev/sda3              46G  1.6G   45G   4% /
devtmpfs              1.9G     0  1.9G   0% /dev
tmpfs                 1.9G     0  1.9G   0% /dev/shm
tmpfs                 1.9G  8.6M  1.9G   1% /run
tmpfs                 1.9G     0  1.9G   0% /sys/fs/cgroup
/dev/sda1             2.0G  135M  1.9G   7% /boot
tmpfs                 378M     0  378M   0% /run/user/0
/dev/mapper/test-xxx   30G   33M   30G   1% /mnt
[root@test-centos7-node1 ~]#
Fourth, reduced LV (xfs file system)
1) Uninstall the good hang LV
[root@test-centos7-node1 ~]# df -h
Filesystem            Size  Used Avail Use% Mounted on
/dev/sda3              46G  1.6G   45G   4% /
devtmpfs              1.9G     0  1.9G   0% /dev
tmpfs                 1.9G     0  1.9G   0% /dev/shm
tmpfs                 1.9G  8.6M  1.9G   1% /run
tmpfs                 1.9G     0  1.9G   0% /sys/fs/cgroup
/dev/sda1             2.0G  135M  1.9G   7% /boot
tmpfs                 378M     0  378M   0% /run/user/0
/dev/mapper/test-xxx   30G   33M   30G   1% /mnt
[root@test-centos7-node1 ~]# umount /mnt
[root@test-centos7-node1 ~]# df -h
Filesystem      Size  Used Avail Use% Mounted on
/dev/sda3        46G  1.6G   45G   4% /
devtmpfs        1.9G     0  1.9G   0% /dev
tmpfs           1.9G     0  1.9G   0% /dev/shm
tmpfs           1.9G  8.6M  1.9G   1% /run
tmpfs           1.9G     0  1.9G   0% /sys/fs/cgroup
/dev/sda1       2.0G  135M  1.9G   7% /boot
tmpfs           378M     0  378M   0% /run/user/0
[root@test-centos7-node1 ~]#
2) force a disk detection
[root@test-centos7-node1 ~]# xfs_repair -n /dev/test/xxx
Phase 1 - find and verify superblock...
Phase 2 - using internal log
        - zero log...
        - scan filesystem freespace and inode maps...
        - found root inode chunk
Phase 3 - for each AG...
        - scan (but don't clear) agi unlinked lists...
        - process known inodes and perform inode discovery...
        - agno = 0
        - agno = 1
        - agno = 2
        - agno = 3
        - process newly discovered inodes...
Phase 4 - check for duplicate blocks...
        - setting up duplicate extent list...
        - check for inodes claiming duplicate blocks...
        - agno = 0
        - agno = 1
        - agno = 2
        - agno = 3
No modify flag set, skipping phase 5
Phase 6 - check inode connectivity...
        - traversing filesystem ...
        - traversal finished ...
        - moving disconnected inodes to lost+found ...
Phase 7 - verify link counts...
No modify flag set, skipping filesystem flush and exiting.
[root@test-centos7-node1 ~]#
Description: ext series e2fsck command to check the file system
3) Adjust the size lv
[root@test-centos7-node1 ~]# lvreduce -L -10G /dev/test/xxx
  WARNING: Reducing active logical volume to <19.98 GiB.
  THIS MAY DESTROY YOUR DATA (filesystem etc.)
Do you really want to reduce test/xxx? [y/n]: y
  Size of logical volume test/xxx changed from <29.98 GiB (3837 extents) to <19.98 GiB (2557 extents).
  Logical volume test/xxx successfully resized.
[root@test-centos7-node1 ~]# lvs
  LV   VG   Attr       LSize   Pool Origin Data%  Meta%  Move Log Cpy%Sync Convert
  xxx  test -wi-a----- <19.98g
[root@test-centos7-node1 ~]# lvdisplay
  --- Logical volume ---
  LV Path                /dev/test/xxx
  LV Name                xxx
  VG Name                test
  LV UUID                uhZZaz-Odd9-ibwY-2Z1Z-ZmNY-eZF7-0lXERT
  LV Write Access        read/write
  LV Creation host, time test-centos7-node1, 2020-01-06 10:32:42 -0500
  LV Status              available
  # open                 0
  LV Size                <19.98 GiB
  Current LE             2557
  Segments               2
  Allocation             inherit
  Read ahead sectors     auto
  - currently set to     8192
  Block device           253:0

[root@test-centos7-node1 ~]#
4) Mount
[root@test-centos7-node1 ~]# mount /dev/test/xxx /mnt
mount: /dev/mapper/test-xxx: can't read superblock
[root@test-centos7-node1 ~]#
Description: do find a problem here, xfs file system does not support logical volumes shrinking, why? xfs file system is xfs_growfs adjustment command This command only supports the increased operations. We adjust the size lv when in fact the file system to destroy, in order to reduce space, it must be re-formatted to mount, so that if the original data on the disk, there are lost. So do not make sense on xfs reduced LV
[root@test-centos7-node1 ~]# mkfs.xfs /dev/test/xxx -f
meta-data=/dev/test/xxx          isize=512    agcount=4, agsize=1309184 blks
         =                       sectsz=512   attr=2, projid32bit=1
         =                       crc=1        finobt=0, sparse=0
data     =                       bsize=4096   blocks=5236736, imaxpct=25
         =                       sunit=0      swidth=0 blks
naming   =version 2              bsize=4096   ascii-ci=0 ftype=1
log      =internal log           bsize=4096   blocks=2560, version=2
         =                       sectsz=512   sunit=0 blks, lazy-count=1
realtime =none                   extsz=4096   blocks=0, rtextents=0
[root@test-centos7-node1 ~]# mount  /dev/test/xxx  /mnt
[root@test-centos7-node1 ~]# df -h
Filesystem            Size  Used Avail Use% Mounted on
/dev/sda3              46G  1.6G   45G   4% /
devtmpfs              1.9G     0  1.9G   0% /dev
tmpfs                 1.9G     0  1.9G   0% /dev/shm
tmpfs                 1.9G  8.6M  1.9G   1% /run
tmpfs                 1.9G     0  1.9G   0% /sys/fs/cgroup
/dev/sda1             2.0G  135M  1.9G   7% /boot
tmpfs                 378M     0  378M   0% /run/user/0
/dev/mapper/test-xxx   20G   33M   20G   1% /mnt
[root@test-centos7-node1 ~]
Fifth, reduced LV (ext series File System)
1) uninstall the mounted LV
[root@test-centos7-node1 ~]# df -Th
Filesystem           Type      Size  Used Avail Use% Mounted on
/dev/sda3            xfs        46G  1.6G   45G   4% /
devtmpfs             devtmpfs  1.9G     0  1.9G   0% /dev
tmpfs                tmpfs     1.9G     0  1.9G   0% /dev/shm
tmpfs                tmpfs     1.9G  8.6M  1.9G   1% /run
tmpfs                tmpfs     1.9G     0  1.9G   0% /sys/fs/cgroup
/dev/sda1            xfs       2.0G  135M  1.9G   7% /boot
tmpfs                tmpfs     378M     0  378M   0% /run/user/0
/dev/mapper/test-xxx ext4       20G   45M   19G   1% /mnt
[root@test-centos7-node1 ~]# umount /mnt
[root@test-centos7-node1 ~]# df -Th
Filesystem     Type      Size  Used Avail Use% Mounted on
/dev/sda3      xfs        46G  1.6G   45G   4% /
devtmpfs       devtmpfs  1.9G     0  1.9G   0% /dev
tmpfs          tmpfs     1.9G     0  1.9G   0% /dev/shm
tmpfs          tmpfs     1.9G  8.6M  1.9G   1% /run
tmpfs          tmpfs     1.9G     0  1.9G   0% /sys/fs/cgroup
/dev/sda1      xfs       2.0G  135M  1.9G   7% /boot
tmpfs          tmpfs     378M     0  378M   0% /run/user/0
[root@test-centos7-node1 ~]#
2) enforce disk detection
[root@test-centos7-node1 ~]# e2fsck -f /dev/test/xxx
e2fsck 1.42.9 (28-Dec-2013)
Pass 1: Checking inodes, blocks, and sizes
Pass 2: Checking directory structure
Pass 3: Checking directory connectivity
Pass 4: Checking reference counts
Pass 5: Checking group summary information
/dev/test/xxx: 11/1310720 files (0.0% non-contiguous), 126322/5236736 blocks
[root@test-centos7-node1 ~]#
Description: In this step we do not perform, then direct the next step it will prompt us to do first disk detection
3) resize the file system
[root@test-centos7-node1 ~]# resize2fs /dev/test/xxx 12G
resize2fs 1.42.9 (28-Dec-2013)
Resizing the filesystem on /dev/test/xxx to 3145728 (4k) blocks.
The filesystem on /dev/test/xxx is now 3145728 blocks long.

[root@test-centos7-node1 ~]#
4) adjust the size of the LV
[root@test-centos7-node1 ~]# lvreduce -L 12G /dev/test/xxx
  WARNING: Reducing active logical volume to 12.00 GiB.
  THIS MAY DESTROY YOUR DATA (filesystem etc.)
Do you really want to reduce test/xxx? [y/n]: y
  Size of logical volume test/xxx changed from <19.98 GiB (2557 extents) to 12.00 GiB (1536 extents).
  Logical volume test/xxx successfully resized.
[root@test-centos7-node1 ~]# lvs
  LV   VG   Attr       LSize  Pool Origin Data%  Meta%  Move Log Cpy%Sync Convert
  xxx  test -wi-a----- 12.00g
[root@test-centos7-node1 ~]#
Description: reduced to the space here to be consistent with the size of the file system or reduce space space adjusted to be larger than the file system for the job, so that it can not corrupt the file system, remember not to adjust than the file system space is still small, small , while reducing space undermines the file system will lead to follow-up can not be mounted.
5) Mount
[root@test-centos7-node1 ~]# mount /dev/test/xxx /mnt
[root@test-centos7-node1 ~]# df -h
Filesystem            Size  Used Avail Use% Mounted on
/dev/sda3              46G  1.6G   45G   4% /
devtmpfs              1.9G     0  1.9G   0% /dev
tmpfs                 1.9G     0  1.9G   0% /dev/shm
tmpfs                 1.9G  8.6M  1.9G   1% /run
tmpfs                 1.9G     0  1.9G   0% /sys/fs/cgroup
/dev/sda1             2.0G  135M  1.9G   7% /boot
tmpfs                 378M     0  378M   0% /run/user/0
/dev/mapper/test-xxx   12G   41M   12G   1% /mnt
[root@test-centos7-node1 ~]#