Machine Configuration: HP PRO6300 Used scouring 201912, HP motherboard chipset Intel Q75 chip, integrated graphics (integrated graphics array card conflict with H310) , the CPU I5 the Intel 3450
[Create] array raid5
1, boot, self-test server, see the prompt, press ctrl + R to enter the RAID BIOS interface

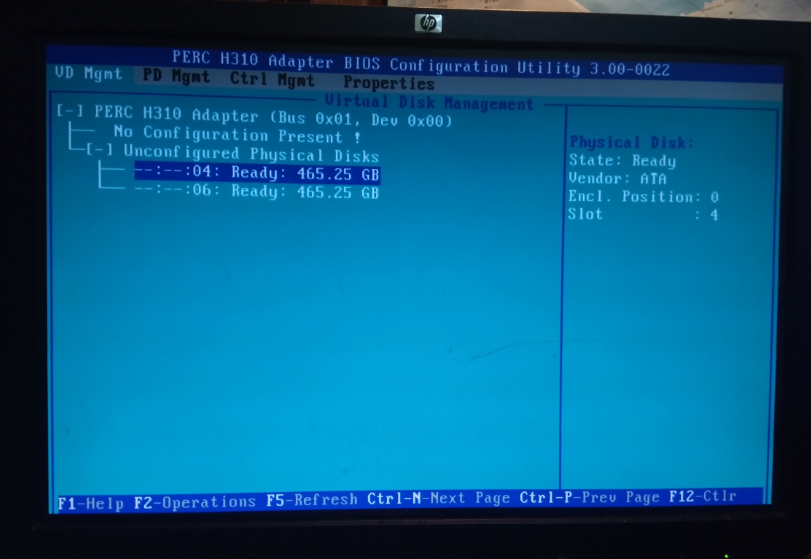
Enter the RAID BIOS have seen first interface is VD Mgmt (virtual disk management, which is an array of management), the following shows have detected three SAS hard disk of 300G

Make sure all drives are in the ready state, it begins to create the entire list, to create the tutorial presentation do RAID5 as an example, the cursor stays in the press the arrow keys F2 PERC H310 mini press opening operation menu, select the Create New VD create the interface into the raid follows:

Select the array you need to create, H310 array card support RAID0.1.10.5, then press Enter to confirm array mode cursor automatically move down to your disk, press the spacebar to select the disk you want to create (in parentheses after the boxes in front of the disk will be more the X) below:
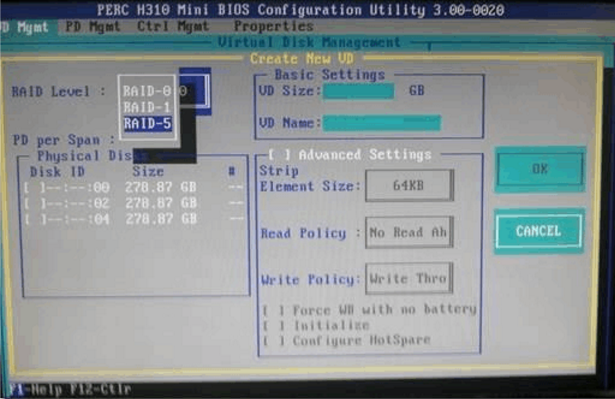
After calculating automatically select a disk array according to the number you select your disk capacity, the following figure:

Enter the name of the array can be directly used RAID1, RAID0, RAID5 and the like named

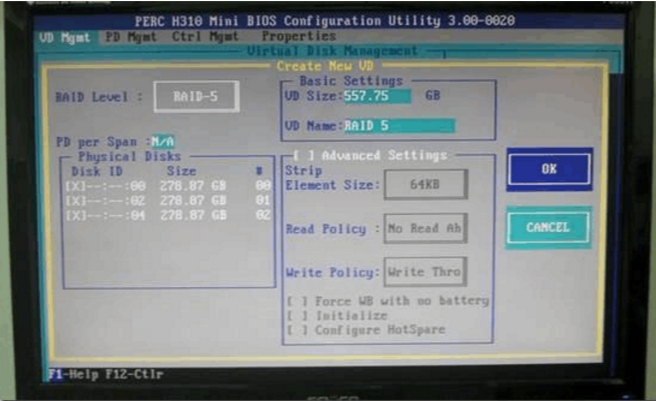
Confirmation, select OK and press Enter. Array created, the FIGS.
See array state, the FIG.
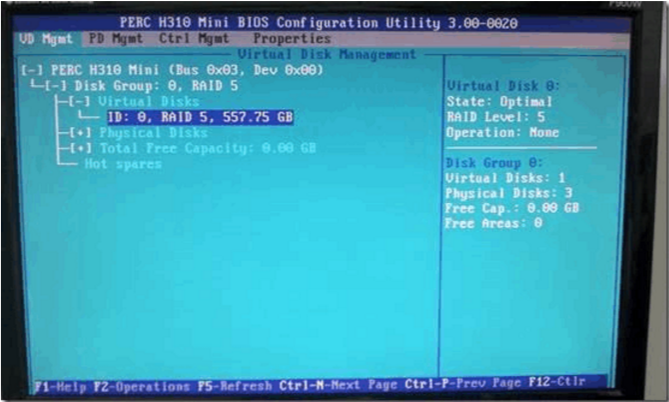
This, raid5 disk entire column has been created
Array [repair]
Hard disk drive failure, or accidentally pulled hard, resulting in the array being given, as shown below

At this time, or by entering CTRL + R RAID BIOS, this time, to see the yellow array information display font,
Is degraded status prompt  , see below:
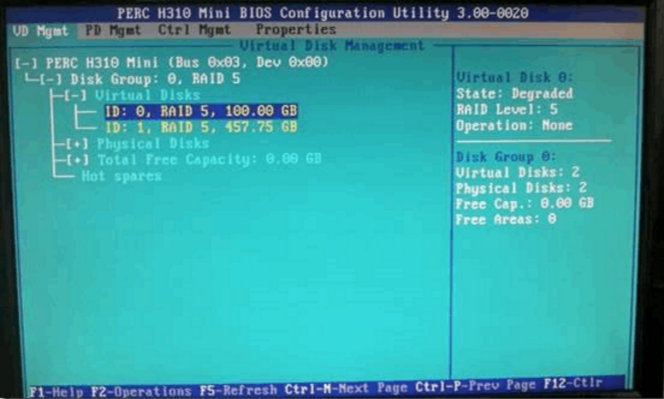
Then we press the CTRL + N to switch to the PD Mgmt (physical disk management interface) Note: Here you can view the status of each hard disk inside the array, if found to have lost the hard drive, your hard drive may have been faulty, need immediate replacement of the hard disk. If you can see the original hard disk array is lost, but the state is not online (Online), as shown below:

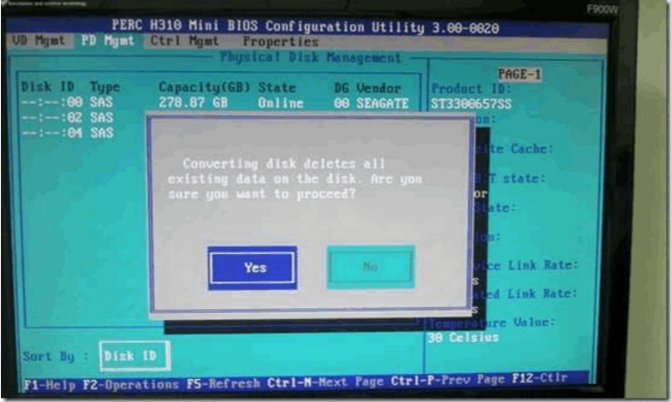
选择状态为Non-Raid(或有其他情况)的硬盘,按F2弹出选项,如下图,选择convert to RAID Capable转换到能加入RAID的状态

会出现提示:清除本磁盘所有数据,选确认
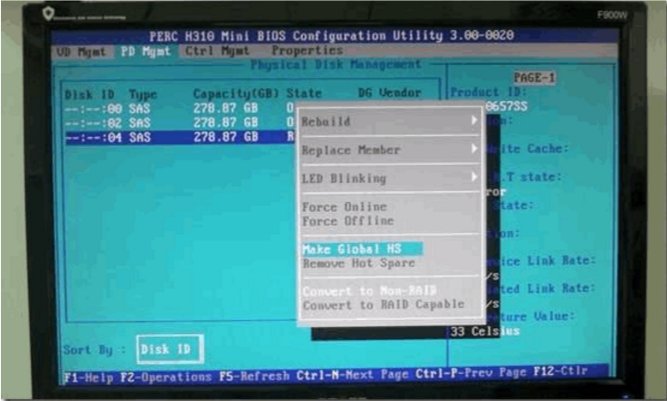
完成数据删除后,正常情况,此磁盘的状态变成ready状态

还是选中这块磁盘,按F2弹出选项,选择make global HS转换成热备状态
接下来,这个硬盘会自动加入阵列并开始修复阵列 rebuild (重建)
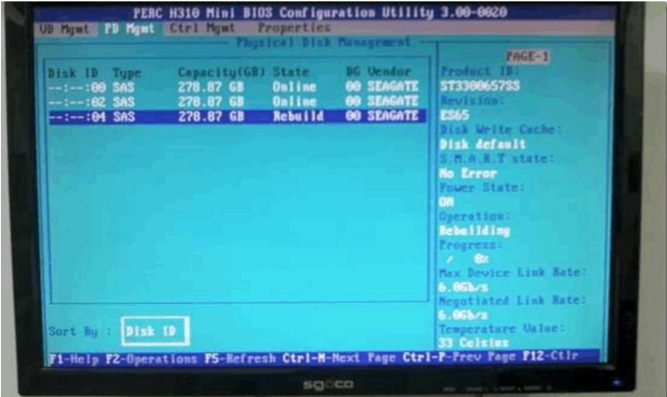
此时呢,喝杯茶,坐等阵列修复完成就可以正常使用了,数据不受影响
阵列修复基本操作结束
【阵列池创建】类似磁盘分区
前面的步骤跟普通做阵列一样,所以直接从选择阵列开始,还是一样选择所有磁盘,到了阵列容量这里就需要注意了,如果你需要把一个阵列分成很多大小,有点像是在分区,输入阵列容量的时候,可以按照自己的需求,把一个阵列,分成多个分区,这里我先分个100GB,如下图:

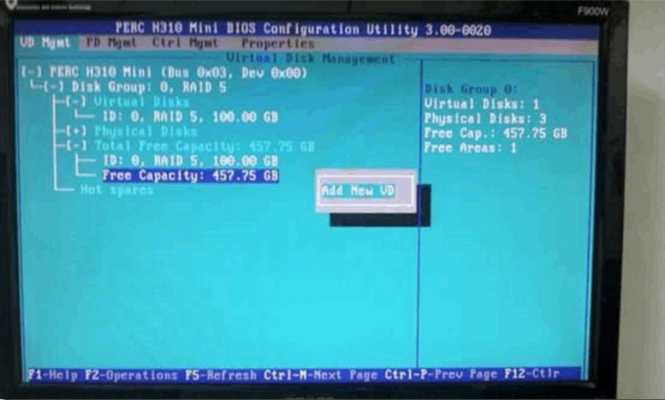
按OK确认之后,我们回到阵列管理主界面 VD Mgmt 剩下的容量会显示在下面

(还剩余457.75GB)
选择剩余的容量 Free capacity 再按F2弹出选项,选择ADD New VD把剩下的空间继续划分,直到分配完
备注:这种情况一般用于阵列的容量大于2TB装系统,因为windows系统对安装系统的磁盘要求容量不超过2TB,所以需要进行划分磁盘(类似磁盘分区)
【遇到的问题记载】
1、刚买来的时候,遇到初始化阵列卡一直卡住,初始化不过去进不了PERC H310的BIOS配置界面,一直停在如下界面,整么搞都没用
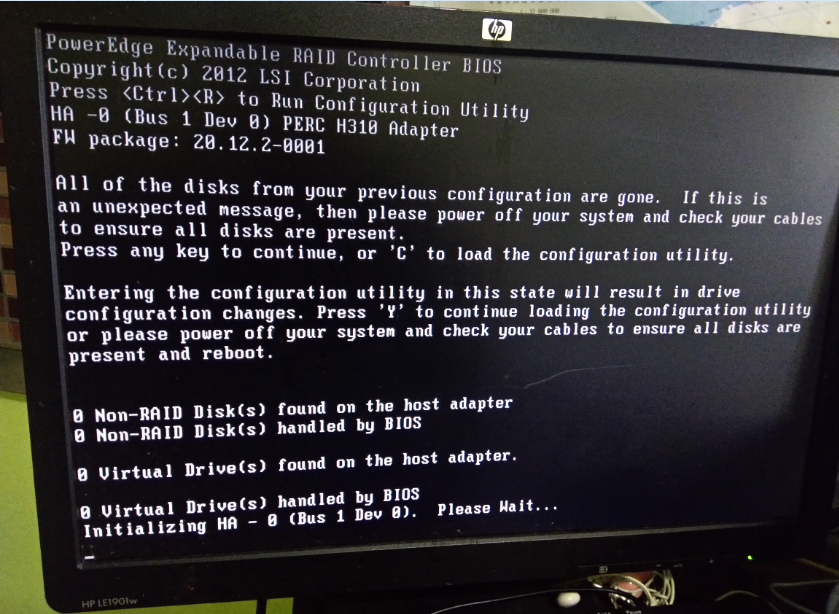
经过查询资料得出,主板为集成显卡,而且跟阵列卡存在冲突,上边已经写出;
解决方案,买一块PCIE 1X的垃圾独立显卡(因为PCIE 16X只有一个插槽被阵列卡占了)插上,并把集成显卡disabled掉
重启后按照操作就可以顺利进入阵列卡的BIOS界面进行配置
2、首次进入阵列卡的BIOS界面时,接了全新的磁盘,VD Mgmt项中,并没有挂入磁盘信息
需要切换到PD Mgmt选项即物理磁盘管理,把磁盘一块块convert to RAID Capable,转换成阵列状态,然后磁盘的状态就会变成ready;
再切换回 VD Mgmt,就可以看到加挂的磁盘信息了