Stand-alone environment to build
JMeter5.1.1 here to install the latest version, for example on Windows 10 (64bit) to explain.
Installation steps are as follows:
1, the installation JDK 11 (Oracle JDK 11 learning purposes anyway)
The default installation path is C: \ Program Files \ Java \ jdk-11.0.3
2, the configuration environment variable JDK 11
2.1, the new environment variable JAVA_HOME, its value is set to:
C:\Program Files\Java\jdk-11.0.3
2.2, modify environment variables Path, after adding the following value:
;%JAVA_HOME%\bin
2.3, JDK 11 test
Each running java, javac, java -version command
If the first two commands display information about the command syntax, the last command displays information about the JDK 11, it indicates that JDK installation was successful.
3, installation JMeter5.1.1
The apache-jmeter-5.1.1.zip can unzip to any directory, for example: D: \ Program Files \ apache-jmeter-5.1.1
4, start JMeter5.1.1 (GUI mode)
To decompress bin subdirectory under the directory, locate jmeter.bat, double-click to start.
Build a distributed environment
Listing
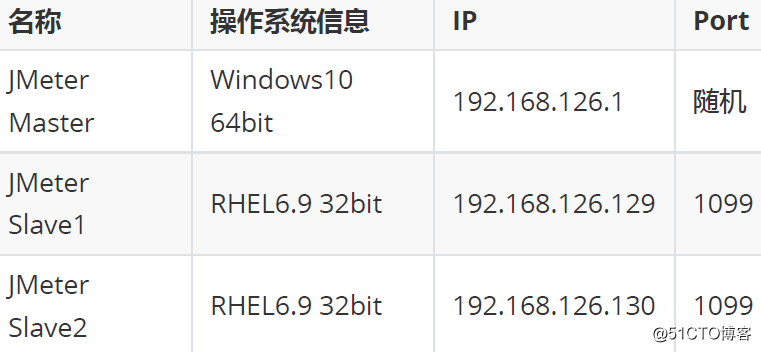
1、jdk-8u212-linux-i586.tar.gz (JDK8 32bit)
2, apache-jmeter-5.1.1.zip (JMeter Master and Slave same installation package)
server list
Here two Slave to Master Control example to introduce the deployment process. Server in the following list:
Steps
1, deploy and configure multiple Slave;
2, deployment and configuration Master;
3, GUI way to start the Master test verification.
First, deploy and configure multiple Slave
Slave1 deployment detailed steps:
1. Install JDK8
[root@localhost ~]# mkdir -p /usr/local/java
[root@localhost ~]# tar -zxvf jdk-8u212-linuxi586.
tar.gz -C /usr/local/java
2. Configure JDK environment variables
[root@localhost ~]# vi /etc/profile
By adding the following at the end of the file:
export JAVA_HOME=/usr/local/java/jdk1.8.0_212
export PATH=$JAVA_HOME/bin:$PATH
3. Install Slave
[root@localhost ~]# mkdir -p /usr/local/jmeter
[root@localhost ~]# unzip apache-jmeter-5.1.1.zip
-d /usr/local/jmeter
4. Slave Configuration
Find bin / jmeter.properties JMeter configuration file in the installation directory, edit:
server_port = 1099 # The default port is 1099, can be changed to other ports
server.rmi.ssl.disable = true # Uncomment and change false to true
5. Start jmeter-server
[root@localhost ~]# cd /usr/local/jmeter/apachejmeter-5.1.1/bin/
[root@localhost bin]# nohup ./jmeter-server -
Djava.rmi.server.hostname=192.168.126.129 &
# Multiple network cards need to specify the IP address
Slave2 deploy the same Slave1, repeat this process can be.
(Need to specify the background when starting Djava.rmi.server.hostname = 192.168.126.130)
Second, deploy and configure Master
1. Install JDK8
2. Configure JDK8 environment variables
3. Install Master
The above steps are the same stand-alone environment, not elaborate.
4. Master Configuration
Find bin \ jmeter.properties this profile jmeter installation directory, edit:
will:
remote_hosts=127.0.0.1
This line make the following changes:
remote_hosts=192.168.126.129:1099,192.168.126.130:1099
# Note: the Slave and save_port with an IP: connection between a plurality of key-value pairs, separated
server.rmi.ssl.disable = true # Uncomment and change false to true
5. Start Master
To decompress apache-jmeter-5.1.1 \ bin directory, find
jmeter.bat, double-click to start.
Three. GUI way to start the Master verification test
GUI way to start the Master, the menu Run -> Remote Start can see the configuration
Slave remote information, as shown below: 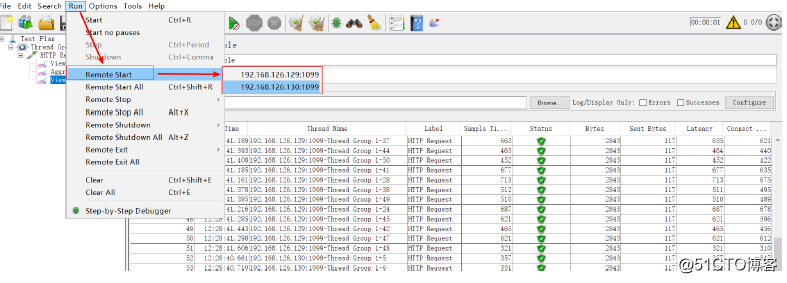
Note
Java version 1.Master with the Slave use consistent;
JMeter version 2.Master with the Slave use consistent;
3. If the test program is referenced in a plug-in, the Master and Slave must contain each of the plug;
4. Test plan only needs to be placed on the Master, will be automatically distributed to each Slave execution, you do not need to copy each Slave;
5. If the test program is referenced to the parameters of the file, you need to copy the file to the parameters of each station Slave, and the directory path stored need to be consistent;
6. The number of threads executing distributed = assumed a stand-alone deployment number * Slave number of threads of execution. For example, stand-alone deployment run 50 threads,
First run in a distributed, there are four Slave, the total number of threads of execution: 50 * 4 = 200.