A: Demand Source:
First look at the source of the entire demand: When migrating applications to Kubernetes, how to protect the health and stability of the application of it? Actually very simple, it can be enhanced in two ways:
1, the first application is to improve observability;
2, a second application is to improve recoverability.
From the observability concerned, you can do it in three areas to enhance:
1, the first is the health status of the application of the above, can be observed in real time;
2, and the second is access to resources such as application usage;
3, the third is a real-time log can get applications to diagnose and analyze problems .
When there is a problem, the first thing to do is to reduce the scope of influence, debug and diagnose problems. Finally, when something goes wrong, the ideal situation is: can a complete recovery and K8s through integrated self-healing mechanism.
Two: describes two detection methods: livenessProbe and ReadnessProbe
-
livenessProbe: [liveness detection], is to determine whether the health of the container according to user-defined rules. Also known as survival pointer, if the pointer Liveness judge container unhealthy, this time will kill the appropriate pod by kubelet, and to determine whether to restart the container according to the restart strategy. If the default is not configured Liveness pointer, then by default considered to be in default return it the probe was successful.
- ReadnessProbe: [agile probe], used to determine whether to activate this container is completed, i.e., the state of pod (expected value) whether ready. If a result of the detection is not successful, then the time it is removed from the upper Endpoint pod, a pod that is removed from the front for access would top layer (pod set as unavailable state), until the next to judge the success, the pod will again hang onto the appropriate endpoint.
What is Endpoint?
Endpoint k8s is a cluster resource object stored in etcd, the pod for recording all access address corresponding to a service.
2, Liveness and two kinds of detection mechanisms Readness usage scenarios:
Liveness pointer application scenarios is to support those applications can be re-pull, and Readiness pointer major deal with these applications immediately after the start not provide external services.
3, the same point Liveness and Readness two kinds of detection mechanisms and different points:
the same point is based on an application or file within the probe pod, to check the health of the pod, the difference is liveness If the probe fails will restart pod, and readliness then after three consecutive failures to detect, pod set state will be unavailable, and will not restart pod.
4, Liveness Readiness pointer and the pointer detection support three different ways:
- 1. The first is httpGet. It is to be judged by sending a http Get request, when the return code status code between 200-399, the identification of this application is healthy;
- 2, the second detection mode is Exec. It is performed through a command vessel to determine whether the current service is normal, when the result of the command return line is 0, the identity of the vessel is healthy;
- 3, the third detection methods is tcpSocket. It is TCP health check by IP and Port detection container, if the normal TCP link can be established, the identity of the current container is healthy.
The first and third detection methods are very similar, commonly used in the first and second detection methods.
Third, the detection mechanisms application examples:
1, LivenessProbe:
Method 1: Use exec detection methods, whether a specified file exists within the pod to see if there is considered a healthy state, otherwise it will restart strategy according to reboot to restart the pod set.
### pod configuration file:
[root@sqm-master yaml]# vim livenss.yaml
kind: Pod
apiVersion: v1
metadata:
  name: liveness
  labels:
    name: liveness
spec:
  restartPolicy: OnFailure    ##定义重启策略,仅在pod对象出现错误时才重启
  containers:
  - name: liveness
    image: busybox
    args:
    - /bin/sh
    - -c
    - touch /tmp/test; sleep 30; rm -rf /tmp/test; sleep 300  #创建文件,并且在30秒后将文件进行删除
    livenessProbe:      #执行活跃度探测
      exec:
        command:
        - cat              #探测/tmp目录下是有test文件,如果有则代表健康,如果没有则执行重启pod策略。
        - /tmp/test
      initialDelaySeconds: 10        #当容器运行多久之后开始探测(单位是s)
      periodSeconds: 5     #探测频率(单位s),每隔5秒探测一次。
Other detection mechanisms in optional fields:
- initialDelaySeconds: the first execution after the vessel started probing is how many seconds to wait.
- periodSeconds: to perform a probe frequency. The default is 10 seconds, a minimum of 1 second.
- timeoutSeconds: probe timeout. Default 1 second, a minimum of 1 second.
- successThreshold: After the probe fails, the least successful of consecutive probe how many times was only recognized as a success. The default is 1. For liveness must be 1. The minimum value is 1.
- failureThreshold: After detection is successful, how many times a minimum of consecutive probe failures was only identified as a failure. The default is 3. The minimum value is 1.
//运行该pod进行测试:
[root@sqm-master yaml]# kubectl  apply -f  livenss.yaml
pod/liveness created
// monitoring pod of state:
begin probing after the vessel started 10 seconds, and the probe once every 5s. 
We can see that the pod has been restarted, from the figure seen RESTARTS
times already 7 times, because execution of the command at startup pod:
/bin/sh -c "touch /tmp/test; sleep 30; rm -rf /tmp/test; sleep 300"There is a / tmp / test file within the first 30 seconds of the container life, cat in the 30 seconds / tmp / test command returns a successful return code. But 30 seconds later, cat / tmp / test returns a failure return code will trigger the restart strategy pod.
//我们来查看一下pod的Events信息:
[root@sqm-master ~]# kubectl describe pod liveness 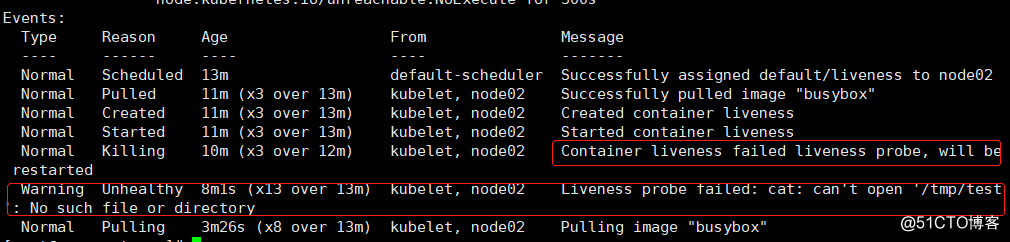
It is found from the above events, the probe fails, it will restart the container, because the file is not found in the specified directory.
Method 2: Use httpGet detection methods, a web service running probe whether the specified file in the root directory of your web page, it is equivalent to "curl -I container ip address: / healthy". (Here, directory /, provides a web service specifies the home directory in the vessel.)
// pod of yaml file:
[root@sqm-master yaml]# vim http-livenss.yaml
apiVersion: v1
kind: Pod
metadata:
  name: web
  labels:
    name: mynginx
spec:
  restartPolicy: OnFailure      #定义pod重启策略
  containers:
  - name: nginx
    image: nginx
    ports:
    - containerPort: 80
    livenessProbe:       #定义探测机制
      httpGet:               #探测方式为httpGet
        scheme: HTTP    #指定协议
        path: /healthy       #指定路径下的文件,如果不存在,探测失败
        port: 80
      initialDelaySeconds: 10       #当容器运行多久之后开始探测(单位是s)
      periodSeconds: 5       #探测频率(单位s),每隔5秒探测一次
---
apiVersion: v1       #关联一个service对象
kind: Service
metadata:
  name: web-svc
spec:
  selector:
    name: mynginx
  ports:
  - protocol: TCP
    port: 80
    targetPort: 80
Detection method httpGet following optional control fields:
- host: host name of the connection, the default connection to the pod of IP. You may want to set "Host" in the http header instead of using IP.
- scheme: the connection schema using the default HTTP.
- path: HTTP server to access the path.
- httpHeaders: header custom request. HTTP run duplicate header.
- port: Port name of the vessel or port access number. Port number must be between 1 and 65,525.
//运行该pod:
[root@sqm-master yaml]# kubectl  apply -f  http-livenss.yaml
pod/web created
service/web-svc created
See pod situation prior to the run 10 seconds ##: 
## 10 seconds of the beginning of the container it is alive, and the returned status code 200.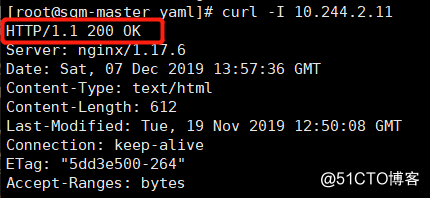
### after 10 seconds when the detection mechanisms to detect start viewing pod situation again:
//查看的pod的events:
[root@sqm-master yaml]# kubectl describe pod web 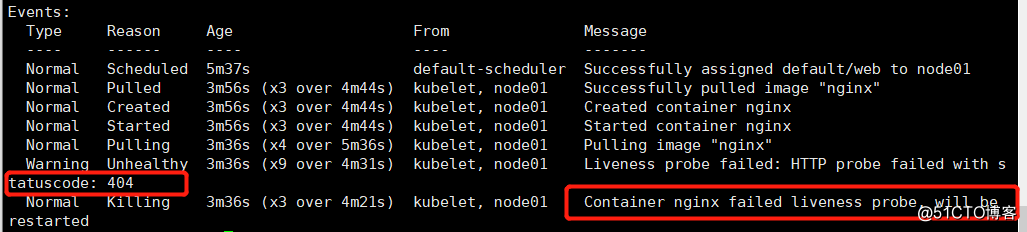
You can see the return of the status code 404 indicates not find the specified file in the root directory of the web page indicates that the detected failure, and restarted four times, the state is completed (completed state), indicating pod is problematic.
2) Next, we continue to detect the probe so that the final success:
modified pod configuration file:
[root @ SQM-Master YAML] # vim HTTP-livenss.yaml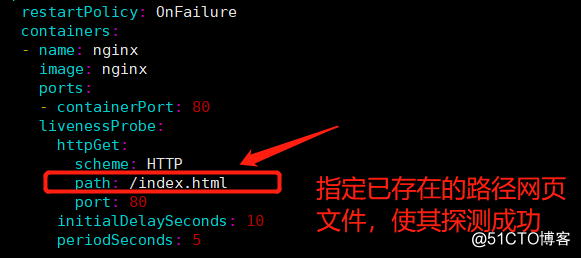
//重新运行pod:
[root@sqm-master yaml]# kubectl  delete -f  http-livenss.yaml
pod "web" deleted
service "web-svc" deleted
[root@sqm-master yaml]# kubectl apply -f  http-livenss.yaml
pod/web created
service/web-svc created
//最终我们查看pod的状态及Events信息:
[root@sqm-master yaml]# kubectl get pod -o wide
NAME READY STATUS RESTARTS AGE IP NODE NOMINATED NODE READINESS GATES
web 1/1 Running 0 5s 10.244.1.11 node01 <none> <none>[root@sqm-master yaml]# kubectl describe pod web
Events:
Type Reason Age From Message
---- ------ ---- ---- -------
Normal Scheduled 71s default-scheduler Successfully assigned default/web to node01
Normal Pulling 71s kubelet, node01 Pulling image "nginx"
Normal Pulled 70s kubelet, node01 Successfully pulled image "nginx"
Normal Created 70s kubelet, node01 Created container nginx
Normal Started 70s kubelet, node01 Started container nginxWhen you can see the status of the normal operation of the pod.
##测试访问网页头部信息:
[root@sqm-master yaml]# curl -I 10.244.1.11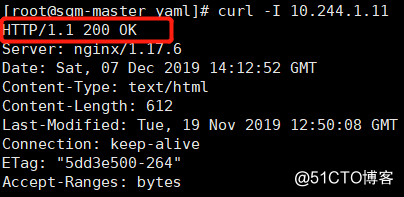
Return status code of 200 and representing the state of health of the pod.
ReadnessProbe detection:
Method 1: Use exec detection methods, and iveness same, detecting whether a file exists.
// pod configuration file as follows:
[root@sqm-master yaml]# vim readiness.yaml
kind: Pod
apiVersion: v1
metadata:
  name: readiness
  labels:
    name: readiness
spec:
  restartPolicy: OnFailure
  containers:
  - name: readiness
    image: busybox
    args:
    - /bin/sh
    - -c
    - touch /tmp/test; sleep 30; rm -rf /tmp/test; sleep 300;
    readinessProbe:   #定义readiness探测方式
      exec:
        command:
        - cat
        - /tmp/test
      initialDelaySeconds: 10
      periodSeconds: 5
//运行该pod:
[root@sqm-master yaml]# kubectl apply -f readiness.yaml
pod/readiness created// Check the state of the pod: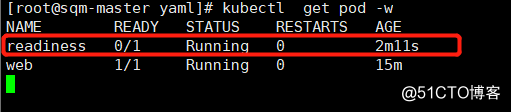
//查看pod的Events:
[root@sqm-master yaml]# kubectl describe pod readiness 
Can be seen not find the file indicates that the detected failure, but different mechanisms of readiness and liveness mechanism, it will not restart the pod, but after three consecutive probe fails, the vessel set to an unusable state.
Method Two: httpGet way.
[root@sqm-master yaml]# vim http-readiness.yaml
apiVersion: v1
kind: Pod
metadata:
  name: web2
  labels:
    name: web2
spec:
  containers:
  - name: web2
    image: nginx
    ports:
    - containerPort: 81
    readinessProbe:
      httpGet:
        scheme: HTTP    #指定协议
        path: /healthy    #指定路径,如果不存在,则需要进行创建,否则探测失败
        port: 81
      initialDelaySeconds: 10
      periodSeconds: 5
---
apiVersion: v1
kind: Service
metadata:
  name: web-svc
spec:
  selector:
    name: web2
  ports:
  - protocol: TCP
    port: 81
    targetPort: 81
//运行pod:
[root@sqm-master yaml]# kubectl apply -f http-readiness.yaml
pod/web2 created
service/web-svc created//查看pod的状态:
[root@sqm-master yaml]# kubectl get pod -o wide
NAME READY STATUS RESTARTS AGE IP NODE NOMINATED NODE READINESS GATES
readiness 0/1 Completed 0 37m 10.244.2.12 node02 <none> <none>
web 1/1 Running 0 50m 10.244.1.11 node01 <none> <none>
web2 0/1 Running 0 2m31s 10.244.1.14 node01 <none> <none>
View Events pod of information by detecting, can know the pod is unhealthy, and http access failure.
It does not restart, but directly to the pod to an unusable state.
Application health monitoring in the rolling update process:
First we see the updated fields used by the explain tool:
[root@sqm-master ~]# kubectl explain deploy.spec.strategy.rollingUpdate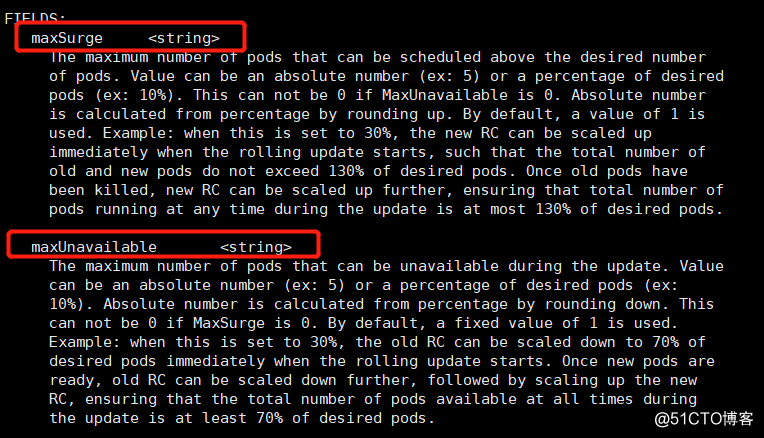
You can see there are two parameters can be used in the process of rolling update:
- maxSurge:此参数控制滚动更新过程中,副本总数超过预期pod数量的上限。可以是百分比,也可以是具体的值,默认为1。如果该值设置为3,则在更新的过程中,一来则会直接增加三个pod进行更新(当然还要进行探测机制的验证是否更新成功)。该值设置得越大、升级速度越快,但会消耗更多的系统资源。
- maxUnavailable:此参数控制滚动更新过程中,不可用的pod的数量,注意是在原pod数量中进行减少,不会计算maxSurge值的范围。若当该值为3时,如果探测失败则在升级的过程中会有3个pod不可用。该值设置得越大、升级速度越快,但会消耗更多的系统资源。
maxSurge和maxUnavailable的适用场景:
1,如果您希望在保证系统可用性和稳定性的前提下尽可能快地进行升级,可以将 maxUnavailable 设置为 0,同时为 maxSurge 赋予一个较大值。
2,如果系统资源比较紧张,pod 负载又比较低,为了加快升级速度,可以将 maxSurge 设置为 0,同时为 maxUnavailable 赋予一个较大值。需要注意的是,如果 maxSurge 为 0maxUnavailable 为 DESIRED,可能造成整个服务的不可用,此时 RollingUpdate 将退化成停机发布
1)首先我们创建一个deployment资源对象:
[root@sqm-master ~]# vim app.v1.yaml
apiVersion: extensions/v1beta1
kind: Deployment
metadata:
  name: my-web
spec:
  replicas: 10              #定义副本数量为10个
  template:
    metadata:
      labels:
        name: my-web
    spec:
       containers:
        - name: my-web
          image: nginx
          args:
          - /bin/sh
          - -c
          - touch /usr/share/nginx/html/test.html; sleep 300000; #创建文件,使其在探测时保持pod为健康状态
          ports:
          - containerPort: 80
          readinessProbe:       #使用readiness机制
            exec:
              command:
              - cat
              - /usr/share/nginx/html/test.html
            initialDelaySeconds: 10
            periodSeconds: 10
//运行该pod后,查看pod数量(10个):
[root@sqm-master yaml]# kubectl get pod -o wide
NAME READY STATUS RESTARTS AGE IP NODE NOMINATED NODE READINESS GATES
my-web-7bbd55db99-2g6tp 1/1 Running 0 2m11s 10.244.2.44 node02 <none> <none>
my-web-7bbd55db99-2jdbz 1/1 Running 0 118s 10.244.2.45 node02 <none> <none>
my-web-7bbd55db99-5mhcv 1/1 Running 0 2m53s 10.244.1.40 node01 <none> <none>
my-web-7bbd55db99-77b4v 1/1 Running 0 2m 10.244.1.44 node01 <none> <none>
my-web-7bbd55db99-h888n 1/1 Running 0 2m53s 10.244.2.41 node02 <none> <none>
my-web-7bbd55db99-j5tgz 1/1 Running 0 2m38s 10.244.2.42 node02 <none> <none>
my-web-7bbd55db99-kjgm2 1/1 Running 0 2m25s 10.244.1.42 node01 <none> <none>
my-web-7bbd55db99-kkmh2 1/1 Running 0 2m38s 10.244.1.41 node01 <none> <none>
my-web-7bbd55db99-lr896 1/1 Running 0 2m13s 10.244.1.43 node01 <none> <none>
my-web-7bbd55db99-rpd8v 1/1 Running 0 2m23s 10.244.2.43 node02 <none> 探测成功,10个副本全部运行。
2)第一次更新:
更新nginx镜像版本,且设置滚动更新策略:
[root@sqm-master yaml]# vim app.v1.yaml
apiVersion: extensions/v1beta1
kind: Deployment
metadata:
  name: my-web
spec:
  strategy:       #设置滚动更新策略,通过该字段下的rollingUpdate的子属性来设置
    rollingUpdate:
      maxSurge: 3                 #指定在滚动更新过程中最多可创建3个额外的 pod
      maxUnavailable: 3     #- 指定在滚动更新过程中最多允许3 pod 不可用
  replicas: 10
  template:
    metadata:
      labels:
        name: my-web
    spec:
       containers:
        - name: my-web
          image: 172.16.1.30:5000/nginx:v2.0    #更新的镜像为私有仓库中的镜像nginx:v2.0
          args:
          - /bin/sh
          - -c
          - touch /usr/share/nginx/html/test.html; sleep 300000;
          ports:
          - containerPort: 80
          readinessProbe:
            exec:
              command:
              - cat
              - /usr/share/nginx/html/test.html
            initialDelaySeconds: 10
            periodSeconds: 10
//执行yaml文件后,查看pod数量:
[root@sqm-master yaml]# kubectl  get pod -o wide
NAME                      READY   STATUS      RESTARTS   AGE     IP            NODE     NOMINATED NODE   READINESS GATES
my-web-7db8b88b94-468zv   1/1     Running     0          3m38s   10.244.2.57   node02   <none>           <none>
my-web-7db8b88b94-bvszs   1/1     Running     0          3m24s   10.244.1.60   node01   <none>           <none>
my-web-7db8b88b94-c4xvv   1/1     Running     0          3m38s   10.244.2.55   node02   <none>           <none>
my-web-7db8b88b94-d5fvc   1/1     Running     0          3m38s   10.244.1.58   node01   <none>           <none>
my-web-7db8b88b94-lw6nh   1/1     Running     0          3m21s   10.244.2.59   node02   <none>           <none>
my-web-7db8b88b94-m9gbh   1/1     Running     0          3m38s   10.244.1.57   node01   <none>           <none>
my-web-7db8b88b94-q5dqc   1/1     Running     0          3m38s   10.244.1.59   node01   <none>           <none>
my-web-7db8b88b94-tsbmm   1/1     Running     0          3m38s   10.244.2.56   node02   <none>           <none>
my-web-7db8b88b94-v5q2s   1/1     Running     0          3m21s   10.244.1.61   node01   <none>           <none>
my-web-7db8b88b94-wlgwb   1/1     Running     0          3m25s   10.244.2.58   node02   <none>           <none>
//查看pod的版本信息:
[root@sqm-master yaml]# kubectl get deployments. -o wide
NAME READY UP-TO-DATE AVAILABLE AGE CONTAINERS IMAGES SELECTOR
my-web 10/10 10 10 49m my-web 172.16.1.30:5000/nginx:v2.0 name=my-web探测成功,10个pod版本全部更新成功。
3)第二次更新:
将镜像版本更新为3.0版本,且设置滚动更新策略。(探测失败)
pod的配置文件如下:
[root@sqm-master yaml]# vim app.v1.yaml
apiVersion: extensions/v1beta1
kind: Deployment
metadata:
  name: my-web
spec:
  strategy:
    rollingUpdate:
      maxSurge: 3                  #定义更新策略,数量依然都是保持3个
      maxUnavailable: 3
  replicas: 10                       #pod数量依然是10个
  template:
    metadata:
      labels:
        name: my-web
    spec:
       containers:
        - name: my-web
          image: 172.16.1.30:5000/nginx:v3.0   #测试镜像版本更新为3.0
          args:
          - /bin/sh
          - -c
          - sleep 300000;        #不在创建指定文件,使其探测失败
          ports:
          - containerPort: 80
          readinessProbe:
            exec:
              command:
              - cat
              - /usr/share/nginx/html/test.html
            initialDelaySeconds: 10
            periodSeconds: 5
//重新运行pod配置文件:
[root@sqm-master yaml]# kubectl apply -f app.v1.yaml
deployment.extensions/my-web configured//查看pod更新后的数量:
[root@sqm-master yaml]# kubectl get pod -o wide
NAME READY STATUS RESTARTS AGE IP NODE NOMINATED NODE READINESS GATES
my-web-7db8b88b94-468zv 1/1 Running 0 12m 10.244.2.57 node02 <none> <none>
my-web-7db8b88b94-c4xvv 1/1 Running 0 12m 10.244.2.55 node02 <none> <none>
my-web-7db8b88b94-d5fvc 1/1 Running 0 12m 10.244.1.58 node01 <none> <none>
my-web-7db8b88b94-m9gbh 1/1 Running 0 12m 10.244.1.57 node01 <none> <none>
my-web-7db8b88b94-q5dqc 1/1 Running 0 12m 10.244.1.59 node01 <none> <none>
my-web-7db8b88b94-tsbmm 1/1 Running 0 12m 10.244.2.56 node02 <none> <none>
my-web-7db8b88b94-wlgwb 1/1 Running 0 12m 10.244.2.58 node02 <none> <none>
my-web-849cc47979-2g59w 0/1 Running 0 3m9s 10.244.1.63 node01 <none> <none>
my-web-849cc47979-2lkb6 0/1 Running 0 3m9s 10.244.1.64 node01 <none> <none>
my-web-849cc47979-762vb 0/1 Running 0 3m9s 10.244.1.62 node01 <none> <none>
my-web-849cc47979-dv7x8 0/1 Running 0 3m9s 10.244.2.61 node02 <none> <none>
my-web-849cc47979-j6nwz 0/1 Running 0 3m9s 10.244.2.60 node02 <none> <none>
my-web-849cc47979-v5h7h 0/1 Running 0 3m9s 10.244.2.62 node02 <none> <none>We can see the current total number of pod is 13, (including maxSurge additional amount) because the probe fails, it is set to be three pod (including additional pod) into an unusable state, but the remaining seven pod available (because maxUnavailable to three), but note: this 7 pod version has not been updated successfully, or on a version.
//查看pod的更新后的版本信息:
[root@sqm-master yaml]# kubectl  get deployments. -o wide
NAME     READY   UP-TO-DATE   AVAILABLE   AGE   CONTAINERS   IMAGES                        SELECTOR
my-web   7/10    6            7           58m   my-web       172.16.1.30:5000/nginx:v3.0   name=my-web
Of parameters:
READY: indicating the user's expectations
UP-TO-DATE: indicates the updated
AVAILABLE: indicate available
We can find the number of the updated image version 6 (including an additional three pod), but as an unusable state, but to ensure that the number of available pod of seven, but the version has not updated.
Summary: The
description of the rollover process, the detection mechanisms do?
If you need to update an application pod in the company, if there is no mechanism to detect, whether the pod is not updated when you've done the work to prepare updating, it will be the application of all the pod to be updated, it will have serious consequences, although the update after you discover pod status is normal, in order to meet expectations controller manager, the value is still 1/1 READY data in the pod, but the pod has been regenerated pod, and said it will be lost.
If we add detection mechanisms, it will detect the container you specify a file or other application exists, if you reach the specified conditions, the probe succeeds, it will be updated on your pod, if the probe fails it will set the pod (container ) is not available, although the failure to detect the container is not available, but at least the previous module, there are other versions of the pod is available, to ensure the normal operation of the company for the service. You can see how important a discovery mechanism yes ah.
-------- end of this article so far, thanks for reading --------