table of Contents
@
Let the object receive shadows
To make shadows on the cube, we make some modifications to the code.
(1) First, we included into a new built-in file in the Base Pass
#include "AutoLight.cginc"This is because we used the following calculation shadow macros are declared in this file.
(2) First, we add a built-in macro SHADOW_COORDS v2f output structure of a vertex shader;
struct v2f{
float4 pos:SV_POSITION;
float3 worldNormal:TEXCOORD0;
float3 worldPos:TEXCOORD1;
SHADOW_COORDS(2);
};
The macro effect is simply to declare a shadow texture coordinate pair for sampling. Note that this macro parameters need to be available for the next index value interpolation register, in the above example is 2.
(3) Then, we added before the vertex shader returns another built-in macro TRANSFER_SHADOW:
V2f Vert (A2V V) {
V2f O;
...
// Pass Shadow coordinates to Pixel Shader
TRANSFER_SHADOW (O);
return O;
};
this macro is used to calculate the previous step declared in the vertex shader shadow texture coordinates.
(4) Next, we calculate the value of the shadow fragment shader, which also uses a built-in macro SHADOW_ATTENUATION:
//Use shadow coordinates to sample shadow map
fixed shadow=SHADOW_ATTENUATION(i);
SHADOW_COORDS, TRANSFER_SHADOW and SHADOW_ATTENUATION the "Three Musketeers" when calculating shadows. We can find them in AutoLight.cginc in a statement:
// ----------
//Shadow helpers
//--------
//------Screen space shadows
#if defined(SHADOWS_SCREEN)
UNITY_DECLARE_SHADOWMAP(_ShadowMapTexture);
#define SHADOW_COORDS(idx1) unityShadowCoord4 _ShadowCoord:TEXCOORD##idx1;
#if defined (UNITY_NO_SCREENSPACE_SHADOWS)
#define TRANSFER_SHADOW_SHADOW(a)a._ShadowCoord=mul(unity_World2Shadow[0],mul(_Object2World,v.vertex));
inline fixed unitySampleShadow (unityShadowCoord4 shadowCoord)
{
...
}
#else//UNITY_NO_SCREENSPACE_SHADOWS
#define TRANSFER_SHADOW(a) a._ShadowCoord=ComputeScreenPos(a.pos);
inline fixed unitySampleShadow(unityShadowCoord4 ShadowCoord)
{
fixed shadow=tex2DProj(_ShadowMapTexture,UNITY_PROJ_COORD(shadowCoord)).r;
return shadow;
}
#endif
#define SHADOW_ATTENUATION(a)unitySampleShadow(a._ShadowCoord)
#endif
//---Spot light shadows
#if defined (SHADOWS_DEPTH)&&defined(SPOT)
...
#endif
//---Point light shadows
#if defined(SHADOWS_CUBE)
...
#endif
//---Shadows off
#if !defined(SHADOWS_SCREEN)&&!defined(SHADOWS_DEPTH)&&!defined(SHADOWS_CUBE)
#define SHADOW_COORDS(idx1)
#define TRANSFER_SHADOW(a)
#define SHADOW_ATTENUATION(a)1.0
#endif
The above code looks very much complicated, in fact, only Unity for processing different types of light sources, a plurality of different versions of the platform defined macros. Forward rendering, macro SHADOW_COORDS actually declare a variable called shadow texture coordinates of _ShadowCoord. TRANSFER_SHADOW achieved will vary depending on the platform. If the current shadow mapping technology platform can use the screen space (obtained by determining whether to define the UNITY_NO_SCREENSPACE_SHADOWS), TRANSFER_SHADOW calls the built-in function to calculate ComputePos _ShadowCoord; if the platform does not support shadow mapping screen space technology, will use the traditional shadow mapping technique, TRANSFER_SHADOW will vertex coordinate transformation from model space to store the light source after _ShadowCoord space. Then SHADOW_ATTENUATION _ShadowCoord responsible for the use of the relevant sample textures, shadows get information.
Noted above defines the built-in code last processing code shadow when closed, it can be seen, when closed shadows, SHADOW_COORDS and actual TRANSFER_SHADOW no effect, while SHADOW_ATTENUATION directly equal to the value 1.
Readers need to note that, due to these macros using context variables related calculations, such as TRANSFER_SHADOW use v.vertex or a.pos to calculate the coordinates, so in order to be able to make these macros work correctly, we need to ensure that custom variable name and these macro variable names used in the match. We need to ensure that: a2f structural body must be the name of the variable apex coordinate vertex, the output structure v2f vertex shader must be named v, and the vertex position v2f variables must be named pos.
(5) After completion of all the above operations, we only need to shadow the shadow value and diffuse reflection and diffuse reflection, and specular color can be multiplied. The results obtained are shown below.
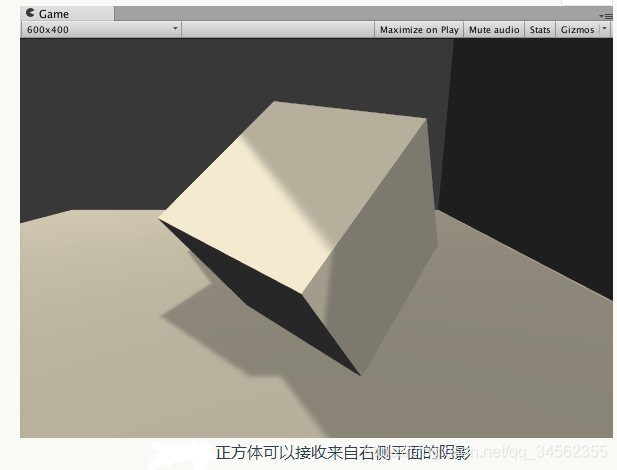
Note that, in the above code we just change the code in the Base Pass so that it can get the shadow effect, but did not make any changes to the Additional Pass. In general, the shadow processing Additional Pass and Base Pass is the same. We will see later how to deal with these shadows. This section of code is implemented only in order to explain how to make an object receive shadows, but can not be directly applied to the project. We will give includes the full light treatment of Unity Shader later.
Use frame debugger to see the shadow of the drawing process
Although we have described above, the process of generating a shadow, but if there is an intuitive way to see the shadow of the drawing process step by step would be great. Fortunately, Unity5 added new debugging tools - frame debugger. We have to use it in front of the drawing process viewed Pass, this section we will look at the process of drawing shadows through it.
First of all, we want to open the frame debugger Window-> Frame Debugger in. The following figure shows the results of the analysis frame debugger
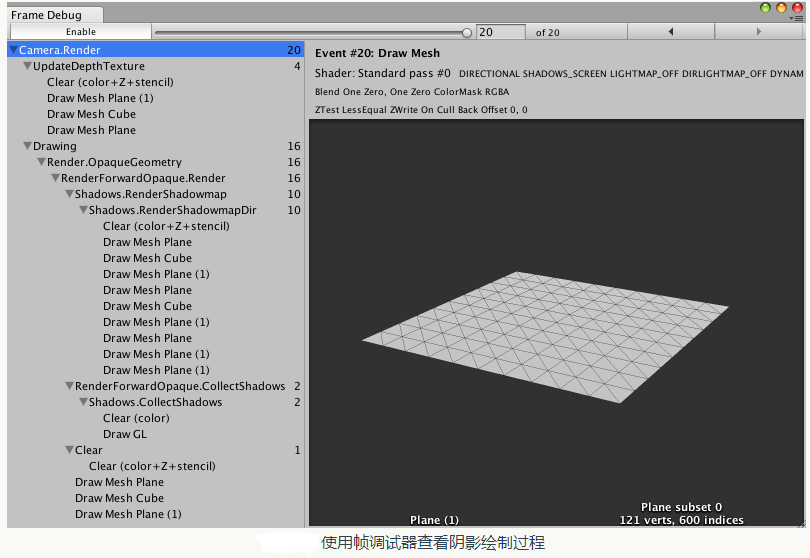
can be seen in the figure, a total draw the scene takes 20 rendering events. These events can be rendered divided into four parts: UpdateDepthTexture, the depth of the texture is updated camera; RenderShadowmap, i.e. rendering the resulting parallel light shadow map texture; CollectShadows, i.e., to obtain the shadow map screen space according to the depth of the texture mapping and shading a texture; final drawing rendering results.
We first look at the first part: updating the camera depth texture, which is rendering the work of the first four events. We can click on these events view their draw result. The following figure shows the results of the update cube depth of the texture.

From the panel on the right debugger we can learn more about this rendering of events. From the graph we can see, Unity called Shader to update the depth texture, ie one third of the Pass. Although on one defines only two Pass, but as we said before, Unity will find in its third Pass Fallback, that LightMode to ShadowCaster Pass to update the depth texture camera. Similarly, in the second part, i.e., to obtain parallel light shadow rendering the texture mapping process, also called Unity shadow map texture Pass the obtained light source.
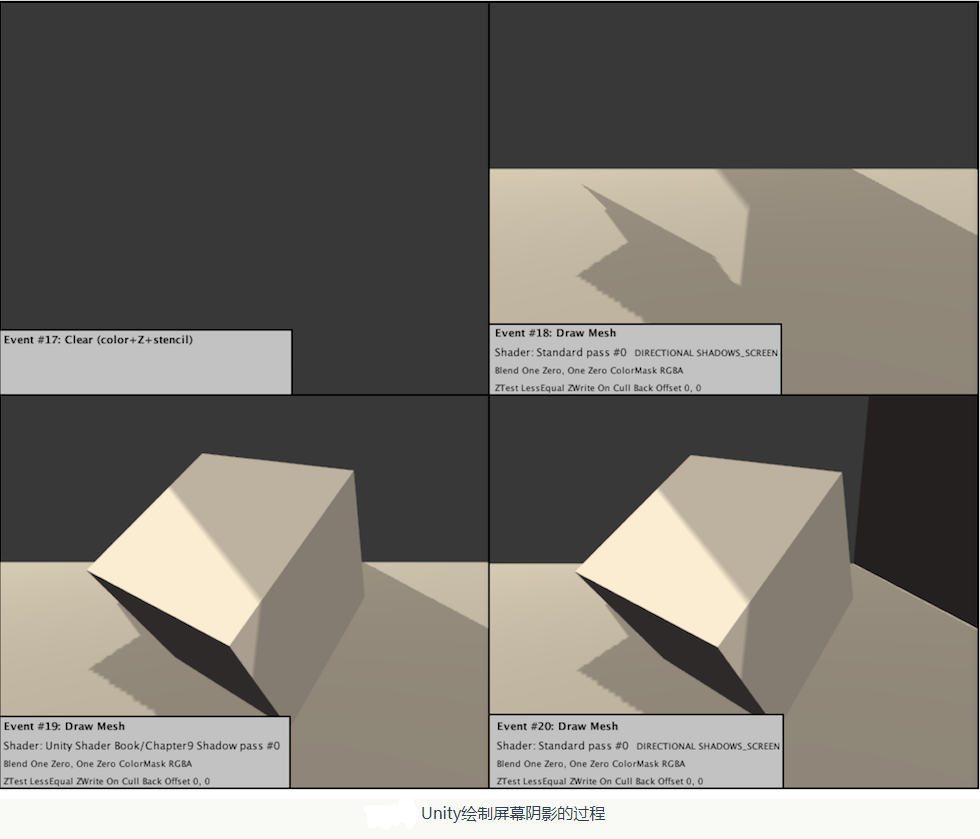
In the third part, will be hatched in FIG Unity screen space, as shown below according to the two previous results:

this figure already contains all the shaded areas on the final screen shadow. In the last section, if used Shader object contains the sampling of the shadow map will give this shadow effect. This part of the figure shows step by step how Unity is drawn hatched screen effect.