参考1: https://www.cnblogs.com/technology-huangyan/p/10484838.html
参考1:https://blog.csdn.net/aiyowei1106/article/details/88703746
emmmm, today we are cloning a virtual machine, really difficult when you install MySQL, this account I have to write it down carefully to police later ha ha ha ha.
Whether in the Linux or Windows, if some "coincidence" appears, then install MySQL it will be difficult. This article today on the record about the bitterness MySQL installation process under CentOS7.
First uninstall the deletion:
1. If you turn the mysql process, then, to kill off! ! !

2, view all installed mysql installation package
View Method 1:

View Method 2:
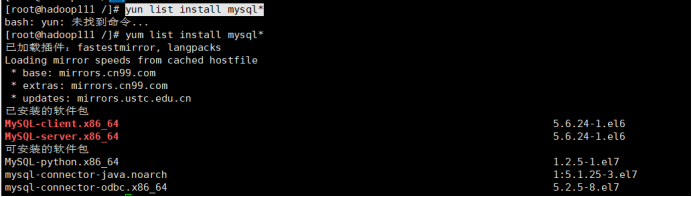
3, uninstall all:
rpm -e --nodeps MySQL-client.x86_64
rpm -e --nodeps MySQL-server.x86_64
4, delete:
First check:
whereis mysql and the Find / - name MySQL, to check out the catalog all deleted!
For example: rm -rf / var / lib / mysql This step is very important, otherwise it will error: can not enter and delete only the lib directory mysql, otherwise invalid, or an error. The reason being given with reference to the second link.

Continue to delete: rm -rf /usr/my.cnf rm -rf /root/.mysql_sercret
Delete mysql boot from the start the service: chkconfig --list | grep -i mysql chkconfig mysqld --del
Then install:
1、wget http://repo.mysql.com/mysql57-community-release-el7-8.noarch.rpm
2、rpm -ivh mysql57-community-release-el7-8.noarch.rpm
3、yum -y install mysql-server(也可以指定安装目录 yum --installroot=/usr/local/mysql --releasever=/ -y install mysql-server)
4、一些配置文件和脚本默认的位置:
配置文件:/etc/my.cnf
日志文件:/var/log/var/log/mysqld.log
服务启动脚本:/usr/lib/systemd/system/mysqld.service
socket文件:/var/run/mysqld/mysqld.pid
5、修改vim /etc/my.cnf
# For advice on how to change settings please see
# http://dev.mysql.com/doc/refman/5.7/en/server-configuration-defaults.html

[mysqld]
#
# Remove leading # and set to the amount of RAM for the most important data
# cache in MySQL. Start at 70% of total RAM for dedicated server, else 10%.
# innodb_buffer_pool_size = 128M
#
# Remove leading # to turn on a very important data integrity option: logging
# changes to the binary log between backups.
# log_bin
#
# Remove leading # to set options mainly useful for reporting servers.
# The server defaults are faster for transactions and fast SELECTs.
# Adjust sizes as needed, experiment to find the optimal values.
# join_buffer_size = 128M
# sort_buffer_size = 2M
# read_rnd_buffer_size = 2M
datadir=/var/lib/mysql
socket=/var/lib/mysql/mysql.sock
server_id = 1
expire_logs_days = 3
# Disabling symbolic-links is recommended to prevent assorted security risks
symbolic-links=0

log-error=/var/log/mysqld.log
pid-file=/var/run/mysqld/mysqld.pid
最后启动MySQL:service mysqld restart
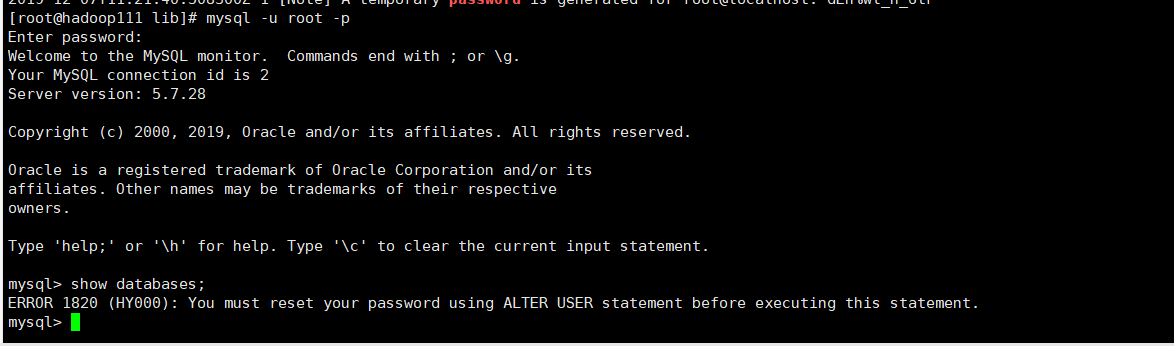
首次启动后去mysqld.log中找临时密码(没启动没得):grep "password" /var/log/mysqld.log

然后输入命令:mysql -u root -p
这是首次登陆,必须重置密码,否则什么也不能操作。
重置密码命令:alter user 'root'@'localhost' identified by 'Lsj199712.’;需要包含大小写字母,数字,和特殊字符
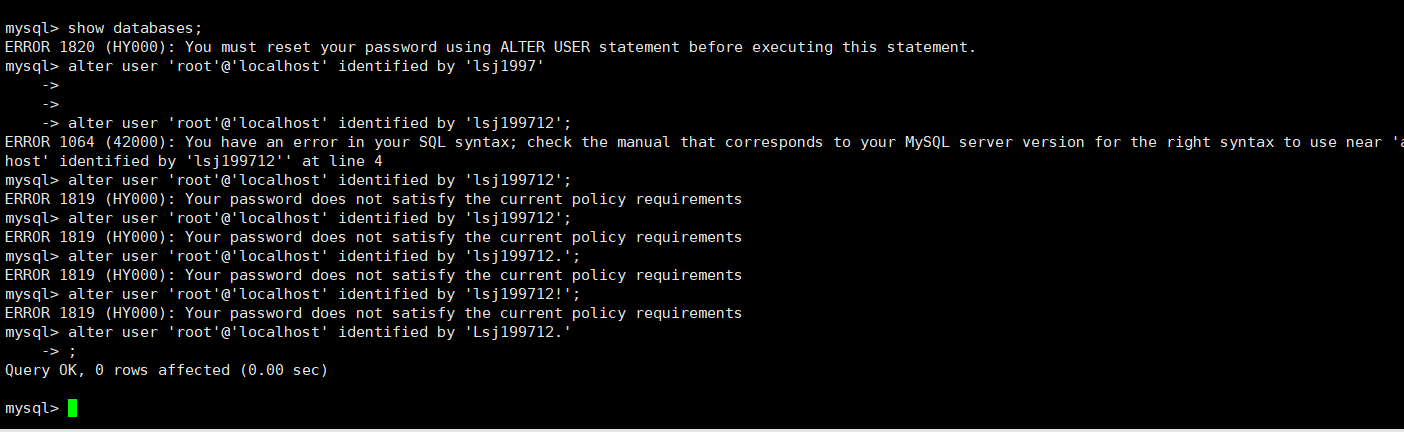
最后刷新权限:flush privileges,然后就可以查看操作数据库了。
附:Mysql启动命令:service mysqld start,systemctl start mysqld.service。Mysql重启命令:service mysqld restart。Mysql关闭命令:service mysqld stop,systemctl stop mysqld.service。查看Mysql状态:systemctl status mysqld.service。