A, Docker image creation method
docker mirror is in addition to the core technology docker, but also the application of the standard release format. A complete docker mirror can support the operation of a docker container, after entering an already shaped container, can operate throughout the course docker in the container, the most common operation is to install apps in the container, if should have installed the migration service, we need to integrate environmental and building services to generate new image.
There are three ways to create a mirror, there are image creation, and creation based on local dockerfile create a template based.
1, based on existing image creation
created primarily docker commit command based on the existing image, its essence is put inside a container packed program running and operating environment of the program up to generate a new image.
Format: Docker the commit [Options] container ID / Name Warehouse name: [label]
Common options
-m: descriptive information;
-a: Author Information;
-p: the build process stops the operation of the vessel;
Start a mirror, make changes in the container, and then submit the modified container for the new image, we need to remember the ID number of the container
[root@test /]# docker ps -a                   # 查看当前容器
CONTAINER ID        IMAGE                         COMMAND                  CREATED             STATUS              PORTS               NAMES
bdd5bb814008        docker.io/networkboot/dhcpd   "/entrypoint.sh /b..."   5 seconds ago       Created                                 stupefied_ptolemy
[root@test /]# docker exec -it bdd5bb814008 /bin/bash            # 进入到该容器,创建一个测试文件
root@bdd5bb814008:/# ls
bin  boot  core  dev  entrypoint.sh  etc  home  lib  lib64  media  mnt  opt  proc  root  run  sbin  srv  sys  tmp  usr  var
root@bdd5bb814008:/# touch test.txt
root@bdd5bb814008:/# exit
exit
[root@test /]# docker commit -m "newdhcp" -a "test" bdd5bb814008 docker:mydhcp          # 将已有容器创为镜像
sha256:d6197c6e3f650d3ef69d13324634759705821b0ed516e8fe631fded72acb9d54
[root@test /]# docker images  | grep docker              # 查看刚刚创建好的镜像
docker                        mydhcp              d6197c6e3f65        24 seconds ago      125 MB
docker.io/networkboot/dhcpd   latest              6f98b6b9b486        19 months ago       125 MB
[root@test /]# docker create -it docker:mydhcp /bin/bash               # 添加为容器
ea434b08d511867be662704ee81d0b5876e922efa50f5f52843daa762185c16a
[root@test /]# docker ps -a
CONTAINER ID        IMAGE                         COMMAND                  CREATED             STATUS              PORTS               NAMES
ea434b08d511        docker:mydhcp                 "/entrypoint.sh /b..."   25 seconds ago      Created                                 compassionate_shirley
bdd5bb814008        docker.io/networkboot/dhcpd   "/entrypoint.sh /b..."   5 minutes ago       Up 4 minutes                            stupefied_ptolemy
[root@test /]# docker start ea434b08d511                        # 启动该容器
ea434b08d511
[root@test /]# docker exec -it ea434b08d511 /bin/bash             # 进入到该容器,查看刚刚所创建的测试文件
root@ea434b08d511:/# ls
bin  boot  core  dev  entrypoint.sh  etc  home  lib  lib64  media  mnt  opt  proc  root  run  sbin  srv  sys  test.txt  tmp  usr  var
2, based on local templates to create
can generate images, a template can be downloaded from OPENVZ open source operating system project by importing the template file, download address is: http://openvz.org/Download/template/precreated
[root@test /]# wget http://download.openvz.org/template/precreated/ubuntu-14.04-x86_64-minimal.tar.gz
# 下载一个迷你版的Ubuntu模板
[root@test /]# cat ubuntu-14.04-x86_64-minimal.tar.gz | docker import - docker:new
sha256:7457fecee0fb28ab06d935e7a9a5a040d9d6ec8931959b752f596cde76a5d647
# 将模板导入
[root@test /]# docker images |grep new              # 查看已经导入
docker                        new                 7457fecee0fb        About a minute ago   215 MB
3, based on Dockerfile create
dockerfile is a file consisting of a set of instructions, wherein each instruction corresponding to a command in Linux, Docker program reads the command generating dockerfile specified image.
dockerfile structure roughly divided into four parts: the base image information, perform a maintainer information, instructions and image containers start command. dockerfile per line support an instruction, each instruction can carry multiple parameters, to support the use of the comment beginning number of "#".
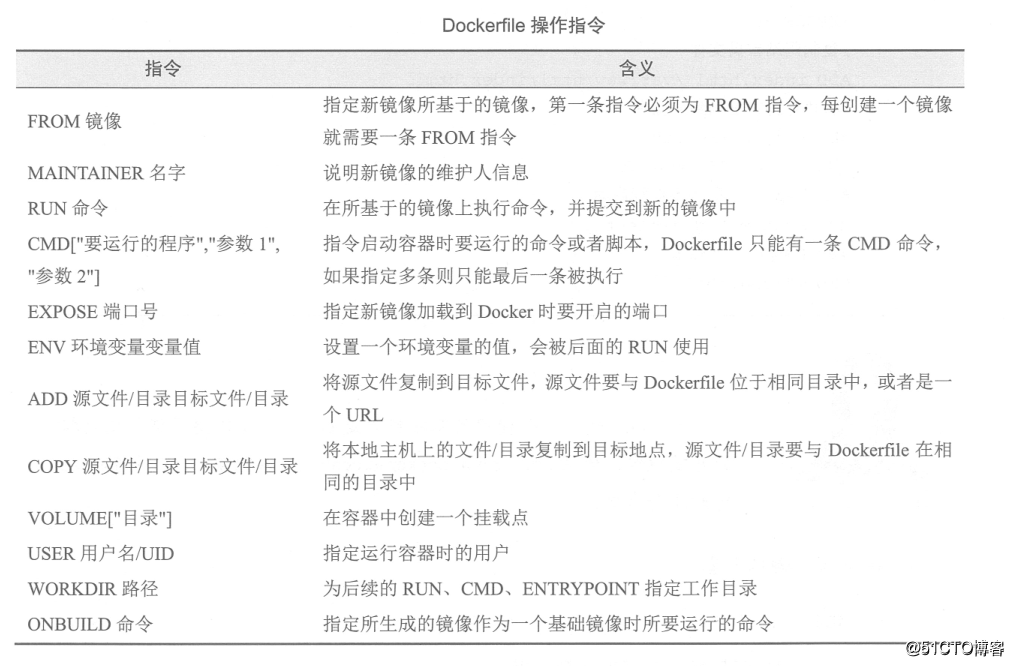
dockerfile configuration item description:
[root@localhost ~]# docker tag docker:new centos7:system
#将上面下载的centos 7迷你镜像更改下名字及标签,以便区分
[root@localhost ~]# docker images | grep system
#确认基础镜像已经准备好(就是一个centos 7的迷你系统进行)
centos7                       system              c065d5c0571d        About an hour ago   435 MB
[root@localhost ~]# vim Dockerfile   #编辑一个Dockerfile文件,注意:文件名最好就是Dockerfile

FROM centos           #第一行必须指明基于的基础镜像(该镜像必须存在)
MAINTAINER The centos project <[email protected]>    #维护该镜像的用户信息
#以下是镜像的操作指令
RUN yum -y update
RUN yum -y install openssh-server
RUN sed -i 's/UsePAM yes/UsePAM no/g' /etc/ssh/sshd_config
RUN ssh-keygen -t dsa -f /etc/ssh/ssh_host_dsa_key
RUN ssh-keygen -t rsa -f /etc/ssh/ssh_host_rsa_key
EXPOSE 22       #开启22端口
CMD ["/usr/sbin/sshd","-D"]     #启动容器时执行指令
In preparing dockerfile, need to follow a strict format: The first line must FROM instruction specifies the name of the mirror is based; MAINTAINER after use the user instruction information of the maintenance instructions mirror; then the image related to the operation instruction, such as instruction RUN, each an operation instruction, will be added to a new layer of the base image; last used to specify the command CMD command to run when the container starts operation.
dockerfile dozen commands for building a mirror, wherein the common command is as follows:
Example: Use dockerfile create and run apache mirror in a container
[root@test /]# mkdir apache                        # 创建工作目录
[root@test /]# cd /apache/
[root@test apache]# vim Dockerfile                # 创建并编写 Dockerfile文件
FROM    centos                               # 基于的基础镜像centos
MAINTAINER      the centos            # 维护该镜像的用户信息
RUN     yum -y update                     # 镜像操作指令安装 Apache 软件包
RUN     yum -y install httpd
EXPOSE  80                                    # 开启80端口
ADD     index.html /var/www/html/index.html               # 复制网站首页文件
ADD     run.sh /run.sh                     # 将执行脚本复制到镜像中
RUN     chmod 775 /run.sh
RUN     systemctl disable httpd           # 设置Apache服务不自行启动
CMD     ["/run.sh"]                     # 启动容器时执行脚本

[root@test apache]# vim run.sh                     # 编写执行脚本内容
#!/bin/bash
rm -rf /run/httpd/*                           # 清理 httpd 缓存
exec /usr/sbin/apachectl -D FOREGROUND                # 启动Apache服务
[root@test apache]# echo "www.test.com" > index.html                 # 创建测试页面
[root@test apache]# ls
Dockerfile  index.html  run.sh
[root@test apache]# docker build -t httpd:centos .
............................               // 省略部分内容
# 注意注意注意:这条命令后面有一个“.”    代表当前路径,否则会报错,切记千万不要忘记
[root@test apache]# docker run -d -p 12345:80 httpd:centos # 使用新的镜像运行容器,-p 选项实现从本地端口12345到容器的80端口映射
0721b1641ce0651d618a393b85d34606180dd33d4795621db320865cda8f3a0a
[root@test apache]# docker ps -a # 查看容器
CONTAINER ID IMAGE COMMAND CREATED STATUS PORTS NAMES
0721b1641ce0 httpd:centos "/run.sh" 6 seconds ago Up 6 seconds 0.0.0.0:12345->80/tcp sad_mcclintock
Access container apache service 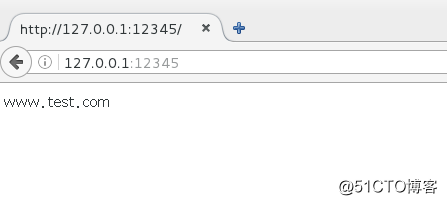
Second, build a private library and its use
with the increase in image creation, you need to have a place to store the image, which is the warehouse, there are two warehouses: public warehouses and private warehouses, the company's production most environments are saved to a private warehouse, the easiest thing to download on a public warehouse mirror, mirror if uploaded to a public warehouse, you need to register and log in, upload on public warehouses, refer to https: // blog. 51cto.com/14227204/2453408
how to build a private warehouse it? You can use the registry to build local private warehouse
[root@test ~]# docker search registry               #查询关键字“registry”
INDEX       NAME                                          DESCRIPTION                                     STARS     OFFICIAL   AUTOMATED
docker.io   docker.io/registry                            The Docker Registry 2.0 implementation for...   2679      [OK]
                 ..................#省略部分内容
[root@localhost ~]# docker pull docker.io/registry     #下载排名靠前的镜像
                 ..................#省略部分内容
Status: Downloaded newer image for docker.io/registry:latest    #下载成功
[root@localhost ~]# vim /etc/sysconfig/docker
#修改docker配置文件指定私有仓库URL,否则在自定义的私有仓库中上传镜像时会报错

# /etc/sysconfig/docker

# Modify these options if you want to change the way the docker daemon runs
OPTIONS='--selinux-enabled --insecure-registry=192.168.1.1:5000'
#更改上面一行内容,其中的IP地址是作为私有仓库服务器的IP地址,这里就是本机的IP地址。
                           ..................#省略部分
#修改完毕后保存退出
[root@test ~]# systemctl restart docker      #重启docker
Use a good registry download mirror start a container, by default, the warehouse stored in the container / tmp / registry directory, use -v option to mount local directories under / tmp / registry directory in the case of container, so mirroring will also be lost after the container is not afraid to be deleted. Start a private service at a local warehouse, listening port number 5000.
Note: I have a local / data / registry directory (mount is a high-availability GFS file system, you can use NFS, you can choose on their own, but it is recommended for important data storage directory, we must ensure the dynamic capacity expansion and disk damage caused by data loss), will be mounted to the private warehouse container / tmp / registry directory for storing uploaded to a private warehouse image file.
[root@test ~]# df -hT /data/registry/             #查看我这个目录所使用的文件系统
文件系统         类型            容量  已用  可用 已用% 挂载点
node4:dis-stripe fuse.glusterfs   80G  130M   80G    1% /data/registry
[root@test ~]# docker run -d -p 5000:5000 -v /data/registry/:/tmp/registry docker.io/registry
#启动私有仓库,并做端口映射到主机的5000端口,将本地的/data/registry目录挂载到容器中的/tmp/registry目录
#docker.io/registry是刚才下载的私有仓库镜像。
a6bf726c612b826e203d6a5bc9eaba26c36195913d3ea546c2111ce290a5524d
[root@test ~]# docker tag docker.io/registry 192.168.1.1:5000/registry
#使用docker  tag命令将要上传的镜像docker.io/registry改一下标记,其中的IP及端口为固定的,否则无法连接到私有仓库
#因为在上面运行容器时,做了端口映射,将私有仓库的端口号映射到了宿主机的5000端
口,
#所以直接访问宿主机的5000端口,就相当于访问了私有仓库。
[root@test ~]# docker images | grep 5000            #找到要上传的镜像
192.168.1.1:5000/registry     latest              f32a97de94e1        6 months ago        25.8 MB
[root@test ~]# docker push 192.168.1.1:5000/registry            #上传至刚刚运行的私有仓库
The push refers to a repository [192.168.1.1:5000/registry]
73d61bf022fd: Pushed
5bbc5831d696: Pushed
d5974ddb5a45: Pushed
f641ef7a37ad: Pushed
d9ff549177a9: Pushed
latest: digest: sha256:b1165286043f2745f45ea637873d61939bff6d9a59f76539d6228abf79f87774 size: 1363
#下面再上传一个镜像,进行测试。
[root@test ~]# docker images | grep mynamed            #就上传它了
docker                        mynamed             e178f320e482        4 hours ago         323 MB
[root@test ~]# docker tag docker:mynamed 192.168.1.1:5000/named:test
#老规矩,必须改仓库名,注意:若标签不是默认的latest,那么还需要在仓库名后面接上标签名
[root@test ~]# docker images | grep 192.168.1.1:5000/named     #确定更改成功
192.168.1.1:5000/named        test                e178f320e482        4 hours ago         323 MB
[root@test ~]# docker push 192.168.1.1:5000/named:test       #上传至私有仓库
The push refers to a repository [192.168.1.1:5000/named]
c756b9ec7fb0: Pushed
7d8d01394159: Pushed
72b7cd87d69b: Pushed
3be48ef75683: Pushed
9b28c58ad64b: Pushed
75e70aa52609: Pushed
dda151859818: Pushed
fbd2732ad777: Pushed
ba9de9d8475e: Pushed
test: digest: sha256:44894a684eac72a518ae5fa66bcbe4e4a9429428ef7ac6f4761022f8ac45ac5f size: 2403
So far, tests on finished, but how to prove private warehouse is local / data / registry directory it? And how to upload the image to view it? (Uploaded to a private warehouse mirroring you can not use the normal ls command to view).
[root@test ~]# df -hT /data/registry/           #先查看本地/data/registry/ 挂载的文件系统
文件系统         类型            容量  已用  可用 已用% 挂载点
node4:dis-stripe fuse.glusterfs   80G  130M   80G    1% /data/registry
[root@test ~]# docker exec -it a6bf726c612b /bin/sh
#进入私有仓库的容器中,该容器没有/bin/bash,所以使用的是/bin/sh。
/ # df -hT /tmp/registry/   #查看发现,该目录挂载的和宿主机挂载的文件系统是同一个,说明没问题。
Filesystem           Type            Size      Used Available Use% Mounted on
node4:dis-stripe     fuse.glusterfs
                                    80.0G    129.4M     79.8G   0% /tmp/registry
                   ——————————————————————
#那么如何查看上传至私有仓库的镜像呢?请看下面:
[root@test ~]# curl -XGET http://192.168.1.1:5000/v2/_catalog
#查看已经上传的镜像,可以看到刚刚上传的那两个镜像
{"repositories":["named","registry"]}
#只知道镜像名还不够,若要下载,还需要镜像对应的标签,那么怎么查看某个镜像的标签呢?
[root@test ~]# curl -XGET http://192.168.1.1:5000/v2/named/tags/list
#就这样查看咯,上面URL路径中的named就是镜像名,查看的就是镜像named对应的标签
{"name":"named","tags":["test"]}
[root@test ~]# docker pull 192.168.1.1:5000/named:test      #将私有仓库中的镜像下载下来
#前面必须指定私有仓库的访问地址,就是上传时的名字是什么,下载时就是什么,哪怕查询的镜像名中没有IP地址。
Trying to pull repository 192.168.1.1:5000/named ...
sha256:44894a684eac72a518ae5fa66bcbe4e4a9429428ef7ac6f4761022f8ac45ac5f: Pulling from 192.168.1.1:5000/named
Digest: sha256:44894a684eac72a518ae5fa66bcbe4e4a9429428ef7ac6f4761022f8ac45ac5f
Status: Downloaded newer image for 192.168.1.1:5000/named:test
If you need to download proprietary warehouse mirrored on other servers, we need to execute the following command on the other server to specify the private warehouse server address:
[root@node1 ~]# echo '{ "insecure-registries":["xxx.xxx.xxx.xxx:5000"] }' > /etc/docker/daemon.json
#其中xxx.xxx.xxx.xxx:5000代表访问私有仓库的IP地址及端口,根据自己的服务器情况来定
[root@node1 ~]#systemctl restart docker          #重启docker服务