3. Spring Bean
3.1 Bean Configuration
Spring can be seen as a large factory for the production and management of the Spring container Bean. If you want to use this factory production and management bean, Bean developers will need to configure the Spring configuration file. Spring framework supports XML and Properties two configuration file format, common configuration file in XML format in the actual development.
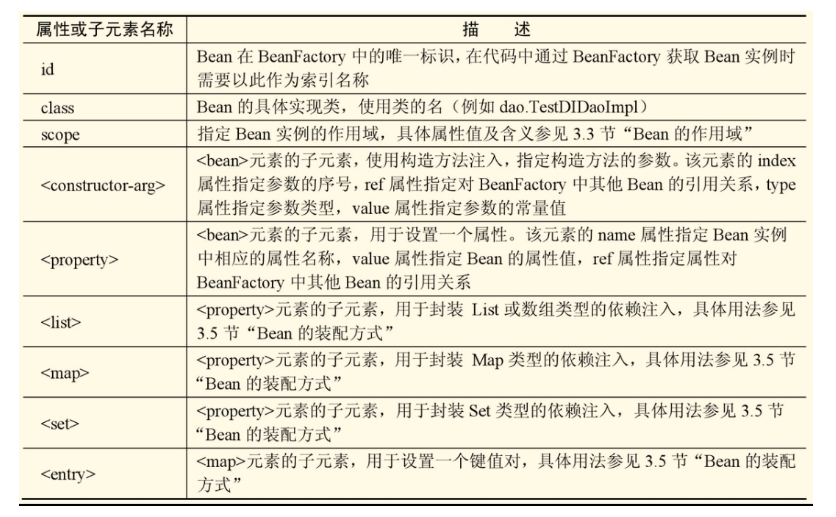
3.1.1 <bean>common attributes and child element
3.1.2 Bean configuration example of code
<?xml version="1.0" encoding="UTF-8"?>
<beans xmlns="http://www.springframework.org/schema/beans"
    xmlns:xsi="http://www.w3.org/2001/XMLSchema-instance"
    xsi:schemaLocation="http://www.springframework.org/schema/beans
        http://www.springframework.org/schema/beans/spring-beans.xsd">
    <!-- 使用id属性定义myTestDIDao,其对应的实现类为dao.TestDIDaoImpl-->
    <bean id="myTestDIDao" class="dao.TestDIDaoImpl" />
    <!-- 使用构造方法注入 -->
    <bean id="testDIService" class="service.TestDIServiceImpl">
        <!-- 给构造方法传引用类型的参数值myTestDIDao -->
        <constructor-arg index="0" ref="myTestDIDao"/>
    </bean>
</beans>
3.2 Bean instantiation
In the Spring framework, if you want to use the container Spring Bean, need to instantiate Bean. Examples of the Spring Framework Bean there . 3 ways, i.e. constructor instantiated , static factory instantiation , and examples of plant instantiated , where the most common is the constructor instantiated .
3.2.1 constructor instantiated
In the Spring framework, Spring container configuration parameters can be called without a corresponding Bean class method to instantiate Bean , this constructor is called instantiation.
Examples of presentations:
Create a Web application, create the instance package in the src directory, create BeanClass class in package
package instance;
public class BeanClass {
    public String message;
    public BeanClass() {
        message = "构造方法实例化Bean";
  }

    public BeanClass(String s) {
        message = s;
    }
}
Create a profile
<?xml version="1.0" encoding="UTF-8"?>
<beans xmlns="http://www.springframework.org/schema/beans"
       xmlns:xsi="http://www.w3.org/2001/XMLSchema-instance"
       xsi:schemaLocation="http://www.springframework.org/schema/beans
                           http://www.springframework.org/schema/beans/spring-beans.xsd">

<!--    构造方法实例化Bean-->
    <bean id="constructorInstance" class="instance.BeanClass" />

</beans>
Create a test class
package test;

import instance.BeanClass;
import org.springframework.context.ApplicationContext;
import org.springframework.context.support.ClassPathXmlApplicationContext;

public class TestInstance {
    public static void main(String[] args) {
//        初始化Spring容器ApplicationContext,加载配置文件
        ApplicationContext appCon = new ClassPathXmlApplicationContext("applicationContext.xml");
//        测试构造方法实例化Bean
        BeanClass b1 = (BeanClass) appCon.getBean("constructorInstance");
        System.out.println(b1+b1.message);
    }

}
operation result

3.2.2 Examples of static factory
When using a static factory instance of Bean requires developers to create a static method in the factory class to create an instance of the Bean . When configuring Bean, class attribute specifies a static factory class, which also requires the factory-method property specifies a static factory method in the class .
Examples of presentations:
Create a factory class BeanStaticFactory, create a factory class BeanStaticFactory instance in package
package instance;

public class BeanStaticFactory {
    private static BeanClass beanInstance = new BeanClass("调用静态工厂方法实例化Bean");
    public static BeanClass createInstance() {
        return beanInstance;
    }

}
Edit Profile
<?xml version="1.0" encoding="UTF-8"?>
<beans xmlns="http://www.springframework.org/schema/beans"
       xmlns:xsi="http://www.w3.org/2001/XMLSchema-instance"
       xsi:schemaLocation="http://www.springframework.org/schema/beans http://www.springframework.org/schema/beans/spring-beans.xsd">

<!--    静态工厂方法实例化Bean,createInstance为静态工厂类BeanStaticFactory中的静态方法-->
    <bean id="staticFactoryInstance" class="instance.BeanStaticFactory" factory-method="createInstance" />
</beans>
Add test code
package test;

import instance.BeanClass;
import org.springframework.context.ApplicationContext;
import org.springframework.context.support.ClassPathXmlApplicationContext;

public class TestInstance {
    public static void main(String[] args) {
//        初始化Spring容器ApplicationContext,加载配置文件
        ApplicationContext appCon = new ClassPathXmlApplicationContext("applicationContext.xml");
//        测试静态工厂方法实例化Bean
        BeanClass b2 = (BeanClass) appCon.getBean("staticFactoryInstance");
        System.out.println(b2+b2.message);

    }
}
running result

3.2.3 Examples of plant instantiated
When instantiating Example Bean plants requires developers to create an instance of the class method in the factory to create an instance of the Bean . Required when configuring Bean factory-method property specifies the plant configuration example, also requires the use of factory-method attribute specifies the method of Example instance in the plant .
Create a factory class BeanStaticFactory
BeanInstanceFactory factory class instance created in the package, there is a class to instantiate an object class instance method
package instance;

public class BeanInstanceFactory {
    public BeanClass createBeanClassInstance() {
        return new BeanClass("调用实例工厂方法实例化Bean");
    }
}
Edit Profile
<?xml version="1.0" encoding="UTF-8"?>
<beans xmlns="http://www.springframework.org/schema/beans"
       xmlns:xsi="http://www.w3.org/2001/XMLSchema-instance"
       xsi:schemaLocation="http://www.springframework.org/schema/beans http://www.springframework.org/schema/beans/spring-beans.xsd">

<!--    配置工厂-->
    <bean id="myFactory" class="instance.BeanInstanceFactory" />
<!--    使用factory-bean属性指定配置工厂,使用factory-method属性指定使用工厂中的哪个方法实例化Bean-->
    <bean id="instanceFactoryInstance" factory-bean="myFactory" factory-method="createBeanClassInstance" />
</beans>
Add test code
package test;

import instance.BeanClass;
import org.springframework.context.ApplicationContext;
import org.springframework.context.support.ClassPathXmlApplicationContext;

public class TestInstance {
    public static void main(String[] args) {
//        初始化Spring容器ApplicationContext,加载配置文件
        ApplicationContext appCon = new ClassPathXmlApplicationContext("applicationContext.xml");
//        测试实例工厂方法实例化Bean
        BeanClass b3 = (BeanClass) appCon.getBean("instanceFactoryInstance");
        System.out.println(b3+b3.message);

    }
}
running result

3.3 Bean scopes
3.3.1 Spring 5.0 defined for instance in the scope Bean
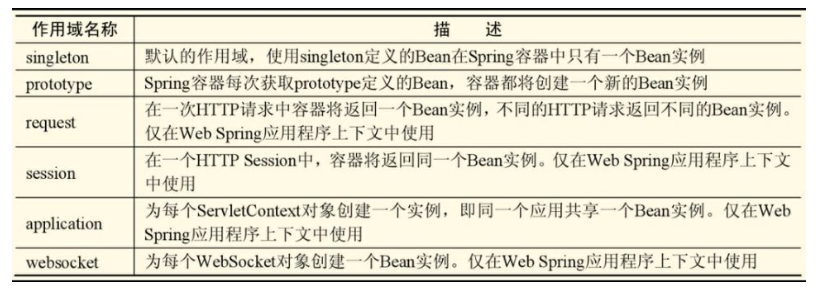
singleton and prototype are two most commonly used, followed by 4 in the scopes used to make Web Spring application context.
3.3.2 singleton scope
When the scope is set to the bean Singleton, the Spring and manage only the IoC container generates a Bean instance . When using id or instance name Get Bean, IoC container will return Bean instance sharing.
The default mode when the scope of the singleton, there are two ways the bean's scope is set to singleton. Examples are as follows:
<bean id="constructorInstance" class="instance.BeanClass" />
or
<bean id="constructorInstance" class="instance.BeanClass" scope="singleton"/>
When using id or instance name Get Bean, IoC container return only the same Bean instance.
3.3.3 prototype scope
When the bean's scope is set to prototype, the Spring IoC container will create a new instance of each request . Examples are as follows:
<bean id="constructorInstance" class="instance.BeanClass" scope="prototype"/>
3.4 Bean Life Cycle
- Bean's life cycle:
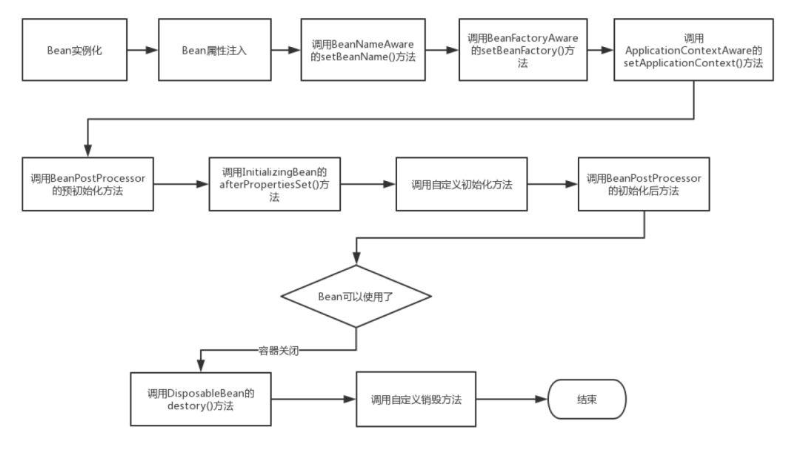
- Step text description:
- Spring starts, find and load needs to be managed bean Spring, Bean is instantiated.
- Bean instantiated to be introduced and injected into the Bean Bean value of property.
- If the Bean implements the interface, then BeanNameAware, Spring Bean of the Id passed to setBeanName () method.
- If the Bean implements the interface, then BeanFactoryAware, Spring will call setBeanFactory () method, passing the BeanFactory container instance.
- If the Bean implements the interface, then ApplicationContextAware, Spring will call setApplicationContext Bean's () method, where the application context bean reference passed in.
- If the Bean implements BeanPostProcessor interface, Spring will call their postProcessBeforeInitialization () method.
- If the Bean implements the interface InitializingBean, Spring will call their afterPropertiesSet () method. Similarly, if the bean using init-method declares initialization method, which is also called
- If the Bean implements BeanPostProcessor interface, Spring will call their postProcessAfterInitialization () method.
- At this time, Bean is ready, the application can be used. They will always reside in the application context, until the application context is destroyed.
- If the bean implements the interface DisposableBean, Spring will call its destory () interface method Likewise, if the bean used destory-method declaration destruction method, which is also called.
Examples demonstrate Bean's life cycle:
Create a Bean implementation class
Creating life package in the src directory, create a class in life BeanLife package. There are two ways in BeanLife class, a demonstration initialization method, a demonstration of the destruction process.
package life;

public class BeanLife {
    public void initMyself() {
        System.out.println(this.getClass().getName()+"执行自定义的初始化方法");
    }

    public void destoryMyself() {
        System.out.println(this.getClass().getName()+"执行自定义的销毁方法");
    }
}
Configuration Bean
A class that implements BeanLife configured in the Spring configuration file an id beanLife of Bean.
<?xml version="1.0" encoding="UTF-8"?>
<beans xmlns="http://www.springframework.org/schema/beans"
       xmlns:xsi="http://www.w3.org/2001/XMLSchema-instance"
       xsi:schemaLocation="http://www.springframework.org/schema/beans http://www.springframework.org/schema/beans/spring-beans.xsd">

<!--    配置bean,使用iniit-method属性指定初始化方法,使用destroy-method属性指定销毁方法-->
    <bean id="beanLife" class="life.BeanLife" init-method="initMyself" destroy-method="destoryMyself" />
</beans>
Test lifecycle
Create a test class TestLife in the test package.
package test;

import life.BeanLife;
import org.springframework.context.support.ClassPathXmlApplicationContext;

public class TestLife {
    public static void main(String[] args) {
//        初始化Spring容器,加载配置文件
//        为了方便演示销毁方法的执行,这里使用ClassPathXmlApplicationContext
//        实现类声明容器
        ClassPathXmlApplicationContext ctx = new ClassPathXmlApplicationContext("applicationContext.xml");
        System.out.println("获得对象前");
        BeanLife blife = (BeanLife)ctx.getBean("beanLife");
        System.out.println("获得对象后" + blife);
        ctx.close();     //关闭容器,销毁Bean对象
    }
}
running result

3.5 Bean fitting way
Bean assembly may be understood to be injected into the bean dependency Spring container , Bean Bean way that the assembly dependency injection manner .
3.5.1 XML-based configuration of the assembly
In using the injection method Bean assembly construction method when, Bean implementation class needs to provide parameters to the constructor , and in the configuration file
Examples of presentations:
Create a Bean implementation class
Creating assemble the package in the src directory, create ComplexUser class under assemble package. Constructor injection method using the setter and use properties of injection respectively ComplexUser class.
package assemble;

import java.util.List;
import java.util.Map;
import java.util.Set;

public class ComplexUser {
    private String uname;
    private List<String> hobbyList;
    private Map<String,String> residenceMap;
    private Set<String> aliasSet;
    private String[] array;

    /*
    使用构造方法注入,需要提供带参数的构造方法
     */
    public ComplexUser(String uname, List<String> hobbyList, Map<String, String> residenceMap, Set<String> aliasSet, String[] array) {
        super();
        this.uname = uname;
        this.hobbyList = hobbyList;
        this.residenceMap = residenceMap;
        this.aliasSet = aliasSet;
        this.array = array;
    }
    /**
     * 使用属性的setter方法注入,提供默认无参数的构造方法,并为注入的属性提供setter方法
     */
    public ComplexUser() {
        super();
    }

    @Override
    public String toString() {
        return  "uname=" + uname + ";hobbyList=" + hobbyList + ";residenceMap=" + residenceMap + ";aliasSet=" + aliasSet +";array=" + array;
    }

    //    此处为所有属性的setter方法
    public void setUname(String uname) {
        this.uname = uname;
    }

    public void setHobbyList(List hobbyList) {
        this.hobbyList = hobbyList;
    }

    public void setResidenceMap(Map residenceMap) {
        this.residenceMap = residenceMap;
    }

    public void setAliasSet(Set aliasSet) {
        this.aliasSet = aliasSet;
    }

    public void setArray(String[] array) {
        this.array = array;
    }
}
Configuration Bean
Using implementation class ComplexUser arranged in two instances Bean Spring configuration file.
<?xml version="1.0" encoding="UTF-8"?>
<beans xmlns="http://www.springframework.org/schema/beans"
       xmlns:xsi="http://www.w3.org/2001/XMLSchema-instance"
       xsi:schemaLocation="http://www.springframework.org/schema/beans
                           http://www.springframework.org/schema/beans/spring-beans.xsd">

<!--    使用构造方法注入方式装配ComplexUser实例user1-->
    <bean id="user1" class="assemble.ComplexUser">
        <constructor-arg index="0" value="yihang1" />
        <constructor-arg index="1">
            <list>
                <value>唱歌</value>
                <value>跳舞</value>
                <value>爬山</value>
            </list>
        </constructor-arg>

        <constructor-arg index="2">
            <map>
                <entry key="dalian" value="大连" />
                <entry key="beijing" value="北京" />
                <entry key="shanghai" value="上海" />
            </map>
        </constructor-arg>

        <constructor-arg index="3">
            <set>
                <value>逸航01</value>
                <value>逸航02</value>
                <value>逸航03</value>
            </set>
        </constructor-arg>

        <constructor-arg index="4">
            <array>
                <value>aaaaa</value>
                <value>bbbbb</value>
            </array>
        </constructor-arg>
    </bean>

<!--    使用属性的setter方法注入方式装配 ComplexUser实例user2-->
    <bean id="user2" class="assemble.ComplexUser">
        <property name="uname" value="yihang2" />
        <property name="hobbyList">
            <list>
                <value>看书</value>
                <value>学习Spring</value>
            </list>
        </property>

        <property name="residenceMap" >
            <map>
                <entry key="shenzhen" value="深圳" />
                <entry key="guangzhou" value="广州" />
                <entry key="tianjin" value="天津" />
            </map>
        </property>

        <property name="aliasSet">
            <set>
                <value>逸航04</value>
                <value>逸航05</value>
                <value>逸航06</value>
            </set>
        </property>

        <property name="array">
            <array>
                <value>ccccc</value>
                <value>ddddd</value>
            </array>
        </property>
    </bean>
</beans>
Based on test configuration of assembly XML way
Create a test class TestAssemble in the test package.
package test;

import assemble.ComplexUser;
import org.springframework.context.ApplicationContext;
import org.springframework.context.support.ClassPathXmlApplicationContext;

public class TestAssemble {
    public static void main(String[] args) {
        ApplicationContext appCon = new ClassPathXmlApplicationContext("applicationContext.xml");
//        使用构造方法装配测试
        ComplexUser u1 = (ComplexUser) appCon.getBean("user1");
        System.out.println(u1);
        System.out.println("-------------------------");
//        使用setter方法装配测试
        ComplexUser u2 = (ComplexUser) appCon.getBean("user2");
        System.out.println(u2);
    }
}
running result

3.5.2 Annotation-based assembly
Bean will lead to a large number of assembly XML configuration file is too large, the future is not convenient to upgrade and maintain, and therefore more often recommend developers use annotations (annotation) way to assemble Bean.
3.5.1.1 @Component
The annotation is a generalization of the concept, represent only a component object (Bean), may act on any level.
3.5.2.2 @Repository
The annotation for a data access layer (DAO) is identified as a class Bean, i.e. annotation data access layer Bean, function is the same @Component.
3.5.2.3 @Service
The annotation for a business logic component class label (Service layer) function is the same @Component.
3.5.2.4 @Controller
The annotation component class used to annotate a controller (Spring MVC of Controller), which is the same function @Component.
3.5.2.5 @Autowired
The annotation can annotate class member variables, methods and method of construction of the automatic assembly work is completed. By using @Autowired to eliminate setter and getter methods. The default type is assembled in accordance with the Bean.
3.5.2.6 @Resource
The Notes and @Autowired function as, except that the notes by name default is to assemble injection, only when the match can not be found with the name of Bean will be assembled in accordance with the type of injection; and @Autowired default according to the type of Bean assembled, by name if you want to inject assembly is required and @Qualifier annotation used together.
3.5.3.7 @Qualifier
The notes used in conjunction with @Aitowired comment. When required to assemble the required injection @Autowired annotation in accordance with the name and the comment, Bean instance name developed by the @Qualifier annotation parameters.
Examples of presentations:
Creating DAO layer
Created in the src annotation.dao package, and creating an interface TestDao TestDaoImpl implementation classes in the packet, and the implementation class TestDaoImpl labeled using @Repository annotation data access layer.
TestDao code is as follows:
package annotation.dao;

public interface TestDao {
    public void save();
}
TestDaoImpl code is as follows:
package annotation.dao;

import org.springframework.stereotype.Repository;

@Repository("testDao")
/**
 * 相当于@Repository,但如果在service层中使用@Resource(name="testDao"),
 * testDao不能省略
 */
public class TestDaoImpl implements TestDao {
    @Override
    public void save() {
        System.out.println("testDao save");
    }
}
Creating Service Layer
Created in the src annotation.service package, and creating an interface TestService TestServiceImpl implementation classes in the packet, and the implementation class TestServiceImpl @service annotations using labeled Yewuluojiceng.
Testservice code is as follows:
package annotation.service;

public interface TestService {
    public void save();
}
TestServiceImpl code is as follows:
package annotation.service;

import annotation.dao.TestDao;
import org.springframework.beans.factory.annotation.Autowired;
import org.springframework.stereotype.Service;

@Service("testService")  //相当于@Service
public class TestSerivceImpl implements TestService {
//    @Resource(name="testDao")
    @Autowired
//    相当于@Autowired,@Autowired默认按照Bean状态装配
    private TestDao testDao;

    @Override
    public void save() {
        testDao.save();
        System.out.println("testService save");
    }
}
Creating Controller layer
Created in the src annotation.controller packet created at the packet TestController class, and class TestController labeled using @Controller annotation layer controller.
TestController code is as follows:
package annotation.controller;

import annotation.service.TestService;
import org.springframework.beans.factory.annotation.Autowired;
import org.springframework.stereotype.Controller;

@Controller
public class TestController {
    @Autowired
    private TestService testService;

    public void save() {
        testService.save();
        System.out.println("testController save");
    }
}
Configuration Notes
Because annotation.dao, annotation.service and annotation.controller packages are all sub-packages annotation package, so do not comment on configuration profiles annotationContext.xml in.
<?xml version="1.0" encoding="UTF-8"?>
<beans xmlns="http://www.springframework.org/schema/beans"
       xmlns:xsi="http://www.w3.org/2001/XMLSchema-instance"
       xmlns:context="http://www.springframework.org/schema/context"
       xsi:schemaLocation="http://www.springframework.org/schema/beans http://www.springframework.org/schema/beans/spring-beans.xsd http://www.springframework.org/schema/context http://www.springframework.org/schema/context/spring-context.xsd">

    <context:component-scan base-package="annotation" />
</beans>
Create a test class
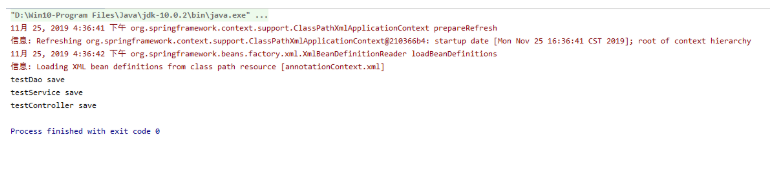
package test;

import annotation.controller.TestController;
import org.springframework.context.ApplicationContext;
import org.springframework.context.support.ClassPathXmlApplicationContext;

public class TestMoreAnnotation {
    public static void main(String[] args) {
        ApplicationContext appCon = new ClassPathXmlApplicationContext("annotationContext.xml");
        TestController testcon = (TestController) appCon.getBean("testController");
        testcon.save();
    }
}
running result