A, Harbor Introduction
1.1 What is Harbor
Several VMware Chinese people engaged in a mirrored container warehouse.
Harbor Enterprise Registry is a server for storing and distributing Docker image.
1.2, Harbor framework
The following figure shows the main harbor of functional components and the flow of information: 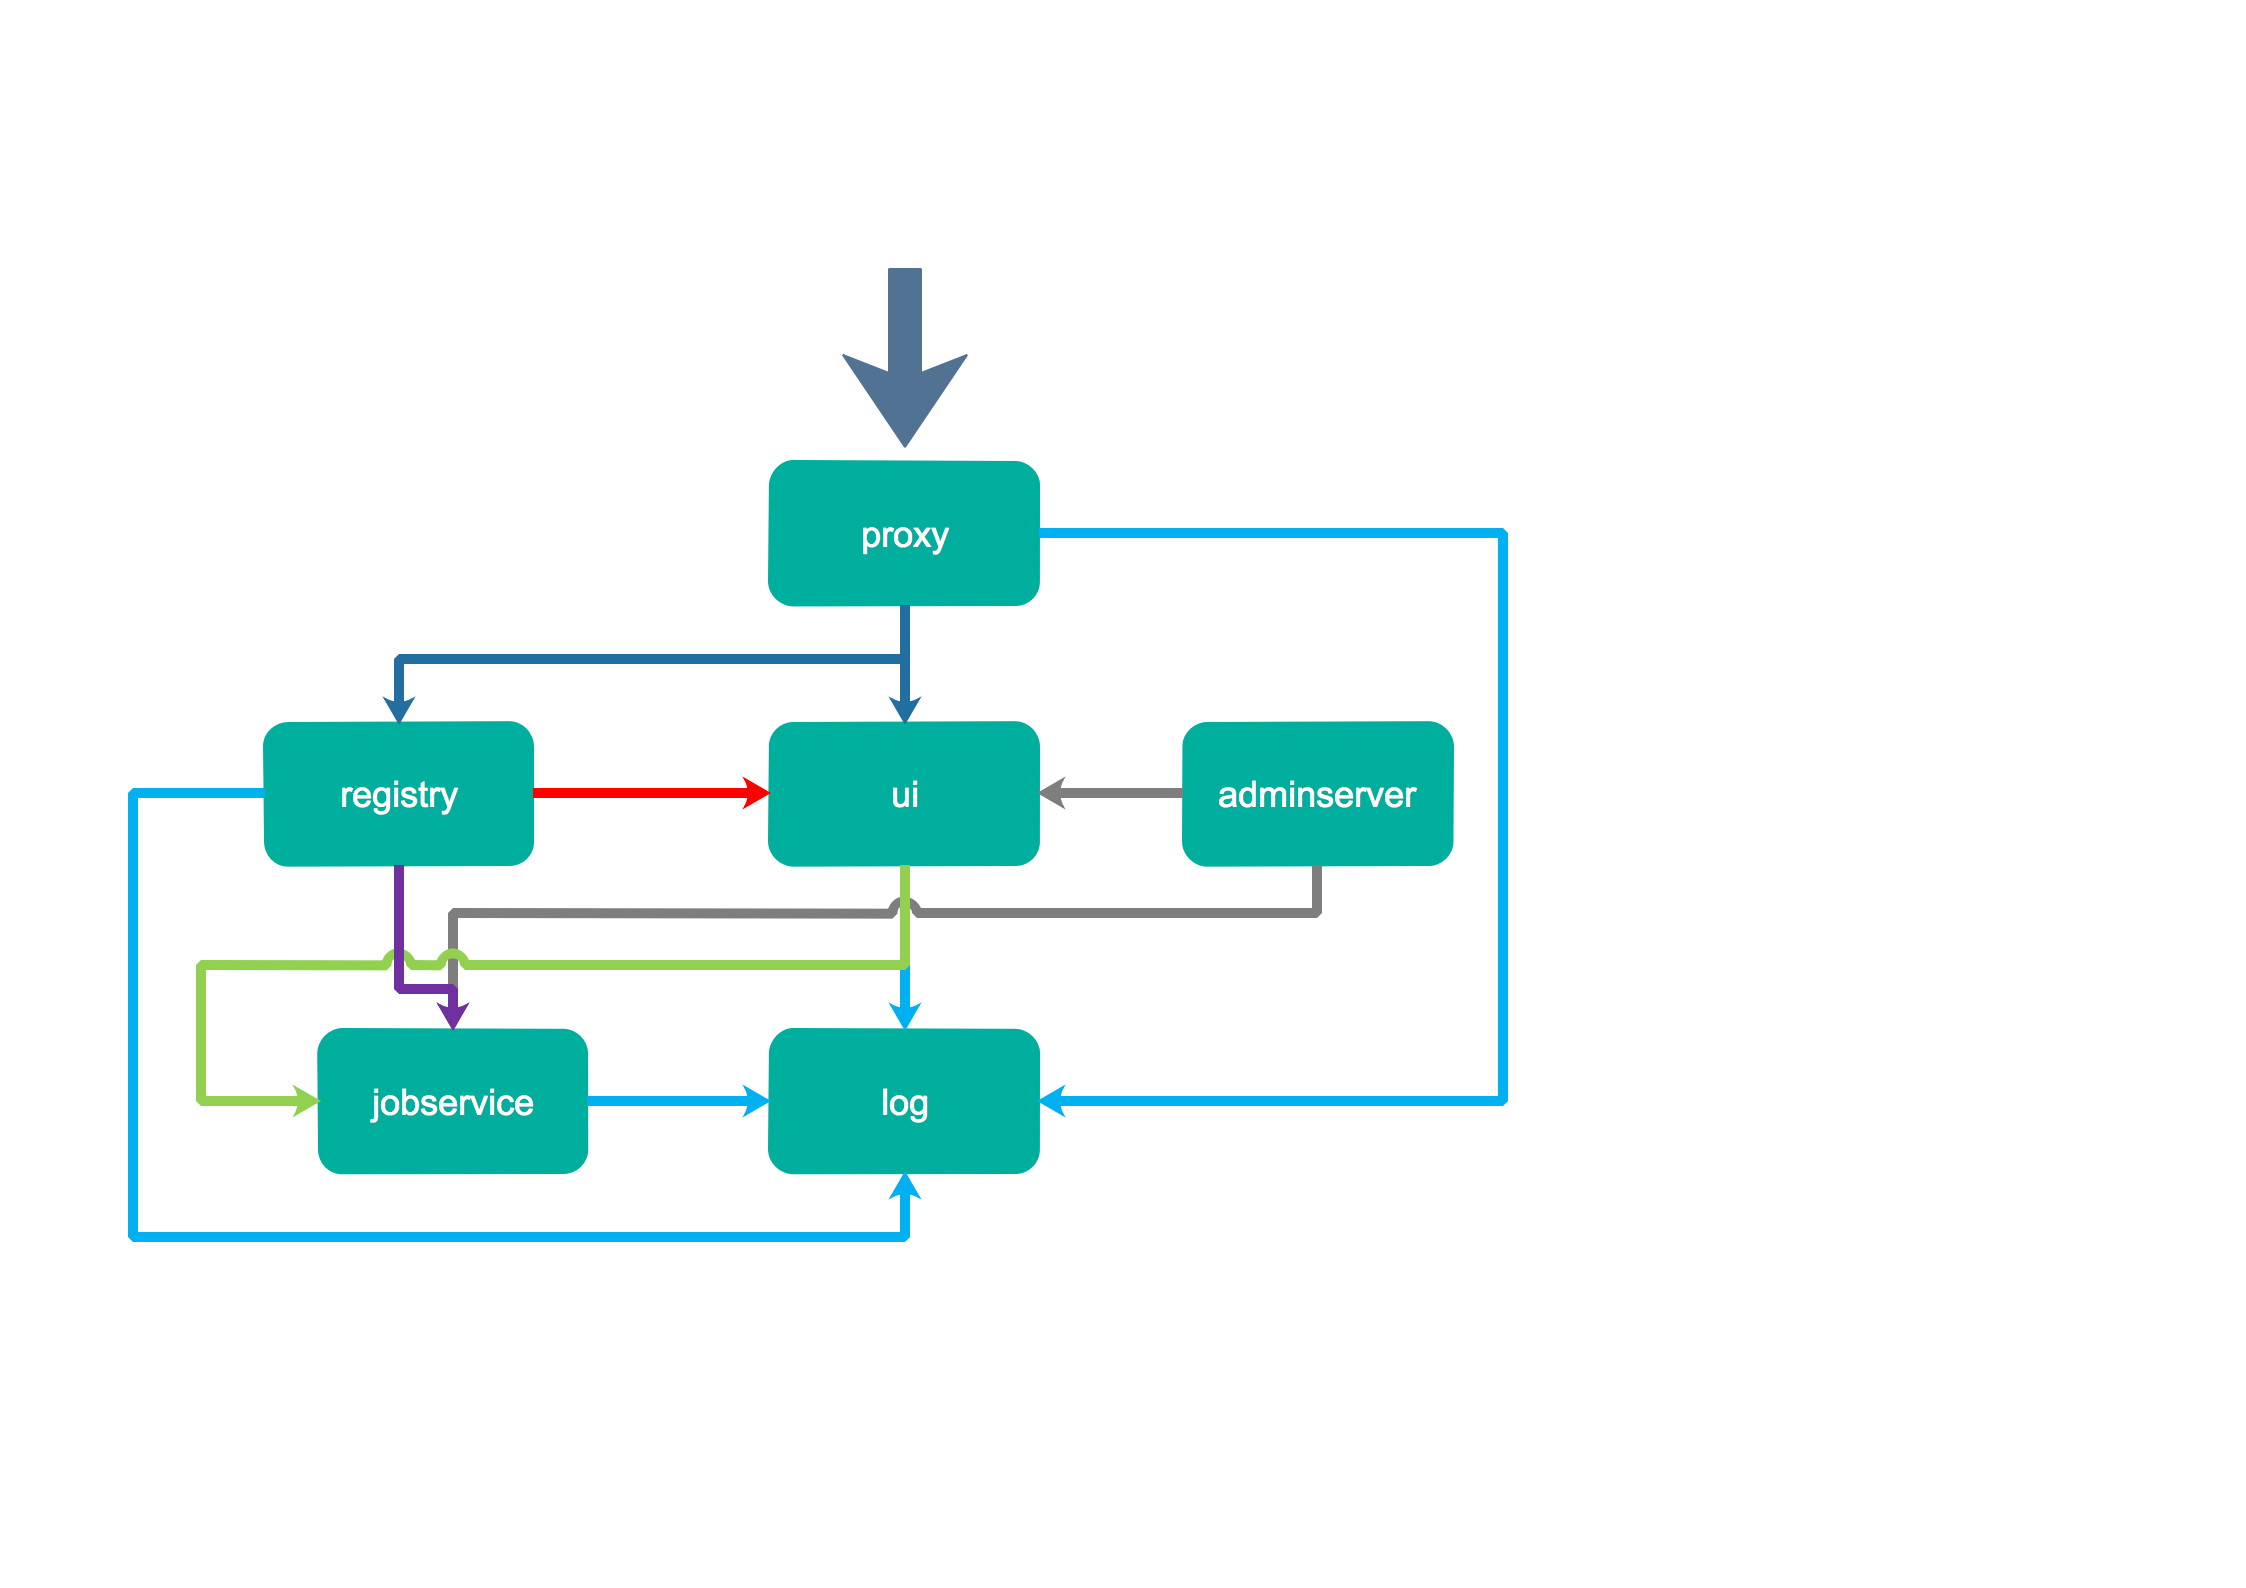
The main components include proxy, he is a front-end proxy nginx, primarily dispatching the front page ui access and mirror upload and download traffic, the above figure by dark blue to identify; ui provided a web page management, of course, also includes a front page and back-end API, the underlying use mysql database; registry is mirrored warehouse, responsible for storing image files, when the image is uploaded by hook notification ui create a repository, on the map by a red line logo of course registry of token authentication is completed by ui component; adminserver configuration management center system comes with checking memory usage, ui and jobserver start time back to the need to load adminserver configuration, through gray line identification; jobsevice is responsible for mirror copy work, he registry and communication from a mirrored pull and push registry registry to another, and recording job_log, purple line on the map by identifying; log log is aggregated components, the log aggregated together by the docker log-driver, with a blue line identity.
1.3, Harbor features
1.3.1, User Management
Role-based access control --RBAC. Users are divided into three roles: Project Administrator (MDRWS), developer (RWS) and visitors (RS), and of course a top administrator privileges admin system administrator.
M: Management, D: delete, R: read, W: write, S: query, very detailed rights management systems. Of course, a user can play different roles in different projects inside this reality and user management system is very consistent.
1.3.2 Project Management
Project management is the primary function of the system modules, a group project is a logical collection of mirrors warehouse unit is divided rights management and resource management. Here are a project multiple images warehouses, and associated members of a number of different roles, mirror copy is also based project, you can migrate the project by adding the following mirror copy rule from a harbor to another harbor, and you can view the log replication process, and a retry mechanism.
1.3.3, configuration management and log queries
Configuration management is configured harbor authentication mode, the internal business use, usually on the receiving company LDAP above, of course, also supports database authentication harbor; you can also set the effective time of the token. Users of the mirror pull and push operations can be recorded harbor, which provides an important tool for the investigation file. harbor also integrated clair image scanning function, it is cereos development of a vulnerability scanning tool, you can check the package mirroring operating system and install the package version matches the above known unsafe to improve safety mirror.
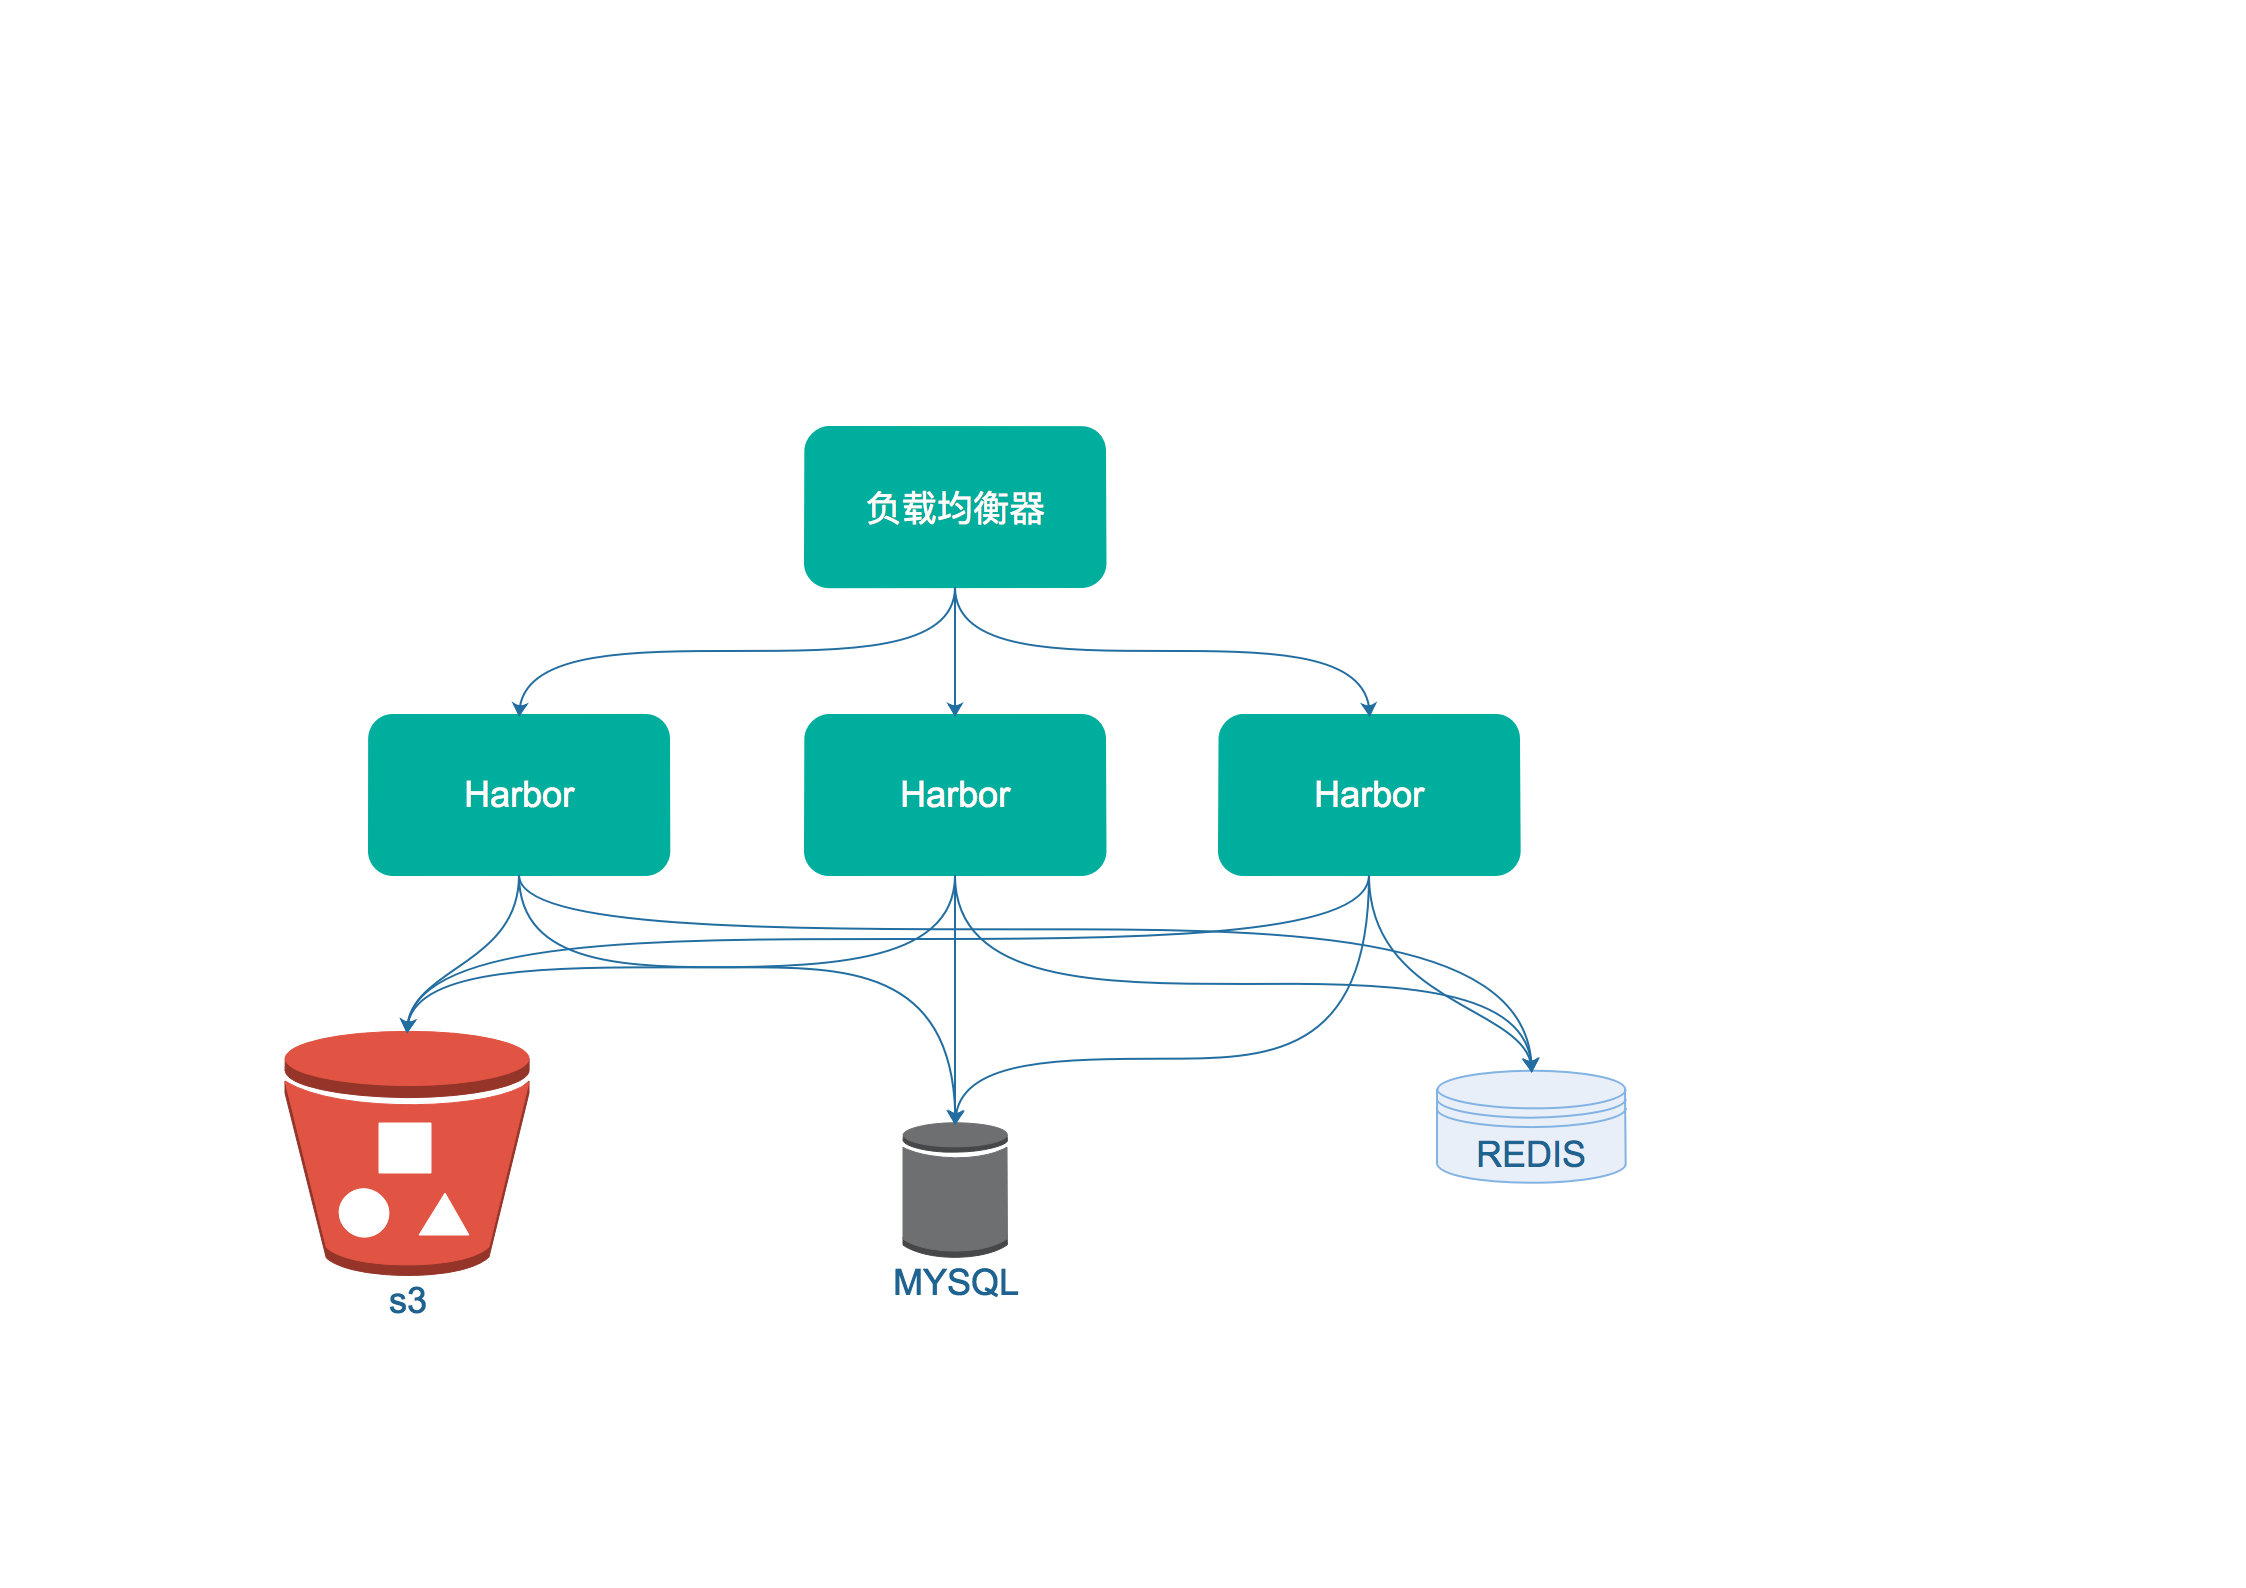
1.3.4, Harbor High Availability deployment
High-availability deployment is completed by three harbor front to provide services through a load balancer. Shared database and cache. Structured as follows:
This chapter describes the original reference: https://blog.csdn.net/u010278923/article/details/77941995
Second, the basic environment to build
2.1, docker build
To learn more about docker has his related operations, please refer to "docker learn fast in Ubuntu 1 hour" . The following steps are performed in the root user, one of two versions optionally
2.1.1, obtain deb Download docker_17.03.2 ~ ce of
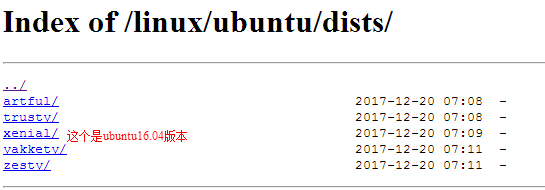
1, enter https://download.docker.com/linux/ubuntu/dists/ page
2, the page will see different versions of ubuntu code, choose your own version of the corresponding entry, the installation is ubuntu16.04, Thus selection xenial ligated into
3, and then all the way to select xenial / pool / stable / amd64 / , stable is a stable version, ubuntu amd64 need is software format
4, in https://download.docker.com/linux/ubuntu/dists/xenial/pool/ stable / amd64 / page will be able to find a stable version docker needed to fight
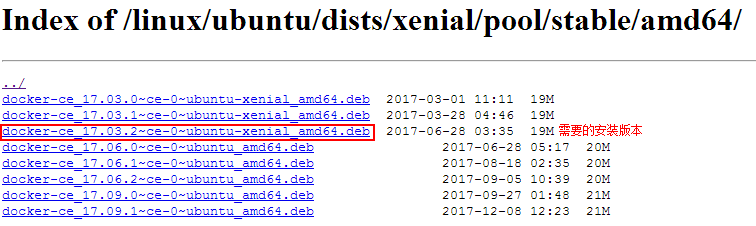
5. Right-click on the desired version, select Copy link address, you can get download address path, as follows:
https://download.docker.com/linux/ubuntu/dists/xenial/pool/stable/amd64/docker -ce_17.03.2 ~ ce-0 ~ ubuntu- xenial_amd64.deb
2.1.2, download and install docker-ce_17.03.2 ~ ce version
1, check whether the kernel to meet the requirements, Docker system requirements Ubuntu kernel version higher than 3.10, it is recommended Ubuntu14.04 version
root@duke:/var/cache/apt/archives# uname -r
3.13.0-135-generic
2, installation docker
Duke @ root: ~ / Docker # wget https://download.docker.com/linux/ubuntu/dists/xenial/pool/stable/amd64/docker-ce_17.03.2~ce-0~ubuntu-xenial_amd64.deb
- 2017-12-19 19: 30: 29-- https://download.docker.com/linux/ubuntu/dists/xenial/pool/stable/amd64/docker-ce_17.03.2~ce-0~ubuntu-xenial_amd64. deb
Resolving host download.docker.com (download.docker.com) ... 52.85.158.200, 52.85.158.223 , 52.85.158.109, ...
connecting download.docker.com (download.docker.com) | 52.85 .158.200 |: 443 ... connected.
HTTP request has been issued, awaiting response ... 200 OK
length: 19,183,424 (18M) [file application / X-Debian-Package]  x-debian-package]
Saving to: "docker-ce_17.03.2 ~ ce- 0 ~ ubuntu-xenial_amd64.deb"
Docker-CE-ce_17.03.2 ~ 0 ~ 100% Ubuntu-xenial_ [====== ================================================== ==============>] 18.29M 26.0KB / s in 11m 35s
2017-12-19 19:42:05 (27.0 KB/s) - 已保存 “docker-ce_17.03.2~ce-0~ubuntu-xenial_amd64.deb” [19183424/19183424])
root@duke:~/docker# dpkg -i docker-ce_17.03.2~ce-0~ubuntu-xenial_amd64.deb
3, start the background service docker
root@duke: service docker start
start: Job is already running: docker
2.1.3, get tgz package Download the docker-1.13.1
1, enter https://github.com/moby/moby/releases page

2, click the button to enter the page can be selected according to the selected version
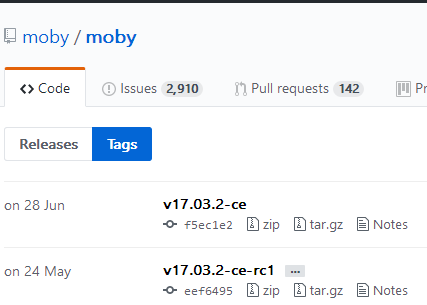
3, to select the current docker-ce_17.03.2 ~ ce or docker-1.13.1, so after page, find the corresponding version, click into the page, find the downloads information you can find on ubuntu system download
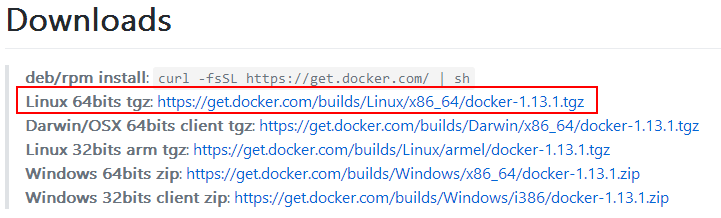
4, after the tgz package Docker pressure, and the service can not be loaded into the system, so he did not recommend installing this way, recommendations or adopt deb package installation, can save unnecessary trouble
Download version 2.1.4 docker-1.13.1.tgz
1, check whether the kernel to meet the requirements, Docker system requirements Ubuntu kernel version higher than 3.10, it is recommended Ubuntu14.04 version
root@duke:/var/cache/apt/archives# uname -r
3.13.0-135-generic
2, installation docker
Duke @ root: ~ / Docker # wget https://get.docker.com/builds/Linux/x86_64/docker-1.13.1.tgz
--2017-12-20 13: 57: 23 - HTTPS: // get.docker.com/builds/Linux/x86_64/docker-1.13.1.tgz
Resolving host get.docker.com (get.docker.com) ... 54.182.1.40, 54.182.1.36 , 54.182.1.148,. ..
connecting get.docker.com (get.docker.com) | 54.182.1.40 |: 443 ... connected.
HTTP request has been issued, awaiting response ... 200 OK
length: 27851024 (27M) [application / x-tar]
Saving to: "Docker-1.13.1.tgz"
Docker-1.13.1.tgz 100% [= ================================================== ===================>] 26.56M 56.1KB / S in 9m 35S
2017-12-20 14:07:00 (47.3 KB / S) - have been saved. " docker-1.13.1.tgz "[27851024/27851024])
2.2, docker-compoes build
The following steps are performed in the root user, one of two methods optionally
2.2.1 offline installation docker-compoes
1, docker-compose, run the following command to download and install the latest version
curl -L https://github.com/docker/compose/releases/download/1.18.0/docker-compose-`uname -s`-`uname -m` -o /usr/local/bin/docker-compose
2, changing binary file permissions so that it can run
chmod +x /usr/local/bin/docker-compose
3, the test installation
docker-compose --version
2.2.2 Online installation docker-compoes
1, the installation source python
apt-get update
apt-get install python-pip
2, delete the old version of the docker-compose
pip uninstall docker-compose
3, mounting docker-compose
pip install docker-compose
4, the test installation
docker-compose --vesion
Three, Harbor environmental requirements
3.1 Hardware Requirements
| Resources | Configuration | description |
|---|---|---|
| CPU | Minimum 2 CPU | 4CPU (recommended) |
| RAM | Minimum 4GB | 8GB (recommended) |
| Disk | * | * |
3.2, Software Requirements
| Software name | version |
|
|---|---|---|
| Python | Version 2.7 or higher | Note: You may have to install Python on Linux distributions (Gentoo, Arch), the Python interpreter is not installed by default |
| Docker | 1.10 or later | For installation instructions, please refer to: https://docs.docker.com/engine/installation/ |
| Docker-Compose | 1.6.0 or later | For installation instructions, please refer to: https://docs.docker.com/compose/install/ |
| Openssl | Recommend the latest version | Generate a certificate and key for Harbor |
3.3, Network Requirements
| port | protocol |
|
|---|---|---|
| 443 | HTTPS | Harbor UI API and receiving the https protocol requests on this port |
| 4443 | HTTPS | Notary enabled only when the need to connect to Docker Content Trust Services |
| 80 | HTTP | Harbor UI and API will accept this port http protocol on request |
Four, Harbor obtain version
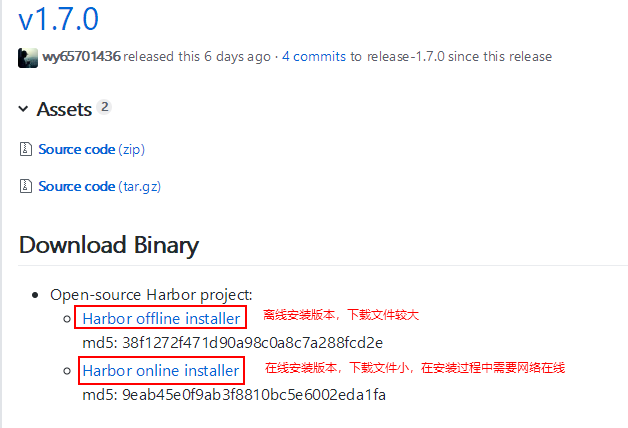
Get this official page, click on the download
version of the mounting plate is divided into online and offline version installed, you can choose to download the corresponding version on demand.
Online and offline versions installation methods, like paper-based off-line installation.
Fifth, no single node is offline Harbor SSL authentication structures
5.1, extracting archive
tar xvf harbor-offline-installer-v1.7.0-rc2.tgz
5.2, Harbor configuration parameters
Extracting archive will get the harbor folder, harbor.cfg configuration file located in the root folder?. There are two types of parameters in harbor.cfg, the required and optional parameters.
| parameter |
|
|---|---|
| Necessary parameters | You need to set these parameters in the configuration file. If the user updates harbor.cfg and run the install.sh script to reinstall Harbor, parameter changes will take effect. |
| Optional parameters | These parameters are optional update that users can retain their default values, and update them on the Web UI after startup Harbour. If you have configured harbor.cfg, these parameters will only take effect when you first start Harbour. harbor.cfg ignored subsequent changes to these parameters. |
In particular, before you have to register or create a new user in Harbour, set the desired auth_mode. When the system has a user (other than the default administrator user outside), can not be changed auth_mode.
Necessary parameters
| parameter name |
|
|---|---|
| hostname | Hostname of the target host for access to the UI and Harbor service. It should be the target computer's IP address or domain name (FQDN), for example, 192.168.1.10 or reg.yourdomain.com. Do not use localhost or 127.0.0.1 as the host name, because external clients need to access Harbor service! |
| ui_url_protocol | (Http or https. The default is http) protocol is used to access UI and token / notification services. If a notary is enabled, this parameter must be HTTPS . By default, this is HTTP . To set the https protocol, see Using HTTPS access configuration Harbor. |
| db_password | Db_auth root password for the MySQL database. Production environment please change this password |
| max_job_workers | (The default is 3) the maximum number of jobs working copy service. For each mirror copy job, the program will mark all repositories are synchronized to a remote destination. This increases the number of concurrent replication jobs can achieve more in the system. However, because each replication process consumes certain network / CPU / IO resources, carefully selected according to the value of the parameter of the hardware resources of the host. |
| customize_crt | (On or off, the default is on), if this property is on, ready script creates a private key and the root certificate for generation / verification registry token. When an external source and root key certificate, this property is set to off. For more information, see Custom Key and harbor Token Service certificate. |
| ssl_cert | SSL certificate path only when the application https protocol provided |
| ssl_cert_key | SSL key path only when the application https protocol provided |
| secretkey_path | Copy the key used to encrypt or decrypt remote path policy Harbor password. |
| log_rotate_count | Log file before it is deleted will be rotate log_rotate_count times. If the count is 0, then delete the old version instead of the rotation. |
| log_rotate_size | Only when the log file is larger than log_rotate_size bytes will rotate the log file. If the size is followed by k, the assumed size in kilobytes. If M, the size in megabytes, if G, the size of gigabytes. Size 100, Size 100K, 100M size and size 100G are valid. |
Optional parameters
| parameter name |
|
|---|---|
| Email settings | Harbor需要这些参数才能向用户发送“密码重置”电子邮件,并且仅在需要该功能时才做配置。另外,请注意,在默认情况下SSL连接没有启用,如果你的SMTP服务器需要SSL,那么你应该通过设置email_ssl = TRUE参数来启用SSL,但不支持STARTTLS。如果电子邮件服务器使用自签名证书或不受信任证书,则需要设置email_insecure = true。有关email_identity的详细说明,请参阅rfc2595 - email_server = smtp.mydomain.com - email_server_port = 25 - email_identity = - email_username = [email protected] - email_password = abc - email_from = admin [[email protected](mailto:[email protected]) - email_ssl = false - email_insecure = false |
| harbor_admin_password | 管理员的初始密码。此密码仅在Harbor首次启动时生效。之后将忽略此设置,并且应在UI中设置管理员密码。请注意:默认用户名/密码为admin/Harbor12345 |
| auth_mode | 使用的身份验证类型。默认情况下,它是db_auth,即凭据存储在数据库中。对于LDAP身份验证,请将其设置为ldap_auth。重要信息:从现有Harbor实例升级时,必须确保在启动新版本的Harbor之前,harbor.cfg配置文件中auth_mode相同。否则,用户可能无法在升级后登录。 |
| ldap_url | LDAP连接URL(例如ldaps://ldap.mydomain.com)。 仅在auth_mode设置为ldap_auth时使用。 |
| ldap_searchdn | 具有搜索LDAP/AD服务器权限的用户的DN(例如uid=admin,ou=people,dc=mydomain,dc=com)。 |
| ldap_search_pwd | ldap_searchdn指定的用户密码。 |
| ldap_basedn | 查找用户的基本DN,例如ou=people,dc=mydomain,dc=com。 仅在auth_mode设置为ldap_auth时使用。 |
| ldap_filter | 用于查找用户的搜索过滤器,例如(objectClass=person)。 |
| ldap_uid | 用于在LDAP搜索期间匹配用户的属性,它可以是uid,cn,email或其他属性。 |
| ldap_scope | 搜索用户的范围,0-LDAP_SCOPE_BASE,1-LDAP_SCOPE_ONELEVEL,2-LDAP_SCOPE_SUBTREE。默认值为2。 |
| self_registration | ( on或off。默认on)启用/禁用用户自助注册功能。禁用时,新用户只能由管理员用户创建,只有管理员可以在Harbor中创建新用户。 注意:当auth_mode设置为ldap_auth时,始终禁用自助注册功能,并忽略此设置。 |
| token_expiration | 令牌服务创建的令牌到期时间(以分钟为单位),默认为30分钟。 |
| project_creation_restriction | 用于控制用户有权创建项目的设置。默认情况下,每个人都可以创建一个项目,设置为“adminonly”,只有管理员才能创建项目。 |
配置存储后端(可选)
默认情况下,Harbor将镜像存储在本地文件系统中。在生产环境中,可以考虑使用其他存储后端而不是本地文件系统,如S3,OpenStack Swift,Ceph等。需要更新的是storage文件中的部分common/templates/registry/config.yml。例如,如果使用Openstack Swift作为存储后端,则该部分可能如下所示:
storage:
  swift:
    username: admin
    password: ADMIN_PASS
    authurl: http://keystone_addr:35357/v3/auth
    tenant: admin
    domain: default
    region: regionOne
    container: docker_images
5.3、Harbor自定义监听端口
默认情况下,Harbor监听80(HTTP)和443(HTTPS),如果端口已经被占用,可以使用自定义端口。
对于HTTP协议
1、修改 docker-compose.yml
将第一个80修改为自定义端口,例如8888:80。
proxy:
    image: goharbor/nginx-photon:v1.7.0
    container_name: nginx
    restart: always
    cap_drop:
      \- ALL
    cap_add:
      \- CHOWN
      \- SETGID
      \- SETUID
      \- NET_BIND_SERVICE
    volumes:
      \- ./common/config/nginx:/etc/nginx:z
    networks:
      \- harbor
    dns_search: .
    ports:
           \- 8888:80        将80端口映射到8888
           \- 8443:443   将443端口映射到8443
      \- 4443:4443
    depends_on:
      \- postgresql
      \- registry
      \- core
      \- portal
      \- log
    logging:
      driver: "syslog"
      options:
        syslog-address: "tcp://192.168.0.2:1514"
        tag: "proxy"
2、修改harbor.cfg,将8888端口添加到参数“hostname”
hostname = 192.168.0.2:8888
5.4、安装Harbor
在harbor文件夹中有install.sh脚本,一旦harbor.cfg和存储后端(可选)配置完成,就可以镜像Harbor安装。请注意,在线安装需要一些时间从Docker hub下载Harbor镜像,具体根据实际网络情况。
由于Harbor已与Notary和Clair集成(用于漏洞扫描),所以存在以下4中安装,任选其一即可:
- 默认安装(没有Notary/Clair)
- 使用Notary安装
- 使用Clair安装
- 同时安装Clair和Notary
5.4.1、默认安装(没有Notary/Clair)
sudo ./install.sh
Harbor已与Notary和Clair集成(用于漏洞扫描)。但是,默认不安装Notary或Clair服务。如果一切正常,应该能够打开浏览器访问http://192.168.0.2:8888/ 上的管理门户(192.168.0.2:8888是harbor.cfg配置的hostname,默认管理员用户名/密码为:admin/Harbor12345)。如下图:
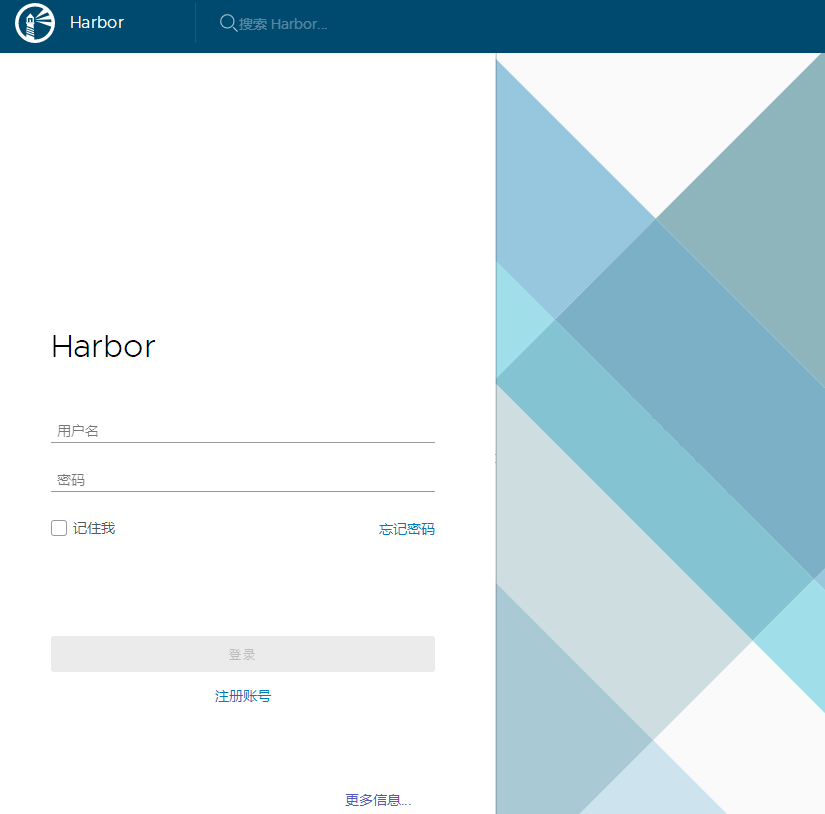
登录管理门户并创建一个新项目,例如: myproject。然后,可以使用docker命令登录和推送镜像。
所以,要想docker命令登录和推送镜像,
需要添加 "insecure-registries":["192.168.0.2:8888"]参数到docker的 /etc/docker/daemon.json配置文件中,
并重启docker服务。
可以使用下面命令进行验证是否搭建成功
docker login 192.168.0.2:8888
过程如下:
root@duke:/etc/docker# docker login 192.168.0.2:8888
Username (admin): 输入账户:admin
Password: 输入默认密码:Harbor12345
Login Succeeded
六、单节点离线Harbor有SSL认证搭建
6.1、配置自定义CA认证
6.1.1、创建root CA私钥
openssl req -newkey rsa:4096 -nodes -sha256 -keyout ca.key -x509 -days 365 -out ca.crt
执行步骤如下:
root@duke:~# openssl req -newkey rsa:4096 -nodes -sha256 -keyout ca.key -x509 -days 365 -out ca.crt
Generating a 4096 bit RSA private key
.............................................++
.............................................++
writing new private key to 'ca.key'
-----
You are about to be asked to enter information that will be incorporated
into your certificate request.
What you are about to enter is what is called a Distinguished Name or a DN.
There are quite a few fields but you can leave some blank
For some fields there will be a default value,
If you enter '.', the field will be left blank.
-----
Country Name (2 letter code) [AU]:CN
State or Province Name (full name) [Some-State]:NanJing
Locality Name (eg, city) []:NanJing
Organization Name (eg, company) [Internet Widgits Pty Ltd]:rancher
Organizational Unit Name (eg, section) []:info technology
Common Name (e.g. server FQDN or YOUR name) []:duke
Email Address []:[email protected]
6.1.2、为服务端(web)生成证书签名请求文件
如果你使用类似demo.rancher.com的FQDN域名访问,则需要设置demo.rancher.com作为CN;如果你使用IP地址访问,CN则为IP地址:
openssl req -newkey rsa:4096 -nodes -sha256 -keyout demo.rancher.com.key -out demo.rancher.com.csr
或者
openssl req -newkey rsa:4096 -nodes -sha256 -keyout 192.168.0.2.key -out 192.168.0.2.csr
执行步骤如下:
Commone Name一定要是你要授予证书的FQDN域名或主机名,并且不能与生成root CA设置的Commone Name相同。
challenge password可以不填。
root@duke:~# openssl req -newkey rsa:4096 -nodes -sha256 -keyout 192.168.0.2.key -out 192.168.0.2.csr
Generating a 4096 bit RSA private key
....................................................................++
....................................................................++
writing new private key to '192.168.0.2.key'
-----
You are about to be asked to enter information that will be incorporated
into your certificate request.
What you are about to enter is what is called a Distinguished Name or a DN.
There are quite a few fields but you can leave some blank
For some fields there will be a default value,
If you enter '.', the field will be left blank.
-----
Country Name (2 letter code) [AU]:CN
State or Province Name (full name) [Some-State]:NanJing
Locality Name (eg, city) []:NanJing
Organization Name (eg, company) [Internet Widgits Pty Ltd]:RANCHER
Organizational Unit Name (eg, section) []:info technology
Common Name (e.g. server FQDN or YOUR name) []:192.168.0.2
Email Address []:[email protected]

Please enter the following 'extra' attributes
to be sent with your certificate request
A challenge password []:附属属性修改密码,可以不填
An optional company name []:附属属性另一个公司名称,可以不填
6.1.3、用1.1创建的CA证书给1.2生成的签名请求进行签名
openssl x509 -req -days 365 -in 192.168.0.2.csr -CA ca.crt -CAkey ca.key -CAcreateserial -out 192.168.0.2.crt
执行步骤如下:
root@duke:~# openssl x509 -req -days 365 -in 192.168.0.2.csr -CA ca.crt -CAkey ca.key -CAcreateserial -out 192.168.0.2.crt
Signature ok
subject=/C=CN/ST=NanJing/L=NanJing/O=RANCHER/OU=info technology/CN=192.168.0.2/[email protected]
Getting CA Private Key
6.1.4、使用IP进行签名
如果你使用IP,例如192.168.0.2来连接,则可以改为运行以下命令
echo 'subjectAltName = IP:192.168.0.2' > extfile.cnf
openssl x509 -req -days 365 -in 192.168.0.2.csr -CA ca.crt -CAkey ca.key -CAcreateserial -extfile extfile.cnf -out  192.168.0.2.crt
执行步骤如下:
root@duke:~# echo 'subjectAltName = IP:192.168.0.2' > extfile.cnf
root@duke:~# openssl x509 -req -days 365 -in 192.168.0.2.csr -CA ca.crt -CAkey ca.key -CAcreateserial -extfile extfile.cnf -out 192.168.0.2.crt
Signature ok
subject=/C=CN/ST=NanJing/L=NanJing/O=RANCHER/OU=info technology/CN=192.168.0.2/[email protected]
Getting CA Private Key
6.1.5、检查文件
经过上面步骤操作后,会生成ca.crt、ca.srl、ca.key、192.168.0.2.crt、192.168.0.2.key、192.168.0.2.csr、extfile.cnf这几个文件。
执行步骤如下:
root@duke:~# ls
192.168.0.2.crt 192.168.0.2.key ca.crt ca.srl docker-1.13.1.tgz kubectl shipyard var 模板 图片 下载 桌面
192.168.0.2.csr anaconda3 ca.key docker extfile.cnf mapd-docker-storage tigervncserver_1.6.80-4_amd64.deb 公共的 视频 文档 音乐
6.2、Harbor配置
6.2.1、配置harbor文件
如果要启用SSL,并进行HTTPS登陆,就必须配置harbor.cfg以下配置
hostname = 192.168.0.2:8443             在修改了默认端口情况下,必须配置端口,此处为8443,不配置将无法保证 docker login的正常登陆
ui_url_protocol = https              要启用SSL认证,就必须配置为https
customize_crt = on                   要启用SSL认证,就必须配置为on
ssl_cert = /data/cert/server.crt     私有证书存放地址
ssl_cert_key = /data/cert/server.key 私有密钥存放地址
secretkey_path = /data               配置目录
### 6.2.2、配置harbor的自定义CA认证 复制6.1章节生成的密钥到指定的秘钥目录 ``` cp 192.168.0.2.crt /data/cert/server.crt cp 192.168.0.2.key /data/cert/server.key ``` ## 6.3、Harbor自定义监听端口 默认情况下,Harbor监听80(HTTP)和443(HTTPS),如果端口已经被占用,可以使用自定义端口。 **对于HTTPS协议** **1、修改 docker-compose.yml** 将第一个443修改为自定义端口,例如8443:443。
proxy:
    image: goharbor/nginx-photon:v1.7.0
    container_name: nginx
    restart: always
    cap_drop:
      \- ALL
    cap_add:
      \- CHOWN
      \- SETGID
      \- SETUID
      \- NET_BIND_SERVICE
    volumes:
      \- ./common/config/nginx:/etc/nginx:z
    networks:
      \- harbor
    dns_search: .
    ports:
           \- 8888:80        将80端口映射到8888
           \- 8443:443   将443端口映射到8443
      \- 4443:4443
    depends_on:
      \- postgresql
      \- registry
      \- core
      \- portal
      \- log
    logging:
      driver: "syslog"
      options:
        syslog-address: "tcp://192.168.0.2:1514"
        tag: "proxy"
2、修改harbor.cfg,将8443端口添加到参数“hostname”
hostname = 192.168.0.2:8443
6.4、安装Harbor
在harbor文件夹中有install.sh脚本,一旦harbor.cfg和存储后端(可选)配置完成,就可以镜像Harbor安装。请注意,在线安装需要一些时间从Docker hub下载Harbor镜像,具体根据实际网络情况。
由于Harbor已与Notary和Clair集成(用于漏洞扫描),所以存在以下4中安装,任选其一即可:
- 默认安装(没有Notary/Clair)
- 使用Notary安装
- 使用Clair安装
- 同时安装Clair和Notary
6.4.1、默认安装(没有Notary/Clair)
sudo ./install.sh
Harbor已与Notary和Clair集成(用于漏洞扫描)。但是,默认不安装Notary或Clair服务。如果一切正常,应该能够打开浏览器访问http://192.168.0.2:8888/ 上的管理门户(192.168.0.2:8888是harbor.cfg配置的hostname,默认管理员用户名/密码为:admin/Harbor12345)。如下图:

管理门户并创建一个新项目,例如: myproject。然后,可以使用docker命令登录和推送镜像。
所以,要想docker命令登录和推送镜像,
需要添加 "insecure-registries":["192.168.0.2:8888"]参数到docker的 /etc/docker/daemon.json配置文件中,
并重启docker服务。
可以使用下面命令进行验证是否搭建成功
docker login -u admin -p Harbor12345 192.168.0.2:8443
过程如下:
root@duke:/etc/docker# docker login  -u admin -p Harbor12345 192.168.0.2:8443
Login Succeeded
6.4.2、使用Notary安装
要使用Notary服务安装Harbour,请在运行install.sh时添加参数:
sudo ./install.sh --with-notary
注意:使用notary安装,参数ui_url_protocol必须设置为“https”。
6.4.3、使用Clair安装
要使用Clair服务安装Harbour,请在运行install.sh时添加参数:
sudo ./install.sh --with-clair
6.4.4、同时安装Clair和Notary
sudo ./install.sh --with-notary --with-clair
6.5、重装或重配Harbor
6.5.1、默认安装方式
如果在安装配置HTTPS的Harbor前,已经默认方式安装了HTTP的harbor,可以执行以下操作,前提是同版本操作。
sudo docker-compose down -v  停止并卸载harbor
sudo vim harbor.cfg          重新配置harbor
sudo prepare                 重新生成harbor配置
sudo docker-compose up -d    重新安装启动harbor
删除Harbor的数据库和图像数据(用于干净的重新安装)
rm -r /data/database
rm -r /data/registry
6.5.2、与notary或者Clair一起安装时管理Harbor的生命周期
当Harbour与Notary或者Clair一起安装时,docker-compose命令需要指定一个或者两个额外的模板文件。用于管理Harbour生命周期的docker-compose命令是:
sudo docker-compose -f ./docker-compose.yml -f ./docker-compose.notary.yml [ up|down|ps|stop|start ]
sudo docker-compose -f ./docker-compose.yml -f ./docker-compose.notary.yml -f ./docker-compose.clair.yml [ up|down|ps|stop|start ]
如果要在使用Notary安装Harbor时更改配置并重新部署Harbour,则应使用以下命令:
sudo docker-compose -f ./docker-compose.yml -f ./docker-compose.notary.yml down -v
sudo vim harbor.cfg
sudo prepare --with-notary
sudo docker-compose -f ./docker-compose.yml -f ./docker-compose.notary.yml up -d
sudo docker-compose -f ./docker-compose.yml -f ./docker-compose.notary.yml -f   ./docker-compose.clair.yml down -v
sudo vim harbor.cfg
sudo prepare --with-notary --with-clair
sudo docker-compose -f ./docker-compose.yml -f ./docker-compose.notary.yml -f   ./docker-compose.clair.yml up -d
6.6、故障排除
当Harbor无法正常工作时,请运行以下命令以查明Harbor的所有容器是否处于UP状态:
sudo docker-compose ps
如果容器不是UP状态,检查目录容器的日志文件/var/log/harbor。例如,如果容器harbor-ui未运行,则应查看日志文件ui.log。