When you read this, I guess you must have come across vexing problem, and I hope this article will make you gain something.
A few months ago I was white Spring, came a few months, saw Spring, Spring boot, this time to the Spring Security.
In order to avoid all stepped pit, I will be the entry of experience to those who, like me, are white learning of Spring Security.
We learn from the official examples:
1, we first create a project HelloWorld Boot Spring of:
I use development tools eclipse, if not installed STS, please click on Help -> Eclipse MarketPlace ...

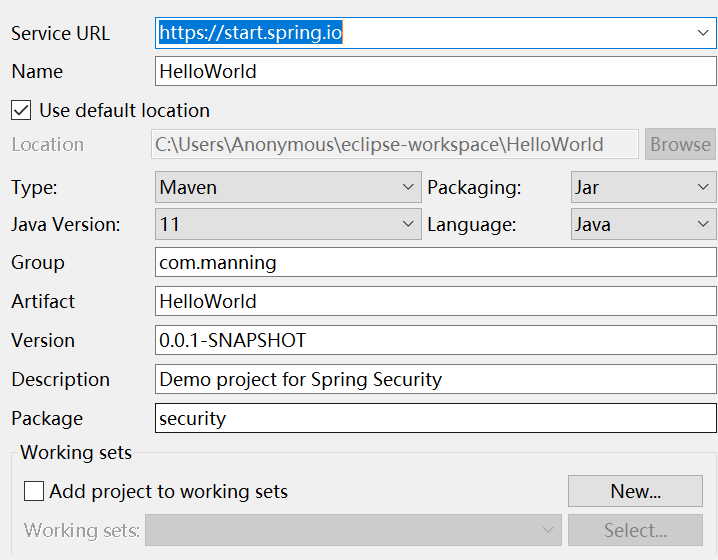
2. Click on File -> New -> Spring Starter Project.
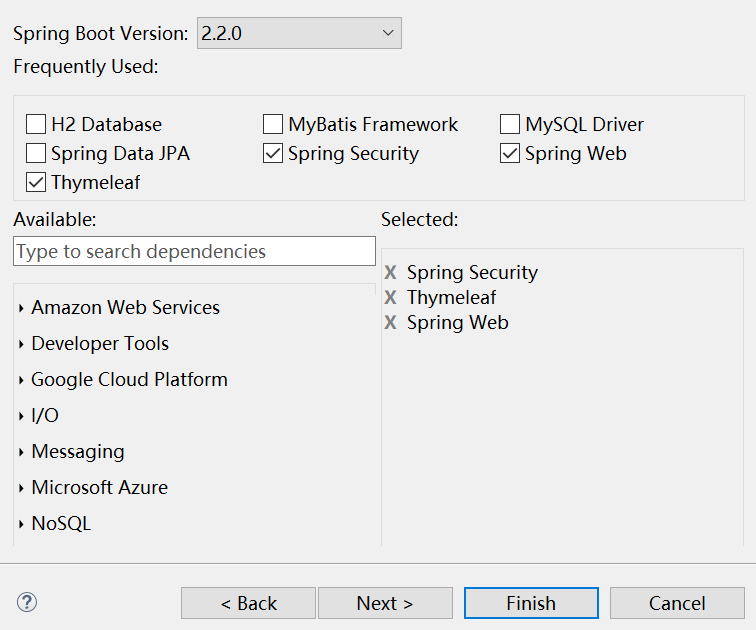
We then selected according to need, as shown:


3, after the project directory is created as shown:

4, then we create a new package, named security.config, to build a class in the package and make it inherit WebSecurityConfigurerAdapter.

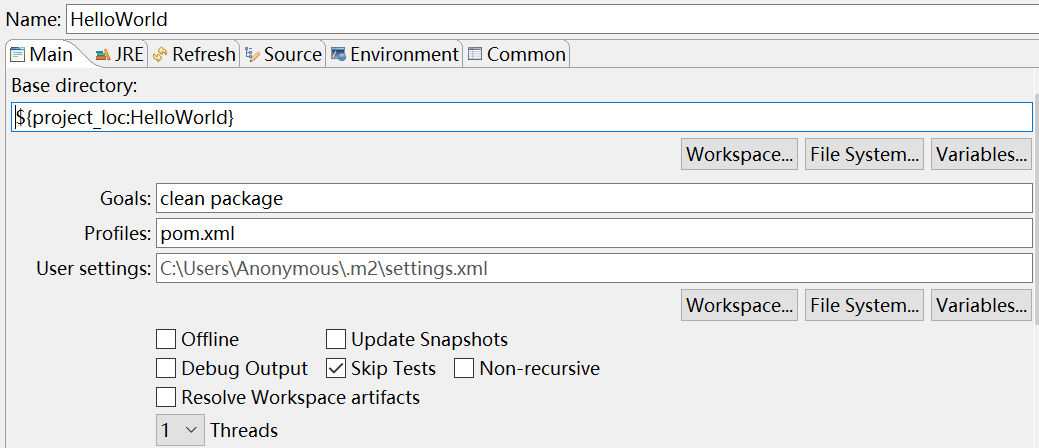
5, so that you can already generate jar again, and we right project Run as -> Maven Build ... then Debug, it will generate a jar in the target directory.

6. Right-generated jar, click Properties will see its file location, we run it in the console:
java -jar C:\Users\Anonymous\eclipse-workspace\HelloWorld\target\HelloWorld-0.0.1-SNAPSHOT.jar
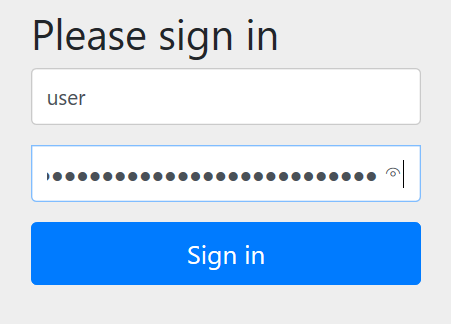
Then enter in the browser http: // localhost: 8080 / will be a login page.
User name user, password can be found in the console: Using generated security password: 254f14b9-a3e4-4dd5-9888-4c46b0c27e3f
Enter into the picture will appear as follows:


7、让我们从头回顾一下,我们干了啥!我们仅仅在 security 包下创建了一个 config 子包。
然后在该子包里创建了一个类并让它继承 WebSecurityConfigurerAdapter 类,并在类上加了一个注解 @EnableWebSecurity。
我们打开 HelloWorldApplication 类,可以看到 main() 函数里只一行代码:
SpringApplication.run(HelloWorldApplication.class, args); 其实这一行代码的作用总的来说是加载整个项目的意思。
在这个类上方有个 @SpringBootApplication 注解,我们将鼠标放在上面可以看到该注解是由一系列注解组成的。
我们可以把这个类比作一个树的根,所有其他的配置都需要以它为基础而展开,所以项目其他的包应该都是它的子包。
8、我们再看看自己创建的类 WebSecurityConfig,这个类的 @EnableWebSecurity 注解会启用 Web 安全功能。
但是它本身并没有什么用处,Spring Security 必须配置在一个实现了 WebSecurityConfigurer 的 bean 中,
或者(简单起见)扩展 WebSecurityConfigurerAdapter。
9、好啦,最基础的就是这些啦,让我们来实现一下让它打印 HelloWorld!
在配置类中我们写上如下代码:
package security.config;

import org.springframework.security.config.annotation.web.builders.HttpSecurity;
import org.springframework.security.config.annotation.web.configuration.EnableWebSecurity;
import org.springframework.security.config.annotation.web.configuration.WebSecurityConfigurerAdapter;

@EnableWebSecurity
public class WebSecurityConfig extends WebSecurityConfigurerAdapter {

    @Override
    protected void configure(HttpSecurity http) throws Exception {
        // TODO Auto-generated method stub
        http.authorizeRequests()
        .antMatchers("/login").permitAll()
        .anyRequest().authenticated()
        .and()
        .formLogin().defaultSuccessUrl("/hello");
    }
}
10、再在控制器类中写上如下代码:
package security.controller;

import org.springframework.web.bind.annotation.GetMapping;
import org.springframework.web.bind.annotation.RestController;

@RestController
public class HelloController {

    @GetMapping("/hello")
    public String hello() {
        return "Hello World";
    }
}
11、好啦,大功告成,代码已经可以运行啦。现在我们来了解一下它们。
在 WebSecurityConfig 类中我们重写了 configure(HttpSecurity http) 方法,这个方法是完成用户授权的。
还有另外一个 configure(AuthenticationManagerBuilder auth) 方法,这个方法是完成用户认证的。
暂时我们只了解第一个,第二个我们在(二) 中了解。
以下内容摘自 《Spring Boot2 企业应用实战》:HttpSecurity 的 authorizeRequests() 方法有多个子节点。
其中每个 matcher 按照它们的声明顺序执行,指定用户可以访问的多个 URL 模式。
Ⅰ、antMatchers 使用 Ant 风格匹配路径。
Ⅱ、regexMatchers 使用正则表达式匹配路径。
在匹配了请求路径后,可以针对当前用户的信息对请求路径进行安全处理。
| 方法 | 用途 |
| anyRequest | 匹配所有请求路径 |
| access(String) | Spring EL 表达式结果为 true 时可以访问 |
| anonymous() | 匿名可以访问 |
| denyAll() | 用户不能访问 |
| fullyAuthenticated() | 用户完全认证可以访问(非 remember-me 下自动登录) |
| hasAnyAuthority(String...) | 如果有参数,参数表示权限,则其中任何一个权限可以访问 |
| hasAnyRole(String...) | 如果有参数,参数表示角色,则其中任何一个角色可以访问 |
| hasAuthority(String...) | 如果有参数,参数表示权限,则其权限可以访问 |
| hasIpAdress(String...) | 如果有参数,参数表示 IP 地址,如果用户 IP 和参数匹配,则可以访问 |
| hasRole(String...) | 如果有参数,参数表示角色,则其角色可以访问 |
| permitAll() | 用户可以任意访问 |
| rememberMe() | 允许通过 remember-me 登录的用户访问 |
| authenticated() | 用户登录后可访问 |
12、现在我们读一下代码的意思:授权请求的路径为 "/login" 时,用户可以任意访问。
其他匹配所有请求的路径都需要授权才能访问。.and() 是再从 http 参数开始。
举个例子:.and().formLogin() 相当于 http.formLogin()。
formLogin():开始设置登录操作。defaultSuccessUrl("/hello"): 指定登录成功后转向的页面。
另外还有其他的方法,我们在(二)再了解。控制类中的代码是常见的代码,就不说了。
13、代码写完了,我们在控制台运行一下,再在浏览器输入:http://localhost:8080/login:
登录后,就可以看到 Hello World!

14、运行结果如上图所示,市面上有些书说输入 http://localhost:8080/ 就会自动跳转的 login 页面。
这的确没错,但是当我们输入用户名密码后,会进入到 error 页面。这是为什么呢?
这是因为 "/" 请求需要用户认证,而又没有运行任意访问,所以跳转到 login 页面进行认证。
认证成功后,控制类中并没有对 "/" 请求的处理。所以这将导致出现错误页面。
注意这是一个大坑,坑了本人好几天了。
15、最后,上面的例子仅仅是一个简单的入门例子,我们更常用的是自定义登录页面,并且用户名和密码都是从数据库读取来认证的。
这一部分内容将在(二)中讲解。
16、如果这篇文章帮助了你,请给我点个赞哦!方便的话关注一下哒!