HTML 5 in the new cross-domain resource access (Cross-Origin Resource Sharing) characteristic allows us to decide whether to allow the cross-domain access resources in the development of back-end systems. The so-called cross-domain refers to a different domain names, or different ports or different protocols, such as when accessing resources from mrbrid.cc mrbird.cc:8080 website site will cross-domain problems. Spring 4.2 version from the beginning to provide a cross-domain support out of the box. Here's how to solve cross-domain problems in Spring Boot development, and the interface is divided into annotation-driven programming.
Cross-domain simulation
To solve the problem of cross-domain, we have to first simulate a cross-domain scenario. New Spring Boot project, version 2.1.0.RELEASE, and cited the following dependence:
<dependency>
    <groupId>org.springframework.boot</groupId>
    <artifactId>spring-boot-starter-web</artifactId>
</dependency>
<dependency>
   <groupId>org.springframework.boot</groupId>
   <artifactId>spring-boot-starter-thymeleaf</artifactId>
</dependency>
Item structure is as follows:

In com.example.demo new path under the controller package and create TestController :
@Controller
public class TestController {
@RequestMapping("index")
public String index () {
return "index";
}
@RequestMapping("hello")
@ResponseBody
public String hello(){
return "hello";
}
}
Then a new index.html under resources / templates:
<!DOCTYPE html>
<html lang="en">
<head>
    <meta charset="UTF-8">
    <title>跨域测试</title>
   <script src="http://libs.baidu.com/jquery/1.11.3/jquery.min.js"></script>
</head>
<body>
<div id="hello"></div>
</body>
<script>
   $(function () {
       $.get("http://test.mrbird.cc:8080/hello", function (data) {
           $("#hello").text(data);
       })
   })
</script>
</html>
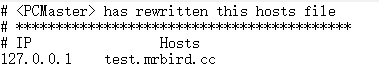
Edit the local hosts file, http://test.mrbird.cc mapped to the 127.0.0.1 address:
Startup Items visit HTTP: // localhost: 8080 / , find the page does not successfully display hello, and F12 to observe the browser console will find its incorrect report:

This is because we http: 8080 /: // localhost attempt at domain names http://test.mrbird.cc:8080 the Hello-interface, which cross-domain issues, then we have to solve this problem.
Annotation-driven
Spring 4.2 provides @CrossOrigin annotation, the annotation may be marked on the method or class, includes the following attributes:
| Attributes | meaning |
|---|---|
| value | Specified set of supported domain, *indicating that all domains are supported, the default value *. These values correspond to the HTTP request headerAccess-Control-Allow-Origin |
| origins | 同value |
| allowedHeaders | Allow the request header header, default support |
| exposedHeaders | Allow access to the head in response header, the default is empty |
| methods | The method of supporting the request, such as GET, POST, PUTand the like, and consistent with the default label on the Controller method. |
| allowCredentials | Allow cookie sent with the request must specify a specific domain when using |
| maxAge | Validity pre result of the request, the default 30 minutes |
We have to transform TestControllerthe hellomethod:
@RequestMapping("hello")
@ResponseBody
@CrossOrigin(value = "*")
public String hello() {
    return "hello";
}
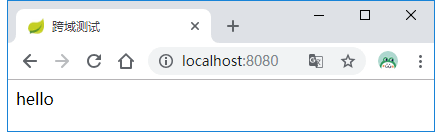
Permits all fields are supported, restart the project, once again visit HTTP: // localhost: 8080 / :
Programming Interface
In addition to using @CrossOriginannotations, we can use the interface to configure unified programming.
In com.example.democase a new path configpackage, and then create WebConfigurer, implement WebMvcConfigurer, override the addCorsMappingsdefault implementation:
@Configuration
public class WebConfigurer implements WebMvcConfigurer {
@Override
public void addCorsMappings(CorsRegistry registry) {
registry.addMapping("/**")
.allowedOrigins("*")
.allowedMethods("GET");
}
}
上面配置表示允许所有请求支持跨域访问,并且不限定域,但是支持持GET方法。将hello方法上的@CrossOrigin注解注释掉,重启项目,再次访问http://localhost:8080/,结果也是OK的。
过滤器实现
查看官方文档,发现其还提供了基于过滤器的实现方式:
@Bean
public FilterRegistrationBean corsFilter() {
    UrlBasedCorsConfigurationSource source = new UrlBasedCorsConfigurationSource();
    CorsConfiguration config = new CorsConfiguration();
    config.setAllowCredentials(true);
   config.addAllowedOrigin("*");
   source.registerCorsConfiguration("/**", config);
   FilterRegistrationBean bean = new FilterRegistrationBean(new CorsFilter(source));
   bean.setOrder(0);
   return bean;
}
Actuator跨域
如果项目里集成了Actuator相关功能,其暴露的接口也支持跨域,只需要在配置文件中添加如下配置即可:
ENDPOINTS CORS CONFIGURATION (CorsEndpointProperties)
management.endpoints.web.cors.allow-credentials= # Whether credentials are supported. When not set, credentials are not supported.
management.endpoints.web.cors.allowed-headers= # Comma-separated list of headers to allow in a request. '*' allows all headers.
management.endpoints.web.cors.allowed-methods= # Comma-separated list of methods to allow. '*' allows all methods. When not set, defaults to GET.
management.endpoints.web.cors.allowed-origins= # Comma-separated list of origins to allow. '*' allows all origins. When not set, CORS support is disabled.
management.endpoints.web.cors.exposed-headers= # Comma-separated list of headers to include in a response.
management.endpoints.web.cors.max-age=1800s # How long the response from a pre-flight request can be cached by clients. If a duration suffix is not specified, seconds will be used.