Django way of learning
Achieve basic web framework
1. Pure hand line and web frameworks.
1, the manual writing codes socket
2, manual processing data http

#socket套接字
import socket
server = socket.socket()
server.bind(('127.0.0.1',8080))
server.listen(5)


while True:
    conn, addr = server.accept()
    data = conn.recv(1024)
    conn.send(b'HTTP/1.1 200 OK\r\n\r\n')
    # print(data)
    data = data.decode('utf-8')
    current_path = data.split('\r\n')[0].split(' ')[1]
    # print(current_path)
    if current_path == '/index':
        # conn.send(b'index')
        with open(r'D:\python脱产10期视频\day51\01 纯手撸html文件.html','rb') as f:
            conn.send(f.read())
    elif current_path == '/login':
        conn.send(b'login')
    else:
        conn.send(b'hello world!')
    conn.close()
#类型转换
data = b'hello world'

data = str(data,encoding='utf-8')
print(data)

data = bytes(data,encoding='utf-8')
print(data)
2. Based on the wsgiref module to help us deal scoket and http data
wsgiref module
1, when the request, parse http data, packaged into a dictionary to help you transmitted to you, you to facilitate operation of the data.
2, take the time to respond automatically to help you re-package the data into line with the way the http protocol format, and then returned to the front
RUN DEF (the env, response):
    "" "
    the env-related data is a request
    response in response to data relating to
    " ""
    # Print (the env)
    response ( '200 is the OK', [])
    current_path = env.get ( 'the PATH_INFO' )
    # Print (current_path)
    # IF current_path == '/ index':
    # return [b'index ']
    # elif current_path ==' / Login ':
    # return [b'login']
    # define a function name stored in the flag bit
    FUNC = None
    for URLs in url:
        # determines current url is not within the tuple
        if url [0] == current_path:
            # Url if it matches suffix put on the corresponding name of the function assigned to the FUNC
            FUNC = url [1]
            # Once the match should quit immediately save resources for loop
            break
    To make a judgment on the variable # FUNC
    FUNC IF:
        RES = FUNC (the env)
    the else:
        RES = errors (the env)
    return [res.encode ( 'UTF-. 8')]


IF the __name__ == '__main__':
    Server make_server = ( '127.0.0.1', 8080, run)
    Once the real-time monitoring # 127.0.0.1:8080 address has client to connect automatically parentheses calls the run method
    server.serve_forever () # start the server
3. Package Routing and view the number of correspondence, documents and view function, all html files used by all site templates in the folder
1, urls.py routing and view function correspondence relationship
2, views.py view function (function not only refers to the view function may be a class)
3, templates templates folder
#urls
from 代码.views import *

urls = [
    ('/index',index),
    ('/login',login),
    ('/reg',reg),
    ('/get_time',get_time),
    ('/get_user',get_user),
    ('/get_db',get_db),
]
#views
DEF index (the env):
    return 'index'
DEF Login (the env):
    return 'Login'
DEF errors (the env):
    return '404 error'

DEF REG (the env):
    return 'REG'

from datetime datetime Import


DEF GET_TIME ( the env):
    # rear end by means of a module is now time to acquire the time data
    CURRENT_TIME = DateTime.Now () the strftime ( '% Y-M-%%% X-D').
    with Open (r'templates / 02 get_time.html ' , 'R & lt', encoding = 'UTF-. 8') AS F:
        Data reached, f.read = () # Data is actually a series of strings nothing !!!
    Data = data.replace ( '$$ $$ Time' , CURRENT_TIME)
    return Data


from Jinja2 Import Template
DEF The get_user (the env):
    = {user_dict 'username': 'Jason', 'password': '123', 'Hobby': [ 'Read', 'Game', 'running']}
    with Open (r'templates / 03 get_user.html ', 'R & lt', encoding = 'UTF-. 8') AS F:
        Data reached, f.read = ()
    TEMP = Template (Data)
    RES = temp.render (Data = user_dict) # pass user_dict front page to the front page by the variable name it is possible to acquire the data dictionary
    return RES

Import pymysql
DEF get_db (the env):
    Conn = pymysql.connect (
        Host = '127.0.0.1',
        Port = 3306,
        User = 'the root',
        password = '123',
        Database = ' day51 ',
        charset =' UTF8 ',
        autocommit = True
    )
    cursor = conn.cursor(pymysql.cursors.DictCursor)
    sql = "select * from userinfo"
    affect_rows = cursor.execute(sql)
    data = cursor.fetchall()
    # print(data)
    with open(r'templates/04 get_db.html','r',encoding='utf-8') as f:
        data1 = f.read()
    temp = Template(data1)
    res = temp.render(user_list= data)
    return res
4. Based on jinja2 achieve rendering templates
Render Template
Generate good back-end data, transfer some way to use the front page (front page can easily pass over the back-end data based on the syntax more quickly)
python web framework introduces three mainstream and analysis
1.Django: large and comes with special function is similar to a particularly large aircraft carriers sometimes too heavy
2.Flask: dapper own particular special features are all less dependent on third-party components, particularly flask framework of third-party components, all add up to a third party if the flask completely overshadowed by Django, the comparison is limited by a third party Developers
3.Tornado: born non-blocking asynchronous framework capable of very fast withstood high concurrency, you can develop a game server
A: socket
B: Routing and view function match
C: template syntax
Django
A: with others wsgiref
B: Write your own
C: himself wrote
the Flask
A: with others >>> Werkzeug wsgiref
B: Write your own
C : use of someone else's jinja2
Tornado
a, B, C are all to write their own
Django use
"" "
Version of the problem:
Django 1.x version of the problem and 2.x (this is a learning object to 1.11.11)
Notes:
    1. The name of the computer you can not have a Chinese
    name of the file 2. Try not to use Chinese
    3. a pycharm window can have only one project do not put more than one item placed under a window
. "" "
Django download and install
#django download
in the # command line knock:
    PIP3 install Django == 1.11.11
# to confirm whether the download was successful
knock in the # command line:
    Django-ADMIN
Create a Django project
Command line
1. Create a command line django project
django-admin startproject project name
2. Create a django applications in the command line (an application corresponding to a separate function)
django-admin startapp application name
python manage.py startapp application name
3. Start the command line django project
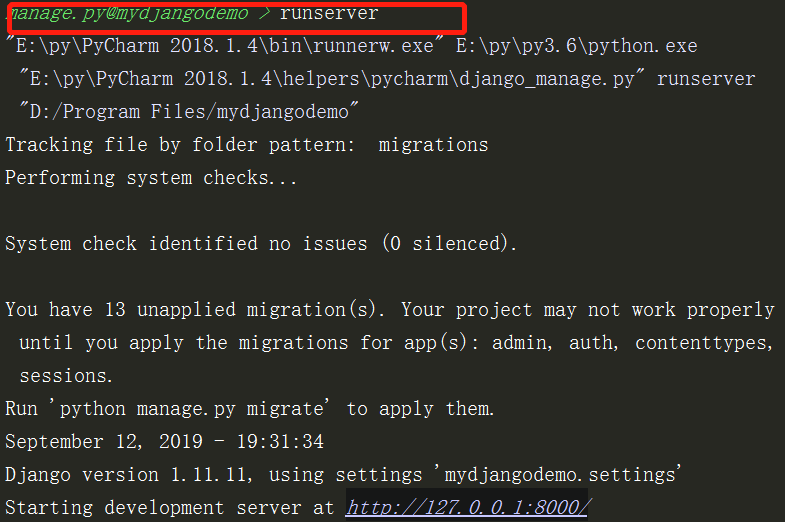
python manage.py runserver
Note: The command line django project does not automatically create new templates template folders, you need to manually create your own needs and your own path to the file settings.py file registration
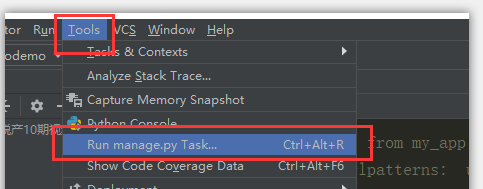
pycharm Shortcuts
Create a Django project
Create a Django project
One:
two:

(******)
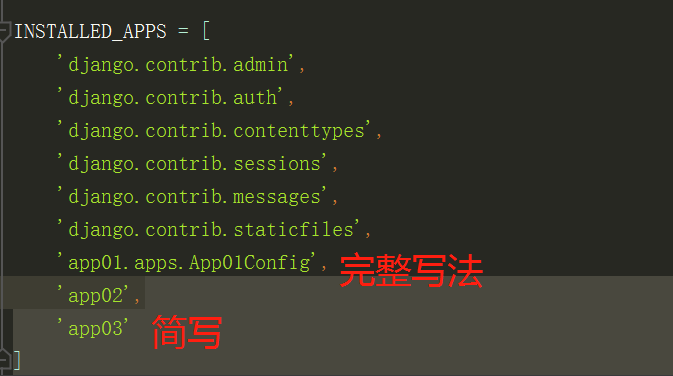
created by the application must be registered in the settings to take effect in otherwise not be recognized
If you do not have to manually add the path to the configuration temlates

Start django project
Django create a page after the completion of

The main file folder presentation django
Project file name
the same name as the project folder
settings.py django exposed file to the user-configurable
urls.py routing and view function correspondence between
manage.py django file entrance
applications folder
migrations folder database migration records
admin.py django Admin
apps .py registration application related
models.py orm model class
tests.py test file
views.py view function
Django foundation necessary three-piece:
from django.shortcuts import HttpResponse, render, redirect
HttpResponse
Inside pass a string parameter and returns to the browser.
E.g:
render
除request参数外还接受一个待渲染的模板文件和一个保存具体数据的字典参数。
将数据填充进模板文件,最后把结果返回给浏览器。(类似于我们上面用到的jinja2)
例如:
redirect
接受一个URL参数,表示跳转到指定的URL(重定向)。
例如:
基础web框架的实现
1.纯手撸web框架。
1、手动书写socket代码
2、手动处理http数据
#socket套接字
import socket
server = socket.socket()
server.bind(('127.0.0.1',8080))
server.listen(5)


while True:
    conn, addr = server.accept()
    data = conn.recv(1024)
    conn.send(b'HTTP/1.1 200 OK\r\n\r\n')
    # print(data)
    data = data.decode('utf-8')
    current_path = data.split('\r\n')[0].split(' ')[1]
    # print(current_path)
    if current_path == '/index':
        # conn.send(b'index')
        with open(r'D:\python脱产10期视频\day51\01 纯手撸html文件.html','rb') as f:
            conn.send(f.read())
    elif current_path == '/login':
        conn.send(b'login')
    else:
        conn.send(b'hello world!')
    conn.close()
#类型转换
data = b'hello world'

data = str(data,encoding='utf-8')
print(data)

data = bytes(data,encoding='utf-8')
print(data)
2.基于wsgiref模块帮助我们处理scoket以及http数据
wsgiref模块
1、请求来的时候,解析http数据,帮你打包成一个字典传输给你,便于你操作各项数据。
2、响应走的时候,自动帮你把数据再打包成符合http协议格式的样子,再返回给前端
def run(env,response):
    """
    env是请求相关的数据
    response是响应相关的数据
    """
    # print(env)
    response('200 OK',[])
    current_path = env.get('PATH_INFO')
    # print(current_path)
    # if current_path == '/index':
    #     return [b'index']
    # elif current_path == '/login':
    #     return [b'login']
    # 定义一个存储函数名的标志位
    func = None
    for url in urls:
        # 判断当前url在不在元组内
        if url[0] == current_path:
            # 只要匹配上了  就把url后缀对应的函数名赋值给func
            func = url[1]
            # 一旦匹配上 应该立刻退出for循环 节省资源
            break
    # 对变量func做判断
    if func:
        res = func(env)
    else:
        res = errors(env)
    return [res.encode('utf-8')]


if __name__ == '__main__':
    server = make_server('127.0.0.1',8080,run)
    # 实时监测127.0.0.1:8080地址 一旦有客户端来连接 会自动加括号调用run方法
    server.serve_forever()  # 启动服务端
3.封装路由与视图数对应关系,以及视图函数文件,网站用到的所有html文件全部放在了templates文件夹下
1、urls.py路由与视图函数对应关系
2、views.py视图函数(视图函数不单单指函数,也可以是类)
3、templates模板文件夹
#urls
from 代码.views import *

urls = [
    ('/index',index),
    ('/login',login),
    ('/reg',reg),
    ('/get_time',get_time),
    ('/get_user',get_user),
    ('/get_db',get_db),
]
#views
def index(env):
    return 'index'
def login(env):
    return 'login'
def errors(env):
    return '404 error'

def reg(env):
    return 'reg'

from datetime import datetime


def get_time(env):
    # 借助于时间模块 现在后端获取到时间数据
    current_time = datetime.now().strftime('%Y-%m-%d %X')
    with open(r'templates/02 get_time.html','r',encoding='utf-8') as f:
        data = f.read()  # data其实就是一串字符串  仅此而已!!!
    data = data.replace('$$time$$',current_time)
    return data


from jinja2 import Template
def get_user(env):
    user_dict = {'username':'jason','password':'123','hobby':['read','game','running']}
    with open(r'templates/03 get_user.html','r',encoding='utf-8') as f:
        data = f.read()
    temp = Template(data)
    res =  temp.render(data = user_dict)  # 将user_dict传递给前端页面 前端页面通过变量名data就能够获取到该字典
    return res

import pymysql
def get_db(env):
    conn = pymysql.connect(
        host = '127.0.0.1',
        port = 3306,
        user = 'root',
        password = '123',
        database = 'day51',
        charset = 'utf8',
        autocommit = True
    )
    cursor = conn.cursor(pymysql.cursors.DictCursor)
    sql = "select * from userinfo"
    affect_rows = cursor.execute(sql)
    data = cursor.fetchall()
    # print(data)
    with open(r'templates/04 get_db.html','r',encoding='utf-8') as f:
        data1 = f.read()
    temp = Template(data1)
    res = temp.render(user_list= data)
    return res
4.基于jinja2实现模板的渲染
模板的渲染
后端生成好数据,通过某种方式传递给前端页面使用(前端页面可以基于语法更加快捷简便使用后端传过来的数据)
python三大主流web框架介绍和分析
1.Django:大而全 自带的功能特别特别多 就类似于航空母舰 有时候过于笨重
2.Flask:短小精悍 自带的功能特别特别少 全都是依赖于第三方组件,flask框架第三方的组件特别多,如果把flask第三方全部加起来 完全可以盖过Django,比较受限于第三方的开发者
3.Tornado:天生的异步非阻塞框架 速度特别快 能够抗住高并发,可以开发游戏服务器
A:socket
B:路由与视图函数匹配
C:模板语法
Django
A:用的别人的 wsgiref
B:自己写的
C:自己写的
Flask
A:用的别人的 wsgiref>>> werkzeug
B:自己写的
C:用的别人的 jinja2
Tornado
A,B,C全都是自己写的
Django的使用
"""
版本问题:
django版本问题1.x和2.x(本次以1.11.11为学习对象)
注意事项:
    1.你的计算机的名称不能有中文
    2.文件的命名尽量也不要用中文
    3.一个pycharm窗口只能有一个项目 不要把多个项目放在一个窗口下
"""
Django的下载与安装
#django下载
#命令行内敲:
    pip3 install django==1.11.11
#确认是否下载成功
#命令行内敲:
    django-admin
Django的项目创建
命令行式
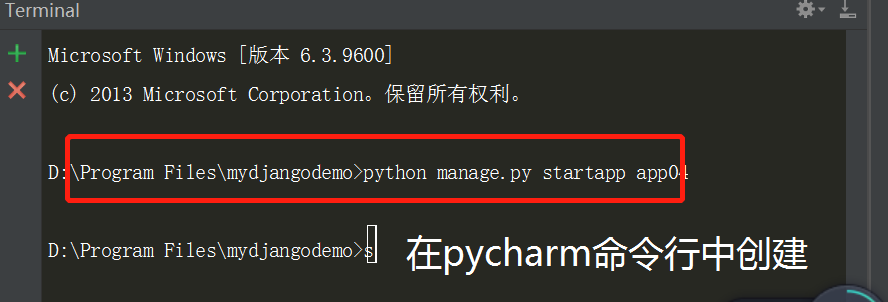
1.命令行创建django项目
django-admin startproject 项目名
2.命令行内创建django应用(一个应用对应一块独立的功能)
django-admin startapp 应用名
python manage.py startapp 应用名
3.命令行启动django项目
python manage.py runserver
注意 :用命令行创建django项目 不会自动新建templates模板文件夹,需要你自己手动创建 并且需要你自己去settings.py文件中注册该文件路径
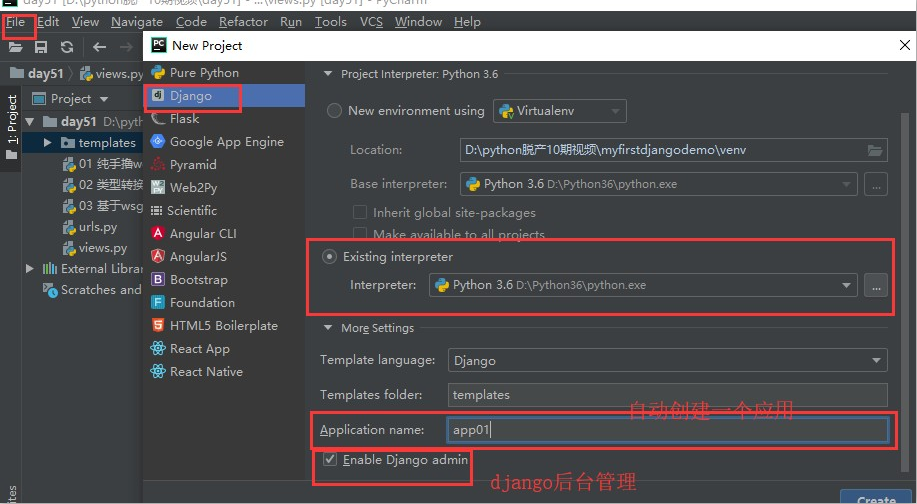
pycharm快捷方式
创建Django项目
创建Django项目
一:
二:
(******)
创建的应用一定要在settings中注册 才能生效 否则无法识别
如果没有配置temlates路径也要手动添加
启动django项目
Django创建完成后的页面
django的主要文件夹介绍
项目名文件
同名的项目文件夹
settings.py django暴露给用户可配置的文件
urls.py 路由与视图函数对应关系
manage.py django入口文件
应用文件夹
migrations文件夹 数据库迁移记录
admin.py django后台管理
apps.py 应用注册相关
models.py orm模型类
tests.py 测试文件
views.py 视图函数
Django基础必备三件套:
from django.shortcuts import HttpResponse, render, redirect
HttpResponse
内部传入一个字符串参数,返回给浏览器。
例如:
render
In addition to the request parameter also accepts a template file to be rendered and saved a data dictionary specific parameters.
The data filled in the template file, and finally return the result to the browser. (Similar to what we used above jinja2)
E.g:
redirect
Accepts a URL parameter that indicates a jump to the specified URL (redirect).
E.g: