The difference between HTTP and HTTPS
A, HTTP Hypertext transfer protocol, information is transmitted in the clear, HTTPS is encrypted with SSL security transmission protocol.
Two, HTTPS protocol requires the CA to request a certificate, the certificate is generally free little need to pay.
Three, HTTP, and HTTPS uses a completely different connections, with the port are not the same, the former is 80, which is 443.
Four, HTTP connection is very simple, stateless; is constructed by the HTTPS protocol SSL + HTTP encrypted transmission protocol, authentication of network protocols, security protocols than HTTP.
A local configuration:
1.Ctrl + R Open command cmd entry into the console;
2. Locate the jdk installation directory, I have an example: D: \ Java \ jdkbobo \ jdk1.6.0_45 \ bin;
Enter the directory, execute the following command: keytool -genkeypair -alias "tomcat" -keyalg "RSA" -keystore "D: \ tomcat.keystore"

Then let you fill in some basic information.
Briefly describe below.
Keystore password: 123456 (This password is very important)
and last name: 127.0.0.1 (after the domain name or IP address of the access is very important, certificates and domain name or IP binding)
Organizational Unit Name: anything (just fill)
Organization name : anything (just fill)
city: anything (just fill)
provinces: anything (just fill)
country code: anything (just fill)
3, Tomcat server configuration
a, tomcat open profile, such as: D: /apache-tomcat-6.0.29/conf/server.xml, modified as follows,
<!--
<Connector port="8443" protocol="HTTP/1.1" SSLEnabled="true"
              maxThreads="150" scheme="https" secure="true"
              clientAuth="false" sslProtocol="TLS"/>
 -->
Remove and modify parameters NOTE =>
<Connector port="8443" protocol="HTTP/1.1" SSLEnabled="true"
               maxThreads="150" scheme="https" secure="true"
               clientAuth="false" sslProtocol="TLS" keystoreFile="D:/tomcat.keystore" keystorePass="123456789"/>
Which, keystoreFile is the last step to generate the certificate file address, keystorePass key store password is the last step.
b, annotation conf\server.xmlfile the following line.
<!--<Listener SSLEngine="on" className="org.apache.catalina.core.AprLifecycleListener"/>-->
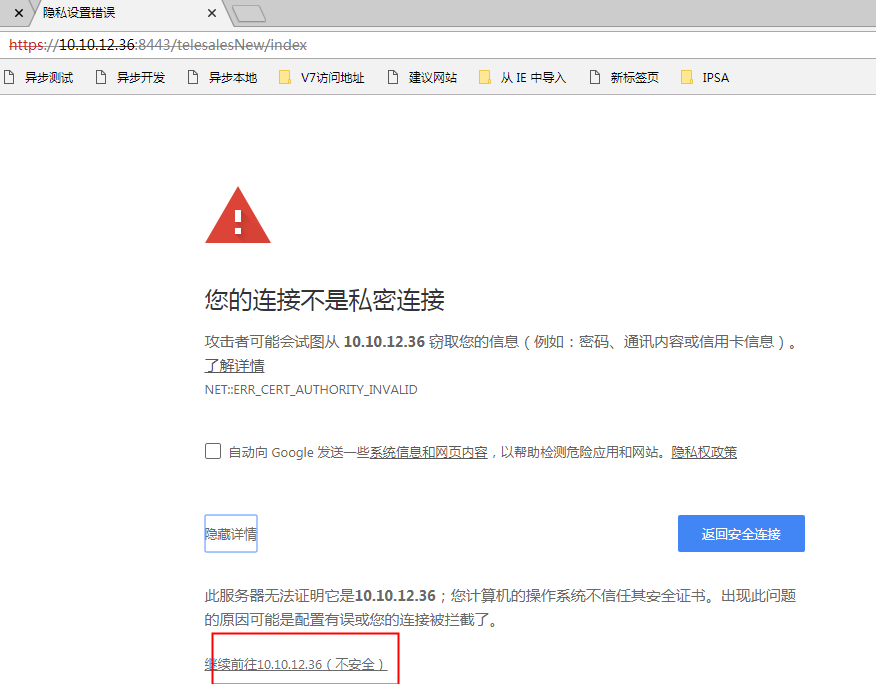
Finally, visit the link: https: //127.0.0.1: 8443 / telesalesNew /

Click Advanced to continue to visit
Second, server configuration
1, the server generates a certificate
from the console switch to % JAVA_HOME% / bin directory, the specific operation slightly. (Open a DOS window, enter the command to the next jdk bin directory. All steps below are done in this path.)
Use keytool to generate a certificate for Tomcat, assume that the target machine's hostname is " localhost", the keystore files you want stored in " D: \ Home \ tomcat.keystore", password is " password", generated using the following command:
keytool -genkey -v -alias tomcat -keyalg RSA -keystore D:\home\tomcat.keystore -validity 36500
(Brief description of the parameters: " D: \ Home \ tomcat.keystore" means that the path to save the certificate file (where D: \ home, be your own new, but tomcat.keystore is automatically generated, so in advance under a new disk to a folder to put the files automatically generated name can take themselves, are unified behind a folder to put this file automatically generated), the certificate file name is tomcat.keystore; "- validity 36500" meaning the certificate is valid, 36500 represents 100 years, the default is 90 days "tomcat" custom certificate name).
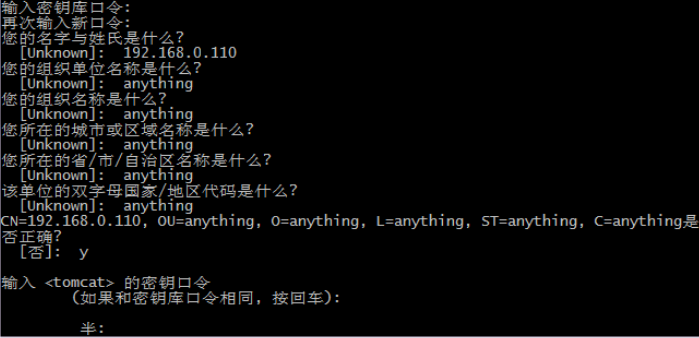
Fill in the necessary parameters on the command line:
A, keystore password: Here you need to enter a string greater than six characters.
B, "What is your first and last name is?" It is mandatory and must be deployed TOMCAT domain host or IP [such as: gbcom.com or 10.1.25.251] (future that you want to enter in the browser access address), otherwise the browser will pop up a warning window that prompts the user certificate does not match the domain. When doing development and testing locally, should fill in "localhost". (This is important)
C, what is the name of your organizational unit? "" What is the name of your organization? "," Name your city or region What is? "" The name of your state or province what? "" Two-letter country code for this unit what? "May or may not directly enter fill in as needed to fill in, ask the system" correct? "When the control input information, if you meet the requirements to use the keyboard to enter letters" y ", otherwise enter" n "re-fill the above information.
D, enter <tomcat> Master Password, this is more important, will the configuration file in tomcat in use, the input and unanimously recommended the keystore password, you can also set other password, after the completion of the input, hit enter then find the file you generated in the position defined in the second step.
2, generate a certificate for the client
to generate a certificate for the browser, in order to allow the server to verify it. In order to be able to smoothly introduced into certificate IE and Firefox, the PKCS12 certificate format should be, therefore, generated using the following command:
keytool -genkey -v alias MyKey -keyalg RSA -storetype PKCS12 -keystore D: \ home \ mykey.p12
(Mykey custom).
Corresponding stock certificates on the " D: \ Home \ mykey.p12", (the same as this one and explain the first step) client CN can be any value. Mykey.p12 Double-click the file, you can import the certificate to the browser (client) (I checked unified trust on this computer includes a lower fourth).
3, let the server to trust client certificates
Because it is a two-way SSL authentication, the server must trust the client certificate, therefore, you must add the client certificate as a trusted authentication server. Since the format of the certificate PKCS12 library can not be imported directly, you must export the first client certificate CER as a separate file, use the following command:
keytool -export -alias mykey -keystore D:\home\mykey.p12 -storetype PKCS12 -storepass password -rfc -file D:\home\mykey.cer
(Mykey custom client-defined mykey to be consistent, password is the password you set). Through the above command, the client certificate was exported to our "D: \ home \ mykey.cer" files.
The next step is to import the file to the server's certificate store, add a trusted certificate using the following command:
keytool -import -v -file D:\home\mykey.cer -keystore D:\home\tomcat.keystore
By list command to view the server's certificate store, you can see two certificates, one server certificate, is a trusted client certificates:
keytool -list -keystore D:\home\tomcat.keystore
(Tomcat set up server-side certificate name for you).
4, allowing the client to trust the server certificate
Because it is a two-way SSL authentication, the client should verify the server certificate, therefore, you must add the server certificate to the browser's "Trusted Root Certification Authorities." Since you can not directly import the keystore certificate store format, you must first export the server certificate CER as a separate file, use the following command:
keytool -keystore D:\home\tomcat.keystore -export -alias tomcat -file D:\home\tomcat.cer
(Tomcat set up server-side certificate name for you, I did not know this step in front of this last part of the name of the certificate which said, there is no change, according to the top of the direct command to do the run).
Through the above command, the server certificate was exported to our "D: \ home \ tomcat.cer" files. Tomcat.cer Double-click the file, follow the prompts to install the certificate, the certificate will be filled to the "Trusted Root Certification Authorities."
5. Configure Tomcat server
a, (1) Open tomcat configuration file, such as: D: /apache-tomcat-6.0.29/conf/server.xml, modified as follows,

< Connector Port = "8080" Protocol = "the HTTP / 1.1" connectionTimeout = "20000" the redirectPort = "8443" /> modify parameters => < Connector Port = "8080" Protocol = "the HTTP / 1.1" connectionTimeout = "20000" the redirectPort = "443" /> (trying to remember when he first tutorial to make 8080 into 8083, finally did not succeed. here it is in accordance with the top of the reform law to change)
(2)
<!--
<Connector port="8443" protocol="HTTP/1.1" SSLEnabled="true"
maxThreads="150" scheme="https" secure="true"
clientAuth="false" sslProtocol="TLS"/>
-->
Uncomment and modify the parameters => (of course, can not remove the comments, add directly to the bottom of this behind the top of this comment, remember to change the inside of keystoreFile, keystorePass two parameters)
<Connector port="443" protocol="HTTP/1.1" SSLEnabled="true" maxThreads="150" scheme="https" secure="true" clientAuth="false" sslProtocol="TLS" keystoreFile="E:/tomcat.keystore" keystorePass="123456789"/>
Comment:
keystoreFile, keystorePass two parameters, namely the location of the certificate file and <tomcat> master password (the position is a position just automatically generated file is stored, the password is the password that were set), is provided in the certificate did file generation process
( 3)
<Connector port="8009" enableLookups="false" protocol="AJP/1.3" redirectPort="8443" />
Modify the parameters =>
<Connector port="8009" enableLookups="false" protocol="AJP/1.3" redirectPort="443" />
(I have not inside enableLookups = "false" This one, I also follow the method on top of the added phrase)
b, open D: /apache-tomcat-6.0.29/conf/web.xml, in the file </ welcome-file-list> followed by this passage:
<login-config>
<!-- Authorization setting for SSL --> <auth-method>CLIENT-CERT</auth-method> <realm-name>Client Cert Users-only Area</realm-name> </login-config> <security-constraint> <!-- Authorization setting for SSL --> <web-resource-collection > <web-resource-name >SSL</web-resource-name> <url-pattern>/*</url-pattern> </web-resource-collection> <user-data-constraint> <transport-guarantee>CONFIDENTIAL</transport-guarantee> </user-data-constraint> </security-constraint>
After I finish this tutorial, run https: // localhost found that there is an error. I find it necessary to comment conf \ server.xml file, find the following line after a few tutorials.
<!--<Listener className="org.apache.catalina.core.AprLifecycleListener" SSLEngine="on" />-->