slicing mongodb
Introduction
Fragment (Sharding) methods are employed for the large collections MongoDB divided into different server (or a cluster). Despite the fragmentation it originated in the relational database partitions, but MongoDB fragmentation is another matter entirely.
And MySQL partitioning scheme, the biggest difference is that it MongoDB almost everything can be done automatically, just tell MongoDB to assign data, it can automatically maintain a balanced data between different servers.
Object slice
High data volume and throughput performance of stand-alone database applications will cause greater pressure, a large amount of queries will run out of stand-alone CPU, a large amount of data on stand-alone storage pressure, the system will eventually run out of memory and the pressure is transferred to the disk IO.
To solve these problems, there are two basic methods: horizontal expansion and vertical expansion.
Vertical expansion: adding more CPU and memory resources to expand capacity.
Horizontal expansion: the data is spread across multiple servers. I.e., the horizontal extension fragments.
Slice design
In response to slice large amounts of data and high throughput method is provided. Use slicing reduces the number of requests to be processed for each tile, and therefore, by the level of extension, clusters can improve their storage capacity and throughput. For example, when inserting a data storage applications require access to this data slice.
Reducing the fragmentation using data pieces stored in each.
For example, if the database 1tb data set, and there are four slices, and each slice may hold data only to 256 GB. If there are 40 slices, each segmentation may only 25GB of data.
Three dominant fragmentation mechanism
1. abstract cluster, so clusters "invisible"
MongoDB comes with a proprietary process called routing of mongos. mongos is to have unified the intersection of router, which will be sent to the client request accurate routing to a cluster or a group of servers, while the response received was pieced together will be sent back to the client.
2. Ensure that the cluster can always read and write
MongoDB to ensure the availability and reliability of the cluster through a variety of ways. The fragmentation and MongoDB replication combination, while ensuring fragmentation data to multiple servers, and also ensures that each have a corresponding sub-data backup, thus ensuring that there is time to replace the server, from other library Now we continue to work to replace the broken part.
3. Make clusters easy to expand
When the system requires more space and resources, MongoDB demand so that we can expand system capacity and convenient.
Slice node cluster architecture
| Package | Explanation |
|---|---|
| Config Server | All storage cluster nodes, the routing information of the data slice. The default configuration requires three Config Server nodes. |
| Mongos | Provision of external application access, all operations are executed by mongos. Often there are multiple nodes mongos. |
| Mongod | Store application data record. Mongod generally have a plurality of nodes, to achieve the purpose of the data slice. |
Cluster architecture diagram
mongos
Data routing, and client dealing module. mongos does not have any data, he does not know how to deal with this data, go to config server
config server
Some configuration information shard all nodes, data access mode, the fragmentation. Metadata can be understood as real data.
shard
The real data storage location to store data chunk as a unit.
What Chunk that?
In an internal shard server, MongoDB or data will be divided into chunks, each chunk of data representative of the internal part of the shard server. chunk is generated, there will be the following two purposes:
Splitting : When the size of a chunk of over chunk size configuration, MongoDB background process will put this chunk cut into smaller chunk, so as to avoid chunk too large
Balancing : in MongoDB, balancer is a background process, responsible chunk of migration, so each shard server load balancing, system initial one chunk, chunk size defaults 64M , select the chunk size appropriate to your business on the production library is the best . mongoDB will automatically split and migration chunks.
Data distribution fragmentation cluster nodes
(1) to store data chunk
(2) after the completed structures into the group, enabled by default a chunk, size 64M,
(3)存储需求超过64M,chunk会进行分裂,如果单位时间存储需求很大,设置更大的chunk
(4)chunk会被自动均衡迁移。
如何选择chunksize?
小的chunksize:数据均衡是迁移速度快,数据分布更均匀。数据分裂频繁,路由节点消耗更多资源。
大的chunksize:数据分裂少。数据块移动集中消耗IO资源。通常100-200M
适合业务的chunksize是最好的;
chunk的分裂和迁移非常消耗IO资源;
chunk分裂的时机:在插入和更新,读数据不会分裂;
chunk分裂及迁移
随着数据的增长,其中的数据大小超过了配置的chunk size,默认是64M,则这个chunk就会分裂成两个。
这时候,各个shard 上的chunk数量就会不平衡。这时候,mongos中的一个组件balancer 就会执行自动平衡。把chunk从chunk数量最多的shard节点挪动到数量最少的节点。
chunkSize对分裂及迁移的影响
- MongoDB 默认的 chunkSize 为64MB,如无特殊需求,建议保持默认值;chunkSize 会直接影响到 chunk 分裂、迁移的行为。
- chunkSize 越小,chunk 分裂及迁移越多,数据分布越均衡;反之,chunkSize 越大,chunk 分裂及迁移会更少,但可能导致数据分布不均。
- chunk 自动分裂只会在数据写入时触发,所以如果将 chunkSize 改小,系统需要一定的时间来将 chunk 分裂到指定的大小。
- chunk 只会分裂,不会合并,所以即使将 chunkSize 改大,现有的 chunk 数量不会减少,但 chunk 大小会随着写入不断增长,直到达到目标大小。
shard key 分片键
MongoDB中数据的分片是、以集合为基本单位的,集合中的数据通过片键(Shard key)被分成多部分。其实片键就是在集合中选一个键,用该键的值作为数据拆分的依据。
所以一个好的片键对分片至关重要。片键必须是一个索引。
对集合进行分片时,你需要选择一个片键,片键是每条记录都必须包含的,且建立了索引的单个字段或复合字段,MongoDB按照片键将数据划分到不同的数据块中,并将数据块均衡地分布到所有分片中。
分片建策略
- 一个自增的片键对写入和数据均匀分布就不是很好,因为自增的片键总会在一个分片上写入,后续达到某个阀值可能会写到别的分片。但是按照片键查询会非常高效。
- 随机片键对数据的均匀分布效果很好。注意尽量避免在多个分片上进行查询。在所有分片上查询,mongos会对结果进行归并排序。
- MongoDB使用基于范围的分片方式 或者 基于哈希的分片方式。
- 注意事项
- 分片键是不可变。
- 分片键必须有索引。
- 分片键大小限制512bytes。
- 分片键用于路由查询。
- 键的文档(不支持空值插入)
基于范围的分片方式
Sharded Cluster支持将单个集合的数据分散存储在多shard上,用户可以指定根据集合内文档的某个字段即shard key来进行范围分片(range sharding)。
对于基于范围的分片,MongoDB按照片键的范围把数据分成不同部分。
假设有一个数字的片键:想象一个从负无穷到正无穷的直线,每一个片键的值都在直线上画了一个点。MongoDB把这条直线划分为更短的不重叠的片段,并称之为数据块,每个数据块包含了片键在一定范围内的数据。在使用片键做范围划分的系统中,拥有“相近”片键的文档很可能存储在同一个数据块中,因此也会存储在同一个分片中。
基于哈希的分片方式
分片过程中利用哈希索引作为分片的单个键,且哈希分片的片键只能使用一个字段,而基于哈希片键最大的好处就是保证数据在各个节点分布基本均匀。
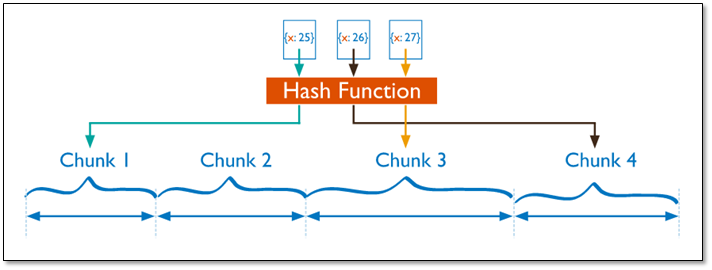
> 对于基于哈希的分片,MongoDB计算一个字段的哈希值,并用这个哈希值来创建数据块。在使用基于哈希分片的系统中,”相近”片键的文档很可能不会存储在同一个数据块中,因此数据的分离性更好一些。
>
> Hash分片与范围分片互补,能将文档随机的分散到各个chunk,充分的扩展写能力,弥补了范围分片的不足,但不能高效的服务范围查询,所有的范围查询,要分发到后端所有的Shard,才能找出满足条件的文档。分片集群部署的常见错误
- Copy sets can be configured as a set of slice copied node is configured to use basically the same individual. But the startup parameters to be specified -shardsvr parameters. Otherwise, given time slice start database: { "code": 193, "OK": 0, "ErrMsg": "Can Not Started Not Accept Sharding with --shardsvr IF Commands"}.
- Fragment generated by default does not need to start slice (sh.enableSharding ( "DBName")) in the database, and then set the slice set (sh.shardCollection ( "Collection" {} key sheet))
Environmental Information
操作系统:centos6.8
mongodb版本:mongodb-linux-x86_64-rhel62-4.0.6.tgz
3台虚拟机
192.168.57.201、192.168.57.202、192.168.57.203
集群环境
2个分片复制集
shard1(192.168.57.201:27017、192.168.57.202:27017、192.168.57.203:27017)
shard2(192.168.57.201:27018、192.168.57.202:27018、192.168.57.203:27018)
1个config复制集
(192.168.57.201:28018、192.168.57.202:28018、192.168.57.203:28018)
1个mongos节点
Replication set slice building mongodb
shard1 cluster step
#解压缩
tar xzvf mongodb-linux-x86_64-rhel62-4.0.6.tgz
Add (yidian_repl) replication set configuration file: mongo.conf (201/202/203)
fork=true
# 数据路径
dbpath=/opt/mongo/data/db
port=27017
bind_ip=0.0.0.0
# 日志路径
logpath=/opt/mongo/logs/mongodb.log
logappend=true
# 复制集的名字
replSet=yidian_repl
smallfiles=true
#分片集群必须要有的属性
shardsvr=true
Add (yidian_repl2) replication set configuration file: mongo2.conf (201/202/203)
fork=true
dbpath=/opt/mongo/data/db2
port=27018
bind_ip=0.0.0.0
logpath=/opt/mongo/logs/mongodb2.log
logappend=true
replSet=yidian_repl2
smallfiles=true
shardsvr=true
Start replica set
# 根据自己文件的路径去调整
./mongod -f mongo.conf

# 当前视频中的地址,启动(yidian_repl)
/opt/yidian/mongodb-linux-x86_64-rhel62-4.0.6/bin/mongod -f /opt/mongo/mongo.conf
# 当前视频中的地址,启动(yidian_repl2)
/opt/yidian/mongodb-linux-x86_64-rhel62-4.0.6/bin/mongod -f /opt/mongo/mongo2.conf
Log replication set, add the initial configuration
# 进入mongo客户端

# 配置(yidian_repl)
/opt/yidian/mongodb-linux-x86_64-rhel62-4.0.6/bin/mongo -port 27017

# 配置(yidian_repl2)
/opt/yidian/mongodb-linux-x86_64-rhel62-4.0.6/bin/mongo -port 27018
27017 after entering the client, perform the initialization command
# 配置复制集
var rsconf = {
    _id:'yidian_repl', //这里的_id要与配置文件中指定的服务所属的复制集相同
    members:  //复制集成员
    [
        {
        _id:1, //成员的id
        host:'192.168.57.201:27017' //成员所属节点的ip以及该成员服务启动时所占的端口
        },
        {
        _id:2,
        host:'192.168.57.202:27017'
         },
         {
         _id:3,
         host:'192.168.57.203:27017'
          }
        ]
}

#初始化配置(加载rsconf配置文件)
rs.initiate(rsconf);

#状态查看
rs.status();
27018 after entering the client, perform the initialization command
# 配置复制集
var rsconf = {
    _id:'yidian_repl2', //这里的_id要与配置文件中指定的服务所属的复制集相同
    members:  //复制集成员
    [
        {
        _id:1, //成员的id
        host:'192.168.57.201:27018' //成员所属节点的ip以及该成员服务启动时所占的端口
        },
        {
        _id:2,
        host:'192.168.57.202:27018'
         },
         {
         _id:3,
         host:'192.168.57.203:27018'
          }
        ]
}

#初始化配置(加载rsconf配置文件)
rs.initiate(rsconf);

#状态查看
rs.status();
Build config replication set node
Create a config node configuration file: mongo-cfg.conf (201/202/203)
systemLog:
  destination: file
  # 日志存储位置
  path: /opt/mongo/mongo-cfg/logs/mongodb.log
  logAppend: true
storage:
  journal:
    enabled: true
  # 数据存储位置
  dbPath: /opt/mongo/mongo-cfg/data
  # 是否一个库一个文件夹
  directoryPerDB: true
  wiredTiger:
    engineConfig:
      # 最大使用cache(根据真实情况自行调节)
      cacheSizeGB: 1
      # 是否将索引也按照数据库名单独存储
      directoryForIndexes: true
    collectionConfig:
      # 表压缩配置
      blockCompressor: zlib
    indexConfig:
      prefixCompression: true
net:
  # IP地址
  bindIp: 192.168.57.201
  # 端口
  port: 28018
replication:
  oplogSizeMB: 2048
  # 配置节点的复制集名字
  replSetName: configReplSet
sharding:
  clusterRole: configsvr
processManagement:
  fork: true
Copy the startup configuration set
# 配置文件地址,自行调整
/opt/yidian/mongodb-linux-x86_64-rhel62-4.0.6/bin/mongod -f /opt/mongo/mongo-cfg.conf
Login Configuration node
#登录 指定IP 和 端口
/opt/yidian/mongodb-linux-x86_64-rhel62-4.0.6/bin/mongo -host 192.168.57.201 -port 28018
Initialization Commands
rs.initiate(
  {
    _id: "configReplSet",
    configsvr: true,
    members: [
      { _id : 0, host : "192.168.57.201:28018" },
      { _id : 1, host : "192.168.57.202:28018" },
      { _id : 2, host : "192.168.57.203:28018" }
    ]
  }
)
mongos node (201)
mongos profile
systemLog:
  destination: file
  path: /opt/mongo/mongos/log/mongos.log
  logAppend: true
net:
  bindIp: 192.168.57.201
  port: 28017
sharding:
  configDB: configReplSet/test201:28018,test202:28018,test203:28018
processManagement:
  fork: true
test201 / test202 / test203 Configure the local host
[root@test201 mongos]# cat /etc/hosts
127.0.0.1   localhost localhost.localdomain localhost4 localhost4.localdomain4
::1         localhost localhost.localdomain localhost6 localhost6.localdomain6

192.168.57.201 test201
192.168.57.202 test202
192.168.57.203 test203
Start mongos
/opt/yidian/mongodb-linux-x86_64-rhel62-4.0.6/bin/mongos -config /opt/mongo/mongos/mongos.confLogin mongos node
/opt/yidian/mongodb-linux-x86_64-rhel62-4.0.6/bin/mongo 192.168.57.201:28017
Add cluster node fragment
Switching admin: use admin
Add shard1 replication set
db.runCommand( { addshard : "yidian_repl/192.168.57.201:27017,192.168.57.202:27017,192.168.57.203:27017",name:"shard1"} )Add shard2 replication set
db.runCommand( { addshard : "yidian_repl2/192.168.57.201:27018,192.168.57.202:27018,192.168.57.203:27018",name:"shard2"} )View fragmentation
# mongos
db.runCommand( { listshards : 1 } )
View fragmentation status
# mongos
sh.status()
Test cluster fragmentation
Open slice configuration database
db.runCommand( { enablesharding : "testdb" } )Create a key slice (id)
db.runCommand( { shardcollection : "testdb.users",key : {id: 1} } )Create an index (if not the empty set, is not the first operation)
use testdb
db.users.ensureIndex( { id: 1 } )
Add test data
var arr=[];
for(var i=0;i<1500000;i++){
  var uid = i;
  var name = "name"+i;
  arr.push({"id":uid,"name":name});
}
db.users.insertMany(arr);
Other fragments of the cluster command
# 添加分片
db.runCommand( { addshard : "yidian_repl2/192.168.57.201:27018,192.168.57.202:27018,192.168.57.203:27018",name:"shard2"} )

# 删除分片
db.runCommand( { removeShard: "shard2" } )
Video Tutorial: www.yidiankt.com
QQ discussion group: 706 564 342

Public concern number - free access to core knowledge [JAVA]! !