# 1 express application creation
1, the installation Node.js (self Baidu)
2, the overall installation express generator express-generator
npm install express-generator -g
3, see the express version, you can check whether the generator express-generator installed successfully
express -v
4. (Optional) Check express all the help command and usage
express -h
5, cd into the specified directory Workspace (arbitrarily designated) -------------- cmd command system which is not an instruction node
6, in the specified directory workspace (any name) to create a project nodejs-demo (any name)
express -e nodejs-demo
7, from the current directory workspace (any name) into the project directory nodejs-demo (any name) -------------- This is a system cmd command, not the node command
cd workspace
8, mounted reliance
npm install
9, startup items
Elevation start
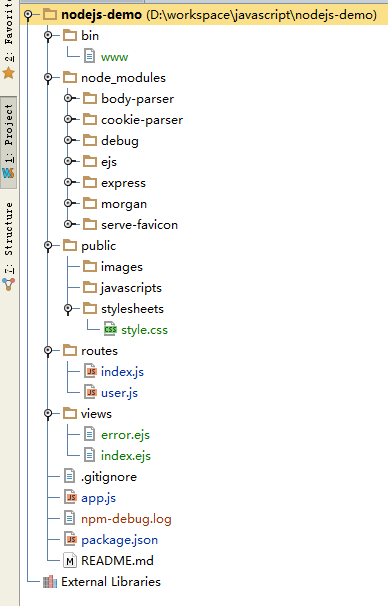
# 2 # directory structure Next, we look at the detailed structure Express4 project, configure and use.
bin, which houses a script file to start the project
node_modules, storage of all project dependencies.
public, static files (css, js, img)
routes, routing files (MVC in C, controller)
views, page file (Ejs template)
package.json, configuration and project dependencies Developer Information
app.js, application core profile

# 3 package.json # project configuration package.json用于项目依赖配置及开发者信息,scripts属性是用于定义操作命令的,可以非常方便的增加启动命令, such as the default Start, 用npm start代表执行node ./bin/www命令. View package.json file.
{
  "name": "express4-demo",
  "version": "0.0.0",
  "private": true, "scripts": { "start": "node ./bin/www" }, "dependencies": { "body-parser": "~1.10.2", "cookie-parser": "~1.3.3", "debug": "~2.1.1", "ejs": "~2.2.3", "express": "~4.11.1", "morgan": "~1.5.1", "serve-favicon": "~2.2.0" } }
#4 app.js核心文件# 从Express3.x升级到Express4.x,主要的变化就在app.js文件中。查看app.js文件,我已经增加注释说明。
// 加载依赖库,原来这个类库都封装在connect中,现在需地注单独加载
var express = require('express');
var path = require('path'); var favicon = require('serve-favicon'); var logger = require('morgan'); var cookieParser = require('cookie-parser'); var bodyParser = require('body-parser'); // 加载路由控制 var routes = require('./routes/index'); //var users = require('./routes/users'); // 创建项目实例 var app = express(); // 定义EJS模板引擎和模板文件位置,也可以使用jade或其他模型引擎 app.set('views', path.join(__dirname, 'views')); app.set('view engine', 'ejs'); // 定义icon图标 app.use(favicon(__dirname + '/public/favicon.ico')); // 定义日志和输出级别 app.use(logger('dev')); // 定义数据解析器 app.use(bodyParser.json()); app.use(bodyParser.urlencoded({ extended: false })); // 定义cookie解析器 app.use(cookieParser()); // 定义静态文件目录 app.use(express.static(path.join(__dirname, 'public'))); // 匹配路径和路由 app.use('/', routes); //app.use('/users', users); // 404错误处理 app.use(function(req, res, next) { var err = new Error('Not Found'); err.status = 404; next(err); }); // 开发环境,500错误处理和错误堆栈跟踪 if (app.get('env') === 'development') { app.use(function(err, req, res, next) { res.status(err.status || 500); res.render('error', { message: err.message, error: err }); }); } // 生产环境,500错误处理 app.use(function(err, req, res, next) { res.status(err.status || 500); res.render('error', { message: err.message, error: {} }); }); // 输出模型app module.exports = app; 我们看到在app.js中,原来调用connect库的部分都被其他的库所代替,serve-favicon、morgan、cookie-parser、body-parser,默认项目中,只用到了最基本的几个库,还没有其他需要替换的库,在本文最后有详细列出。
另外,原来用于项目启动代码也被移到./bin/www的文件,www文件也是一个node的脚本,用于分离配置和启动程序。查看./bin/www文件。
#!/usr/bin/env node

/**
 * 依赖加载
 */
var app = require('../app'); var debug = require('debug')('nodejs-demo:server'); var http = require('http'); /** * 定义启动端口 */ var port = normalizePort(process.env.PORT || '3000'); app.set('port', port); /** * 创建HTTP服务器实例 */ var server = http.createServer(app); /** * 启动网络服务监听端口 */ server.listen(port); server.on('error', onError); server.on('listening', onListening); /** * 端口标准化函数 */ function normalizePort(val) { var port = parseInt(val, 10); if (isNaN(port)) { return val; } if (port >= 0) { return port; } return false; } /** * HTTP异常事件处理函数 */ function onError(error) { if (error.syscall !== 'listen') { throw error; } var bind = typeof port === 'string' ? 'Pipe ' + port : 'Port ' + port // handle specific listen errors with friendly messages switch (error.code) { case 'EACCES': console.error(bind + ' requires elevated privileges'); process.exit(1); break; case 'EADDRINUSE': console.error(bind + ' is already in use'); process.exit(1); break; default: throw error; } } /** * 事件绑定函数 */ function onListening() { var addr = server.address(); var bind = typeof addr === 'string' ? 'pipe ' + addr : 'port ' + addr.port; debug('Listening on ' + bind); }
#5 Bootstrap界面框架# 创建Bootstrap界面框架,直接在index.ejs文件上面做修改。可以手动下载Bootstrap库放到项目中对应的位置引用,也可以通过bower来管理前端的Javascript库,参考文章 bower解决js的依赖管理。另外还可以直接使用免费的CDN源加载Bootstrap的css和js文件。下面我就直接使用bower来管理前端的JavaScript库的方式。编辑views/index.ejs文件:
<!DOCTYPE html>
<html lang="zh-CN"> <head> <title><%= title %></title> <link rel="stylesheet" href="/bower_components/bootstrap/dist/css/bootstrap.min.css"> <link rel='stylesheet' href='/stylesheets/style.css' /> </head> <body> <div class="well jumbotron"> <h1><%= title %></h1> <p>This is a simple hero unit, a simple jumbotron-style component for calling extra attention to featured content or information.</p> <p><a class="btn btn-primary btn-lg" href="#" role="button">Learn more</a></p> </div> <script src="/bower_components/jquery/dist/jquery.min.js"></script> <script src="/bower_components/bootstrap/dist/js/bootstrap.min.js"></script> </body> </html>
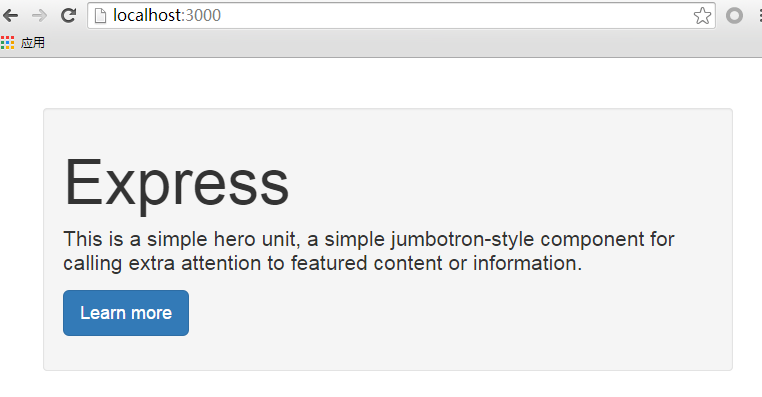
效果如下,已经加入了bootstrap的样式了。

接下来,我们把index.ejs页面切分成3个部分:header.ejs, index.ejs, footer.ejs,用于网站页面的模块化。
header.ejs, 为页面的头部区域
index.ejs, 为内容显示区域
footer.ejs, 为页面底部区域
编辑header.ejs:
<!DOCTYPE html>
<html lang="zh-CN"> <head> <title><%= title %></title> <link rel="stylesheet" href="/bower_components/bootstrap/dist/css/bootstrap.min.css"> <link rel='stylesheet' href='/stylesheets/style.css' /> </head> <body>
编辑footer.ejs:
<script src="/bower_components/jquery/dist/jquery.min.js"></script> <script src="/bower_components/bootstrap/dist/js/bootstrap.min.js"></script> </body> </html> 编辑index.ejs:
<% include header.ejs %>

<div class="well jumbotron"> <h1><%= title %></h1> <p>This is a simple hero unit, a simple jumbotron-style component for calling extra attention to featured content or information.</p> <p><a class="btn btn-primary btn-lg" href="#" role="button">Learn more</a></p> </div> <% include footer.ejs %>
把页表和页底的代码分离后,让index.ejs页面的核心代码更少,更容易维护。
#6 路由功能# 路由功能,是Express4以后全面改版的功能。在应用程序加载隐含路由中间件,不用担心在中间件被装载相对于路由器中间件的顺序。定义路由的方式是不变的,路由系统中增加2个新的功能。
app.route()函数,创建可链接的途径处理程序的路由路径。
express.Router类,创建模块化安装路径的处理程序。
app.route方法会返回一个Route实例,它可以继续使用所有的HTTP方法,包括get,post,all,put,delete,head等。
app.route('/users')
  .get(function(req, res, next) {})
  .post(function(req, res, next) {})
express.Router类,则可以帮助我们更好的组织代码结构。在app.js文件中,定义了app.use(‘/’, routes); routes是指向了routes目录下的index.js文件,./routes/index.js文件中,express.Router被定义使用,路径/*处理都会由routes/index.js文件里的Router来处理。如果我们要管理不同的路径,那么可以直接配置为多个不同的Router。
app.use('/user', require('./routes/user').user);
app.use('/admin', require('./routes/admin').admin); app.use('/', require('./routes'));
#7 Ejs模板使用# 让ejs模板文件,使用扩展名为html的文件。修改:app.js
app.engine('.html', ejs.__express);
app.set('view engine', 'html');
// app.set('view engine', 'ejs');
修改后,ejs变量没有定义,supervisor的程序会一直报错
ReferenceError: ejs is not defined at Object. (D:\workspace\project\nodejs-demo\app.js:17:21) at Module._compile (module.js:456:26) at Object.Module._extensions..js (module.js:474:10) at Module.load (module.js:356:32) at Function.Module._load (module.js:312:12) at Function.Module.runMain (module.js:497:10) at startup (node.js:119:16) at node.js:901:3 DEBUG: Program node app.js exited with code 8 在app.js中增加ejs变量:
var express = require('express')
, routes = require('./routes') , user = require('./routes/user') , http = require('http') , path = require('path') , ejs = require('ejs');
#8 Session使用# session这个问题,其实是涉及到服务器的底层处理方式。像Java的web服务器,是多线程调用模型。每用户请求会打开一个线程,每个线程在内容中维护着用户的状态。
像PHP的web服务器,是交行CGI的程序处理,CGI是无状态的,所以一般用cookie在客户的浏览器是维护用户的状态。但cookie在客户端维护的信息是不够的,所以CGI应用要模仿用户session,就需要在服务器端生成一个session文件存储起来,让原本无状态的CGI应用,通过中间文件的方式,达到session的效果。
Nodejs的web服务器,也是CGI的程序无状态的,与PHP不同的地方在于,单线程应用,所有请求都是异步响应,通过callback方式返回数据。如果我们想保存session数据,也是需要找到一个存储,通过文件存储,redis,Mongdb都可以。
接下来,我将演示如何通过mongodb来保存session,并实现登陆后用户对象传递。
app.js文件:
var express = require('express')
, routes = require('./routes') , user = require('./routes/user') , http = require('http') , path = require('path') , ejs = require('ejs') , SessionStore = require("session-mongoose")(express); var store = new SessionStore({ url: "mongodb://localhost/session", interval: 120000 }); .... app.use(express.favicon()); app.use(express.logger('dev')); app.use(express.bodyParser()); app.use(express.methodOverride()); app.use(express.cookieParser()); app.use(express.cookieSession({secret : 'fens.me'})); app.use(express.session({ secret : 'fens.me', store: store, cookie: { maxAge: 900000 } })); app.use(function(req, res, next){ res.locals.user = req.session.user; next(); }); app.use(app.router); app.use(express.static(path.join(__dirname, 'public')));
注:app.js文件有顺序要求,一定要注意!!!
安装session-mongoose依赖库:
D:\workspace\project\nodejs-demo>npm install session-mongoose D:\workspace\project\nodejs-demo\node_modules\session-mongoose\node_modules\mongoose\node_modules\mongodb\node_modules\bson>node "D:\toolkit\nodejs\node_modules\npm\bin\node-gyp-bin\\..\..\node_modules\node-gyp\bin\node-gyp.js" rebuild C:\Program Files (x86)\MSBuild\Microsoft.Cpp\v4.0\Microsoft.Cpp.InvalidPlatform.Targets(23,7): error MSB8007: 项目“kerberos.vcxproj”的平台无效。平台为“x64”。您会看到此消息的可能原因是,您尝试在没有解决方案文件的情况下生成项目,并且为 oose\node_modules\mongoose\node_modules\mongodb\node_modules\bson\build\bson.vcxproj] session-mongoose@0.2.2 node_modules\session-mongoose └── mongoose@3.6.10 (mpath@0.1.1, ms@0.1.0, hooks@0.2.1, sliced@0.0.3, muri@0.3.1, mpromise@0.2.1, mongodb@1.3.3) 安装有错误但是没关系。访问:http://localhost:3000/login,正常
Modify routes / index.js file, exports.doLogin method:
exports.doLogin = function(req, res){
    var user={
        username:'admin', password:'admin' } if(req.body.username===user.username && req.body.password===user.password){ req.session.user=user; return res.redirect('/home'); } else { return res.redirect('/login'); } };
exports.logout method:
exports.logout = function(req, res){
    req.session.user=null;
    res.redirect('/'); };
exports.home method:
exports.home = function(req, res){
    res.render('home', { title: 'Home'}); };
This time session has been worked, exports.home pass the user display value has been removed. By app.js in app.use of res.locals variable assignments performed by frame.
app.use(function(req, res, next){
    res.locals.user = req.session.user;
    next();
});
Note: This session is express3.0 wording, and express2.x is not the same. 原理是在框架内每次赋值,把我们刚才手动传值的过程,让框架去完成了.