NameNode and SecondaryNameNode (Interview development focus )
1 NN and 2 N N working mechanism
Thinking : the NameNode metadata is stored in the where?
First, we make a hypothesis, if stored in NameNode disk node, because often the need for random access, as well as respond to customer requests, must be low efficiency. Thus, the metadata need to be stored in memory. But if there is only a memory, once the power failure , the metadata is lost, the entire cluster will not work . Thus generating the backup disk metadata of the FsImage .
This will bring new problems, when the metadata in memory update, if at the same time update the FsImage , will lead to low efficiency, but if you do not update, consistency problem occurs, once NameNode node power failure , it It is data loss. Therefore, the introduction Edits file ( only append operation, high efficiency ) . Every time when the metadata update or add metadata, modifying metadata in memory and added to the Edits in. Thus, once the NameNode node off, by FsImage and Edits combined synthesis metadata.
However, if you add data to a long Edits in, cause the file data is too large, reduce efficiency, but once the power failure, the recovery time required metadata is too long. Therefore, regular FsImage and Edits combined, if the operation by the NameNode completion point, only low efficiency. Thus, the introduction of a new node SecondaryNamenode , dedicated FsImage and Edits combined.
NN and 2NN mechanism, as shown in FIG.
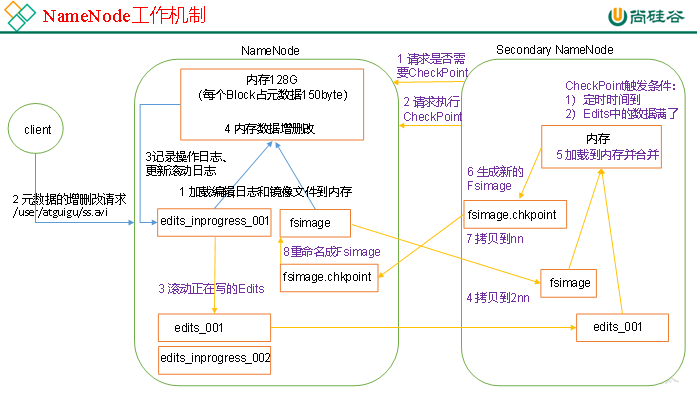
1. The first stage: the NameNode start
( 1 ) first start NameNode After formatting , create Fsimage and Edits files . If not the first time you start, log and edit the image directly load files into memory.
( 2 ) the client requests the metadata of additions and deletions .
( 3 ) the NameNode record operating logs, update rolling log .
( . 4 ) the NameNode of additions and deletions to the data in memory .
2. The second stage: Secondary work the NameNode
( 1 ) Secondary NameNode asked NameNode need CheckPoint . Directly back to NameNode whether the test results.
( 2 ) Secondary request the NameNode performed CheckPoint.
( 3 ) the NameNode scroll being written Edits log .
( 4 ) the editing image file and the log before rolling copied to Secondary NameNode.
( . 5 ) Secondary the NameNode loading edit log and image files to the memory, and merging.
( 6 ) generating a new image file fsimage.chkpoint.
( 7 ) copy fsimage.chkpoint to the NameNode .
( 8 ) the NameNode will fsimage.chkpoint re- named as fsimage.
---------------------------------------------------------------------------------------------------------------------------------------------------------------------------------
NN and 2NN working mechanism breakdown:
Fsimage: NameNode file metadata in memory after the formation of the sequence.
Edits : recording each step the client update metadata information (by Edits calculated metadata).
NameNode start, first scroll Edits and generate an empty edits.inprogress , then load Edits and Fsimage into memory, then NameNode memory to hold the latest metadata information. Client starts NameNode transmission request metadata additions and deletions, such requested operation will first be recorded edits.inprogress in (metadata query operation is not recorded in the Edits , the operation does not change because the query metadata) If this time NameNode hang, will restart from Edits read information metadata. Then, the NameNode performs CRUD operations metadata in memory.
Since Edits recorded in the operation will be more and more, Edits files will become increasingly large, resulting in NameNode in the boot loader Edits time will be very slow, so it is necessary to Edits and Fsimage merger (the so-called merger is to Edits and Fsimage loaded into memory, according Edits operation performed in one step, forming new FsImage ). SecondaryNameNode role is to help NameNode be Edits and Fsimage merger work.
SecondaryNameNode will first ask NameNode whether CheckPoint (CheckPoint trigger any need to meet two conditions in one of the regular time and Edits data filled) . Directly back to NameNode whether the test results. SecondaryNameNode perform CheckPoint operation, first make NameNode scroll Edits and generate an empty edits .inprogress, scroll Edits purpose is to give Edits to make a mark, after all new operations are written edits .inprogress, other unincorporated Edits and Fsimage copied to the SecondaryNameNode locally, and then copy the Edits and Fsimage loaded into memory are combined to generate FsImage. chkpoint , thenfsimage.chkpoint copy to the NameNode , rename FsImage after replace the original FsImage . NameNode at startup only need to load unconsolidated before Edits and Fsimage can, because the merger had Edits metadata information has been recorded in the Fsimage in.
-----------------------------------------------------------------------------------------------------------------------------------------------------
2 Fsimage and Edits resolve

2. oiv View Fsimage file
( 1 ) View oiv and oev command
[atguigu@hadoop102 current]$ hdfs
oiv apply the offline fsimage viewer to an fsimage
oev apply the offline edits viewer to an edits file
(2)基本语法
hdfs oiv -p 文件类型 -i镜像文件 -o 转换后文件输出路径
(3)案例实操
[atguigu@hadoop102 current]$ pwd
/opt/module/hadoop-2.7.2/data/tmp/dfs/name/current
[atguigu@hadoop102 current]$ hdfs oiv -p XML -i fsimage_0000000000000000025 -o /opt/module/hadoop-2.7.2/fsimage.xml
[atguigu@hadoop102 current]$ cat /opt/module/hadoop-2.7.2/fsimage.xml
将显示的xml文件内容拷贝到Eclipse中创建的xml文件中,并格式化。部分显示结果如下。
<inode>
<id>16386</id>
<type>DIRECTORY</type>
<name>user</name>
<mtime>1512722284477</mtime>
<permission>atguigu:supergroup:rwxr-xr-x</permission>
<nsquota>-1</nsquota>
<dsquota>-1</dsquota>
</inode>
<inode>
<id>16387</id>
<type>DIRECTORY</type>
<name>atguigu</name>
<mtime>1512790549080</mtime>
<permission>atguigu:supergroup:rwxr-xr-x</permission>
<nsquota>-1</nsquota>
<dsquota>-1</dsquota>
</inode>
<inode>
<id>16389</id>
<type>FILE</type>
<name>wc.input</name>
<replication>3</replication>
<mtime>1512722322219</mtime>
<atime>1512722321610</atime>
<perferredBlockSize>134217728</perferredBlockSize>
<permission>atguigu:supergroup:rw-r--r--</permission>
<blocks>
<block>
<id>1073741825</id>
<genstamp>1001</genstamp>
<numBytes>59</numBytes>
</block>
</blocks>
</inode >
思考:可以看出,Fsimage中没有记录块所对应DataNode,为什么?
在集群启动后,要求DataNode上报数据块信息,并间隔一段时间后再次上报。
3. oev查看Edits文件
(1)基本语法
hdfs oev -p 文件类型 -i编辑日志 -o 转换后文件输出路径
(2)案例实操
[atguigu@hadoop102 current]$ hdfs oev -p XML -i edits_0000000000000000012-0000000000000000013 -o /opt/module/hadoop-2.7.2/edits.xml
[atguigu@hadoop102 current]$ cat /opt/module/hadoop-2.7.2/edits.xml
将显示的xml文件内容拷贝到Eclipse中创建的xml文件中,并格式化。显示结果如下。
<?xml version="1.0" encoding="UTF-8"?>
<EDITS>
<EDITS_VERSION>-63</EDITS_VERSION>
<RECORD>
<OPCODE>OP_START_LOG_SEGMENT</OPCODE>
<DATA>
<TXID>129</TXID>
</DATA>
</RECORD>
<RECORD>
<OPCODE>OP_ADD</OPCODE>
<DATA>
<TXID>130</TXID>
<LENGTH>0</LENGTH>
<INODEID>16407</INODEID>
<PATH>/hello7.txt</PATH>
<REPLICATION>2</REPLICATION>
<MTIME>1512943607866</MTIME>
<ATIME>1512943607866</ATIME>
<BLOCKSIZE>134217728</BLOCKSIZE>
<CLIENT_NAME>DFSClient_NONMAPREDUCE_-1544295051_1</CLIENT_NAME>
<CLIENT_MACHINE>192.168.1.5</CLIENT_MACHINE>
<OVERWRITE>true</OVERWRITE>
<PERMISSION_STATUS>
<USERNAME>atguigu</USERNAME>
<GROUPNAME>supergroup</GROUPNAME>
<MODE>420</MODE>
</PERMISSION_STATUS>
<RPC_CLIENTID>908eafd4-9aec-4288-96f1-e8011d181561</RPC_CLIENTID>
<RPC_CALLID>0</RPC_CALLID>
</DATA>
</RECORD>
<RECORD>
<OPCODE>OP_ALLOCATE_BLOCK_ID</OPCODE>
<DATA>
<TXID>131</TXID>
<BLOCK_ID>1073741839</BLOCK_ID>
</DATA>
</RECORD>
<RECORD>
<OPCODE>OP_SET_GENSTAMP_V2</OPCODE>
<DATA>
<TXID>132</TXID>
<GENSTAMPV2>1016</GENSTAMPV2>
</DATA>
</RECORD>
<RECORD>
<OPCODE>OP_ADD_BLOCK</OPCODE>
<DATA>
<TXID>133</TXID>
<PATH>/hello7.txt</PATH>
<BLOCK>
<BLOCK_ID>1073741839</BLOCK_ID>
<NUM_BYTES>0</NUM_BYTES>
<GENSTAMP>1016</GENSTAMP>
</BLOCK>
<RPC_CLIENTID></RPC_CLIENTID>
<RPC_CALLID>-2</RPC_CALLID>
</DATA>
</RECORD>
<RECORD>
<OPCODE>OP_CLOSE</OPCODE>
<DATA>
<TXID>134</TXID>
<LENGTH>0</LENGTH>
<INODEID>0</INODEID>
<PATH>/hello7.txt</PATH>
<REPLICATION>2</REPLICATION>
<MTIME>1512943608761</MTIME>
<ATIME>1512943607866</ATIME>
<BLOCKSIZE>134217728</BLOCKSIZE>
<CLIENT_NAME></CLIENT_NAME>
<CLIENT_MACHINE></CLIENT_MACHINE>
<OVERWRITE>false</OVERWRITE>
<BLOCK>
<BLOCK_ID>1073741839</BLOCK_ID>
<NUM_BYTES>25</NUM_BYTES>
<GENSTAMP>1016</GENSTAMP>
</BLOCK>
<PERMISSION_STATUS>
<USERNAME>atguigu</USERNAME>
<GROUPNAME>supergroup</GROUPNAME>
<MODE>420</MODE>
</PERMISSION_STATUS>
</DATA>
</RECORD>
</EDITS >
思考:NameNode如何确定下次开机启动的时候合并哪些Edits?
3 CheckPoint时间设置
(1)通常情况下,SecondaryNameNode每隔一小时执行一次。
[hdfs-default.xml]
<property>
<name>dfs.namenode.checkpoint.period</name>
<value>3600</value>
</property>
(2)一分钟检查一次操作次数,3当操作次数达到1百万时,SecondaryNameNode执行一次。
<property>
<name>dfs.namenode.checkpoint.txns</name>
<value>1000000</value>
<description>操作动作次数</description>
</property>
<property>
<name>dfs.namenode.checkpoint.check.period</name>
<value>60</value>
<description> 1分钟检查一次操作次数</description>
</property >
4 NameNode故障处理
NameNode故障后,可以采用如下两种方法恢复数据。
方法一:将SecondaryNameNode中数据拷贝到NameNode存储数据的目录;
1. kill -9 NameNode进程
2. 删除NameNode存储的数据(/opt/module/hadoop-2.7.2/data/tmp/dfs/name)
[atguigu@hadoop102 hadoop-2.7.2]$ rm -rf /opt/module/hadoop-2.7.2/data/tmp/dfs/name/*
3. 拷贝SecondaryNameNode中数据到原NameNode存储数据目录
[atguigu@hadoop102 dfs]$ scp -r atguigu@hadoop104:/opt/module/hadoop-2.7.2/data/tmp/dfs/namesecondary/* ./name/
4. 重新启动NameNode
[atguigu@hadoop102 hadoop-2.7.2]$ sbin/hadoop-daemon.sh start namenode
方法二:使用-importCheckpoint选项启动NameNode守护进程,从而将SecondaryNameNode中数据拷贝到NameNode目录中。
- 修改hdfs-site.xml中的
<property>
<name>dfs.namenode.checkpoint.period</name>
<value>120</value>
</property>
<property>
<name>dfs.namenode.name.dir</name>
<value>/opt/module/hadoop-2.7.2/data/tmp/dfs/name</value>
</property>
2. kill -9 NameNode进程
3. 删除NameNode存储的数据(/opt/module/hadoop-2.7.2/data/tmp/dfs/name)
[atguigu@hadoop102 hadoop-2.7.2]$ rm -rf /opt/module/hadoop-2.7.2/data/tmp/dfs/name/*
4. 如果SecondaryNameNode不和NameNode在一个主机节点上,需要将SecondaryNameNode存储数据的目录拷贝到NameNode存储数据的平级目录,并删除in_use.lock文件
[atguigu@hadoop102 dfs]$ scp -r atguigu@hadoop104:/opt/module/hadoop-2.7.2/data/tmp/dfs/namesecondary ./
[atguigu@hadoop102 namesecondary]$ rm -rf in_use.lock
[atguigu@hadoop102 dfs]$ pwd
/opt/module/hadoop-2.7.2/data/tmp/dfs
[atguigu@hadoop102 dfs]$ ls
data name namesecondary
5. 导入检查点数据(等待一会ctrl+c结束掉)
[atguigu@hadoop102 hadoop-2.7.2]$ bin/hdfs namenode -importCheckpoint
6. 启动NameNode
[atguigu@hadoop102 hadoop-2.7.2]$ sbin/hadoop-daemon.sh start namenode
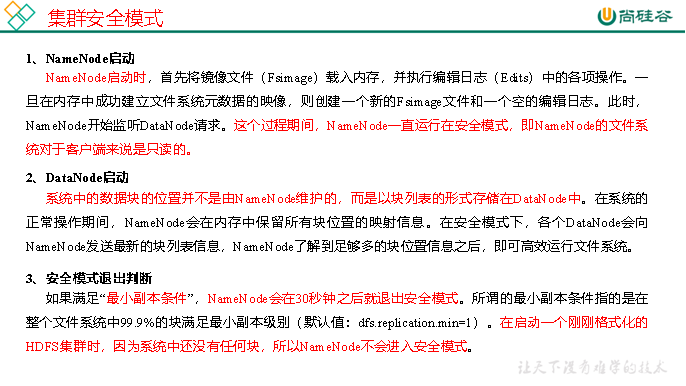
5 集群安全模式
1. 概述
2.基本语法
集群处于安全模式,不能执行重要操作(写操作)。集群启动完成后,自动退出安全模式。
(1)bin/hdfs dfsadmin -safemode get (功能描述:查看安全模式状态)
(2)bin/hdfs dfsadmin -safemode enter (功能描述:进入安全模式状态)
(3)bin/hdfs dfsadmin -safemode leave (功能描述:离开安全模式状态)
(4)bin/hdfs dfsadmin -safemode wait (功能描述:等待安全模式状态)
3. 案例
模拟等待安全模式
(1)查看当前模式
[atguigu@hadoop102 hadoop-2.7.2]$ hdfs dfsadmin -safemode get
Safe mode is OFF
(2)先进入安全模式
[atguigu@hadoop102 hadoop-2.7.2]$ bin/hdfs dfsadmin -safemode enter
(3)创建并执行下面的脚本
在/opt/module/hadoop-2.7.2路径上,编辑一个脚本safemode.sh
[atguigu@hadoop102 hadoop-2.7.2]$ touch safemode.sh
[atguigu@hadoop102 hadoop-2.7.2]$ vim safemode.sh
#!/bin/bash
hdfs dfsadmin -safemode wait
hdfs dfs -put /opt/module/hadoop-2.7.2/README.txt /
[atguigu@hadoop102 hadoop-2.7.2]$ chmod 777 safemode.sh
[atguigu@hadoop102 hadoop-2.7.2]$ ./safemode.sh
(4)再打开一个窗口,执行
[atguigu@hadoop102 hadoop-2.7.2]$ bin/hdfs dfsadmin -safemode leave
(5)观察
(a)再观察上一个窗口
Safe mode is OFF
(b)HDFS集群上已经有上传的数据了。
6 NameNode多目录配置
1. NameNode的本地目录可以配置成多个,且每个目录存放内容相同,增加了可靠性
2. 具体配置如下
(1)在hdfs-site.xml文件中增加如下内容
<property>
<name>dfs.namenode.name.dir</name>
<value>file:///${hadoop.tmp.dir}/dfs/name1,file:///${hadoop.tmp.dir}/dfs/name2</value>
</property>
(2)停止集群,删除data和logs中所有数据。
[atguigu@hadoop102 hadoop-2.7.2]$ rm -rf data/ logs/
[atguigu@hadoop103 hadoop-2.7.2]$ rm -rf data/ logs/
[atguigu@hadoop104 hadoop-2.7.2]$ rm -rf data/ logs/
(3)格式化集群并启动。
[atguigu@hadoop102 hadoop-2.7.2]$ bin/hdfs namenode –format
[atguigu@hadoop102 hadoop-2.7.2]$ sbin/start-dfs.sh
(4)查看结果
[atguigu@hadoop102 dfs]$ ll
总用量 12
drwx------. 3 atguigu atguigu 4096 12月 11 08:03 data
drwxrwxr-x. 3 atguigu atguigu 4096 12月 11 08:03 name1
drwxrwxr-x. 3 atguigu atguigu 4096 12月 11 08:03 name2