20.1 Setting item "study notes" style
To set the style, we will use the Bootstrap library, which is a set of tools used to style Web applications.
20.1.1 Application django-bootstrap3
We will use django-bootstrap3 to inherit Bootstrap to the project.
Install django-bootstrap3:
(11_env) D:\learning_log>pip install django-bootstrap3
  --ship--
Successfully installed django-bootstrap3-11.1.0
Next, we need to add the code in settings.py of your INSTALLED_APPS:
# Third-party applications
    ' bootstrap3 '
We need to get django-bootstrap3 include jQuery, which is a JavaScript library that allows you to use the Bootstrap templates provide some interactive elements. Add code at the end of dettings.py:
# Django-bootstrap3 provided
BOOTSTRAP3 = {
     ' include_jquery ' : True
}
These codes let you do not need to manually download jQuery and put it in the right place.
20.1.2 Use Bootstrap project to set up "study notes" style
To view the template Bootstrap offer, visit http://getbootstrap.com/, click Getting Started, and then scroll down to the Examples section and find Navbars in action. We will use the template Static top navbar, it provides a simple top navigation bar, page title and page content for preventing the container.
20.1.3 modify base.html
1, Custom HTML header
Delete all of the code base.html, and enter the following code:
 1 {% load bootstrap3 %}
 2
 3 <!DOCTYPE html>
 4 <html lang ="en">
 5     <head>
 6         <meta charset="utf-8">
 7         <meta http-equiv="X-UA-Compatible" content="IE=edge">
 8         <meta name="viewport" content="width",initial-scale="1">
 9         <title>Learning Log</title>
10         {% bootstrap_css %}
11         {% bootstrap_javascript %}
12     </head>
At 1, a tag set is loaded in django-bootstrap3. Next, we will use this document to declare English (see 4), in which the third line will complain, the students said it can be deleted, said bootstrap template which already contains. I deleted.
2. Define the navigation bar
    <body>
        <!-- Static navbar -->
        <nav class="navbar navbar-default navbar-static-top">
            <div class="container">

                <div class="navbar-header">
                    <button type="button" class="navbar-toggle collapsed"
                            data-toggle="collapse" data-target="#navbar"
                            aria-expanded="false" aria-controls="navbar">
                    </button>
                    <a class="navbar-brand" href="{% url 'learning_logs:index' %}">
                        Learning Log</a>
                </div>

                <div id="navbar" class="navbar-collapse collapse">
                    <ul class="nav navbar-nav">
                        <li><a href="{% url'learning_logs:topics' %}">Topics</a></li>
                    </ul>
                    <ul class="nav navbar-nav navbar-right">
                        {% if user.is_authenticated %}
                            <li><a>Hello,{{ user.username }}.</a></li>
                            <li><a href="{% url 'users:logout' %}">log out</a></li>
                        {% else %}
                            <li><a href="{% url 'users:register' %}">register</a></li>
                            <li><a href="{% url 'users:login' %}">log in</a></li>
                        {% endif%}
                    </ul>
                </div><!--/.nav-collapse-->
            </div>
        </nav>
The main section 3, define page
    <div class="container">
        <div class="page-header">
            {% block header %}{% endblock header%}
        </div>
        <div>
            {% block content %}{% endblock content%}
        </div>

    </div><!-- /container -->
    </body>
</html>
20.1.4 Use jumbotron set up home style
{% extends "learning_logs/base.html" %}
{% block header %}
    <div class="jumbotron">
        <h1> Track your learning.</h1>
    </div>
{% endblock header %}
{% block content %}
    <h2>
        <a href="{% url 'users:register' %}">Register an account</a> to make
        your own Learning Log,and list the topics you're learning about.
    </h2>
<h2>
    Whenever you learn something new about a topic,make an entry
    summarizing what you've learned.
</h2>
{% endblock content %}
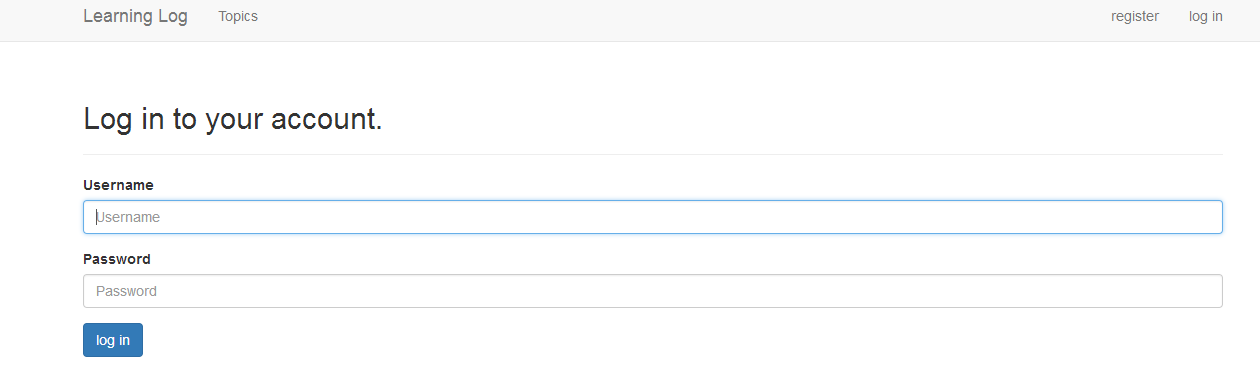
20.1.5 Set the style of login page
{% extends "learning_logs/base.html" %}
{% load bootstrap3 %}
{% block header %}
    <h2>Log in to your account.</h2>
{% endblock header %}
{% block content %}
  <form method="post" action="{% url 'users:login' %}" class="form">
      {% csrf_token %}
      {% bootstrap_form form %}
      {% buttons %}
        <button name="submit" class="btn btn-primary">log in</button>
      {% endbuttons %}
      <input type="hidden" name="next" value="{% url 'learning_logs:index'%}" />
  </form>
{% endblock content %}
We removed {% if form.errors%} code block from this template, because django-bootstrap3 automatically manage forms error.

20.1.6 Setting new_topic Page Style
{% extends "learning_logs/base.html" %}
{% load bootstrap3 %}

{% block header %}
    <h2>Add a new topic:</h2>
{% endblock header %}

{% block content %}
    <form action="{% url 'learning_logs:new_topic' %}" method="post"
        class="form">
        {% csrf_token %}
        {% bootstrap_form form %}
        {% buttons %}
            <button name="submit" class="btn btn-primary">add topic</button>
        {% endbuttons %}
    </form>

{% endblock content %}
20.1.7 styled topics page
{% extends "learning_logs/base.html" %}

{% block header %}
    <h1>Topics</h1>
{% endblock header %}

{% block content %}
    <ul>
        {% for topic in topics %}
            <li>
                <h3>
                <a href="{% url 'learning_logs:topic' topic.id %}">{{topic}}</a>
                </h3>
            </li>
        {% empty %}}
            <li>No topics have been added yet.</>
        {% endfor %}
    </ul>
<h3><a href="{% url 'learning_logs:new_topic' %}">Add a new topic:</a></h3>
{% endblock content %}
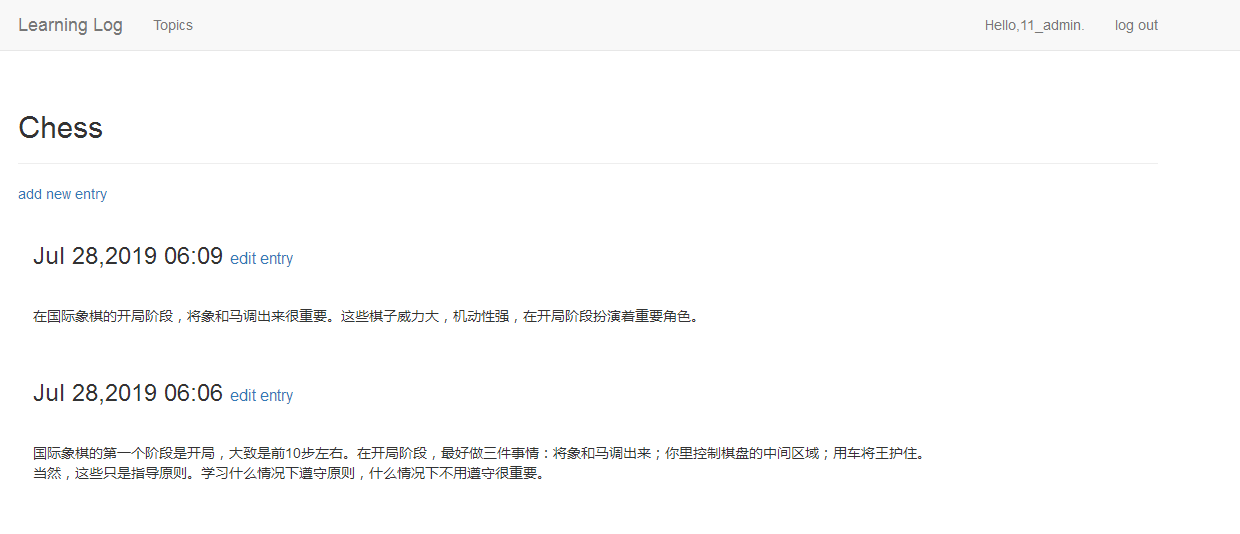
20.1.8 Settings page topic entries in style
We will use Bootstrap panel (panel) to highlight each entry. Is a panel with a predetermined pattern div, very suitable for entry to display topics:
{% extends "learning_logs/base.html" %}

{% block header %}
    <h2>{{ topic }}</h2>
{% endblock header %}

{% block content %}
    <p>Topic:{{ topic }}</p>
    <p>Entries:</p>
    <p>
        <a href="{% url 'learning_logs:new_entry' topic.id %}">add new entry</a>
    </p>
        {% for entry in entries %}
            <div class="pannel panel_default">
                <div class="panel-heading">
                    <h3>
                        {{ entry.date_added||date:'M d,Y H:i' }}
                        <small>
                            <a href="{% url 'learning_logs:edit_entry' entry.id %}">
                                edit entry</a>
                        </small>
                    </h3>
                </div>
                <div class="panel-body">
                    {{ entry.text|linebreaks}}
                </div>
            </div><!--panel-->
        {% empty %}
                There are no entries for this topic yet.
        {% endfor %}
{% endblock content %}
p419 hands Try 20-1
Modify new_entry page:
{% extends "learning_logs/base.html" %}
{% load bootstrap3 %}
{% block header %}
    <h2>Add a new entry:</h2>
{% endblock header %}

{% block content %}
    <small><a href="{% url 'learning_logs:topic' topic.id %}">{{ topic }}</a> </small>
  <form action="{% url 'learning_logs:new_entry' topic.id %}" method="post">
    {% csrf_token %}
    {% bootstrap_form form %}
    {% buttons %}
        <button name="submit" class="btn btn-primary">add entry</button>
    {% endbuttons %}
  </form>

{% endblock content %}}
修改edit_entry页面:
{% extends "learning_logs/base.html" %}
{% load bootstrap3 %}
{% block header %}
    <h2>Edit entry:</h2>
{% endblock header %}

{% block content %}
    <small><a href="{% url 'learning_logs:topic' topic.id %}">{{ topic }}</a> </small>
  <form action="{% url 'learning_logs:edit_entry' entry.id %}" method="post" class="form">
    {% csrf_token %}
    {% bootstrap_form form %}
    {% buttons %}
        <button name="submit" class="btn btn-primary">save changes</button>
    {% endbuttons %}
  </form>

{% endblock content %}}
20.2 部署”学习笔记”
下面来将其部署到一台服务器,让任何有网络连接的人都能使用它。为此我们将使用Heroku,这是一个基于Web的平台,让你能够管理Web应用程序的部署。
20.2.1 建立Heroku账户
访问https://heroku.com/,单击其中的一个注册链接。注册账户是免费的。其中邮箱qq邮箱是不行的。
20.1.2 安装Hero Toolbelt
要将项目部署到Heroku的服务器并对其进行管理,需要使用Heroku Toolbelt提供的工具。要安装最新的Heroku Toolbelt版本,请访问https://toolbelt.heroku.com/,并根据你使用的操作系统按相关的说明做:使用只包含一行的终端命令,或下载并运行安装程序。
20.2.3 安装必要的包
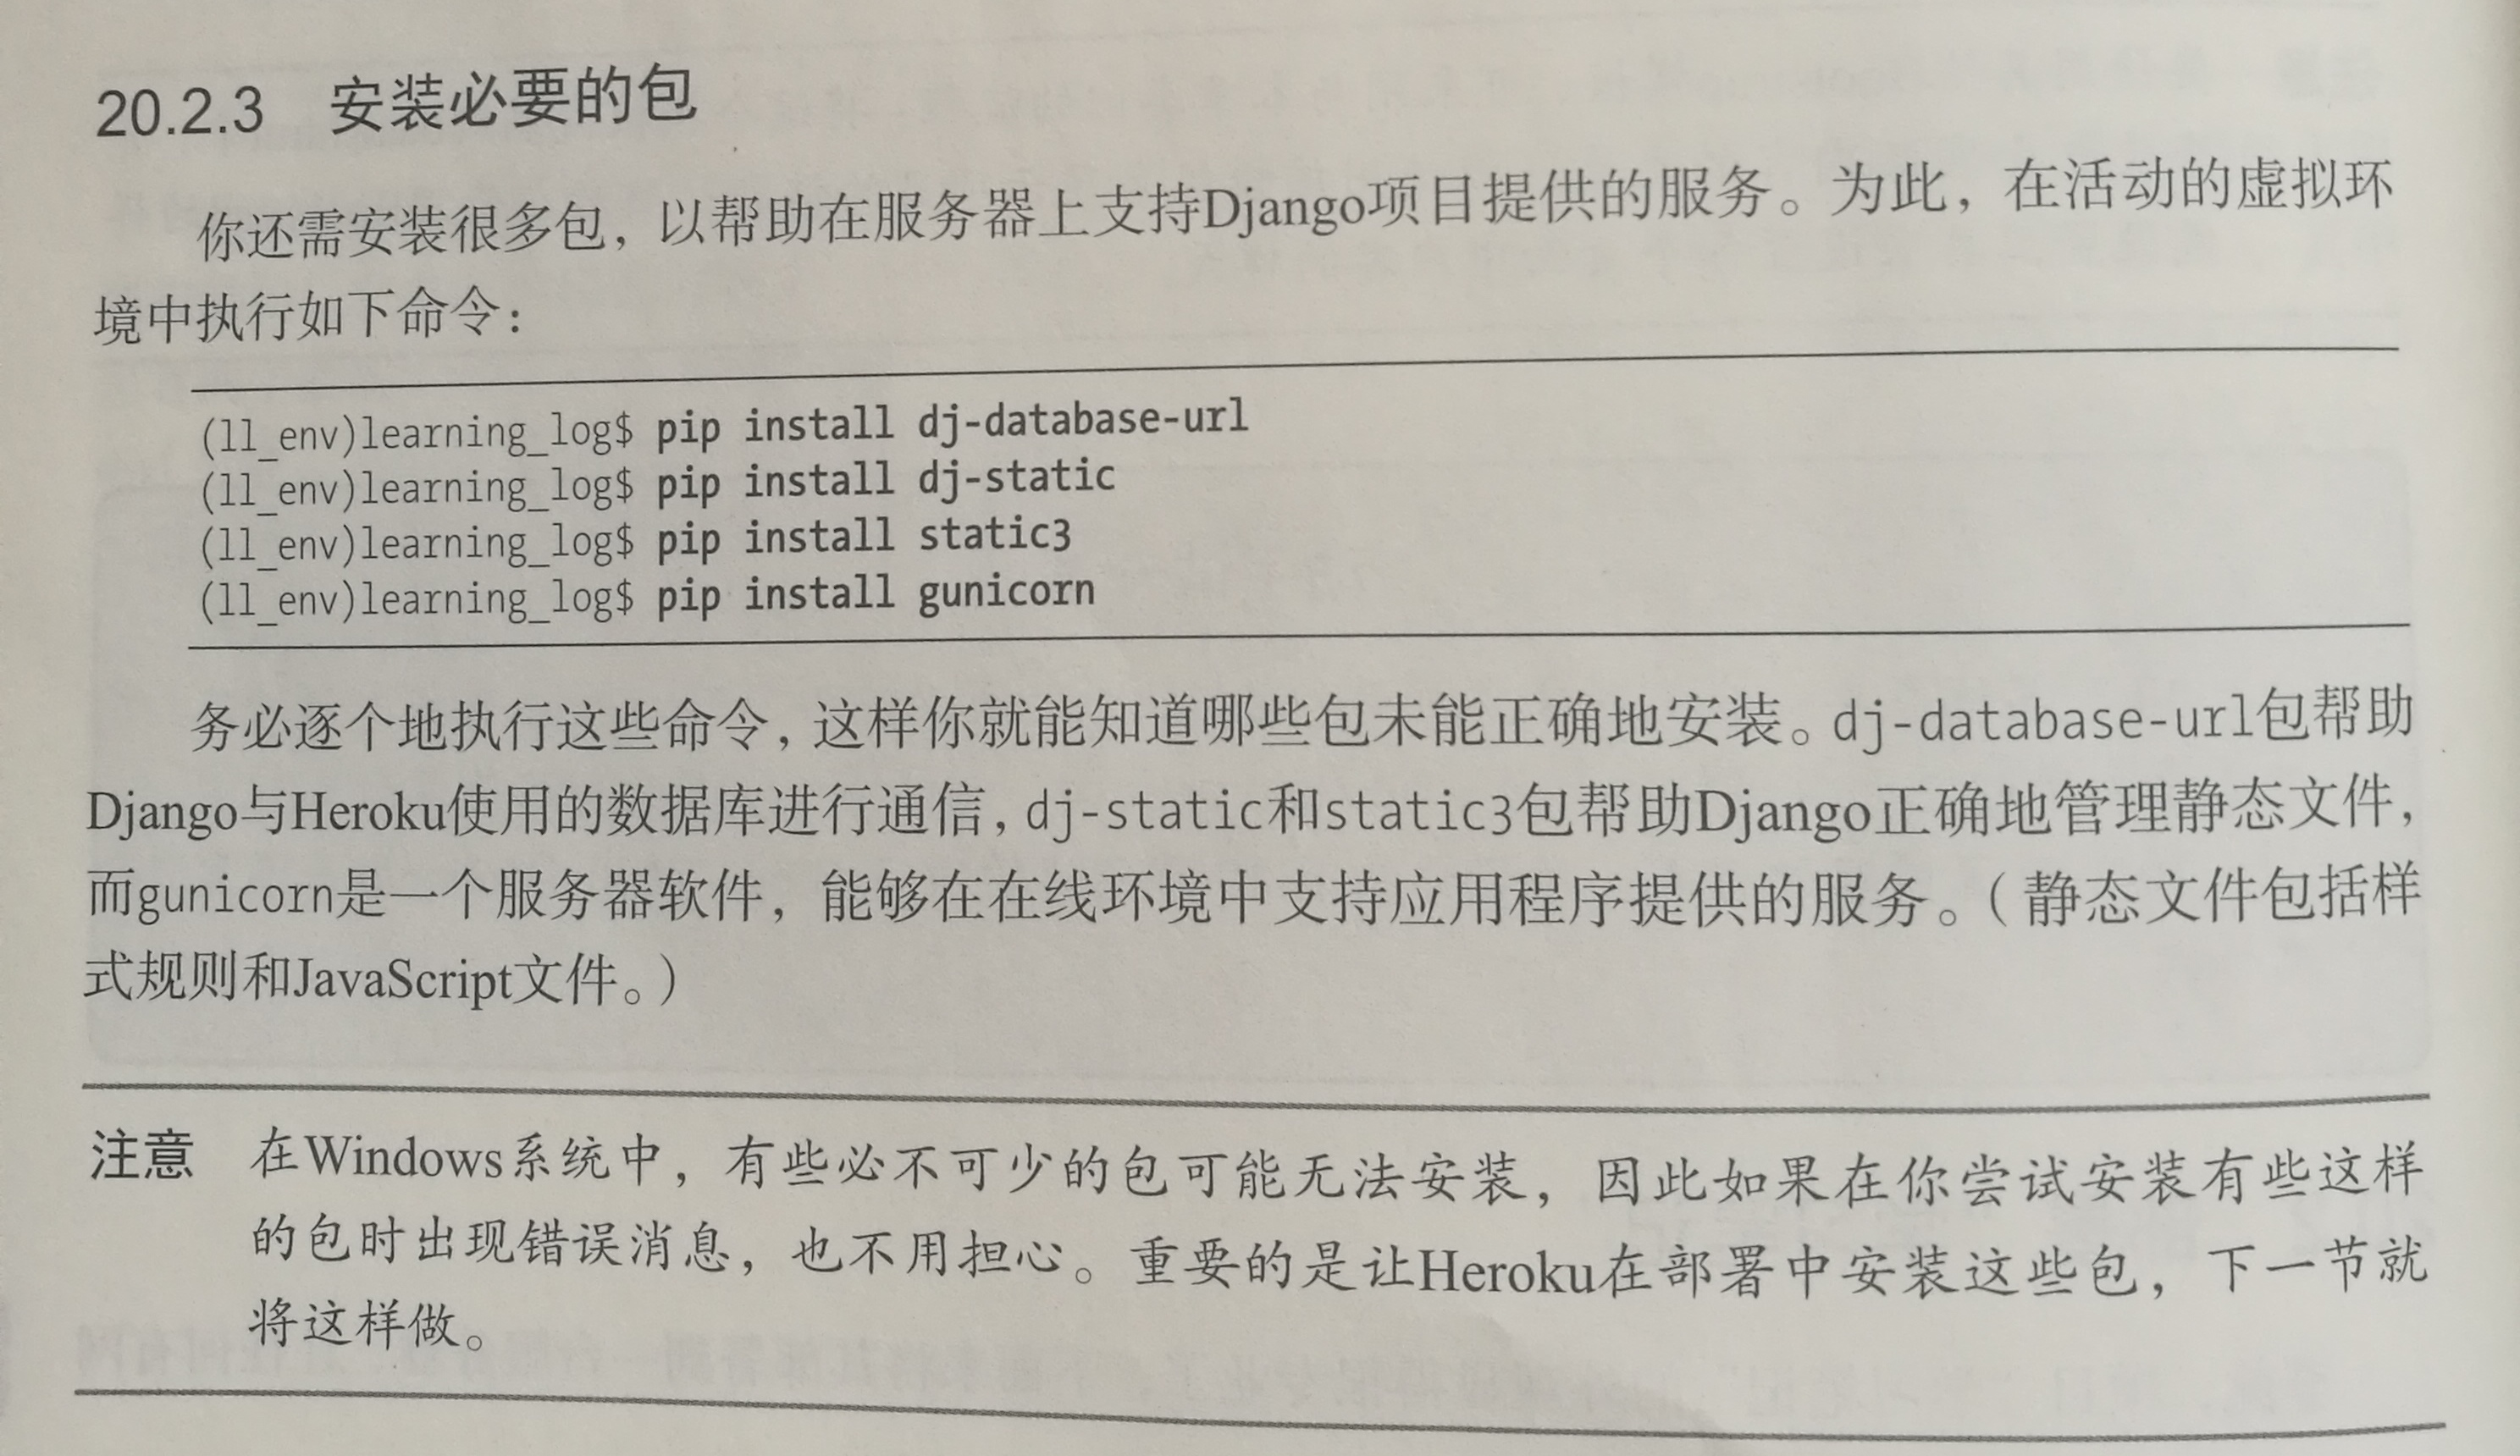
20.2.4 创建包含列表的文件requirements.txt

命令freeze让pip项目当前安装的所有包的名称都写入到文件requirements.txt中。打开文件,查看项目中安装的包及其版本(Windows可能看到的内容不全):
dj-database-url==0.5.0
dj-static==0.0.6
Django==1.11
django-bootstrap3==11.1.0
pytz==2019.1
static3==0.7.0
添加psycopg2以及刚刚没有安装成功的包(笔者的是gunicorn):
dj-database-url==0.5.0
dj-static==0.0.6
Django==1.11
django-bootstrap3==11.1.0
pytz==2019.1
static3==0.7.0
psycopg2>=2.6.1
gunicorn==19.3.0
20.2.5 指定Python版本

在manage.py所在的文件夹中新建一个名为runtime.txt的文件,并在其中输入如下内容:
python-3.6.8
20.2.6 为部署到Heroku而修改settings.py
# Heroku设置
# 获取当前的工作目录
cwd = os.getcwd()
if cwd == '/app' or cwd[:4] == '/tmp':
    import dj_database_url
    DATABASES = {
        'default':dj_database_url.config(default='postgres://localhost')
    }
    # 让request.is_secure()承认X-Forwarded-Proto头
    SECURE_PROXY_SSL_HEADER = ('HTTP_X_FORWARDED_PROTO','https')

    # 支持所有的主机头
    ALLOWED_HOSTS = ['*']

    # 静态资产配置
    BASE_DIR = os.path.dirname(os.path.abspath(_file_))
    STATIC_ROOT = 'staticfiles'
    STATICFILES_DIRS = (
        os.path.join(BASE_DIR,'static'),
    )
20.2.7 创建启动进程的Procfile
创建Rrocfile,不指定文件扩展名,并保存到manage.py所在的目录中,内容如下:
web: gunicorn learning_log.wsgi --log-file -
20.2.8 为部署带Heroku而修改wsgi.py
import os

from django.core.wsgi import get_wsgi_application
from dj_static import Cling

os.environ.setdefault("DJANGO_SETTINGS_MODULE", "learning_log.settings")

application = Cling(get_wsgi_application())
20.2.9 创建用于存储静态文件的目录
在文件夹learning_log中,有一个名称也为learning_log的子文件夹。在这个文件夹中,新建一个名为static的文件夹。我们还需要在这个文件夹中创建一个占位文件,因为项目被推送到Heroku时,它将不包含原来为空的文件夹。在目录static/中创建一个名为placeholder.txt的文件:
The file ensures that learning_log/static/ will be added to the project.
Django will collect static files and place them in learning_log/static/.
20.2.10 在本地使用gunicorn服务器
gunicorn不能在Windows系统上运行,跳过这一步。
20.2.11 使用Git跟踪项目文件
1、安装Git

2、配置Git


3、忽略文件
在manage.py所在的文件夹中创建一个名为.gitignore的文件,不包含扩展名。
11_env/
_pycache_/
*.sqlite3
4、提交项目


20.2.12 推送到Heroku
--ship--
对不起,由于我没有成功注册heroku所以下面的就只是看书,没有实践了。。。。。