0.5 Overview
ZYNQ uboot generated when normal ARM and apparatus are not the same, the secondary part of the starting aid ZYNQ uboot uboot then started by the kernel, probably means a ZYNQ internal mechanism that can not be modified, can be started by way of DIP switches, for example, start or boot from the SD card from QSPI, SD card information to be included in the mirror of uboot. The biggest difference is, uboot compiled not be used directly, also you need to use Vivado design PL, then the SDK files uboot design and synthesis of PL, the final document synthesized copied to the SD card from its start.
I will not FPGA, this article only outlines the Linux side, how do SD card, how to create a new Linux system.
BOOT.BIN image files typically include: FSBL, Bitstream and SSBL these three documents, which are configured Bitstream PL-side program is optional and does not need when we make Linaro system. FSBL is the first stage boot loader, the production of documents is required Vivado environment; SSBL is Second Stage Boot Loader, used here is the u-boot Xilinx companies.
References 1 from
1. Environment and Materials
1.1 Development Environment
-
Software Environment: Vivado 2017.02 Linux version
-
System environment: Ubuntu 16.04 amd64
-
Cross compiler: GCC-Linaro-7.3-2018.05.tar.xz
I cross-compiler environment in / opt / toolschain / linaro / bin / lower arm-linux-gnueabihf-, I like to specify an absolute compile time the compiler path
1.2 Preparation Materials
- ARM linux kernel source end: https: //github.com/Xilinx/linux-xlnx
- ARM end uboot source: https: //github.com/Xilinx/u-boot-xlnx
- ARM Linaro end of the file system: https: //releases.linaro.org/archive/12.07/ubuntu/precise-images/ubuntu-desktop/linaro-precise-ubuntu-desktop-20120723-305.tar.gz (I use ubuntu 12.07)
2. Make uboot
2.1 compiler uboot
-
Xilinx get the uboot source code:
git clone https://github.com/Xilinx/u-boot-xlnx.git -
Clear compilation:
make CROSS_COMPILE=/opt/toolschain/linaro/bin/arm-linux-gnueabihf- ARCH=arm clean -
Board-level configuration information:
make CROSS_COMPILE=/opt/toolschain/linaro/bin/arm-linux-gnueabihf- ARCH=arm zynq_zc702_defconfigboard-level information in the position shown in FIG, I is zc701 board, but did not, and this I choose a closest.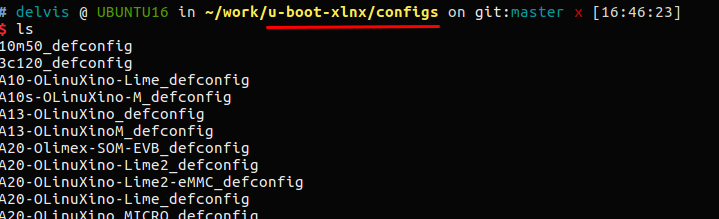
-
menuconfig write configuration information:
make CROSS_COMPILE=/opt/toolschain/linaro/bin/arm-linux-gnueabihf- ARCH=arm menuconfig -
Compile uboot:
make CROSS_COMPILE=/opt/toolschain/linaro/bin/arm-linux-gnueabihf- ARCH=arm -j8 -
After compiling successful production is the uboot, so it is necessary to rename uboot:
mv uboot uboot.elf
After getting uboot.elf, save for reuse, re-synthesis of the final boot program requires the uboot.elf file.
2.2 FSBL, making bit file
The general process is: use Vivado this new software engineering, then add ip design, configuration clock, configure some basic Linux needs of peripheral (SD card, serial, Ethernet, etc.), use wrap HDL function .v file generated top-level design, then compile .v file generated .bit file, and then generates a hardware description file, launch SDK software will automatically generate a project, get fsbl compiled file.
The specific process many bloggers have written very clearly, and I speak here posted a relatively good, can do according to this method: inside the future multi-core communication mechanisms, communication PS and PL, the PL this document is designed after good then we re-synthesis uboot file.
https://blog.csdn.net/long_fly/article/details/78643258
We got this way bit file vivado compiled, and the establishment of a project in the SDK, generates a hardware platform, then we get fsbl this file. fsbl file FSBL need to create a project in the SDK, and we just generated based hardware platform.
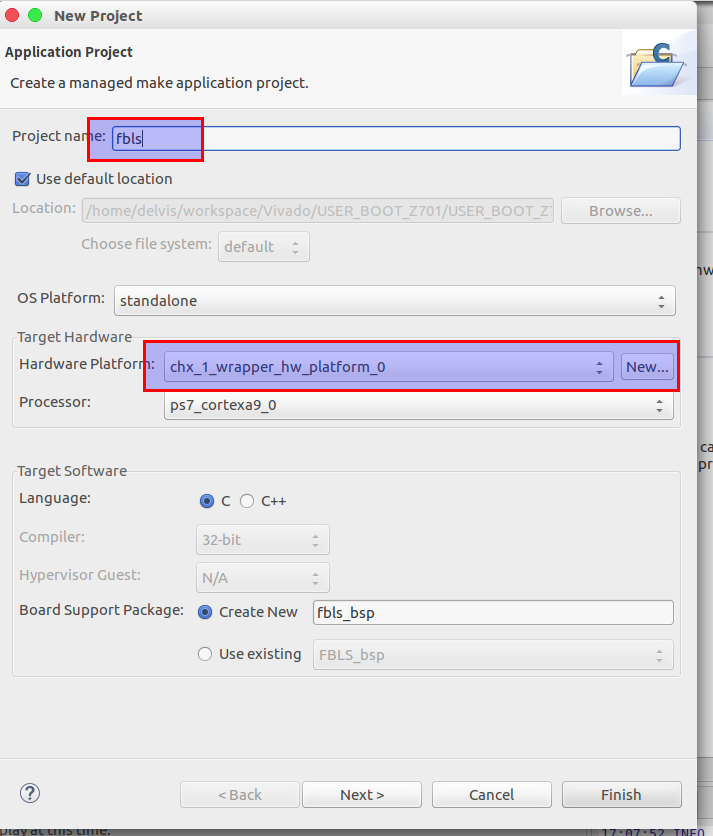
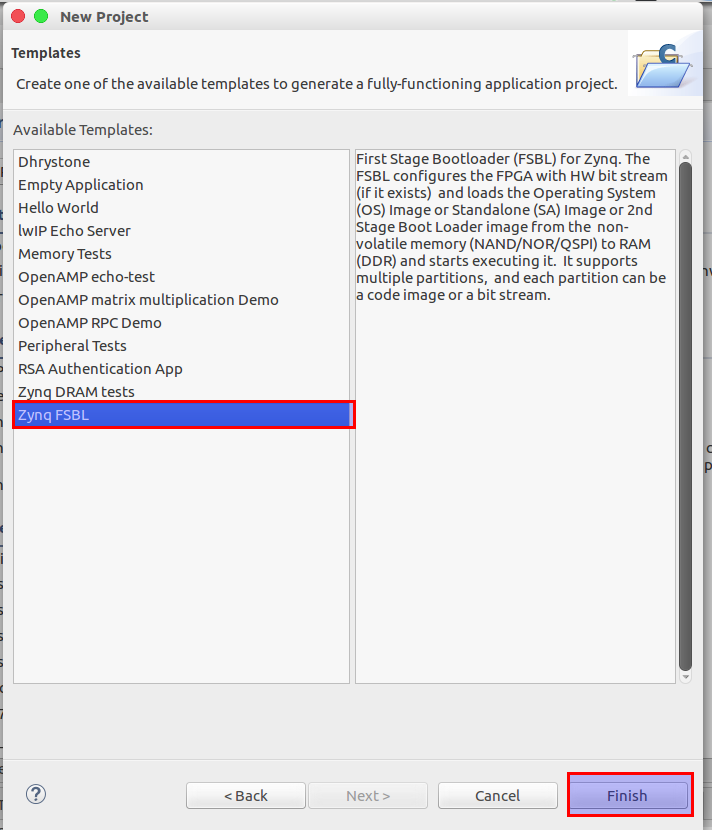
After completion of the establishment of direct compiler, you can get fsbl file.
Until now, we got:
- vivado compiled of: bit file
- sdk generated: fsbl file
- Just uboot compiler generated: uboot.elf file
Files can be synthesized starting BOOT.bin
2.3 Synthesis BOOT.bin
This operation was carried out in the sdk software inside.
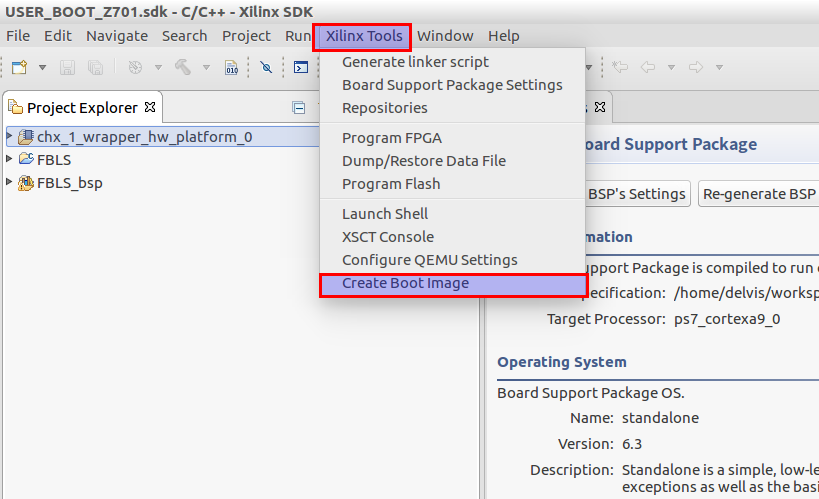
Use create boot image function:
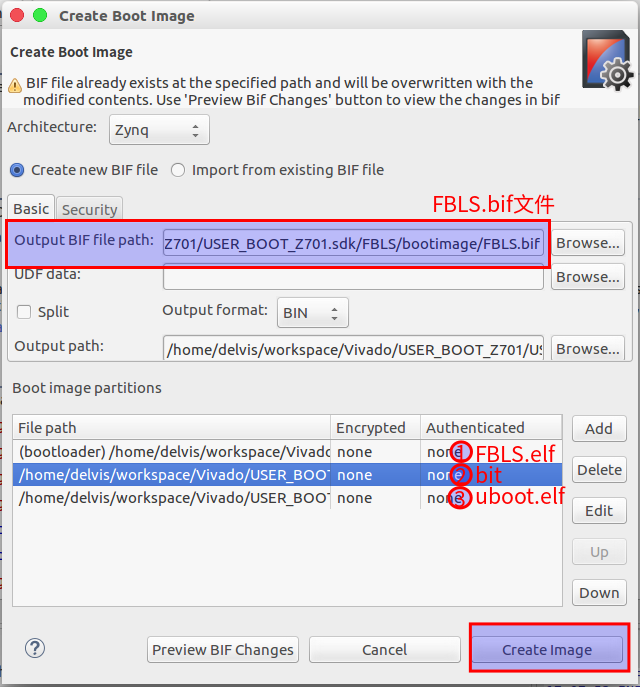
This completes the synthesis BOOT.bin.
2.4 file permissions (Linux developers users only)
There is also a very important thing, I tried many times, zynq platform that does not start, uboot does not output any information. This little card issue me a long time, but when wash this morning, suddenly thought, Xilinx Vivado and SDK are starting at the root, the generated BOOT.bin may also have a permissions problem. and so....
I got the board, then the SD card inside, given sudo chmod 777 BOOT.binthen eject the SD card, the SD on ZYNQ, actually started successfully. If you are under the Linux system, do not forget BOOT.bin given permission.
3 Linux kernel production
3.1 Linux kernel compile uImage file
- Gets the Linux kernel:
git clone https://github.com/Xilinx/linux-xlnx.git - Switch to the Linux kernel source directory, start cleaning up the kernel:
make CROSS_COMPILE=/opt/toolschain/linaro/bin/arm-linux-gnueabihf- ARCH=arm clean - Board-level configuration information:
make CROSS_COMPILE=/opt/toolschain/linaro/bin/arm-linux-gnueabihf- ARCH=arm xilinx_zynq_defconfig - Use menuconfig write .config file:
make CROSS_COMPILE=/opt/toolschain/linaro/bin/arm-linux-gnueabihf- ARCH=arm menuconfigexit came on the line after. - Compile the kernel:
make CROSS_COMPILE=/opt/toolschain/linaro/bin/arm-linux-gnueabihf- ARCH=arm -j8 - Production uImage file:
make CROSS_COMPILE=/opt/toolschain/linaro/bin/arm-linux-gnueabihf- ARCH=arm uImage LOADADDR=0x00008000 - After compilation, the linux-xlnx / arch / arm / boot file uImage keep the backup.
3.2 file tree production equipment
New zynq-7010.dts file in the linux-xlnx / arch / arm / boot / dts directory, file contents:
/dts-v1/;
/include/ "zynq-7000.dtsi"
/ {
model = "HLF";
compatible = "ALINX,zynq", "xlnx,zynq-7000";
aliases {
ethernet0 = &gem0;
serial0 = &uart1;
spi0 = &qspi;
mmc0 = &sdhci0;
};
memory@0 {
device_type = "memory";
reg = <0x0 0x20000000>;
};
chosen {
bootargs = "";
stdout-path = "serial0:115200n8";
};
usb_phy0: phy0 {
compatible = "usb-nop-xceiv";
#phy-cells = <0>;
reset-gpios = <&gpio0 46 1>;
};
};
&clkc {
ps-clk-frequency = <50000000>;
};
&gem0 {
status = "okay";
phy-mode = "rgmii-id";
phy-handle = <ðernet_phy>;
ethernet_phy: ethernet-phy@0 {
reg = <0>;
};
};
&qspi {
u-boot,dm-pre-reloc;
status = "okay";
};Switch to the home directory of the kernel which:./scripts/dtc/dtc -I dts -O dtb -o ./arch/arm/boot/devicetree.dtb ./arch/arm/boot/dts/zynq-7010.dts
Then the file can be found at devicetree.dtb linux-xlnx / arch / arm / boot / directory also keep spare.
3.3 启动配置文件制作uEnv.txt
随便找个位置新建一个uEnv.txt 文件,文件内写入boot的配置信息:
uenvcmd=run linaro_sdboot

linaro_sdboot=echo Copying Linux from SD to RAM... && \
fatload mmc 0 0x3000000 ${kernel_image} && \
fatload mmc 0 0x2A00000 ${devicetree_image} && \
if fatload mmc 0 0x2000000 ${ramdisk_image}; \
then bootm 0x3000000 0x2000000 0x2A00000; \
else bootm 0x3000000 - 0x2A00000; fi

bootargs=console=ttyPS0,115200 root=/dev/mmcblk0p2 rw earlyprintk rootfstype=ext4 rootwait
保存,留着备用。
4 SD卡制作
准备一张空白的超过8G的SD卡,读卡器读取该卡,我们使用Linux系统进行格式化,Windows用户可以通过diskgen等格式化分区的软件制作也好。
- 查看SD卡格式化分区:
sudo fdisk -l假如查看到的SD卡是/dev/sde分区,(不要格式化错了,在我年轻的时候我曾经把整个硬盘都格式化了,很危险的操作,看清楚是/dev/sd* 后面是c 还是d还是e还是f)。 -
进入分区管理:
sudo fdisk /dev/sde -
以下步骤按照这个OMAPL138制作SD卡启动盘及重装Linux系统,我的这个博客来。注意不同的是,我们建立启动分区的大小是100M即可,创建boot的分区的类型也为Linux。
-
然后格式化boot分区:
sudo mkfs.vfat -F 32 -n "boot" /dev/sde1 -
格式化rootfs分区:
sudo mkfs.ext4 -L "rootfs" /dev/sde2到此我们完成了SD卡制作。
5 烧写SD启动卡
-
sd卡的boot分区:使用命令将 BOOT.bin / devicetree.dtb / uImage / uEnv.txt 四个文件拷贝到boot分区。
-
解压Linaro的文件系统: 在第一章写的 ARM端的Linaro文件系统:linaro-precise-ubuntu-desktop-20120723-305.tar.gz 解压到SD卡的root分区
sudo tar --strip-components=3 -C /media/delvis/rootfs -xzpf linaro-precise-ubuntu-desktop-20120723-305.tar.gz binary/boot/filesystem.dir -
最好找一个带知识灯的读卡器,解压命令执行完了,不代表SD卡写入完毕,如果有指示灯,指示灯不闪烁之后弹出SD卡。
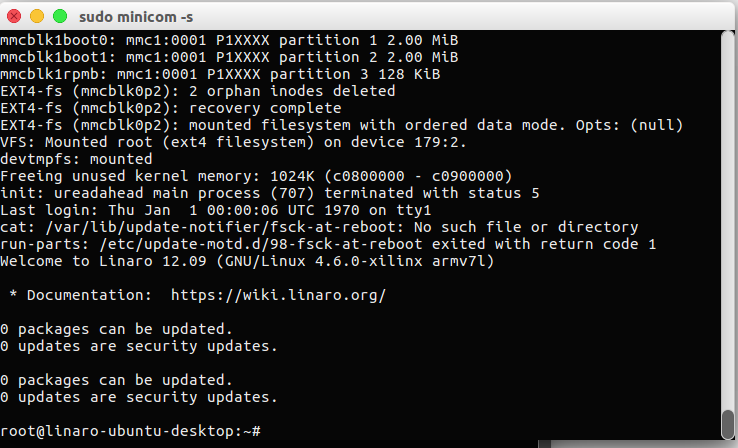
到此,一个完整的Linaro系统就写入了SD卡,将FPGA板子的boot拨码开关拨到SD卡启动位置,就可以看到Linaro系统启动了。
参考文献:
[1] long_fly, ZYNQ跑系统 系列(一) 传统方式移植linux, 2017年11月28日
[2] 雅可, Zedboard上运行Linaro系统(二):生成BOOT.BIN, 2016年07月26日
[3] 带你高飞, 03-ZYNQ学习(启动篇)之程序的固化, 2018年05月22日