First, set up the environment
1, install the server node
Official website to download https://nodejs.org/zh-cn/
node: using C ++ written language, used to run JavaScript language
    node can provide a front-end server for the project (including the socket)
2, the installation package manager npm
Administrator command-line installation: window system: npm install -g CNPM --registry = HTTPS: // registry.npm.taobao.org
          Mac systems: sudo npm install -g CNPM --registry = HTTPS: // registry.npm. taobao.org

index npm instructions can be replaced CNPM
  npm the install vuex => CNPM the install vuex
3, installation of scaffolding:
Command line installation: CNPM install -g @ VUE / cli
If the error: npm Cache Clean --force
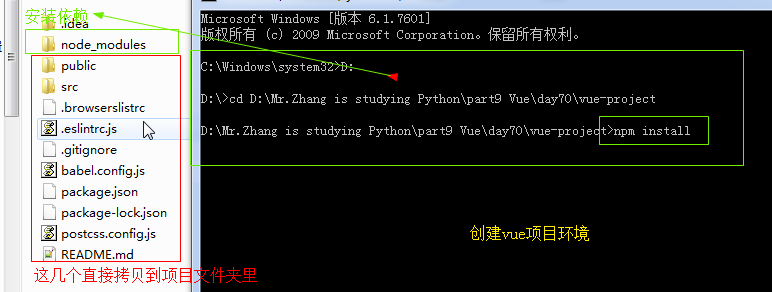
Second, create a Vue project
1, cd to the target directory
2, create a project: vue create a directory name
Note: To enter the destination directory in advance (which projects should be created in the directory)
   select customize the way you create a project, select Router, Vuex plug
3, start the project
① terminal starts
Into the project: cd to the project directory
to start the project: npm run serve
②pycharm Configuration
App.vue installed plug-in vue.js, if not prompt, search Vue.js installed in settings where the plugins, and then restart
npm startup item configuration item:
direct copy, dependent on the need to install their own cpm install
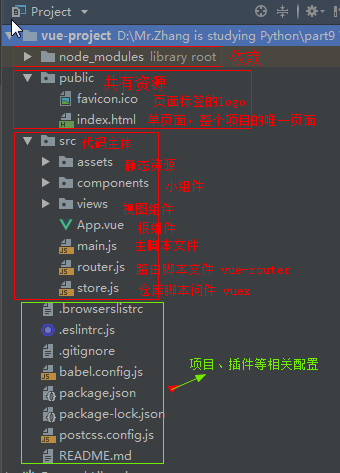
Third, the project directory
Fourth, the component
1, page rendering components in the root component
①Main.vue Home Components
<template>
    <div class="main">
        <h1>{{ title }}</h1>
    </div>
</template>

<script>
    export default {
        name: "Main",
        data: function () {
            return {
                title: '主页'
            }
        }
    }
</script>

<style scoped>
    .main {
        height: 100vh;
        background-color: orange;
    }
    h1 {
        margin: 0;
        color: red;
    }
</style>
②App.vue根组件
<template>
    <div id="app">
        <!-- 3.使用 -->
        <Main></Main>
    </div>
</template>
<script>
    // 1.导入
    import Main from '@/views/Main'
    export default {
        // 2.注册
        components: {
            Main: Main
        }
    }
</script>
<style>
    html, body {
        margin: 0;
    }
</style>
五、路由router.js
1、在根组件中设计转跳页面的导航栏


<template>
    <div id="app">
        <ul class="nav">
            <li>主页</li>
            <li>商品页</li>
            <li>个人页</li>
        </ul>

    </div>
</template>

<script>
    import Main from '@/views/Main'

    export default {
        components: {
            Main: Main
        }
    }
</script>

<style>
    .nav {
        height: 200px;
        background-color: orange;
    }
    .nav li{
        float: left;
        height: 200px;
        width: 200px;
        text-align: center;   /* 水平居中 */
        line-height: 200px;    /* 垂直居中 */
    }
    .nav li:hover {
        background-color: aqua;
    }

    html, body, ul {
        margin: 0;
    }
    ul {
        list-style: none;
    }
</style>
2、创建三个页面
主页   Main
商品页 Goods
个人页 User
3、组件配置
import Vue from 'vue'
import Router from 'vue-router'
import Main from './views/Main.vue'
import Goods from './views/Goods.vue'
import User from './views/User.vue'
// import Home from './views/Home.vue'

Vue.use(Router)

export default new Router({
  mode: 'history',
  base: process.env.BASE_URL,
  routes: [
    {
      path: '/',
      name: 'main',
      component: Main
    },
    {
      path: '/goods',
      name: 'goods',
      component: Goods
    },
    {
      path: '/user',
      name: 'user',
      component: User
    },
  ]
})
<template>
    <div id="app">
        <ul class="nav">
            <!--<router-link>组件支持用户在具有路由功能的应用中点击导航。
            通过to属性指定目标地址,默认渲染为带有正确连接的<a>标签-->
            <li><router-link to="/">主页</router-link></li>
            <li><router-link to="/goods">商品页</router-link></li>
            <li><router-link to="/user">个人页</router-link></li>
        </ul>
        <!--不想跳转到新页面,只在当前页面切换着显示,那么就要涉及到路由的嵌套。
        点击每个导航链接会跳转到不同的组件,并且加上<router-view></router-view>这个标签-->
        <router-view/>

    </div>
</template>

<script>
    import Main from '@/views/Main'

    export default {
        components: {
            Main: Main
        }
    }
</script>

<style>
    .nav {
        height: 200px;
        background-color: red;
    }
    .nav li{
        float: left;
        height: 200px;
        width: 400px;
        text-align: center;   /* 水平居中 */
        line-height: 200px;    /* 垂直居中 */
    }
    .nav li:hover {
        background-color: aqua;
    }
    .nav li a {
        text-decoration: none;
        font: bold 30px/30px 'STSong';
    }

    html, body, ul, h1 {
        margin: 0;
    }
    ul {
        list-style: none;
    }
</style>
4、路由前后台交互
①生命周期钩子
前端点击页面要显示页面的信息,要从后端拿数据,那么什么时候拿,当页面一加载时就拿,这个时候就涉及到生命周期钩子
生命周期钩子:
    表示一个vue实例从创建到销毁的这个过程,将这个过程的一些时间节点赋予了对应的钩子函数
    钩子函数: 满足特点条件被回调的方法
    new Vue({
        el: "#app",
        data: {
            msg: "message"
        },
        beforeCreate () {
            console.log("实例刚刚创建");
            console.log(this.msg

        },
        created () {
            console.log("实例创建成功, data, methods已拥有");
            console.log(this.msg);
        },
        mounted () {
            console.log("页面已被vue实例渲染, data, methods已更新");
        }
        拿到需求 => 确定钩子函数 => 解决需求的逻辑代码块
    })
开始创建的时候往后端发送请求,发送请求完渲染得到之后在mouted做数据替换
②如何前后端交互?去创建一个Django项目
首先在Vue项目中
    安装 axios(ajax)的命令
        npm install axios --save
    为项目配置全局axios
        import Axios from 'axios'
        Vue.prototype.$ajax = Axios
③配置完成之后开始请求后端,写完之后开始在后端写路由接口
<template>
    <div class="goods">
        <h1>商品页</h1>
        <h2>{{ msg }}</h2>
    </div>
</template>

<script>
    export default {
        name: "Goods",
        data: function() {
            return {
                msg: ''
            }
        },
        beforeCreate() {
            window.console.log('开始创建Goods组件')
        },
        created() {
            window.console.log('创建Goods组件完毕')
        },
        mounted() {
            window.console.log('Goods组件渲染完毕');
            // 请求后台
            let _this = this;
            this.$ajax({
                method: 'post',
                url: ' http://127.0.0.1:8000/goods/',
                params: {
                    info: '前台数据'
                }
            }).then(function (result) {
                let data = result.data;
                // this 指向的是then的function
                _this.mas = data
            })

        }
    }
</script>

<style scoped>
    .goods {
        height: 100vh;
        background-color: pink;
    }
</style>
def goods(request):
    print(request.method)  # POST
    # axios的请求不管是get请求还是post请求,前端把所有的数据都解析到GET里,原生Django在GET里拿数据
    print(request.GET)     # <QueryDict: {'info': ['前台数据']}>
    print(request.POST)    # <QueryDict: {}>
    return HttpResponse('后端数据')
④前端和后端在交互的过程中会出现跨域问题:
A网页访问B服务器资源时,不满足以下三个条件其一就是跨域访问
    1. 协议不同
    2. 端口不同
    3. 主机不同

Django解决跨域:
    1、安装django-cors-headers模块
    2、在settings.py中配置
        注册app
        INSTALLED_APPS = [
        'corsheaders'
        ]
    3、添加中间件
        MIDDLEWARE = [
        'corsheaders.middleware.CorsMiddleware'
        ]
    4、允许跨域源
        CORS_ORIGIN_ALLOW_ALL = True
⑤最后两者能够正常的交互,需要注意的是
axios的请求不管是get请求还是post请求,前端把所有的数据都解析到GET里,原生Django在GET里拿数据
