A, vue-resource request data
Introduction: vue-resource request data is a way of plug-official
step:
1, npm install


npm install vue-resource --save
Or use cnpm Taobao mirror installation, it will be much faster. cnpm install vue-resource --save
To add --save is referenced in package.json in, that the use in a production environment. Because our daily development, if we want to pack the code to others or upload to github, or if you want to publish the code, package.json is to install the required packages. If only in the development environment, you only need --save-dev, with some only in the development environment, there are some to be used in a production environment.
2, is introduced vue-resource in the file entry main.js
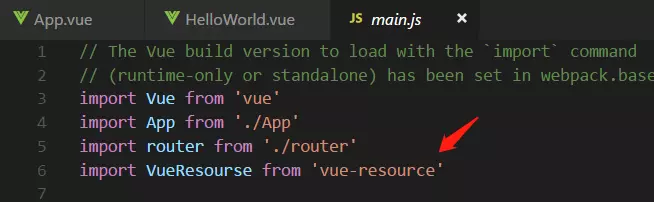

After the introduction of plug-in to use this


If you do not use this plug-in, it will be reported the following error:


3, this. $ Http.get (), etc. used in the project with details, see vue-resource github
Example:
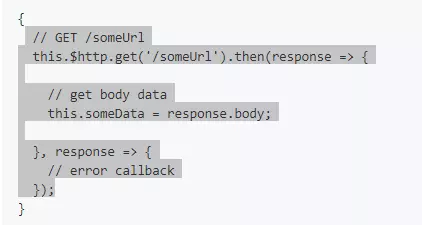

Note:. This $ http.get () and so on various http requests are to inherit the promise. promise request is asynchronous; secondly, .then function in the arrow represents this context. According to this definition of the function of the arrow, only when the function definition has been assigned seen, this, refer to the object-defined functions, and methods is the current page in the object vue. So this guide is data inside the data. If you want to obtain data function outside the function package, i.e. the concept of closures. The method is implemented in the outer function plus a var that = this; this will be the outer layer to that in the first reservoir. The following examples, but also to solve the cross-domain issues:

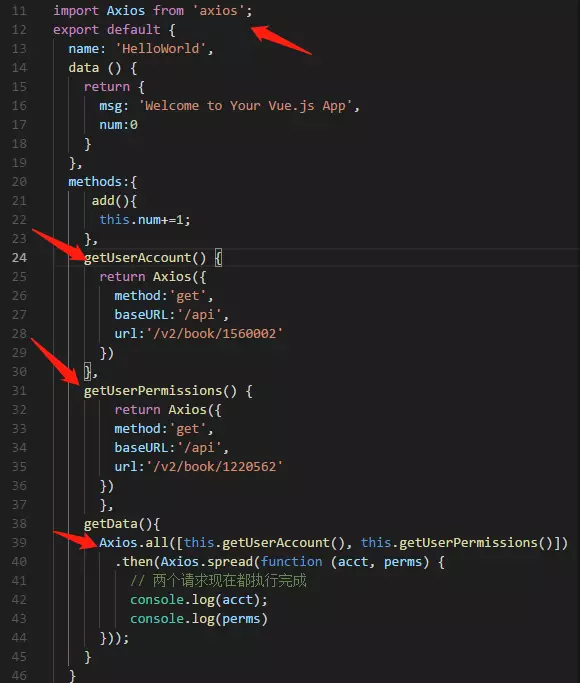
Two, axios request data
Description: This is a third-party plug-ins github Address: https://github.com/axios/axios
第一步:npm安装 npm install axios -save


第二步:直接调用。和vue-resource的区别是:aixos是每在一个页面用一次就要在该页面调用一次。vue-resource是绑定了全局的了。具体使用方法可以看github:


第三步:关于axios的跨域请求
在config->index.js->proxyTable配置如下:target填写自己想要的地址


如下配置,url为地址后面所带的参数,配置好后,现在npm run dev 运行就行。


第四步:关于多个并发请求:

上面这个是同一地址的跨域,如果要拿不同地址的跨域,只需要更改config->index.js->proxyTable的配置,增加地址块就行。
三,关于fetch-jsonp