This chapter introduces the functions and features of the main structure and common methods of TensorFlow. This chapter involves a lot of technical terms will help to improve reading skills and ability to use the code readers, but also involves a lot of knowledge of neural networks, later we will introduce to.
Programming Model
TensorFlow programming constructs as a flowchart in FIG tensor will be transmitted from FIG flows after the start node data in each figure, after completion of the calculation flows from the output terminal. It is also determined by TensorFlow named, Tensor tensor representative of a multidimensional array, Flow of stream represents tensor calculation in the data flow diagram in FIG.
Understand the operational mechanism of the model
TensorFlow operating mechanism consists of two parts: the definition of the data flow diagram and data flow diagram run. In TensorFlow, the algorithm is represented as a dataflow graph, so before TensorFlow started, we should understand a few basic concepts of Table 1.
Table 1 Construction of the basic concept of the model
| Types of |
description |
meaning |
||
| Tensor (tensors) |
data |
Data, i.e., a certain type of multidimensional array. |
||
| Variables (variables) |
variable |
Often used to define parameters in the model, the value is obtained through continuous training. |
||
| Graph (FIG calculated) |
Description of the settlement process |
FIG call must be executed in a "session" context. FIG sessions distributed to the OP such as a CPU or GPU computing |
||
| Session (sessions) |
Conversation |
All operations are performed in the TensorFlow in the session (session), the session responsible for the allocation and management of resources |
||
| FIG node operation (operation, op) |
operating |
I.e., obtain a OP Tensor 0 or more, perform calculations, the output of zero or more additional tensor. |
||
| Placeholder (placeholder) |
Placeholder |
Input vector variables. It is to be understood that the parameters defined function. |
||
| feed (injection mechanism) |
|
Tensor for the assignment of op, the incoming data into the model by the placeholder |
||
| fetch (retrieve Mechanism) |
The value |
Tensor op values from, the result obtained from the model |
||
| Constant (Constant) |
constant |
|
Table 1 The basic concept of the relationship in FIG. 1, the basic concept tensor variables session placeholder operation, and the like are referred to as container in a "map" of the completed, a calculation is performed is a process in FIG. FIG achieve constructed after starting running in the session data flow graph. The whole process can be expressed as op session to distribute to the respective CPU, GPU and other equipment, as well as provide a method of performing op. After performing these methods will produce a corresponding return tensor. If executed in Python, it will return numpynadarry object. In the model, a sample is input argument, parameter is a placeholder, the arithmetic process is equivalent to the function body, the result is equivalent to the return value.

1 work session and the diagram
In the actual process, the operation of FIG. 1 will be training scenarios, test scenarios and usage scenarios. The following detailed description for the three scenarios.
Training scenarios: is the process of generating the model. The process is used as the label and sample the input node, loop iteration by a large amount, forward the output to obtain the output value, then the reverse operation, more learning parameter line model, the model will eventually produce a positive output sample maximizes close label. This has been a model sample could be fitted regularly.
Test scenario and use scenarios: positive test scenarios using the output is compared with FIG Zhang difference value; use scenarios are directly obtained using the positive output of the result of FIG., And used directly. So both the operation process is the same. Similar models especially for the normal function of the programming for the scene. In the function, it can be divided into arguments, parameters, return value and the body of the function. Also in the model, a sample is input argument, parameter is a placeholder, the arithmetic process is equivalent to the function body, the resulting expect the return value.
Examples 1 : write hello world away 1 training scenarios
The establishment of a session, output hello, TensorFlow in the session!
Code 1 hello
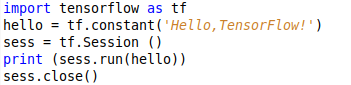
Output:
![]()
1 tf.constant code used to define a constant, when the input content hello session starts. To start with with the following session.
实例2:演示with session的使用
with session的用法是最常见的,它沿用了 Python中with的语法,即当程序结束后会自动关闭session,而不需要再去写close。
实例描述:
使用with session来建立session,并在session实现两个变量(4和7)的相加和相乘运算。
代码2 withsession

输出结果:
![]()
实例3:演示注入机制
定义占位符,使用feed机制将具体数值(4和 7)通过占位符传入,并进行相加和相乘运算。
代码3 withsessionfeed

运行结果:
![]()
其中,tf.placeholder为这些操作创建占位符,然后使用feed_dict把具体数值放到占位符里。
建立session 的其他方法
建立session还有交互的tf.InteractiveSession()和Supervisor方式。
tf.InteractiveSession()方式一般在Jupyter环境下使用较多,它为自己成为了默认的session,也就是用户在运行是不必知名是用哪个session。即run()和eval()函数可以不指明session。
Supervisor方法更加高级,使用也更复杂可以用来自动管理session中的具体任务,例如,载入/载出检查点文件、写入TensorBoard等,另外该方法还支持分布式训练的部署。
实例4:使用注入机制获取节点
在实例3中,通过在最后一句加上如代码4的代码可实现一次将多个节点取出来。
代码4 withsessionfeed1

输出结果:

指定GPU运算
如果设备上有多个GPU,则指定第一个为默认GPU其他的不工作。若想用其他GPU,可用with tf.device(……)指定。实例如下:
代码5 指定GPU

目前设备用字符串标识,大概可表示为:
cpu:0 机器的cpu
gpu:0 机器的第一个GPU,如果有的话
gpu:1 机器的第二个GPU……
同时还可通过tf.ConfigProto方式来构建一个config,在config中指定相关的GPU。tf.ConfigProto参数如下:
log_device_placement = True :是否打印设备分配日志
allow_soft_placement = True :如果指设备不存在,允许tf自动分配
使用举例:
config = tf.ConfigProto(log_device_placement = Ture, allow_soft_placement = Ture)
session = tf.Session(config=config,……)
保存和载入模型的方法介绍
训练完成的模型在一般情况下都需要保存,网上介绍了TensorFlow加载和保存的几种基本方法,下边给大家分别做介绍。
1.保存模型
最常用的基本方法是使用saver.save()方法保存,先建立一个saver,然否在session中通过saver的save即可将模型保存起来。代码示例如下:
代码6 保存模型

2.加载模型
最常用的基本方法是用saver.restore()方法载入,模型保存后可在session中通过saver的restore()函数载入。代码示例如下:
代码7 加载模型

实例5:保存/载入线性回归模型
代码8是已经添加了保存及载入功能的线性回归模型的展示。
代码8 线性回归模型的保存及载入


程序运行输出结果:


最后再重启一个session,命名为sess2的部分是用来证明测试效果的,这里是通过saver的restore函数将模型载入。将前面的session注释掉,可以看到如图输出,说明模型载入成功,并且计算出正确的值。
![]()
同时在代码的同级目录 下log文件夹里生成了几个文件,如图所示:

图2 模型文件
实例6:分析模型内容,演示模型的其他 保存方法
1.模型内容
模型保存以后对我们是不透明的,我们可以通过编写代码来查看模型里的内容。通过把模型里的东西打印出来,来了解有那些东西,是什么样的。
代码9 模型内容

运行代码,输出如下:

可以看到,tensor_name: 后面跟的就是创建的变量名,接着是他的数值。
2.保存模型的其他方法
本例给大家介绍tf.train.Saver函数的其他更加高级的功能,通过在函数里放参数来指定存储变量名字与变量的对应关系。实例如下:
代码10 查看模型内容

运行代码,输出如下:

代码saver = tf.train.Saver({‘wight’:w,……})表示将w变量的值放到weight名字中。从结果可以看到,给b和w分别指定固定的值之后,创建的saver将它们颠倒了。
检查点(Checkpoint)
TensorFlow训练模型因为很多原因可能会出现中断情况,这种情况下,即使没有训练完,我们还是希望训练过程中得到的中间参数保存下来,不然下次又要从头开始训练。所以为了在训练中保存模型,引入了检查点概念。
实例7:为模型添加保存检查点
实列描述:
为一个线性回归模型添加“检查点功能”功能。通过该功能,可以生成载入检查点文件,并能够指定生成检查点文件的个数。
该例相比模型保存功能,保存位置发生了变化,保存位置放在了迭代训练中的打印信息后面。
完整代码如下:
代码11 保存检查点


代码运行完以后,会在log文件下多如下几个文件,就是检查点文件。

图3 检查点文件
其中头tf,train.Saver(max_to_keep=1)表示在迭代过程中只保存一个文件,这样以后,新生成的模型会覆盖掉以前的模型。
实例8:更简便地保存检查点
还有另一种方法可以保存检查点,而且相对上一例更加简单便捷——tf.train.MonitoredTraining Session函数。该函数可以直接实现保存及载入检查点模型的文件。与前面的方式不同,本例中并不是按照循环步数来保存,而是按照训练时间来保存的。通过指定save_ckeckpoint_secs参数的具体秒数,来设置每训练多久保存一次检查点。
实例描述:
演示使用MonitoredTrainingSession函数来自动管理检查点文件。
具体代码如下:
代码12 更简保存检查点

运行输出如下:

将程序终止,可看到log/checkpoints下面生成以下几个文件。
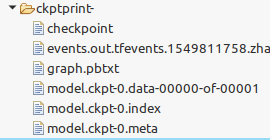
图4 检查点文件
再次运行代码,有如下输出:

可见,程序自动载入检查点是从第0次开始运行的。