A, LVS Introduction
LVS is referred to as the Linux Virtual Server, which is the Linux Virtual Server is a sponsored by Dr. Zhang Wen-song free software projects, the official site is: http://www.linuxvirtualserver.org . Now LVS is already part of the standard Linux kernel in Linux2.4 kernel before, the use of LVS have to recompile the kernel to support the LVS modules, but from the inside after Linux2.4 core, has been completely built LVS various functional modules without fight any patch to the kernel, you can directly use the various functions provided by LVS.
The use of technology to achieve the goal of LVS are: load balancing technology provided by LVS and Linux operating system to achieve a high-performance, highly available server clusters, it has good reliability, scalability and operability. Thus at low cost to achieve optimal service performance.
Two, LVS architecture
Use LVS erection server cluster system has three components: the foremost end load balancing layer (Loader Balancer), an intermediate layer of the server group, represented by Server Array, the bottom of the shared data storage layer, represented by the Shared Storage. In the user view all the applications are transparent, but users in the use of high-performance service provided by a virtual server.
LVS architecture as shown:
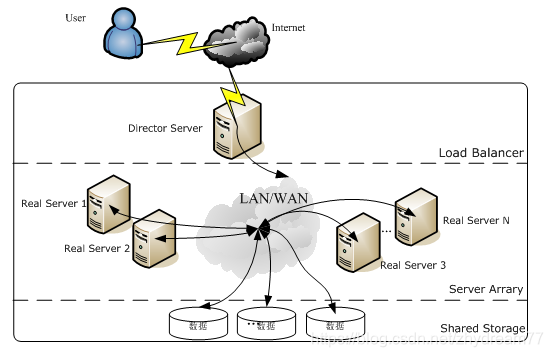
LVS all levels of detail:
Load Balancer layer: The most distal end located throughout the cluster system, has one or a plurality of the load balancer (Director Server) composition, LVS module on the installation on a Director Server, main role Director similar to a router, which contains complete LVS function set the routing table, the routing table through which the user requests the application server server Array distributed layer (Real server) on. Meanwhile, the Director Server also install monitoring module for Real Server services Ldirectord, this module is used to monitor the health of each Real Server services. LVS it removed from the routing table when the Real Server is unavailable, rejoin recovery.
Server Array layer: consists of machines and services actually running application composition, Real Server WEB server may be, among MAIL server, FTP server, DNS server, one or more video servers, each of the high-speed LAN Real Server or distributed across the WAN is connected. In practical applications, Director Server can also serve the role of Real Server at the same time.
Shared Storage Layer: Real Server provides for all shared memory consistency and content storage area in the physical disk array devices generally have a composition, in order to provide consistency of content may generally be a network file system NFS data sharing, but NFS in a busy business system, the performance is not good, then cluster file system can be used, such as Red hat of the GFS file system, oracle provides OCFS2 file system.
As can be seen from the entire structure of LVS, LVS Director Server is the core of the current operating system for the Director Server is the only Linux and FreeBSD, linux2.6 kernel can be set up without any support LVS function, and FreeBSD as Director Server not a lot of applications, performance is not very good. For Real Server, almost all the system platforms, Linux, windows, Solaris, AIX, BSD series can be a good support.
Three, LVS basic working principle
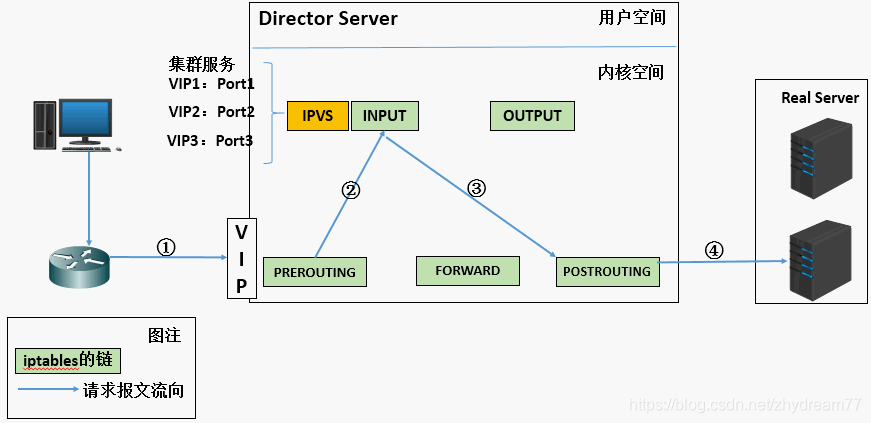
- When a user initiates a request to the load balancer scheduler (Director Server), it sends the requests to the scheduler to kernel space.
- PREROUTING chain will first user request is received, determines whether the target IP unit are determined IP, packets destined for the INPUT chain.
- IPVS is working on the INPUT chain, when the user requests arrive INPUT, IPVS request and sends the user that they have defined a cluster service for comparison, if the user requests a cluster service is defined, then the time will be forced to amend IPVS destination IP address and port data of the bag, and the new packet sent POSTROUTING chain.
- POSTROUTING link packet received after finding the target IP address happens to be their own back-end server, then the time will eventually send packets through routing to the back-end server.
三、LVS组成
LVS 由2部分程序组成,包括 ipvs 和 ipvsadm。
- IPVS(ip virtual server):一段代码工作在内核空间,叫IPVS,是真正生效实现调度的代码。IPVS的总体结构主要由IP包处理、负载均衡算法、系统配置与管理三个模块及虚拟服务器与真实服务器链表组成。
- ipvsadm:另外一段是工作在用户空间,叫ipvsadm,即IPVS管理器,负责为ipvs内核框架编写规则,定义谁是集群服务,而谁是后端真实的服务器(Real Server)。
四、LVS技术术语
- DS:Director Server。指的是前端负载均衡器节点。
- RS:Real Server。后端真实的工作服务器。
- VIP:Virtual IP,向外部直接面向用户请求,作为用户请求的目标的IP地址。
- DIP:Director Server IP,主要用于和内部主机通讯的IP地址。
- RIP:Real Server IP,后端服务器的IP地址。
- CIP:Client IP,访问客户端的IP地址。
五、LVS工作模式和原理
5.1、NAT模式
5.1.1、NAT模式工作原理

- 当用户请求到达Director Server,此时请求的数据报文会先到内核空间的PREROUTING链。 此时报文的源IP为CIP,目标IP为VIP。
- PREROUTING检查发现数据包的目标IP是本机,将数据包送至INPUT链。
- IPVS比对数据包请求的服务是否为集群服务,若是,修改数据包的目标IP地址为后端服务器IP,然后将数据包发至POSTROUTING链。 此时报文的源IP为CIP,目标IP为RIP。
- POSTROUTING链通过选路,将数据包发送给Real Server
- Real Server比对发现目标为自己的IP,开始构建响应报文发回给Director Server。 此时报文的源IP为RIP,目标IP为CIP。
- Director Server在响应客户端前,此时会将源IP地址修改为自己的VIP地址,然后响应给客户端。 此时报文的源IP为VIP,目标IP为CIP。
5.1.2、NAT特性
- RIP最好是内网IP
- RS的网关必须指向DIP。
- DIP和RIP必须在同一个网段内。
- 请求和回应的报文都必须经过director,director容易成为瓶颈。
- nat支持端口转发。
5.2、DR模式
5.2.1、DR模式工作原理

- 首先用户用CIP请求VIP。
- 根据上图可以看到,不管是Director Server还是Real Server上都需要配置相同的VIP,那么当用户请求到达我们的集群网络的前端路由器的时候,请求数据包的源地址为CIP目标地址为VIP,此时路由器会发广播问谁是VIP,那么我们集群中所有的节点都配置有VIP,此时谁先响应路由器那么路由器就会将用户请求发给谁,这样一来我们的集群系统是不是没有意义了,那我们可以在网关路由器上配置静态路由指定VIP就是Director Server,或者使用一种机制不让Real Server 接收来自网络中的ARP地址解析请求,这样一来用户的请求数据包都会经过Director Servrer。
- 当用户请求到达Director Server,此时请求的数据报文会先到内核空间的PREROUTING链。 此时报文的源IP为CIP,目标IP为VIP。
- PREROUTING检查发现数据包的目标IP是本机,将数据包送至INPUT链。
- IPVS比对数据包请求的服务是否为集群服务,若是,将请求报文中的源MAC地址修改为DIP的MAC地址,将目标MAC地址修改RIP的MAC地址,然后将数据包发至POSTROUTING链。 此时的源IP和目的IP均未修改,仅修改了源MAC地址为DIP的MAC地址,目标MAC地址为RIP的MAC地址
- 由于DS和RS在同一个网络中,所以是通过二层来传输。POSTROUTING链检查目标MAC地址为RIP的MAC地址,那么此时数据包将会发至Real Server。
- RS发现请求报文的MAC地址是自己的MAC地址,就接收此报文。处理完成之后,将响应报文通过lo接口传送给eth0网卡然后向外发出。 此时的源IP地址为VIP,目标IP为CIP
- 响应报文最终送达至客户端。
5.2.2、配置DR有三种方式:
第一种方式:
在路由器上明显说明vip对应的地址一定是Director上的MAC,只要绑定,以后再跟vip通信也不用再请求了,这个绑定是静态的,所以它也不会失效,也不会再次发起请求,但是有个前提,我们的路由设备必须有操作权限能够绑定MAC地址,万一这个路由器是运行商操作的,我们没法操作怎么办?第一种方式固然很简便,但未必可行。
第二种方式:
在给别主机上(例如:红帽)它们引进的有一种程序arptables,它有点类似于iptables,它肯定是基于arp或基于MAC做访问控制的,很显然我们只需要在每一个real server上定义arptables规则,如果用户arp广播请求的目标地址是本机的vip则不予相应,或者说相应的报文不让出去,很显然网关(gateway)是接受不到的,也就是director相应的报文才能到达gateway,这个也行。第二种方式我们可以基于arptables。
第三种方式:
在相对较新的版本中新增了两个内核参数(kernelparameter),第一个是arp_ignore定义接受到ARP请求时的相应级别;第二个是arp_announce定义将自己地址向外通告时的通告级别。【提示:很显然我们现在的系统一般在内核中都是支持这些参数的,我们用参数的方式进行调整更具有朴实性,它还不依赖于额外的条件,像arptables,也不依赖外在路由配置的设置,反而通常我们使用的是第三种配置】
arp_ignore:定义接受到ARP请求时的相应级别
0: 只要本地配置的有相应地址,就给予响应。(默认)
1: 仅回应目标IP地址是本地的入网地址的arp请求。
2: 仅回应目标IP地址是本地的入网地址,而且源IP和目标IP在同一个子网的arp请 求。
3: 不回应该网络界面的arp请求,而只对设置的唯一和连接地址做出回应
4-7:保留未使用
8: 不回应所有的arp请求。
arp_announce:定义将自己地址向外通告是的通告级别;
0: 将本地任何接口上的任何地址向外通告
1: 试图仅向目标网络通告与其网络匹配的地址
2: 仅向与本地接口上地址匹配的网络进行通告
5.2.3、DR特性
- 特点1:保证前端路由将目标地址为VIP报文统统发给Director Server,而不是RS。
- Director和RS的VIP为同一个VIP。
- RS可以使用私有地址;也可以是公网地址,如果使用公网地址,此时可以通过互联网对RIP进行直接访问。
- RS跟Director Server必须在同一个物理网络中。
- 所有的请求报文经由Director Server,但响应报文必须不能进过Director Server。
- 不支持地址转换,也不支持端口映射
- RS可以是大多数常见的操作系统
- RS的网关绝不允许指向DIP(因为我们不允许他经过director)
- RS上的lo接口配置VIP的IP地址
- DR模式是市面上用得最广的。
- 缺陷:RS和DS必须在同一机房中
补充:特点1的解决方法
- 在前端路由器做静态地址路由绑定,将对于VIP的地址仅路由到Director Server。存在问题:用户未必有路由操作权限,因为有可能是运营商提供的,所以这个方法未必实用。
- arptables:在arp的层次上实现在ARP解析时做防火墙规则,过滤RS响应ARP请求。这是由iptables提供的。
- 修改RS上内核参数(arp_ignore和arp_announce)将RS上的VIP配置在lo接口的别名上,并限制其不能响应对VIP地址解析请求。
5.3、Tunnel模式
5.3.1、Tunnel模式工作原理

- 当用户请求到达Director Server,此时请求的数据报文会先到内核空间的PREROUTING链。 此时报文的源IP为CIP,目标IP为VIP 。
- PREROUTING检查发现数据包的目标IP是本机,将数据包送至INPUT链。
- IPVS比对数据包请求的服务是否为集群服务,若是,在请求报文的首部再次封装一层IP报文,封装源IP为为DIP,目标IP为RIP。然后发至POSTROUTING链。 此时源IP为DIP,目标IP为RIP。
- POSTROUTING链根据最新封装的IP报文,将数据包发至RS(因为在外层封装多了一层IP首部,所以可以理解为此时通过隧道传输)。 此时源IP为DIP,目标IP为RIP。
- RS接收到报文后发现是自己的IP地址,就将报文接收下来,拆除掉最外层的IP后,会发现里面还有一层IP首部,而且目标是自己的lo接口VIP,那么此时RS开始处理此请求,处理完成之后,通过lo接口送给eth0网卡,然后向外传递。 此时的源IP地址为VIP,目标IP为CIP
- 响应报文最终送达至客户端
5.3.2、Tunnel模式特性
- RIP、VIP、DIP全是公网地址。
- RS的网关不会也不可能指向DIP
- 所有的请求报文经由Director Server,但响应报文必须不能进过Director Server
- 不支持端口映射
- RS的系统必须支持隧道
六、LVS的调度算法
固定调度算法:rr,wrr,dh,sh
动态调度算法:wlc,lc,lblc,lblcr
固定调度算法:即调度器不会去判断后端服务器的繁忙与否,一如既往得将请求派发下去。
动态调度算法:调度器会去判断后端服务器的繁忙程度,然后依据调度算法动态得派发请求。
6.1、rr:轮询(round robin)
这种算法是最简单的,就是按依次循环的方式将请求调度到不同的服务器上,该算法最大的特点就是简单。轮询算法假设所有的服务器处理请求的能力都是一样的,调度器会将所有的请求平均分配给每个真实服务器,不管后端 RS 配置和处理能力,非常均衡地分发下去。这个调度的缺点是,不管后端服务器的繁忙程度是怎样的,调度器都会讲请求依次发下去。如果A服务器上的请求很快请求完了,而B服务器的请求一直持续着,将会导致B服务器一直很忙,而A很闲,这样便没起到均衡的左右。
6.2、wrr:加权轮询(weight round robin)
这种算法比 rr 的算法多了一个权重的概念,可以给 RS 设置权重,权重越高,那么分发的请求数越多,权重的取值范围 0 – 100。主要是对rr算法的一种优化和补充, LVS 会考虑每台服务器的性能,并给每台服务器添加要给权值,如果服务器A的权值为1,服务器B的权值为2,则调度到服务器B的请求会是服务器A的2倍。权值越高的服务器,处理的请求越多。
6.3、dh:目标地址散列调度算法 (destination hash)
简单的说,即将同一类型的请求分配给同一个后端服务器,例如将以 .jgp、.png等结尾的请求转发到同一个节点。这种算法其实不是为了真正意义的负载均衡,而是为了资源的分类管理。这种调度算法主要应用在使用了缓存节点的系统中,提高缓存的命中率。
6.4、sh:源地址散列调度算法(source hash)
即将来自同一个ip的请求发给后端的同一个服务器,如果后端服务器工作正常没有超负荷的话。这可以解决session共享的问题,但是这里有个问题,很多企业、社区、学校都是共用的一个IP,这将导致请求分配的不均衡。
6.5、lc:最少连接数(least-connection)
这个算法会根据后端 RS 的连接数来决定把请求分发给谁,比如 RS1 连接数比 RS2 连接数少,那么请求就优先发给 RS1。这里问题是无法做到会话保持,即session共享。
6.6、wlc:加权最少连接数(weight least-connection)
这个比最少连接数多了一个加权的概念,即在最少连接数的基础上加一个权重值,当连接数相近,权重值越大,越优先被分派请求。
6.7、lblc:基于局部性的最少连接调度算法(locality-based least-connection)
将来自同一目的地址的请求分配给同一台RS如果这台服务器尚未满负荷,否则分配给连接数最小的RS,并以它为下一次分配的首先考虑。
6.8、lblcr:基于地址的带重复最小连接数调度 (Locality-Based Least-Connection with Replication)
这个用得少,可以略过。
七、LVS部署
7.1、ipvsadm命令详解
ipvsadm是ipvs的管理器,需要yum安装。
基本用法:
ipvsadm COMMAND [protocol] service-address [scheduling-method] [persistence options]
ipvsadm COMMAND [protocol] service-address server-address [packet-forwarding-method] [weight options]
第一条命令用于向LVS系统中添加一个用于负载均衡的virtual server(VS);第二条命令用来修改已经存在的VS的配置,service address用来指定涉及的虚拟服务即虚拟地址,server-address指定涉及的真实地址。
命令参数:
-A, --add-service: 为ipvs虚拟服务器添加一个虚拟服务,即添加一个需要被负载均衡的虚拟地址。虚拟地址需要是ip地址,端口号,协议的形式。
-E, --edit-service: 修改一个虚拟服务。
-D, --delete-service: 删除一个虚拟服务。
-C, --clear: 清除所有虚拟服务。
-R, --restore: 从标准输入获取ipvsadm命令。一般结合下边的-S使用。
-S, --save: 从标准输出输出虚拟服务器的规则。可以将虚拟服务器的规则保存,在以后通过-R直接读入,以实现自动化配置。
-a, --add-server: 为虚拟服务添加一个real server(RS)
-e, --edit-server: 修改RS
-d, --delete-server: 删除
-L, -l, --list: 列出虚拟服务表中的所有虚拟服务。可以指定地址。添加-c显示连接表。
-Z, --zero: 将所有数据相关的记录清零。这些记录一般用于调度策略。
--set tcp tcpfin udp:修改协议的超时时间。
--start-daemon state:设置虚拟服务器的备服务器,用来实现主备服务器冗余。(注:该功能只支持ipv4)
--stop-daemon: 停止备服务器。
-h, --help: 帮助。
参数:以下参数可以接在上边的命令后边。
-t, --tcp-service service-address:
指定虚拟服务为tcp服务。service-address要是host[:port]的形式。端口是0表示任意端口。如果需要将端口设置为0,还需要加上-p选项(持久连接)。
-u, --udp-service service-address:
使用udp服务,其他同上。
-f, --fwmark-service integer:
用firewall mark取代虚拟地址来指定要被负载均衡的数据包,可以通过这个命令实现把不同址、端口的虚拟地址整合成一个虚拟服务,可以让虚拟服务器同时截获处理去往多个不同地址的数据包。fwmark可以通过iptables命令指定。如果用在ipv6需要加上-6。
-s, --scheduler scheduling-method:
指定调度算法。调度算法可以指定以下8种:rr(轮询),wrr(权重),lc(最后连接),wlc(权重),lblc(本地最后连接),lblcr(带复制的本地最后连接),dh(目的地址哈希),sh(源地址哈希),sed(最小期望延迟),nq(永不排队)
-p, --persistent [timeout]:
设置持久连接,这个模式可以使来自客户的多个请求被送到同一个真实服务器,通常用于ftp或者ssl中。
-M, --netmask netmask:
指定客户地址的子网掩码。用于将同属一个子网的客户的请求转发到相同服务器。
-r, --real-server server-address:
为虚拟服务指定数据可以转发到的真实服务器的地址。可以添加端口号。如果没有指定端口号,则等效于使用虚拟地址的端口号。
[packet-forwarding-method]:
此选项指定某个真实服务器所使用的数据转发模式。需要对每个真实服务器分别指定模式。
-g, --gatewaying: 使用网关(即直接路由),此模式是默认模式。
-i, --ipip: 使用ipip隧道模式。
-m, --masquerading: 使用NAT模式。
-w, --weight weight:
设置权重。权重是0~65535的整数。如果将某个真实服务器的权重设置为0,那么它不会收到新的连接,但是已有连接还会继续维持(这点和直接把某个真实服务器删除时不同的)。
-x, --u-threshold uthreshold:
设置一个服务器可以维持的连接上限。0~65535。设置为0表示没有上限。
-y, --l-threshold lthreshold:
设置一个服务器的连接下限。当服务器的连接数低于此值的时候服务器才可以重新接收连接。如果此值未设置,则当服务器的连接数连续三次低于uthreshold时服务器才可以接收到新的连接。(PS:笔者以为此设定可能是为了防止服务器在能否接收连接这两个状态上频繁变换)
--mcast-interface interface:
指定使用备服务器时候的广播接口。
--syncid syncid:
指定syncid,同样用于主备服务器的同步。
以下选项用于list命令:
-c, --connection:
列出当前的IPVS连接。
--timeout:
列出超时
--daemon:
--stats:
状态信息
--rate:
传输速率
--thresholds:
列出阈值
--persistent-conn:
坚持连接
--sor:
把列表排序。
--nosort:
不排序
-n, --numeric:
不对ip地址进行dns查询
--exact:
单位
-6:
如果fwmark用的是ipv6地址需要指定此选项。
其他注意事项:
- 如果使用IPv6地址,需要在地址两端加上“[]”。例如:ipvsadm -A -t [2001:db8::80]:80 -s rr
- 可以通过设置以下虚拟文件的值来防御DoS攻击:/proc/sys/net/ipv4/vs/drop_entry /proc/sys/net/ipv4/vs/drop_packet /proc/sys/net/ipv4/vs/secure_tcp
- 对于某一目的地址,对应有一个RS子集。对此地址的请求,为它分配子集中连接数最小的RS;如果子集中所有的服务器均已满负荷,则从集群中选择一个连接数较小的服务器,将它加入到此子集并分配连接;若一定时间内,这个子集未被做任何修改,则将子集中负载最大的节点从子集删除。
7.2、NAT模式测试
1)测试环境:
Director: centos 6.8 VIP:192.168.1.111
DIP:192.168.229.133
RealServer1: centos6.8 RIP:192.168.229.132
RealServer2: centos6.8 RIP:192.168.229.134
2)Director配置
安装ipvsadm:
[root@ShiYanLou LVS]# yum install ipvsadm –y
编辑脚本:/LVS/install.sh
#director设置 nat 防火墙
iptables -t nat -F

#!/bin/bash
VIP=192.168.1.111
DIP=192.168.229.133
RIP1=192.168.229.132
RIP2=192.168.229.134
# director服务器上开启路由转发功能:
echo 1 > /proc/sys/net/ipv4/ip_forward
# 关闭 icmp 的重定向
echo 0 > /proc/sys/net/ipv4/conf/all/send_redirects
echo 0 > /proc/sys/net/ipv4/conf/default/send_redirects
echo 0 > /proc/sys/net/ipv4/conf/eth0/send_redirects
echo 0 > /proc/sys/net/ipv4/conf/eth1/send_redirects
# director设置 ipvsadm
IPVSADM='/sbin/ipvsadm'
$IPVSADM -C
$IPVSADM -A -t $VIP:80 -s rr
$IPVSADM -a -t $VIP:80 -r $RIP1:80 -m
$IPVSADM -a -t $VIP:80 -r $RIP2:80 -m
3)RealServer配置
- 配置RealServer1和RealServer2的网关为DIP。如:
vi /etc/sysconfig/network-scripts/ifcfg-eth0
DEVICE=eth0
HWADDR=00:0C:29:46:3B:8C
TYPE=Ethernet
UUID=e2fa0e51-7240-4ef9-8572-bf82ef8bb6a8
ONBOOT=yes
NM_CONTROLLED=yes
BOOTPROTO=static
IPADDR=192.168.229.132
NETMASK=255.255.255.0
GATEWAY=192.168.229.133                #配置网关为DIP
- 安装httpd
yum –y install httpd
标记网页:
RealServer1:echo ”I am RealServer1 192.168.229.132”>/var/www/html/index.html
RealServer2:echo “I am RealServer2 192.168.229.134”>/var/www/html/index.html
4)验证
会轮询得到“I am RealServer1 192.168.229.132”“I am RealServer2 192.168.229.134”
注意:关闭Director的防火墙iptables,不然访问不成功。
7.3、DR模式测试
1)测试环境
Director: centos 6.8 VIP:eth0:0:192.168.229.111
DIP:eth0:192.168.229.133
RealServer1: centos6.8 RIP:eth0:192.168.229.132
VIP:lo:0:192.168.229.111
RealServer2: centos6.8 RIP:eth0:192.168.229.134
VIP:lo:0:192.168.229.111
2)Director配置
脚本如下:
#! /bin/bash
echo 1 > /proc/sys/net/ipv4/ip_forward
ipv=/sbin/ipvsadm
vip=192.168.229.111
rs1=192.168.229.132
rs2=192.168.229.134
ifconfig eth0:0 down
ifconfig eth0:0 $vip broadcast $vip netmask 255.255.255.0 up
route add -host $vip dev eth0:0
$ipv -C
$ipv -A -t $vip:80 -s rr
$ipv -a -t $vip:80 -r $rs1:80 -g
$ipv -a -t $vip:80 -r $rs2:80 –g
3)RealServer配置
脚本如下:
#!/bin/bash
vip=192.168.229.111
ifconfig lo:0 $vip broadcast $vip netmask 255.255.255.255 up
route add -host $vip lo:0
echo "1" >/proc/sys/net/ipv4/conf/lo/arp_ignore
echo "2" >/proc/sys/net/ipv4/conf/lo/arp_announce
echo "1" >/proc/sys/net/ipv4/conf/all/arp_ignore
echo "2" >/proc/sys/net/ipv4/conf/all/arp_announce
4)验证
会轮询得到“I am RealServer1 192.168.229.132” “I am RealServer2 192.168.229.134”
注意:关闭Director的防火墙iptables,不然访问不成功。
7.4、Tun模式测试
1)测试环境
Director: centos 6.8 VIP:eth0:0:192.168.299.111
DIP:eth0:192.168.229.133
RealServer1: centos6.8 RIP:eth0:192.168.229.132
VIP:tunl0:192.168.229.111
RealServer2: centos6.8 RIP:eth0:192.168.229.134
VIP:tunl0:192.168.229.111
2)Director配置
脚本如下:
#! /bin/bash
echo 1 > /proc/sys/net/ipv4/ip_forward
ipv=/sbin/ipvsadm
vip=192.168.229.111
rs1=192.168.229.132
rs2=192.168.229.134
ifconfig eth0:0 down
ifconfig eth0:0 $vip broadcast $vip netmask 255.255.255.0 up
route add -host $vip dev eth0:0
iptables -t nat -F
setenforce 0
$ipv -C
$ipv -A -t $vip:80 -s rr
$ipv -a -t $vip:80 -r $rs1:80 -i
$ipv -a -t $vip:80 -r $rs2:80 -i
3)RealServer配置
a、加载ipip模块
[root@ulife3test LVS]# modprobe ipip
b、配置VIP:
[root@ulife3test LVS]# cd /etc/sysconfig/network-scripts/
[root@ulife3test network-scripts]# cp ifcfg-lo ifcfg-tunl0
[root@ulife3test network-scripts]# vi ifcfg-tunl0
DEVICE=tunl0
IPADDR=192.168.229.111
NETMASK=255.255.255.0
ONBOOT=yes
NAME=tunl0
[root@ulife3test network-scripts]# service network restart
c、关闭arp转发:
[root@ulife3test network-scripts]# echo '0'>/proc/sys/net/ipv4/ip_forward
[root@ulife3test network-scripts]# vi /etc/sysctl.conf                #加入以下行
net.ipv4.conf.tunl0.arp_ignore = 1
net.ipv4.conf.tunl0.arp_announce = 2
net.ipv4.conf.all.arp_ignore = 1
net.ipv4.conf.all.arp_announce = 2
net.ipv4.conf.tunl0.rp_filter = 0
net.ipv4.conf.all.rp_filter = 0
[root@ulife3test network-scripts]# sysctl -p                           #永久生效
net.ipv4.ip_forward = 0
net.ipv4.conf.default.rp_filter = 1
net.ipv4.conf.default.accept_source_route = 0
kernel.sysrq = 0
kernel.core_uses_pid = 1
net.ipv4.tcp_syncookies = 1
net.ipv4.conf.tunl0.arp_ignore = 1
net.ipv4.conf.tunl0.arp_announce = 2
net.ipv4.conf.all.arp_ignore = 1
net.ipv4.conf.all.arp_announce = 2
net.ipv4.conf.tunl0.rp_filter = 0
net.ipv4.conf.all.rp_filter = 0
d、关闭selinux
setenforce 0或者修改/etc/selinux/config 配置文件中SELINUX=disabled然后重启系统。
4)验证
会轮询得到“I am RealServer1 192.168.229.132”“I am RealServer2 192.168.229.134”
注意:关闭Director的防火墙iptables,不然访问不成功。