Day 19
May 25, 2019.
This is what I learn Java Day 19.
On this day, I learned the following knowledge.
NIO flow
NIO stream, the buffer is oriented, based on the IO channel operation, this library is introduced only in JDK1.4. NIO IO and have the same purpose and effect, but with different implementations, the main use is NIO block, NIO efficiency much higher than the IO
or less, with a class file copy copyFile described NIO stream. copyFile perform three basic operations: create a Buffer, and then reads the data from the source file into the buffer and then written to the destination file buffer.
NIO stream detailed description, reference may be: https://www.cnblogs.com/zailushang1996/p/8916017.html
public static void copyFile(String src,String dst) throws IOException{
        //声明源文件和目标文件
        FileInputStream fi=new FileInputStream(new File(src));
        FileOutputStream fo=new FileOutputStream(new File(dst));
        //获得传输通道channel
        FileChannel inChannel=fi.getChannel();
        FileChannel outChannel=fo.getChannel();
        //获得容器buffer
        ByteBuffer buffer=ByteBuffer.allocate(1024);
        while(true){
        //判断是否读完文件
        int eof =inChannel.read(buffer);
        if(eof==-1){
        break;
        }
        //重设一下buffer的position=0,limit=position
        buffer.flip();
        //开始写
        outChannel.write(buffer);
        //写完要重置buffer,重设position=0,limit=capacity
        buffer.clear();
        }
        inChannel.close();
        outChannel.close();
        fi.close();
        fo.close();
}
GUI programming
The GUI, namely Graphical User Interface (graphical user interface programming), refers to the use of computer operating the user interface displayed graphically.
The Java GUI programming is basically the use of swing and AWT, here introduces AWT:
- AWT (Abstract Window Toolkit) includes a number of classes and interfaces for the Java Application GUI (Graphics User Interface graphical user interface) programming
- Various GUI elements (such as: windows, buttons, text boxes, etc.) implemented by Java classes
- AWT classes involved in the use of generally Java.AWT package and its subpackages
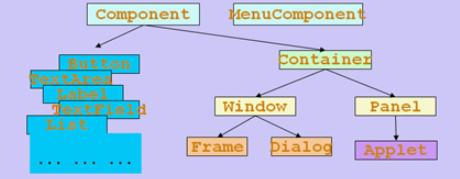
- Container (container) and the Component (component) is AWT two core classes
Component and Container diagrams, as follows:
Next, are introduced and the LayoutManager Container (layout manager) and GUI program will be described Component
-
Container (container)
Container Window and which is divided into Pannel.
Window can be displayed independently, usually we see a window wide variety of applications can be called Window, Window as a separate application window is displayed. Window itself can be divided into Frame and Dialog, Frame is what we usually see a window of the general, and Dialog are those that require the user to perform certain operations (such as clicking on an item in the drop-down menu) only dialog box that appears, this kind of dialog is dialog.
Pannel can also accommodate other graphic elements, but generally can not see Pannel, Pannel can not be displayed as a separate window of the application out, Pannel want to have to come out and show themselves loaded into the Window which can be displayed.- Frame
Frame Windows is a subclass of objects created by Frame or subclass, as a form
constructor:public Frame():We construct a new instance of the initially invisible Frame
public Frame(String title):Frame object to construct a new, initially invisible, with the specified title
Member method
public void setBounds(int x, int y, int width, int height):Set the form and size of the position, x, y coordinates of the upper left corner, width, and height are the width and height
public void setSize(int width, int height):Set the size of the form
public void setLocation(int x, int y):Setting position of the form
public void setBackground(Color c):Set the background color, the object parameters Color
public void setVisible(boolean b):Set the form is visible, the default is not visible
public void setTitle(String title):Set Frame title
public String getTitle():To obtain the title Frame
public void setResizable(boolean resizable):Is set can be resized
Frame code examples:
public class MyTest { public static void main(String[] args) { //这里只是在内存里面创建了一个窗口对象 还不能真正显示出来让我们看到 Frame frame = new Frame("JAVA图形界面窗口"); //设置窗体的背景颜色 frame.setBackground(Color.blue); //设置窗体是否可见 //要想看到在内存里面创建出来的窗口对象 //必须调用setVisble()方法 //并且把参数true传入才能看得见窗体 //如果传入的参数是false //那么窗体也是看不见的 frame.setVisible(true); //设置窗体的初始大小 frame.setSize(500,500); //设置窗体出现时的位置,如果不设置则默认在左上角(0,0)位置显示 frame.setLocation(200,200); // 设置窗体能否被改变大小 // 设置为false后表示不能改变窗体的显示大小 // 这里将窗体显示的大小设置为200X200 // 那么窗体的显示只能是这个大小了,不能再使用鼠标拖大或者缩小 frame.setResizable(false); //设置窗体在点击右上角的“X”按钮时可以退出程序 frame.addWindowListener(new WindowAdapter() { @Override public void windowClosing(WindowEvent e) { System.exit(0); } }); }}- Panel
Panel space for receiving the object can be viewed as a Component, and can have its own layout manager, and the method has inherited from the parent class's
constructor:public Panel():Create a new panel using the default layout manager
public Panel(LayoutManager layout):Frame object to construct a new, initially invisible, with the specified title
Member method
public void setBounds(int x, int y, int width, int height):Setting position and size of the panel, x, y coordinates of the upper left corner, width, and height are the width and height
public void setSize(int width, int height):Set the size of the panel
public void setLocation(int x, int y):Setting position of the panel
public void setBackground(Color c):Set the background color, the object parameters Color
public void setLayout(LayoutManager mgr):Settings panel layout manager
Panel code examples:
- Frame
public class TestPanel {
    public static void main(String[] args) {
        Frame frame = new Frame("JAVA Frame With Panel");
        Panel panel = new Panel(null);
        frame.setLayout(null);

        //这里设置的坐标(300,300)是相对于整个屏幕的
        frame.setBounds(300,300,500,500);

        //设置背景颜色时使用三基色(红,绿,蓝)的比例来调配背景色
        frame.setBackground(new Color(0,0,102));

        //这里设置的坐标(50,50)是相对于Frame窗体的
        panel.setBounds(50,50,400,400);
        panel.setBackground(new Color(204,204,255));

        //把Panel容器装入到Frame容器中,使其能在Frame窗口中显示出来
        frame.add(panel);

        frame.setVisible(true);

        //解决关闭问题
        frame.addWindowListener(new WindowListener() {
            @Override
            public void windowOpened(WindowEvent e) {

            }

            @Override
            public void windowClosing(WindowEvent e) {
                System.exit(0);
            }

            @Override
            public void windowClosed(WindowEvent e) {

            }

            @Override
            public void windowIconified(WindowEvent e) {

            }

            @Override
            public void windowDeiconified(WindowEvent e) {

            }

            @Override
            public void windowActivated(WindowEvent e) {

            }

            @Override
            public void windowDeactivated(WindowEvent e) {

            }
        });
    }
}
-
LayoutManger (layout manager)
in the Java, provides a layout manager object class may, Management Component in Container layout, do not directly Component position and size, and each has a Container layout manager object, when the container when required to locate or determine the size of the size of a component, it will call its corresponding layout manager, calling a method setLayout Container changing its layout manager object.-
The FlowLayout (flow layout)
the FlowLayout is the default layout manager Panel class has the following characteristics:- FlowLayout layout manager component is positioned on the left to right, the filled line wrap within the line.
- Without changing the size of the component, the component according to the original size display component, different components may be provided spacing, line spacing, and alignment.
- The default alignment is centered.
Constructors:
public FlowLayout():Default center alignment, horizontal and vertical spacing to the default value (5)
public FlowLayout(int align):Alignment specified value must be align: FlowLayout.LEFT, FlowLayout.RIGHT, FlowLayout.CENTER, FlowLayout.LEADING or FlowLayout.TRAILING
public FlowLayout(int align, int hgap, int vgap):Specified horizontal and vertical alignment and spacing, the value must be align: FlowLayout.LEFT, FlowLayout.RIGHT, FlowLayout.CENTER, FlowLayout.LEADING or FlowLayout.TRAILING
FlowLayout code examples:
public class TestFlowLayout { public static void main(String[] args) { Frame frame = new Frame("FlowLayout"); //使用Button类创建按钮 // 按钮类的其中一个构造方法:Button(String label) label为按钮显示的文本 Button button1 = new Button("button1"); Button button2 = new Button("button2"); Button button3 = new Button("button3"); // setLayout方法的定义:public void setLayout(LayoutManager mgr) // 使用流水(Flow)线般的布局 frame.setLayout(new FlowLayout()); // 使用了布局管理器FlowLayout,这里的布局采用默认的水平居中模式 // frame.setLayout(new FlowLayout(FlowLayout.LEFT)); // 这里在布局的时候使用了FlowLayout.LEFT常量,这样就将按钮设置为左对齐 // frame.setLayout(new FlowLayout(FlowLayout.RIGHT)); //这里在布局的时候使用了FlowLayout.RIGHT常量,这样就将按钮设置为右对齐 frame.setSize(200,200); frame.add(button1); // 把创建出来的按钮放置到Frame窗体中 frame.add(button2); // 这里并没有设置按钮的大小与位置 frame.add(button3); // 设置按钮的大小与位置都是由布局管理器来做的 frame.setVisible(true); } }-
The BorderLayout (border layout)
the BorderLayout is the default layout manager Frame class, has the following characteristics:- BorderLayout layout manager entire container is divided into: East (EAST), West (WEST), South (SOUTH), North (NORTH), middle (CENTER) five regions, the component can only be added to the designated area.
- If you do not specify the location of the addition component, the default added to the CENTER area.
- Each region to only one component, when added to a plurality, of the previously added is overwritten.
Constructors:
public BorderLayout():The new border layout with no gaps between a structure assembly
public BorderLayout(int hgap, int vgap):Having a frame structure specified component layout pitch
BorderLayout code examples:
public class TestBorderLayout { public static void main(String[] args) { Frame frame = new Frame("TestBorderLayout"); Button buttonEast = new Button("East"); Button buttonWest = new Button("West"); Button buttonSouth = new Button("South"); Button buttonNorth = new Button("North"); Button buttonCenter = new Button("Center"); //把按钮放置到Frame窗体时按照东西南北中五个方向排列好,推荐使用这种方式去排列窗体元素 //这样容易检查出错误 因为这样写如果写错了编译器会提示出错 frame.add(buttonEast,BorderLayout.EAST); frame.add(buttonWest,BorderLayout.WEST); frame.add(buttonSouth,BorderLayout.SOUTH); frame.add(buttonNorth,BorderLayout.NORTH); frame.add(buttonCenter,BorderLayout.CENTER); //也可以使用这样的方式排列按钮 在把按钮放置到Frame窗体时使用方向定位的字符串指定按钮的放置位置 //这种使用方向定位的字符串指定按钮的放置方式不推荐使用 一旦写错了方向字符串就不好检查出来 //因为即使是写错了仍然可以编译通过 /* frame.add(buttonEast,"EAST"); frame.add(buttonWest,"West"); frame.add(buttonSouth,"South"); frame.add(buttonNorth,"North"); frame.add(buttonCenter,"Center"); */ frame.setSize(200,200); frame.setVisible(true); } }- GridLayout (table layout)
GridLayout layout manager type space into regular rectangular network, each cell range equal size. Component is added to each cell in the first row from left to right fill wrap, then top to bottom.
Constructors:public GridLayout():Create a table layout with default values that each component occupies a row
public GridLayout(int rows, int cols):Create a form to specify the number of rows and columns layout
GridLayout code examples:
public class TestGridLayout { public static void main(String[] args) { Frame frame = new Frame("TestGridLayout"); Button btn1 = new Button("btn1"); Button btn2 = new Button("btn2"); Button btn3 = new Button("btn3"); Button btn4 = new Button("btn4"); Button btn5 = new Button("btn5"); Button btn6 = new Button("bnt6"); // 把布局划分成3行2列的表格布局形式 frame.setLayout(new GridLayout(3,2)); frame.add(btn1); frame.add(btn2); frame.add(btn3); frame.add(btn4); frame.add(btn5); frame.add(btn6); // Frame.pack()是JAVA语言的一个函数 // 这个函数的作用就是根据窗口里面的布局及组件的preferredSize来确定frame的最佳大小。 frame.pack(); frame.setVisible(true); } }- Layout nesting
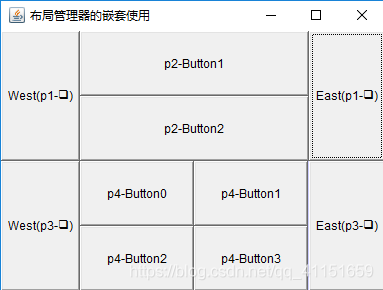
these types of layout manager may be provided inside the Frame, which may be provided in the Panel, the Panel itself may also be added to the Frame inside, and therefore more complex layouts can be achieved by nesting with the Panel Frame.
code show as below:
public class TestTenButtons {
public static void main(String[] args) {
    //这里主要是对显示窗体进行设置
    Frame frame = new Frame("布局管理器的嵌套使用");

    //把整个窗体分成2行1列的表格布局
    frame.setLayout(new GridLayout(2,1));

    frame.setLocation(300,400);
    frame.setSize(400,300);
    frame.setVisible(true);
    frame.setBackground(new Color(204,204,255));

    //这里主要是对Panel进行布局的设置
    Panel p1 = new Panel(new BorderLayout());
    //p2使用2行1列的表格布局
    Panel p2 = new Panel(new GridLayout(2,1));
    Panel p3 = new Panel(new BorderLayout());
    //p4使用2行2列的表格布局
    Panel p4 = new Panel(new GridLayout(2,2));

    //这里主要是把按钮元素加入到Panel里面
    p1.add(new Button("East(p1-东)"),BorderLayout.EAST);
    p1.add(new Button("West(p1-西)"),BorderLayout.WEST);

    p2.add(new Button("p2-Button1"));
    p2.add(new Button("p2-Button2"));

    //p1里面嵌套p2,把p2里面的按钮作为p的中间部分装入到p1里面
    //把p2作为元素加入到p1里面
    p1.add(p2,BorderLayout.CENTER);

    p3.add(new Button("East(p3-东)"),BorderLayout.EAST);
    p3.add(new Button("West(p3-西)"),BorderLayout.WEST);

    for(int i=0;i<4;i++){
        p4.add(new Button("p4-Button"+i));
    }

    //p3里面嵌套p4,把p4里面的按钮作为p的中间部分装入到p3里面
    p3.add(p4,BorderLayout.CENTER);

    //把Panel装入Frame里面,以便于在Frame窗体中显示出来
    frame.add(p1);
    frame.add(p3);
	}
}
Results are as follows:
-
-
The Component (component)
the Component, i.e., the components may be implemented various special functions.- The Button (Button)
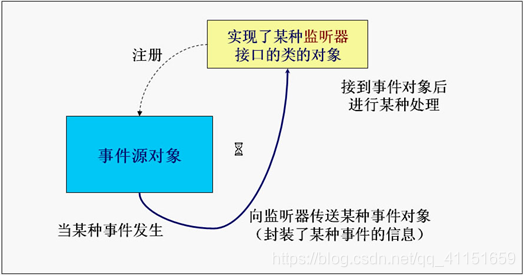
herein describe how to use buttons listener
diagram is as follows:
Code examples are as follows:
public class TestActionEvent { public static void main(String[] args) { Frame frame = new Frame("TestActionEvent"); Button button = new Button("Press Me"); // 创建一个监听对象 MyActionListener listener = new MyActionListener(); // 把监听加入到按钮里面,监听按钮的动作, // 当按钮触发打击事件时,就会返回一个监听对象e // 然后就会自动执行actionPerformed方法 button.addActionListener(listener); frame.add(button, BorderLayout.CENTER); frame.pack(); addWindowClosingEvent(frame); frame.setVisible(true); } //点击窗体上的关闭按钮关闭窗体 private static void addWindowClosingEvent(Frame frame){ frame.addWindowListener(new WindowAdapter() { @Override public void windowClosing(WindowEvent e) { System.exit(0); } }); } } // 自定义Monitor(监听)类实现事件监听接口ActionListener // 一个类要想成为监听类,那么必须实现ActionListener接口 class MyActionListener implements ActionListener{ //重写ActionListener接口里面的actionPerformed(ActionEvent e)方法 @Override public void actionPerformed(ActionEvent e) { System.out.println("A Button has been Pressed"); } }- TextField (text edit box)
where the main text describes use listener
diagram is as follows:
Code examples are as follows:
public class TestTextField { public static void main(String[] args) { new MyFrameTextField(); } } class MyFrameTextField extends Frame{ MyFrameTextField(){ TextField textField = new TextField(); add(textField); textField.addActionListener(new MyMonitor2()); //这个setEchoChar()方法是设置文本框输入时显示的字符,这里设置为*, //这样输入任何内容就都以*显示出来,不过打印出来时依然可以看到输入的内容 textField.setEchoChar('*'); setVisible(true); pack(); } } class MyMonitor2 implements ActionListener{ //接口里面的所有方法都是public(公共的) //所以从API文档复制void actionPerformed(ActionEvent e)时 要在void前面加上public @Override public void actionPerformed(ActionEvent e) { //事件的相关信息都封装在了对象e里面,通过对象e的相关方法就可以获取事件的相关信息 //getSource()方法是拿到事件源,注意:拿到这个事件源的时候 //是把它当作TextField的父类来对待 //getSource()方法的定义是:“public Object getSource()”返回值是一个Object对象 //所以要强制转换成TextField类型的对象 //在一个类里面想访问另外一个类的事件源对象可以通过getSource()方法 TextField textField = (TextField) e.getSource(); // textField.getText()是取得文本框里面的内容 System.out.println(textField.getText()); // 把文本框里面的内容清空 textField.setText(""); } }- paint (drawing method)
Each Component has a paint (Graphics g) for achieving the purpose of the drawing, each paint method automatically calls for redrawing the Component
Code examples are as follows:
- The Button (Button)
public class TestPaint {
    public static void main(String[] args) {
        new MyPaint().launchFrame();
        //在main()方法里面并没有显示调用paint(Graphics g)方法
        //可是当创建出Frame窗体后却可以看到Frame窗体上画出了圆和矩形
        //这是因为paint()方法是一个比较特殊的方法
        //在创建Frame窗体时会自动隐式调用
        //当我们把Frame窗体最小化又再次打开时
        //又会再次调用paint()方法重新把圆和矩形在Frame窗体上画出来
        //即每次需要重画Frame窗体的时候就会自动调用paint()方法
    }
}

class MyPaint extends Frame{
    public void launchFrame(){
        setBounds(200,200,640,480);
        setVisible(true);
    }

    public void paint(Graphics g){
        //paint(Graphics g)方法有一个Graphics类型的参数g
        //我们可以把这个g当作是一个画家,这个画家手里拿着一只画笔
        //我们通过设置画笔的颜色与形状来画出我们想要的各种各样的图像

        /*设置画笔的颜色*/
        g.setColor(Color.red);
        g.fillOval(100,100,100,100);/*画一个实心椭圆*/
        g.setColor(Color.green);
        g.fillRect(150,200,200,200);/*画一个实心矩形*/

        //这下面的两行代码是为了写程序的良好编程习惯而写的
        //前面设置了画笔的颜色,现在就应该把画笔的初始颜色恢复过来
        //就相当于是画家用完画笔之后把画笔上的颜色清理掉一样
        Color c = g.getColor();
        g.setColor(c);

        System.out.println("gogoogo");

    }

}