graylog official website address: www.graylog.org
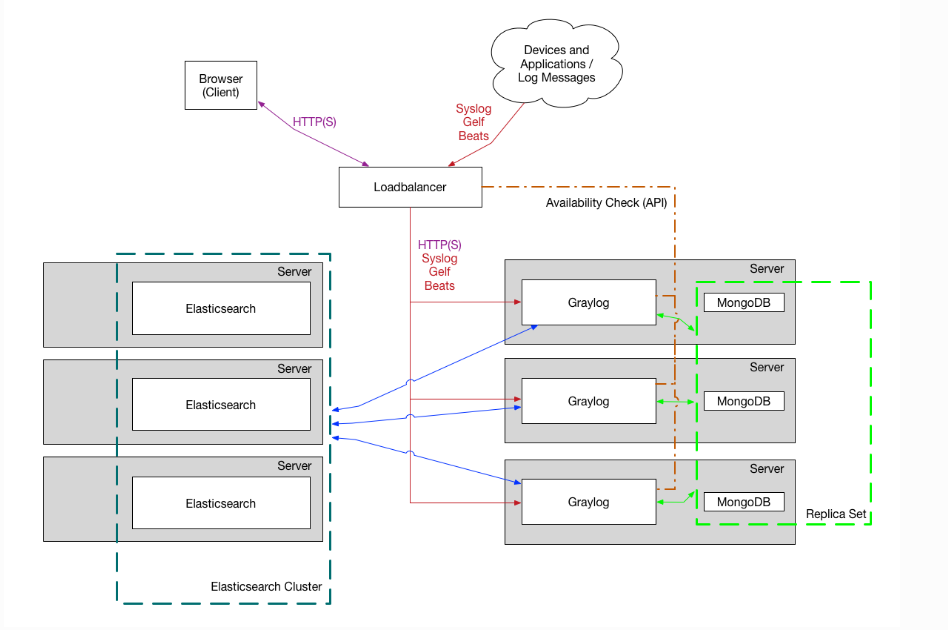
graylog simple architecture diagram:

graylog production Chart:
graylog There are two versions, 1, Enterprise Edition; 2, Open Source Edition
The following built using the open source version of the journal center, graylog There are many ways to install, develop, test environment can be installed using a docker, fast and convenient.
Before installing graylog, you need to first configure it docker environment.
1, the installation docker
docker install docker
2, the mirror configuration docker acceleration, the acceleration of the mirror. After using the image library of our domestic image download speeds will increase a lot.
If Ali cloud, 163, and so the image library
we /etc/docker/daemon.json
Joined:
{
"registry-mirrors": ["http://hub-mirror.c.163.com"]
}
3, docker configuration changes, re-do the next load and restart
systemctl daemon-reload
systemctl restart docker
4, in order to mount graylog convenient, direct use of docker-compose a manner as to install,
docker-compose the official way docker provides a simple way of choreography.
Then you need to have a docker-compose the operating environment, docker-compose is a software, you need to install.
Compose installation Docker:
4.1, using a detector is installed package python-pip
pip -V
4.2 If you do not need to execute the command
yum -y install epel-release
4.3, after performing a successful installation PIP
yum -y install Python-PIP
4.4、对安装好的pip进行升级,执行命令
pip install --upgrade pip
4.5、开始安装docker compose
pip install docker-compose --ignore-installed requests
4.6、安装完成,使用命令检测是否安装成功
docker-compose -version
安装成功后会有版本信息,如 docker-compose version 1.24.0, build 0aa5906
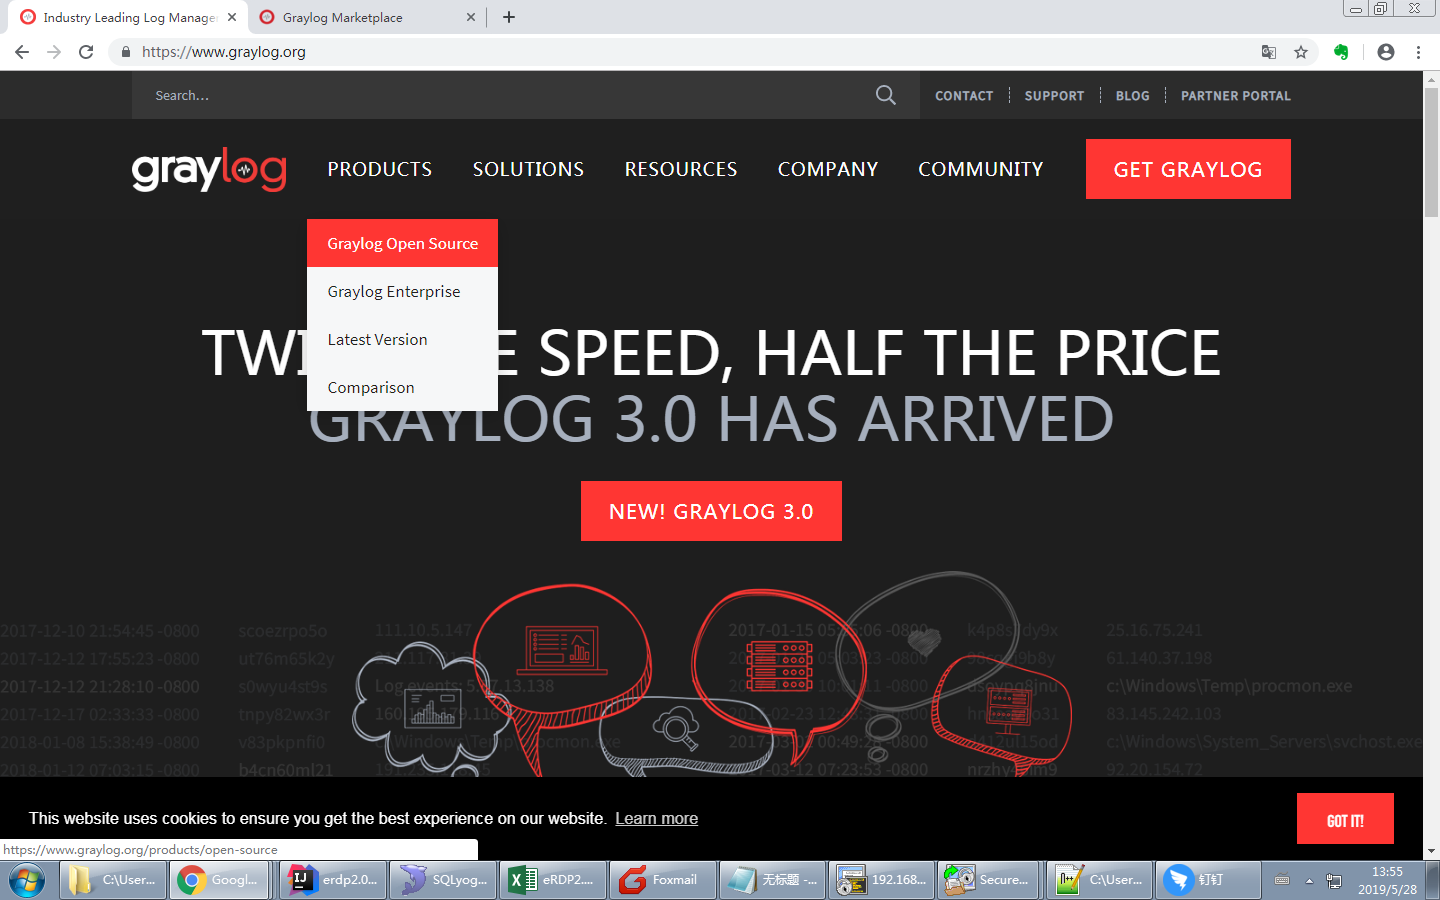
5、登录官网www.graylog.org,主菜单上选择 products,选择 graylog open source
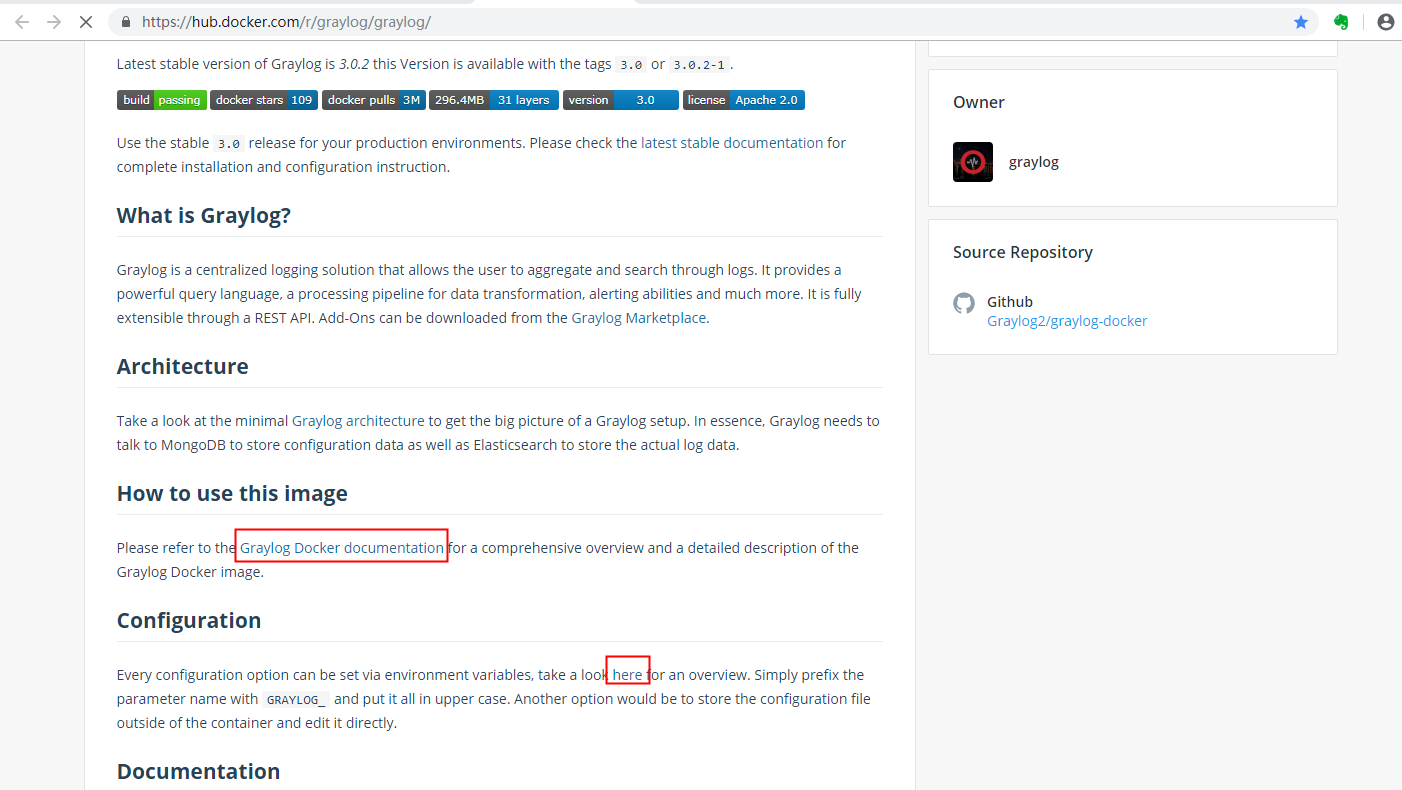
6、选择 docker 方式安装

7、参考 image 使用文档,已经如何配置
8、找到 docker-compose.yml 文件的配置
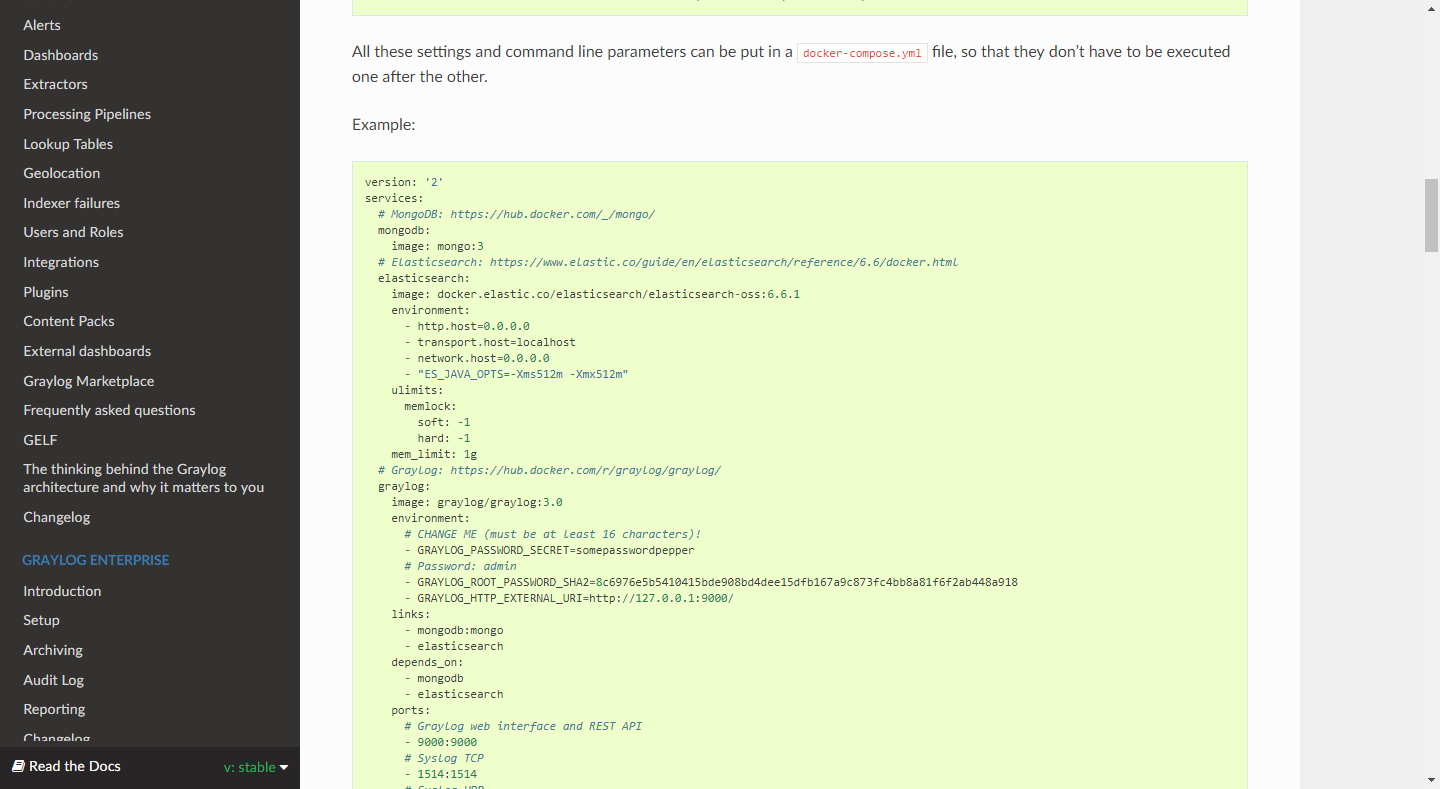
9、在linux服务器上指定目录上创建一个 docker-compose.yml 文件
(如 /opt 目录下创建一个 docker-compose.yml 文件,注意文件名必须是 docker-compose.yml),并将内容copy 到文件中:
version: '2'
services:
  # MongoDB: https://hub.docker.com/_/mongo/ mongodb: image: mongo:3 # Elasticsearch: https://www.elastic.co/guide/en/elasticsearch/reference/6.6/docker.html elasticsearch: image: docker.elastic.co/elasticsearch/elasticsearch-oss:6.6.1 environment: - http.host=0.0.0.0 - transport.host=localhost - network.host=0.0.0.0 - "ES_JAVA_OPTS=-Xms512m -Xmx512m" ulimits: memlock: soft: -1 hard: -1 mem_limit: 1g # Graylog: https://hub.docker.com/r/graylog/graylog/ graylog: image: graylog/graylog:3.0 environment: # CHANGE ME (must be at least 16 characters)! - GRAYLOG_PASSWORD_SECRET=somepasswordpepper # Password: admin - GRAYLOG_ROOT_PASSWORD_SHA2=8c6976e5b5410415bde908bd4dee15dfb167a9c873fc4bb8a81f6f2ab448a918 - GRAYLOG_HTTP_EXTERNAL_URI=http://127.0.0.1:9000/ links: - mongodb:mongo - elasticsearch depends_on: - mongodb - elasticsearch ports: # Graylog web interface and REST API - 9000:9000 # Syslog TCP - 1514:1514 # Syslog UDP - 1514:1514/udp # GELF TCP - 12201:12201 # GELF UDP - 12201:12201/udp
以上配置内容中需要注意两个地方:
- GRAYLOG_HTTP_EXTERNAL_URI=http://127.0.0.1:9000/ #注意此IP地址必须是外网能访问的IP地址,如 192.168.11.127
- GRAYLOG_ROOT_TIMEZONE=Asia/Shanghai #注意加入时区,否则会导致显示的日期差8个小时
10、配置完成后,进入opt 目录,启动 graylog 服务
cd /opt
docker-compose up #启动 graylog 服务
docker-compose down #停止服务并删除容器
graylog 启动后,可以通过ip端口访问 ,如:http://192.168.11.127:9000
至此 graylog 环境以及搭建完毕!!
11、应用及设备,如何将日志信息发送到 graylog?使用网络的方式基于 tcp或udp 方式将日志信息发送到 graylog 服务中。
springboot 微服务使用的日志组件是logback ,将 logback 日志信息发送到 graylog,就需要加入依赖包 logback-gelf
11.1 pom.xml 文件中需要加入组件依赖
<dependency>
    <groupId>de.siegmar</groupId>
    <artifactId>logback-gelf</artifactId>
    <version>2.0.1</version> </dependency>
11.2 logback-spring.xml 文件加入gelf udp 配置,如下
<appender name="GELF" class="de.siegmar.logbackgelf.GelfUdpAppender">
 <graylogHost>192.168.11.127</graylogHost> <!-- graylog 日志服务地址 -->
 <graylogPort>12201</graylogPort> <!-- graylog 日志接收端口 -->
 <maxChunkSize>508</maxChunkSize>
 <useCompression>true</useCompression>
 <encoder class="de.siegmar.logbackgelf.GelfEncoder">
 <includeRawMessage>false</includeRawMessage>
 <includeMarker>true</includeMarker>
 <includeMdcData>true</includeMdcData>
 <includeCallerData>false</includeCallerData>
 <includeRootCauseData>false</includeRootCauseData>
 <includeLevelName>true</includeLevelName>
 <shortPatternLayout class="ch.qos.logback.classic.PatternLayout">
 <pattern>%m%nopex</pattern>
 </shortPatternLayout>
 <fullPatternLayout class="ch.qos.logback.classic.PatternLayout">
 <pattern>%m%n</pattern>
 </fullPatternLayout>
 <staticField>app_name:${spring.application.name}</staticField>
 <staticField>os_arch:${os.arch}</staticField>
 <staticField>os_name:${os.name}</staticField>
 <staticField>os_version:${os.version}</staticField>
 </encoder>
</appender>
<springProfile name="local">
 <logger name="com.elead.ppm" level="DEBUG"/>
 <root level="INFO">
 <appender-ref ref="CONSOLE"/>
 <appender-ref ref="GELF" />
 </root>
</springProfile>
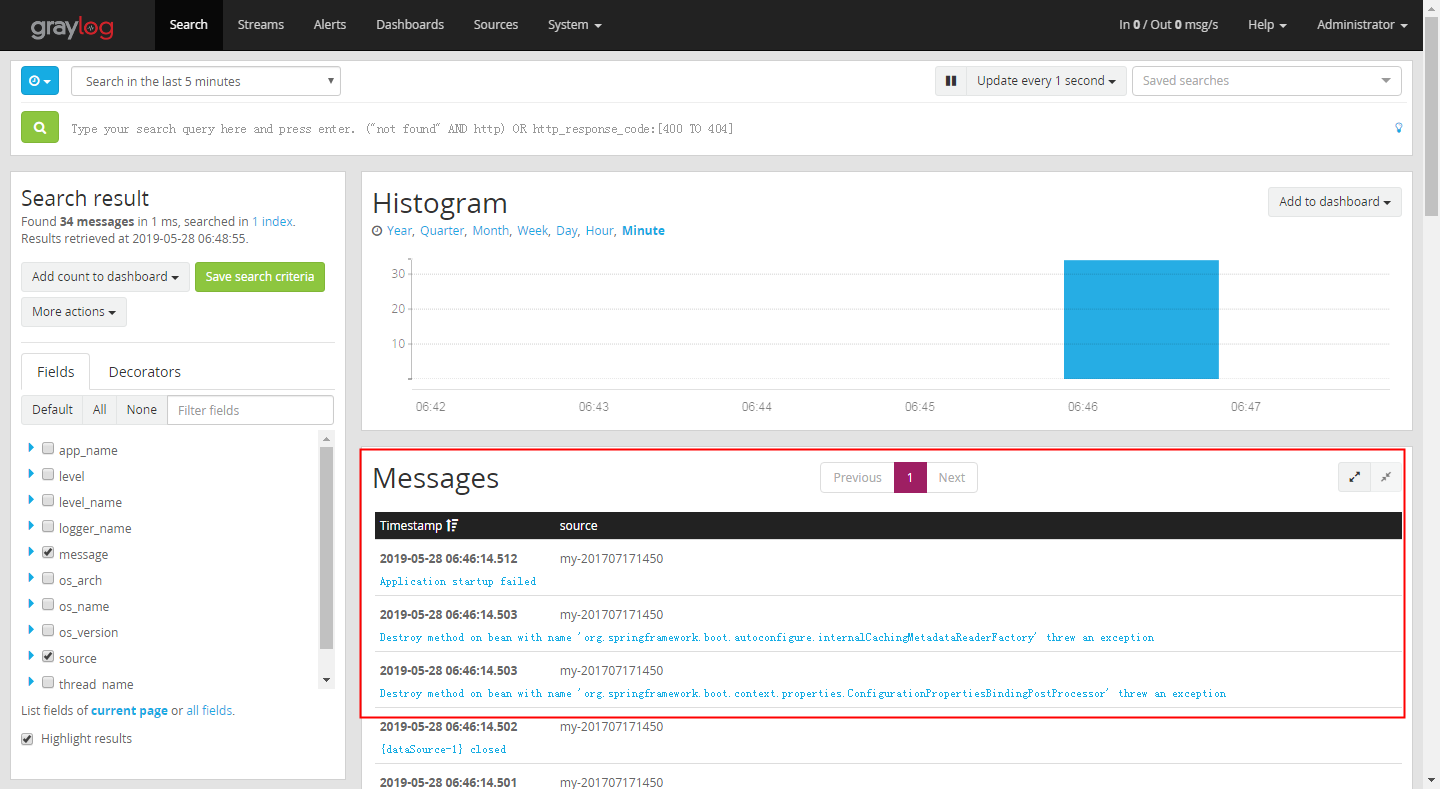
12、启动微服务,进入 graylog 日志中心