1 Introduction
Separate read and write have to do is to choose which one SQL database to perform, as to who will do select the database this child, no more than two or middleware help us to do, or do their own procedures. Thus, in general, there are two separate read and write implementations. The first is to rely on middleware (such as: MyCat), an application that is connected to intermediate SQL help us to do the separation; the second is to do their own separate application. Here we choose to do their own program, mainly using Spring provides the routing data source, and AOP.
However, the application level, do read and write separation greatest weakness (deficiency) that can not be dynamically increased database nodes, because the data source configuration are written in the configuration, add a new database means that new data source, inevitable change configuration and restart the application. Of course, the advantage is relatively simple.

2. AbstractRoutingDataSource
To a specific data source to find specific key-based routing. It maintains a set of target internal data sources, and did a mapping between the data source and the target routing key, a method based on key lookup data source.

3. Practice
About configuration please refer to:
https://www.cnblogs.com/cjsblog/p/9706370.html
3.1. Maven dependent
<?xml version="1.0" encoding="UTF-8"?>
<project xmlns="http://maven.apache.org/POM/4.0.0" xmlns:xsi="http://www.w3.org/2001/XMLSchema-instance"
    xsi:schemaLocation="http://maven.apache.org/POM/4.0.0 http://maven.apache.org/xsd/maven-4.0.0.xsd">
    <modelVersion>4.0.0</modelVersion>

    <groupId>com.cjs.example</groupId>
    <artifactId>cjs-datasource-demo</artifactId>
    <version>0.0.1-SNAPSHOT</version>
    <packaging>jar</packaging>

    <name>cjs-datasource-demo</name>
    <description></description>

    <parent>
        <groupId>org.springframework.boot</groupId>
        <artifactId>spring-boot-starter-parent</artifactId>
        <version>2.0.5.RELEASE</version>
        <relativePath/> <!-- lookup parent from repository -->
    </parent>

    <properties>
        <project.build.sourceEncoding>UTF-8</project.build.sourceEncoding>
        <project.reporting.outputEncoding>UTF-8</project.reporting.outputEncoding>
        <java.version>1.8</java.version>
    </properties>

    <dependencies>
        <dependency>
            <groupId>org.springframework.boot</groupId>
            <artifactId>spring-boot-starter-aop</artifactId>
        </dependency>
        <dependency>
            <groupId>org.springframework.boot</groupId>
            <artifactId>spring-boot-starter-jdbc</artifactId>
        </dependency>
        <dependency>
            <groupId>org.springframework.boot</groupId>
            <artifactId>spring-boot-starter-web</artifactId>
        </dependency>
        <dependency>
            <groupId>org.mybatis.spring.boot</groupId>
            <artifactId>mybatis-spring-boot-starter</artifactId>
            <version>1.3.2</version>
        </dependency>
        <dependency>
            <groupId>org.apache.commons</groupId>
            <artifactId>commons-lang3</artifactId>
            <version>3.8</version>
        </dependency>

        <dependency>
            <groupId>mysql</groupId>
            <artifactId>mysql-connector-java</artifactId>
            <scope>runtime</scope>
        </dependency>
        <dependency>
            <groupId>org.springframework.boot</groupId>
            <artifactId>spring-boot-starter-test</artifactId>
            <scope>test</scope>
        </dependency>
    </dependencies>

    <build>
        <plugins>
            <plugin>
                <groupId>org.springframework.boot</groupId>
                <artifactId>spring-boot-maven-plugin</artifactId>
            </plugin>


            <!--<plugin>
                <groupId>org.mybatis.generator</groupId>
                <artifactId>mybatis-generator-maven-plugin</artifactId>
                <version>1.3.5</version>
                <dependencies>
                    <dependency>
                        <groupId>mysql</groupId>
                        <artifactId>mysql-connector-java</artifactId>
                        <version>5.1.46</version>
                    </dependency>
                </dependencies>
                <configuration>
                    <configurationFile>${basedir}/src/main/resources/myBatisGeneratorConfig.xml</configurationFile>
                    <overwrite>true</overwrite>
                </configuration>
                <executions>
                    <execution>
                        <id>Generate MyBatis Artifacts</id>
                        <goals>
                            <goal>generate</goal>
                        </goals>
                    </execution>
                </executions>
            </plugin>-->

        </plugins>
    </build>
</project>
3.2. 数据源配置
application.yml
spring:
  datasource:
    master:
      jdbc-url: jdbc:mysql://192.168.102.31:3306/test
      username: root
      password: 123456
      driver-class-name: com.mysql.jdbc.Driver
    slave1:
      jdbc-url: jdbc:mysql://192.168.102.56:3306/test
      username: pig   # 只读账户
      password: 123456
      driver-class-name: com.mysql.jdbc.Driver
    slave2:
      jdbc-url: jdbc:mysql://192.168.102.36:3306/test
      username: pig   # 只读账户
      password: 123456
      driver-class-name: com.mysql.jdbc.Driver
多数据源配置
package com.cjs.example.config;

import com.cjs.example.bean.MyRoutingDataSource;
import com.cjs.example.enums.DBTypeEnum;
import org.springframework.beans.factory.annotation.Qualifier;
import org.springframework.boot.context.properties.ConfigurationProperties;
import org.springframework.boot.jdbc.DataSourceBuilder;
import org.springframework.context.annotation.Bean;
import org.springframework.context.annotation.Configuration;

import javax.sql.DataSource;
import java.util.HashMap;
import java.util.Map;

/**
 * 关于数据源配置,参考SpringBoot官方文档第79章《Data Access》
 * 79. Data Access
 * 79.1 Configure a Custom DataSource
 * 79.2 Configure Two DataSources
 */

@Configuration
public class DataSourceConfig {

    @Bean
    @ConfigurationProperties("spring.datasource.master")
    public DataSource masterDataSource() {
        return DataSourceBuilder.create().build();
    }

    @Bean
    @ConfigurationProperties("spring.datasource.slave1")
    public DataSource slave1DataSource() {
        return DataSourceBuilder.create().build();
    }

    @Bean
    @ConfigurationProperties("spring.datasource.slave2")
    public DataSource slave2DataSource() {
        return DataSourceBuilder.create().build();
    }

    @Bean
    public DataSource myRoutingDataSource(@Qualifier("masterDataSource") DataSource masterDataSource,
                                          @Qualifier("slave1DataSource") DataSource slave1DataSource,
                                          @Qualifier("slave2DataSource") DataSource slave2DataSource) {
        Map<Object, Object> targetDataSources = new HashMap<>();
        targetDataSources.put(DBTypeEnum.MASTER, masterDataSource);
        targetDataSources.put(DBTypeEnum.SLAVE1, slave1DataSource);
        targetDataSources.put(DBTypeEnum.SLAVE2, slave2DataSource);
        MyRoutingDataSource myRoutingDataSource = new MyRoutingDataSource();
        myRoutingDataSource.setDefaultTargetDataSource(masterDataSource);
        myRoutingDataSource.setTargetDataSources(targetDataSources);
        return myRoutingDataSource;
    }

}
这里,我们配置了4个数据源,1个master,2两个slave,1个路由数据源。前3个数据源都是为了生成第4个数据源,而且后续我们只用这最后一个路由数据源。
MyBatis配置
package com.cjs.example.config;

import org.apache.ibatis.session.SqlSessionFactory;
import org.mybatis.spring.SqlSessionFactoryBean;
import org.springframework.context.annotation.Bean;
import org.springframework.context.annotation.Configuration;
import org.springframework.core.io.support.PathMatchingResourcePatternResolver;
import org.springframework.jdbc.datasource.DataSourceTransactionManager;
import org.springframework.transaction.PlatformTransactionManager;
import org.springframework.transaction.annotation.EnableTransactionManagement;

import javax.annotation.Resource;
import javax.sql.DataSource;

@EnableTransactionManagement
@Configuration
public class MyBatisConfig {

    @Resource(name = "myRoutingDataSource")
    private DataSource myRoutingDataSource;

    @Bean
    public SqlSessionFactory sqlSessionFactory() throws Exception {
        SqlSessionFactoryBean sqlSessionFactoryBean = new SqlSessionFactoryBean();
        sqlSessionFactoryBean.setDataSource(myRoutingDataSource);
        sqlSessionFactoryBean.setMapperLocations(new PathMatchingResourcePatternResolver().getResources("classpath:mapper/*.xml"));
        return sqlSessionFactoryBean.getObject();
    }

    @Bean
    public PlatformTransactionManager platformTransactionManager() {
        return new DataSourceTransactionManager(myRoutingDataSource);
    }
}
由于Spring容器中现在有4个数据源,所以我们需要为事务管理器和MyBatis手动指定一个明确的数据源。
3.3. 设置路由key / 查找数据源
目标数据源就是那前3个这个我们是知道的,但是使用的时候是如果查找数据源的呢?
首先,我们定义一个枚举来代表这三个数据源
package com.cjs.example.enums;

public enum DBTypeEnum {

    MASTER, SLAVE1, SLAVE2;

}
接下来,通过ThreadLocal将数据源设置到每个线程上下文中
package com.cjs.example.bean;

import com.cjs.example.enums.DBTypeEnum;

import java.util.concurrent.atomic.AtomicInteger;

public class DBContextHolder {

    private static final ThreadLocal<DBTypeEnum> contextHolder = new ThreadLocal<>();

    private static final AtomicInteger counter = new AtomicInteger(-1);

    public static void set(DBTypeEnum dbType) {
        contextHolder.set(dbType);
    }

    public static DBTypeEnum get() {
        return contextHolder.get();
    }

    public static void master() {
        set(DBTypeEnum.MASTER);
        System.out.println("切换到master");
    }

    public static void slave() {
        //  轮询
        int index = counter.getAndIncrement() % 2;
        if (counter.get() > 9999) {
            counter.set(-1);
        }
        if (index == 0) {
            set(DBTypeEnum.SLAVE1);
            System.out.println("切换到slave1");
        }else {
            set(DBTypeEnum.SLAVE2);
            System.out.println("切换到slave2");
        }
    }

}
获取路由key
package com.cjs.example.bean;

import org.springframework.jdbc.datasource.lookup.AbstractRoutingDataSource;
import org.springframework.lang.Nullable;

public class MyRoutingDataSource extends AbstractRoutingDataSource {
    @Nullable
    @Override
    protected Object determineCurrentLookupKey() {
        return DBContextHolder.get();
    }

}
设置路由key
默认情况下,所有的查询都走从库,插入/修改/删除走主库。我们通过方法名来区分操作类型(CRUD)
package com.cjs.example.aop;

import com.cjs.example.bean.DBContextHolder;
import org.apache.commons.lang3.StringUtils;
import org.aspectj.lang.JoinPoint;
import org.aspectj.lang.annotation.Aspect;
import org.aspectj.lang.annotation.Before;
import org.aspectj.lang.annotation.Pointcut;
import org.springframework.stereotype.Component;

@Aspect
@Component
public class DataSourceAop {

    @Pointcut("!@annotation(com.cjs.example.annotation.Master) " +
            "&& (execution(* com.cjs.example.service..*.select*(..)) " +
            "|| execution(* com.cjs.example.service..*.get*(..)))")
    public void readPointcut() {

    }

    @Pointcut("@annotation(com.cjs.example.annotation.Master) " +
            "|| execution(* com.cjs.example.service..*.insert*(..)) " +
            "|| execution(* com.cjs.example.service..*.add*(..)) " +
            "|| execution(* com.cjs.example.service..*.update*(..)) " +
            "|| execution(* com.cjs.example.service..*.edit*(..)) " +
            "|| execution(* com.cjs.example.service..*.delete*(..)) " +
            "|| execution(* com.cjs.example.service..*.remove*(..))")
    public void writePointcut() {

    }

    @Before("readPointcut()")
    public void read() {
        DBContextHolder.slave();
    }

    @Before("writePointcut()")
    public void write() {
        DBContextHolder.master();
    }


    /**
     * 另一种写法:if...else...  判断哪些需要读从数据库,其余的走主数据库
     */
//    @Before("execution(* com.cjs.example.service.impl.*.*(..))")
//    public void before(JoinPoint jp) {
//        String methodName = jp.getSignature().getName();
//
//        if (StringUtils.startsWithAny(methodName, "get", "select", "find")) {
//            DBContextHolder.slave();
//        }else {
//            DBContextHolder.master();
//        }
//    }
}
有一般情况就有特殊情况,特殊情况是某些情况下我们需要强制读主库,针对这种情况,我们定义一个主键,用该注解标注的就读主库
package com.cjs.example.annotation;

public @interface Master {
}
例如,假设我们有一张表member
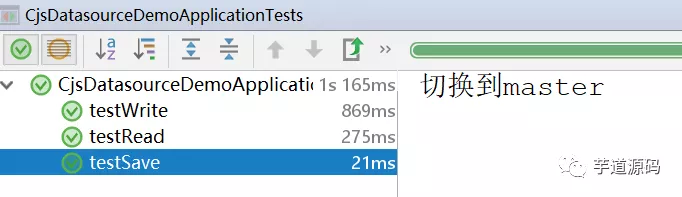
package com.cjs.example.service.impl;

import com.cjs.example.annotation.Master;
import com.cjs.example.entity.Member;
import com.cjs.example.entity.MemberExample;
import com.cjs.example.mapper.MemberMapper;
import com.cjs.example.service.MemberService;
import org.springframework.beans.factory.annotation.Autowired;
import org.springframework.stereotype.Service;
import org.springframework.transaction.annotation.Transactional;

import java.util.List;

@Service
public class MemberServiceImpl implements MemberService {

    @Autowired
    private MemberMapper memberMapper;

    @Transactional
    @Override
    public int insert(Member member) {
        return memberMapper.insert(member);
    }

    @Master
    @Override
    public int save(Member member) {
        return memberMapper.insert(member);
    }

    @Override
    public List<Member> selectAll() {
        return memberMapper.selectByExample(new MemberExample());
    }

    @Master
    @Override
    public String getToken(String appId) {
        //  有些读操作必须读主数据库
        //  比如,获取微信access_token,因为高峰时期主从同步可能延迟
        //  这种情况下就必须强制从主数据读
        return null;
    }
}
4. 测试
package com.cjs.example;

import com.cjs.example.entity.Member;
import com.cjs.example.service.MemberService;
import org.junit.Test;
import org.junit.runner.RunWith;
import org.springframework.beans.factory.annotation.Autowired;
import org.springframework.boot.test.context.SpringBootTest;
import org.springframework.test.context.junit4.SpringRunner;

@RunWith(SpringRunner.class)
@SpringBootTest
public class CjsDatasourceDemoApplicationTests {

    @Autowired
    private MemberService memberService;

    @Test
    public void testWrite() {
        Member member = new Member();
        member.setName("zhangsan");
        memberService.insert(member);
    }

    @Test
    public void testRead() {
        for (int i = 0; i < 4; i++) {
            memberService.selectAll();
        }
    }

    @Test
    public void testSave() {
        Member member = new Member();
        member.setName("wangwu");
        memberService.save(member);
    }

    @Test
    public void testReadFromMaster() {
        memberService.getToken("1234");
    }

}