前言:Hello everyone, my name is Dream. Today, let’s learn how to use OpenCV to control gestures and instantly improve the operating experience! Crossing the boundaries, OpenCV gesture control drag function appears.
1. Introduction to the main steps and library functions
1. Main steps
To implement this experiment, the main steps are as follows:
- Import the OpenCV library.
- Read the camera's video stream through OpenCV.
- Use skin color detection algorithms such as color space conversion and threshold segmentation to identify hand regions.
- Contour detection is performed on the hand area to find the outline of the hand.
- According to the outline of the hand, the pixel coordinates of the finger key points are obtained. For drag gestures, you can focus on the position of your index and middle fingers.
- Calculate the distance between the tips of the index finger and middle finger and determine whether the conditions are met to trigger the drag action.
- If the conditions are met, you can use the Pythagorean Theorem to calculate the distance and change the color of the rectangular area to indicate that the drag is triggered.
- Update the coordinates of the rectangle according to the position of the finger so that the rectangle follows the movement of the finger.
- Stop the rectangle's movement when your finger is released.
2. Import the required modules
# 导入OpenCV
import cv2
# 导入mediapipe
import mediapipe as mp

# 导入其他依赖包
import time
import math
3. Block Management Category
(SquareManager) is a square manager used to create, display, update and process square-related operations.
1.Initialize the block manager
Initialize the block manager, pass in the length of the block (rect_width)as a parameter, and initialize properties such as block list, distance, activation status, and activated block ID .
class SquareManager:
    def __init__(self, rect_width):
        # 方框长度
        self.rect_width = rect_width

        # 方块列表
        self.square_count = 0
        self.rect_left_x_list = []
        self.rect_left_y_list = []
        self.alpha_list = []

        # 中指与矩形左上角点的距离
        self.L1 = 0
        self.L2 = 0

        # 激活移动模式
        self.drag_active = False

        # 激活的方块ID
        self.active_index = -1
2. Create a block
Create a block and add the block's upper left corner coordinates and transparency to the corresponding lists.
# 创建一个方块,但是没有显示
    def create(self, rect_left_x, rect_left_y, alpha=0.4):
        # 将方块的左上角坐标和透明度添加到相应的列表中
        self.rect_left_x_list.append(rect_left_x)
        self.rect_left_y_list.append(rect_left_y)
        self.alpha_list.append(alpha)
        self.square_count += 1
3. Update the position of the display box
Depending on the state of the block, the block is drawn on the image and the overlay image is superimposed onto the original image using transparency.
 # 更新显示方块的位置
    def display(self, class_obj):
        # 遍历方块列表
        for i in range(0, self.square_count):
            x = self.rect_left_x_list[i]
            y = self.rect_left_y_list[i]
            alpha = self.alpha_list[i]

            overlay = class_obj.image.copy()
             # 如果方块处于激活状态,绘制紫色方块;否则绘制蓝色方块
            if (i == self.active_index):
                cv2.rectangle(overlay, (x, y), (x + self.rect_width, y + self.rect_width), (255, 0, 255), -1)
            else:
                cv2.rectangle(overlay, (x, y), (x + self.rect_width, y + self.rect_width), (255, 0, 0), -1)

            # 使用透明度将叠加图像叠加到原始图像上
            class_obj.image = cv2.addWeighted(overlay, alpha, class_obj.image, 1 - alpha, 0)
4. Determine the landing point of the block
Determine whether the given coordinates are within the block and return the block's ID.
    # 判断落在哪个方块上,返回方块的ID
    def checkOverlay(self, check_x, check_y):
        # 遍历方块列表
        for i in range(0, self.square_count):
            x = self.rect_left_x_list[i]
            y = self.rect_left_y_list[i]

            # 检查指定点是否在方块内
            if (x < check_x < (x + self.rect_width)) and (y < check_y < (y + self.rect_width)):
                # 保存被激活的方块ID
                self.active_index = i
                return i

        return -1
5. Calculate distance and update location
setLen Method: Calculate the distance between the activated block and the fingertip.
updateSquare Method: Updates the position of the active square based on the given new coordinates.
    # 计算与指尖的距离
    def setLen(self, check_x, check_y):
        # 计算距离
        self.L1 = check_x - self.rect_left_x_list[self.active_index]
        self.L2 = check_y - self.rect_left_y_list[self.active_index]

    # 更新方块位置
    def updateSquare(self, new_x, new_y):
        self.rect_left_x_list[self.active_index] = new_x - self.L1
        self.rect_left_y_list[self.active_index] = new_y - self.L2
3. Identify control categories
1. Initialize the recognition control class
class HandControlVolume:
    def __init__(self):
        # 初始化mediapipe
        self.mp_drawing = mp.solutions.drawing_utils
        self.mp_drawing_styles = mp.solutions.drawing_styles
        self.mp_hands = mp.solutions.hands

        # 中指与矩形左上角点的距离
        self.L1 = 0
        self.L2 = 0

        # image实例,以便另一个类调用
        self.image = None
HandControlVolumeUsed for initialization mediapipeand 存储中指与矩形左上角点的距离和imageinstantiation.
__init__Method: When initializing the object, initialize the mediapipe, including drawing_utils, drawing_styles and hands. In addition, the distance between the middle finger and the upper left corner of the rectangle and the image instance are also initialized.
Through mediapipe, hand key point detection and posture estimation can be performed, and then gesture recognition and processing can be performed. In order to enable other classes to call the image instance, store it as an attribute of the class to conveniently handle gesture recognition and control operations.
2. Main function
This part of the code is mainly used to initialize and prepare to process the video stream for gesture recognition and interaction.
    def recognize(self):
        # 计算刷新率
        fpsTime = time.time()

        # OpenCV读取视频流
        cap = cv2.VideoCapture(0)
        # 视频分辨率
        resize_w = int(cap.get(cv2.CAP_PROP_FRAME_WIDTH))
        resize_h = int(cap.get(cv2.CAP_PROP_FRAME_HEIGHT))

        # 画面显示初始化参数
        rect_percent_text = 0

        # 初始化方块管理器
        squareManager = SquareManager(150)

        # 创建多个方块
        for i in range(0, 5):
            squareManager.create(200 * i + 20, 200, 0.6)

        with self.mp_hands.Hands(min_detection_confidence=0.7,
                                 min_tracking_confidence=0.5,
                                 max_num_hands=2) as hands:
            while cap.isOpened():

                # 初始化矩形
                success, self.image = cap.read()
                self.image = cv2.resize(self.image, (resize_w, resize_h))

                if not success:
                    print("空帧.")
                    continue
-
resize_wandresize_h: The width and height of the video frame obtained according to the camera resolution and scaled as the image size for subsequent processing. -
rect_percent_text: Screen display initialization parameter, may be used for text display on the screen. -
squareManager: Initializes the instance of the block manager class and sets the length of the block to 150.
Using a loop, five blocks are created and createadded to the block manager via methods. Enter a loop that reads a frame image from the video stream and resizes it to the specified size. If the frame image is successfully read, it will be processed further, otherwise an error message will be output.
3. Improve performance and image processing
                self.image.flags.writeable = False
                # 转为RGB
                self.image = cv2.cvtColor(self.image, cv2.COLOR_BGR2RGB)
                # 镜像
                self.image = cv2.flip(self.image, 1)
                # mediapipe模型处理
                results = hands.process(self.image)

                self.image.flags.writeable = True
                self.image = cv2.cvtColor(self.image, cv2.COLOR_RGB2BGR)
-
self.image.flags.writeable = False: Set the image to be non-writable to improve performance and avoid data copies. -
self.image = cv2.cvtColor(self.image, cv2.COLOR_BGR2RGB): Convert BGR format images to RGB format, because the input image processed by the mediapipe model needs to be in RGB format. -
self.image = cv2.flip(self.image, 1): Mirror-flip the image to correspond to the hand position expected by the mediapipe model. -
results = hands.process(self.image): Pass the processed image to the hands model of mediapipe for gesture recognition and processing. -
self.image = cv2.cvtColor(self.image, cv2.COLOR_RGB2BGR): Convert the image from RGB format back to BGR format for subsequent display and processing.
4. Detect palms, mark key points and connection relationships
                if results.multi_hand_landmarks:
                    # 遍历每个手掌
                    for hand_landmarks in results.multi_hand_landmarks:
                        # 在画面标注手指
                        self.mp_drawing.draw_landmarks(
                            self.image,
                            hand_landmarks,
                            self.mp_hands.HAND_CONNECTIONS,
                            self.mp_drawing_styles.get_default_hand_landmarks_style(),
                            self.mp_drawing_styles.get_default_hand_connections_style())
-
if results.multi_hand_landmarks:: Check if palm is detected. If a palm is detected, proceed to the next step; otherwise, skip. -
for hand_landmarks in results.multi_hand_landmarks:: Traverse each detected palm. -
self.mp_drawing.draw_landmarks: Use the mediapipedraw_landmarksmethod to mark key points and connection relationships of fingers on the image.
self.image: Input image. hand_landmarks: Key points of the palm.
self.mp_hands.HAND_CONNECTIONS: The connection between fingers.
5. Parse the detected palm and extract key points of the fingers
Detect the palm and extract the key points of the fingers, and then store the coordinates of the fingers.
                        landmark_list = []

                        # 用来存储手掌范围的矩形坐标
                        paw_x_list = []
                        paw_y_list = []
                        for landmark_id, finger_axis in enumerate(
                                hand_landmarks.landmark):
                            landmark_list.append([
                                landmark_id, finger_axis.x, finger_axis.y,
                                finger_axis.z
                            ])
                            paw_x_list.append(finger_axis.x)
                            paw_y_list.append(finger_axis.y)
                        if landmark_list:
                            # 比例缩放到像素
                            ratio_x_to_pixel = lambda x: math.ceil(x * resize_w)
                            ratio_y_to_pixel = lambda y: math.ceil(y * resize_h)

                            # 设计手掌左上角、右下角坐标
                            paw_left_top_x, paw_right_bottom_x = map(ratio_x_to_pixel,
                                                                     [min(paw_x_list), max(paw_x_list)])
                            paw_left_top_y, paw_right_bottom_y = map(ratio_y_to_pixel,
                                                                     [min(paw_y_list), max(paw_y_list)])

                            # 给手掌画框框
                            cv2.rectangle(self.image, (paw_left_top_x - 30, paw_left_top_y - 30),
                                          (paw_right_bottom_x + 30, paw_right_bottom_y + 30), (0, 255, 0), 2)

                            # 获取中指指尖坐标
                            middle_finger_tip = landmark_list[12]
                            middle_finger_tip_x = ratio_x_to_pixel(middle_finger_tip[1])
                            middle_finger_tip_y = ratio_y_to_pixel(middle_finger_tip[2])

                            # 获取食指指尖坐标
                            index_finger_tip = landmark_list[8]
                            index_finger_tip_x = ratio_x_to_pixel(index_finger_tip[1])
                            index_finger_tip_y = ratio_y_to_pixel(index_finger_tip[2])
                            # 中间点
                            between_finger_tip = (middle_finger_tip_x + index_finger_tip_x) // 2, (
                                        middle_finger_tip_y + index_finger_tip_y) // 2

                            thumb_finger_point = (middle_finger_tip_x, middle_finger_tip_y)
                            index_finger_point = (index_finger_tip_x, index_finger_tip_y)
-
landmark_list: A list used to store finger key point information. -
paw_x_listandpaw_y_list: the horizontal and vertical coordinates of the rectangular box used to store the palm range. -
In the loop, the index, x coordinate, y coordinate, and z coordinate of each finger's key point are stored in
landmark_list, while the horizontal and vertical coordinates of the palm range are stored inpaw_x_listandpaw_y_list.
If landmark_listit is not empty, that is, a finger key point is detected ratio_x_to_pixeland ratio_y_to_pixel: two lambda functions, functions used to convert relative scales into pixel coordinates. Based on the rectangular coordinates of the palm range, calculate the coordinates of the upper left corner and lower right corner of the palm area, and draw a box. Use landmark_listthe information in to obtain the tip coordinates of the middle finger and the tip coordinates of the index finger and convert them into pixel coordinates. Calculate the midpoint between the coordinates of the middle finger tip and the coordinates of the index finger tip. Store the coordinates of the tip of the middle finger and the coordinates of the tip of the index finger in thumb_finger_pointthe sum index_finger_point.
Analyze the detected palm information, extract the key point coordinates of the fingers, convert the finger coordinates into pixel coordinates, and mark the positions of the middle finger tip and index finger tip on the image.
6. Draw fingertip circles and connecting lines to calculate the distance
                            circle_func = lambda point: cv2.circle(self.image, point, 10, (255, 0, 255), -1)
                            self.image = circle_func(thumb_finger_point)
                            self.image = circle_func(index_finger_point)
                            self.image = circle_func(between_finger_tip)
                            # 画2点连线
                            self.image = cv2.line(self.image, thumb_finger_point, index_finger_point, (255, 0, 255), 5)
                            # 勾股定理计算长度
                            line_len = math.hypot((index_finger_tip_x - middle_finger_tip_x),
                                                  (index_finger_tip_y - middle_finger_tip_y))
                            # 将指尖距离映射到文字
                            rect_percent_text = math.ceil(line_len)
-
cv2.lineFunction that draws a connecting line between the tip of the middle finger and the tip of the index finger on the image. -
math.hypotFunction calculates the length of the hypotenuse of a right triangle. -
Map the distance between fingertips into
rect_percent_texta variable to be used as a parameter for subsequent text display.
7. Track the distance between fingers
                            if squareManager.drag_active:
                                # 更新方块
                                squareManager.updateSquare(between_finger_tip[0], between_finger_tip[1])
                                if (line_len > 100):
                                    # 取消激活
                                    squareManager.drag_active = False
                                    squareManager.active_index = -1

                            elif (line_len < 100) and (squareManager.checkOverlay(between_finger_tip[0],
                                                                                  between_finger_tip[1]) != -1) and (
                                    squareManager.drag_active == False):
                                # 激活
                                squareManager.drag_active = True
                                # 计算距离
                                squareManager.setLen(between_finger_tip[0], between_finger_tip[1])
If squareManagerthe drag_activeproperty is True, that is, the movement mode of the rectangle has been activated, use squareManager.updateSquarethe method to update the position of the rectangle. If the distance between two fingers is greater than 100, that is, the distance between the fingers exceeds the threshold, the activation mode of the rectangle is cancelled, which will be drag_activeset to False and will active_indexbe set to -1.
Otherwise, if the distance between two fingers is less than 100, and there is an overlapping rectangle between the fingers, and the move mode of the rectangle is not activated. To activate the rectangle's move mode, drag_activeset to True. Calculate and set the length of the rectangle based on the distance between fingers, use squareManager.setLenmethod.
8.Display image
                squareManager.display(self)

                # 显示距离
                cv2.putText(self.image, "Distance:" + str(rect_percent_text), (10, 120), cv2.FONT_HERSHEY_PLAIN, 3,
                            (255, 0, 0), 3)

                # 显示当前激活
                cv2.putText(self.image, "Active:" + (
                    "None" if squareManager.active_index == -1 else str(squareManager.active_index)), (10, 170),
                            cv2.FONT_HERSHEY_PLAIN, 3, (255, 0, 0), 3)

                # 显示刷新率FPS
                cTime = time.time()
                fps_text = 1 / (cTime - fpsTime)
                fpsTime = cTime
                cv2.putText(self.image, "FPS: " + str(int(fps_text)), (10, 70),
                            cv2.FONT_HERSHEY_PLAIN, 3, (255, 0, 0), 3)
                # 显示画面
                cv2.imshow('virtual drag and drop', self.image)

                if cv2.waitKey(5) & 0xFF == 27:
                    break
            cap.release()

control = HandControlVolume()
control.recognize()
recognizeThe end of the main function ( ) is used to display the status and refresh rate of the image, rectangle, and wait for the key response. Use squareManager.displaymethod to display rectangle. cv2.waitKeyThe function waits for key input. If the key pressed is the ESC key (the corresponding ASCII code is 27), it exits the loop.
Display the processed image, the status of the rectangle and the refresh rate on the screen, and wait for the key response. This enables interactive virtual drag-and-drop functionality. Next let's take a look at the actual operation effect.
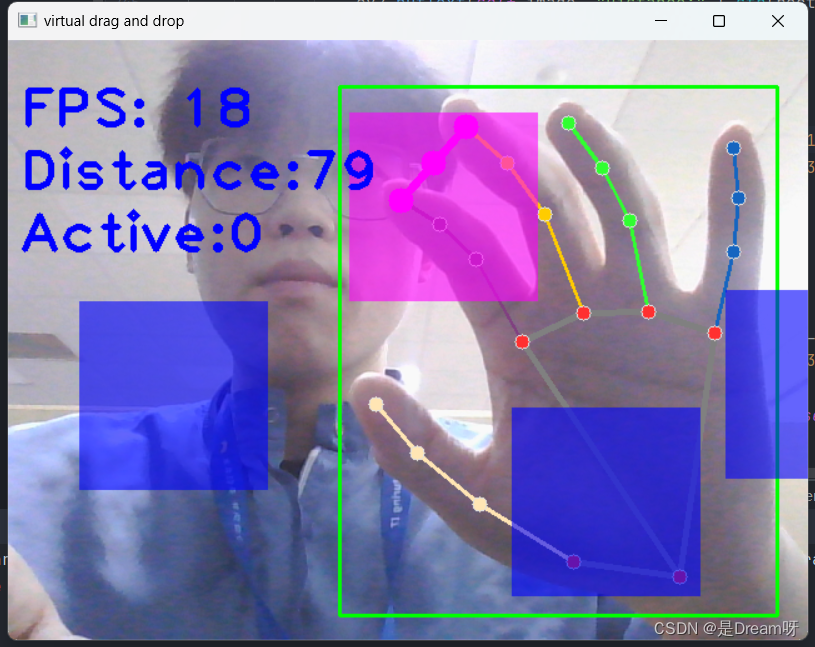
4. Practical demonstration

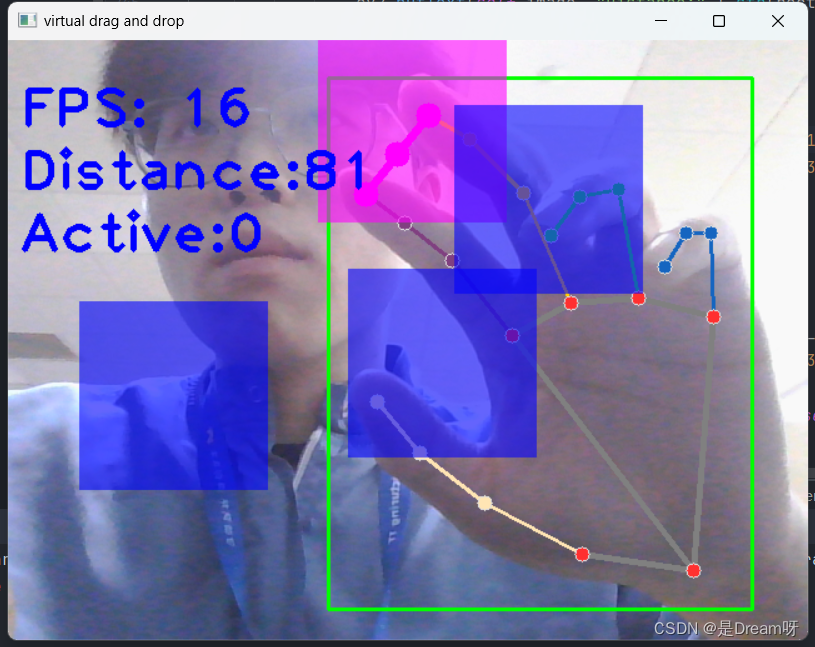
Through the demonstration, we can drag the blocks with our hands, and the effect can be achieved in a good state.
5. Source code sharing
import cv2
import mediapipe as mp
import time
import math
class SquareManager:
    def __init__(self, rect_width):

        # 方框长度
        self.rect_width = rect_width

        # 方块list
        self.square_count = 0
        self.rect_left_x_list = []
        self.rect_left_y_list = []
        self.alpha_list = []

        # 中指与矩形左上角点的距离
        self.L1 = 0
        self.L2 = 0

        # 激活移动模式
        self.drag_active = False

        # 激活的方块ID
        self.active_index = -1

    # 创建一个方块,但是没有显示
    def create(self, rect_left_x, rect_left_y, alpha=0.4):
        self.rect_left_x_list.append(rect_left_x)
        self.rect_left_y_list.append(rect_left_y)
        self.alpha_list.append(alpha)
        self.square_count += 1

    # 更新位置
    def display(self, class_obj):
        for i in range(0, self.square_count):
            x = self.rect_left_x_list[i]
            y = self.rect_left_y_list[i]
            alpha = self.alpha_list[i]

            overlay = class_obj.image.copy()

            if (i == self.active_index):
                cv2.rectangle(overlay, (x, y), (x + self.rect_width, y + self.rect_width), (255, 0, 255), -1)
            else:
                cv2.rectangle(overlay, (x, y), (x + self.rect_width, y + self.rect_width), (255, 0, 0), -1)

            # Following line overlays transparent rectangle over the self.image
            class_obj.image = cv2.addWeighted(overlay, alpha, class_obj.image, 1 - alpha, 0)

    # 判断落在哪个方块上,返回方块的ID
    def checkOverlay(self, check_x, check_y):
        for i in range(0, self.square_count):
            x = self.rect_left_x_list[i]
            y = self.rect_left_y_list[i]

            if (x < check_x < (x + self.rect_width)) and (y < check_y < (y + self.rect_width)):
                # 保存被激活的方块ID
                self.active_index = i

                return i

        return -1

    # 计算与指尖的距离
    def setLen(self, check_x, check_y):
        # 计算距离
        self.L1 = check_x - self.rect_left_x_list[self.active_index]
        self.L2 = check_y - self.rect_left_y_list[self.active_index]

    # 更新方块
    def updateSquare(self, new_x, new_y):
        # print(self.rect_left_x_list[self.active_index])
        self.rect_left_x_list[self.active_index] = new_x - self.L1
        self.rect_left_y_list[self.active_index] = new_y - self.L2


# 识别控制类
class HandControlVolume:
    def __init__(self):
        # 初始化medialpipe
        self.mp_drawing = mp.solutions.drawing_utils
        self.mp_drawing_styles = mp.solutions.drawing_styles
        self.mp_hands = mp.solutions.hands

        # 中指与矩形左上角点的距离
        self.L1 = 0
        self.L2 = 0

        # image实例,以便另一个类调用
        self.image = None

    # 主函数
    def recognize(self):
        # 计算刷新率
        fpsTime = time.time()

        # OpenCV读取视频流
        cap = cv2.VideoCapture(0)
        # 视频分辨率
        resize_w = int(cap.get(cv2.CAP_PROP_FRAME_WIDTH))
        resize_h = int(cap.get(cv2.CAP_PROP_FRAME_HEIGHT))

        # 画面显示初始化参数
        rect_percent_text = 0

        # 初始化方块管理器
        squareManager = SquareManager(150)

        # 创建多个方块
        for i in range(0, 5):
            squareManager.create(200 * i + 20, 200, 0.6)

        with self.mp_hands.Hands(min_detection_confidence=0.7,
                                 min_tracking_confidence=0.5,
                                 max_num_hands=2) as hands:
            while cap.isOpened():

                # 初始化矩形
                success, self.image = cap.read()
                self.image = cv2.resize(self.image, (resize_w, resize_h))

                if not success:
                    print("空帧.")
                    continue

                # 提高性能
                self.image.flags.writeable = False
                # 转为RGB
                self.image = cv2.cvtColor(self.image, cv2.COLOR_BGR2RGB)
                # 镜像
                self.image = cv2.flip(self.image, 1)
                # mediapipe模型处理
                results = hands.process(self.image)

                self.image.flags.writeable = True
                self.image = cv2.cvtColor(self.image, cv2.COLOR_RGB2BGR)
                # 判断是否有手掌
                if results.multi_hand_landmarks:
                    # 遍历每个手掌
                    for hand_landmarks in results.multi_hand_landmarks:
                        # 在画面标注手指
                        self.mp_drawing.draw_landmarks(
                            self.image,
                            hand_landmarks,
                            self.mp_hands.HAND_CONNECTIONS,
                            self.mp_drawing_styles.get_default_hand_landmarks_style(),
                            self.mp_drawing_styles.get_default_hand_connections_style())

                        # 解析手指,存入各个手指坐标
                        landmark_list = []

                        # 用来存储手掌范围的矩形坐标
                        paw_x_list = []
                        paw_y_list = []
                        for landmark_id, finger_axis in enumerate(
                                hand_landmarks.landmark):
                            landmark_list.append([
                                landmark_id, finger_axis.x, finger_axis.y,
                                finger_axis.z
                            ])
                            paw_x_list.append(finger_axis.x)
                            paw_y_list.append(finger_axis.y)
                        if landmark_list:
                            # 比例缩放到像素
                            ratio_x_to_pixel = lambda x: math.ceil(x * resize_w)
                            ratio_y_to_pixel = lambda y: math.ceil(y * resize_h)

                            # 设计手掌左上角、右下角坐标
                            paw_left_top_x, paw_right_bottom_x = map(ratio_x_to_pixel,
                                                                     [min(paw_x_list), max(paw_x_list)])
                            paw_left_top_y, paw_right_bottom_y = map(ratio_y_to_pixel,
                                                                     [min(paw_y_list), max(paw_y_list)])

                            # 给手掌画框框
                            cv2.rectangle(self.image, (paw_left_top_x - 30, paw_left_top_y - 30),
                                          (paw_right_bottom_x + 30, paw_right_bottom_y + 30), (0, 255, 0), 2)

                            # 获取中指指尖坐标
                            middle_finger_tip = landmark_list[12]
                            middle_finger_tip_x = ratio_x_to_pixel(middle_finger_tip[1])
                            middle_finger_tip_y = ratio_y_to_pixel(middle_finger_tip[2])

                            # 获取食指指尖坐标
                            index_finger_tip = landmark_list[8]
                            index_finger_tip_x = ratio_x_to_pixel(index_finger_tip[1])
                            index_finger_tip_y = ratio_y_to_pixel(index_finger_tip[2])
                            # 中间点
                            between_finger_tip = (middle_finger_tip_x + index_finger_tip_x) // 2, (
                                        middle_finger_tip_y + index_finger_tip_y) // 2
                            # print(middle_finger_tip_x)
                            thumb_finger_point = (middle_finger_tip_x, middle_finger_tip_y)
                            index_finger_point = (index_finger_tip_x, index_finger_tip_y)
                            # 画指尖2点
                            circle_func = lambda point: cv2.circle(self.image, point, 10, (255, 0, 255), -1)
                            self.image = circle_func(thumb_finger_point)
                            self.image = circle_func(index_finger_point)
                            self.image = circle_func(between_finger_tip)
                            # 画2点连线
                            self.image = cv2.line(self.image, thumb_finger_point, index_finger_point, (255, 0, 255), 5)
                            # 勾股定理计算长度
                            line_len = math.hypot((index_finger_tip_x - middle_finger_tip_x),
                                                  (index_finger_tip_y - middle_finger_tip_y))
                            # 将指尖距离映射到文字
                            rect_percent_text = math.ceil(line_len)

                            # 激活模式,需要让矩形跟随移动
                            if squareManager.drag_active:
                                # 更新方块
                                squareManager.updateSquare(between_finger_tip[0], between_finger_tip[1])
                                if (line_len > 100):
                                    # 取消激活
                                    squareManager.drag_active = False
                                    squareManager.active_index = -1

                            elif (line_len < 100) and (squareManager.checkOverlay(between_finger_tip[0],
                                                                                  between_finger_tip[1]) != -1) and (
                                    squareManager.drag_active == False):
                                # 激活
                                squareManager.drag_active = True
                                # 计算距离
                                squareManager.setLen(between_finger_tip[0], between_finger_tip[1])

                # 显示方块,传入本实例,主要为了半透明的处理
                squareManager.display(self)

                # 显示距离
                cv2.putText(self.image, "Distance:" + str(rect_percent_text), (10, 120), cv2.FONT_HERSHEY_PLAIN, 3,
                            (255, 0, 0), 3)

                # 显示当前激活
                cv2.putText(self.image, "Active:" + (
                    "None" if squareManager.active_index == -1 else str(squareManager.active_index)), (10, 170),
                            cv2.FONT_HERSHEY_PLAIN, 3, (255, 0, 0), 3)

                # 显示刷新率FPS
                cTime = time.time()
                fps_text = 1 / (cTime - fpsTime)
                fpsTime = cTime
                cv2.putText(self.image, "FPS: " + str(int(fps_text)), (10, 70),
                            cv2.FONT_HERSHEY_PLAIN, 3, (255, 0, 0), 3)
                # 显示画面
                cv2.imshow('virtual drag and drop', self.image)

                if cv2.waitKey(5) & 0xFF == 27:
                    break
            cap.release()

control = HandControlVolume()
control.recognize()