Huichuang Huiwan
write in front
Eight years of bitter, spicy, sour and sweet time, spring, summer, autumn and winter, this life
Introduction to Qt:
Qt (official pronunciation [kju:t], pronounced the same as cute) is a cross-platform C++ development library, mainly used to develop graphical user interface (Graphical User Interface, GUI) programs. Of course, it can also develop programs without an interface. Command line (Command User Interface, CUI) program.
Qt supports many operating systems, such as general operating systems Windows, Linux, and Unix, smart phone systems Android, iOS, and WinPhone, embedded systems QNX, VxWorks, and so on.
Although Qt is often regarded as a GUI library for developing graphical interface applications, this is not all of Qt; in addition to drawing beautiful interfaces (including controls, layout, and interaction), Qt also includes many other functions, such as multi-threading , database access, image processing, audio and video processing, network communication, file operations, etc., these are all built-in in Qt.
In the early stages of exploring the installation process, there were also a few unknown errors. We explored the path in the dark and took many detours.
Recently, because the project needs to be adapted to domestic systems, the software needs to adapt to CPUs of different architectures! Based on this, I would like to share my experience with this article. I hope more like-minded friends will avoid detours on this road of exploration and stay within the theme!
environment:
PC system: Ubutu20.04 (x86_64 architecture) <本机>
Qt version: Qt5.12.8 (GCC 9.3.0, 64bit) <本机>
Qt Creator version: 4.11.0 <本机>
Cross compiler: gcc-arm-8.3-2019.03-x86_64-aarch64-linux-gnu <本机>
Domestic system: Kylin Linux Advanced Server release V10 (4.19.90-25.10.v2101.ky10.aarch64) 部署环境<即arm64架构>
GCC: v8.3.0部署环境<即arm64架构>
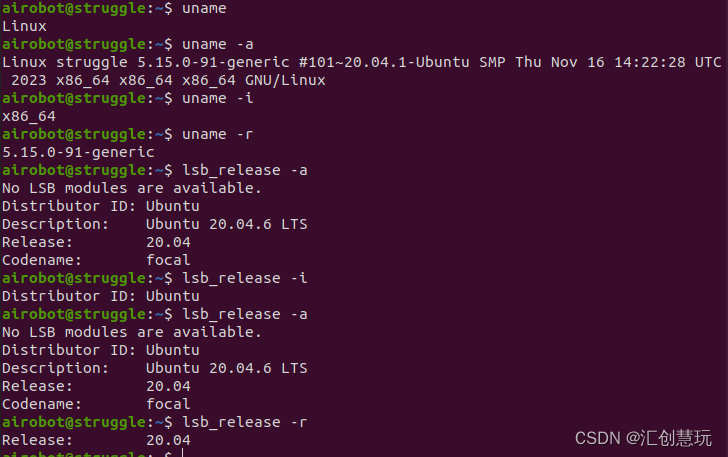
1. View instructions related to system architecture
Dullness本机
uname
uname -a
uname -i
uname -r
lsb_release -a
lsb_release -i
lsb_release -r
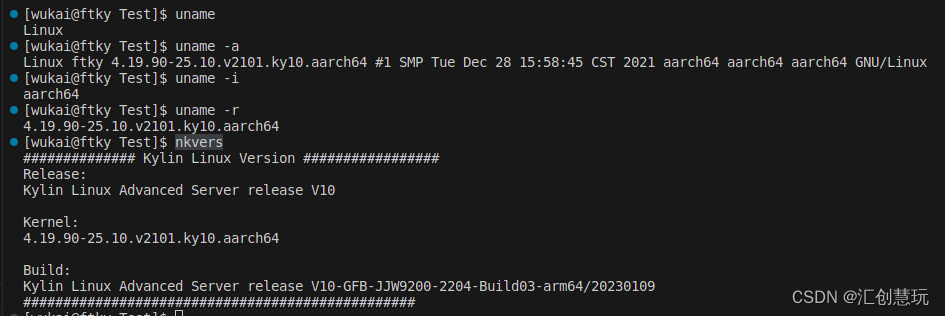
My village's Linux部署环境<即arm64架构>
uname
uname -a
uname -i
uname -r
nkvers
 Check the number of CPU cores, it will show the number of logical cores:
lscpu
nproc
2. ARM64 cross-compiler environment construction
1) Select the compilation tool: gcc-arm-8.3-2019.03-x86_64-aarch64-linux-gnu <可选其他版本>
2) Source code installation cross-compilation tool:
The specified version of the source code installation is to adapt to the deployed environment v8.3.0. The author installed the specified version version, you can refer to it if you have no special needs.3) Instructions to install cross-compilation tools
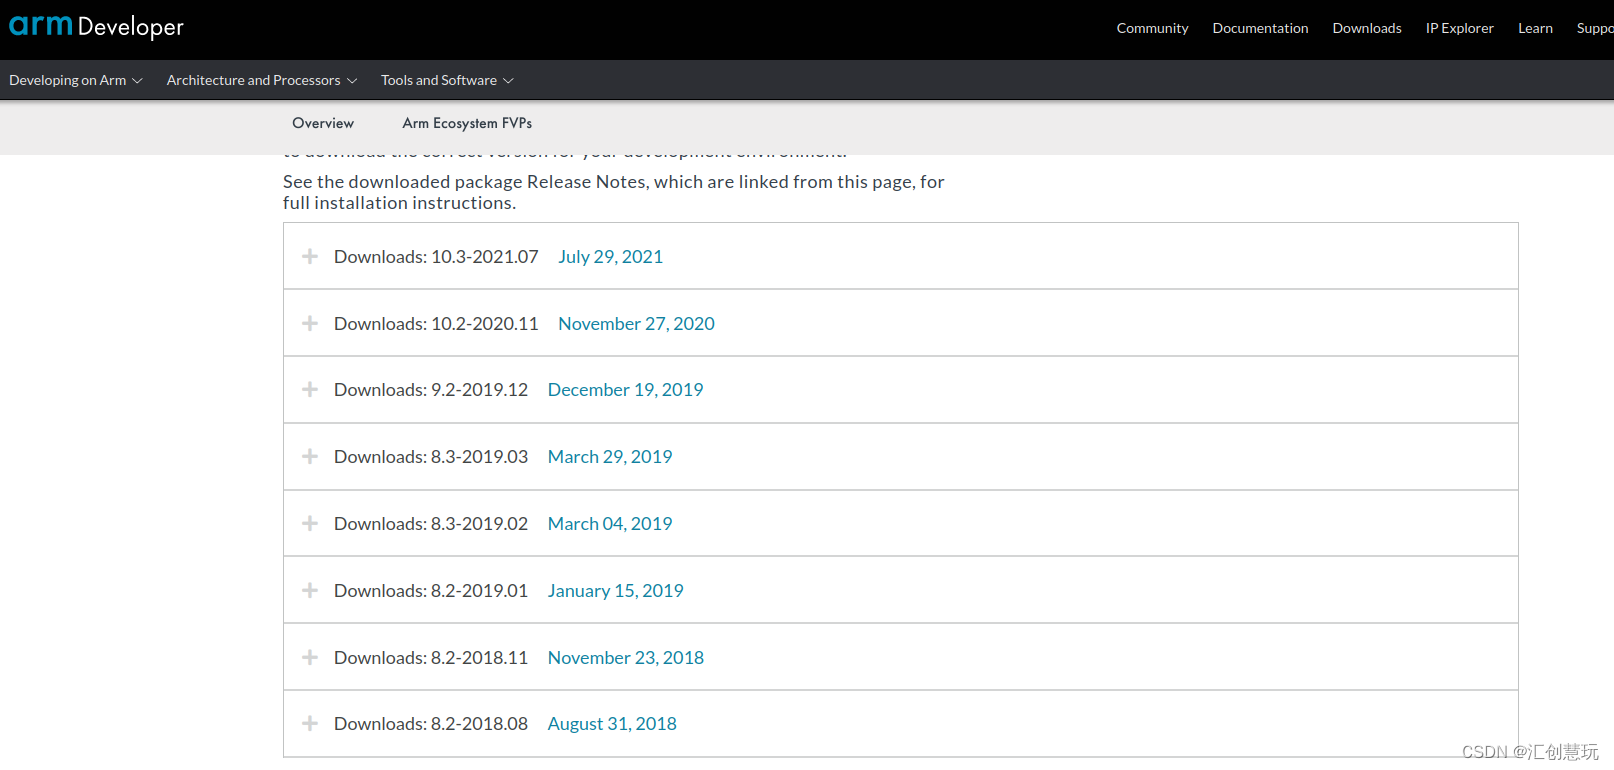
①Download: Download the specified version of the compiler
注1:from arm Developer ;
注2:You can also download v8.3.0 through Baidu Netdisk
② Installation:
解压:
tar -xvf gcc-arm-8.3-2019.03-x86_64-aarch64-linux-gnu.tar.xz
重命名:
mv gcc-arm-8.3-2019.03-x86_64-aarch64-linux-gnu aarch64-linux-gnu-8.3.0
将目标复制到指定目录下:<Generally copy to/optdirectory, I copied it to~/path/goCatalog>
sudo cp -rf aarch64-linux-gnu-8.3.0/ /opt
or
mkdir -p ~/path/go
cp -rf aarch64-linux-gnu-8.3.0/ ~/path/go
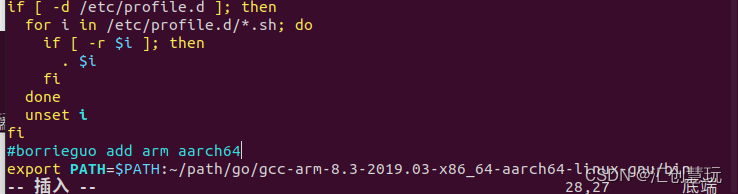
Then in the environment variables/etc/profile<Author added in this file> or~/.bashrcAdd global variables <Be careful to add your own correct path, the author did not rename it before>
$PATH: The following path is the decompression path of gcc-arm-8.3-2019.03-x86_64-aarch64-linux-gnu/bin
sudo vim /etc/profile
#borrieguo add arm aarch64
export PATH=$PATH:~/path/go/gcc-arm-8.3-2019.03-x86_64-aarch64-linux-gnu/bin
Then load the environment variable <add it to the file and source it>
source /etc/profile
or
source ~/.bashrc
Check whether the configuration is successful: Enter aarch64 +TAB to see if a prompt appears (the corresponding version means the configuration is successful):

Check the installation path:
which aarch64-linux-gnu-gcc-8.3.0

3) Instruction installation cross-compilation tool: 源码安装交叉编译工具和指令安装交叉编译工具选其中一个操作即可
Instruction installation automatically adapts to the appropriate version of the machine, which is more convenient without specifying
sudo apt-get install gcc-aarch64-linux-gnu g++-aarch64-linux-gnu
After installation, verify whether it is ok. Directly enter aarch64- and press the Tab key. If it can automatically complete aarch64-linux-gnu-gcc, then there will be no problem.
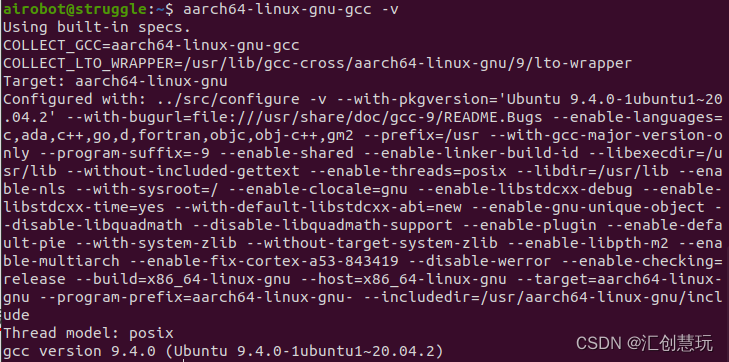
View version information:
aarch64-linux-gnu-gcc -v
If you can find it as shown in the picture below, the installation is complete.
Check the installation path:
which aarch64-linux-gnu-gcc

4) Compile source code test:
In order to further verify whether the cross-compiler environment is successfully established, you can compile the source code for verification testing. (Can be omitted)
What the author is verifying is a C++ program.main.cppThe content is as follows:
#include <iostream>

using namespace std;

int main()
{


    cout << "Hello World!" << endl;
    return 0;
}
Willmain.cppThe source code is compiled into an arm64 executable file with the following instructions:
aarch64-linux-gnu-g++ -o main main.cpp
After the compilation is passed, use filethe command to check whether the file type is ELF:64bit LSB shared object,ARM aarch64.... If so, complete source code compilation.
file main

You can also use readelf -hthe command to check whether the file system architecture is AArch64. If so, complete source code compilation.
readelf -h main

3. Qt compilation arm64 environment construction
1) Select Qt version: 5.12.8 <可选其他版本>
2) Qt source code download:
Because you will run the Qt program on the development board later, you must download the Qt source code package and then compile it with a cross-compilation tool to get a program that can run on the target platform Qt SDK. The Qt version on my machine is Qt5.12.8 (GCC 9.3.0, 64bit), so I downloaded the source code of Qt5.12.8 in order to build two Qt environments (x86_64 and arm64) on my machine. Configure the ARM64 compilation environment on the local PC. After the compilation is completed on the local PC, configure the Qt cross-compilation environment, then use Qt to compile the code you wrote, and finally copy and deploy it to run on the ARM platform.
注1:Qt official website download address
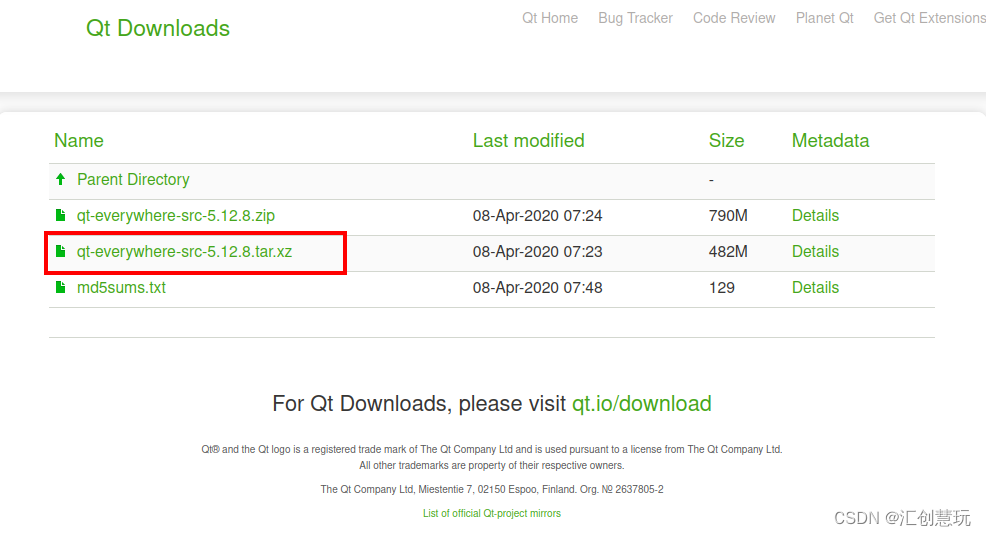
注2:Baidu network disk download v5.12.8
3) Qt source code installation:
① Decompression:
Download qt-everywhere-src-5.12.8.tar.xz, then use the xz command to decompress the qt-everywhere-src-5.12.8.tar file, and then use the tar command to decompress qt -everywhere-src-5.12.8.tar file, get the folder: qt-everywhere-src-5.12.8.
xz -d qt-everywhere-src-5.12.8.tar.xz
tar -xvf qt-everywhere-src-5.12.8.tar
or
tar -xvf qt-everywhere-src-5.12.8.tar.xz
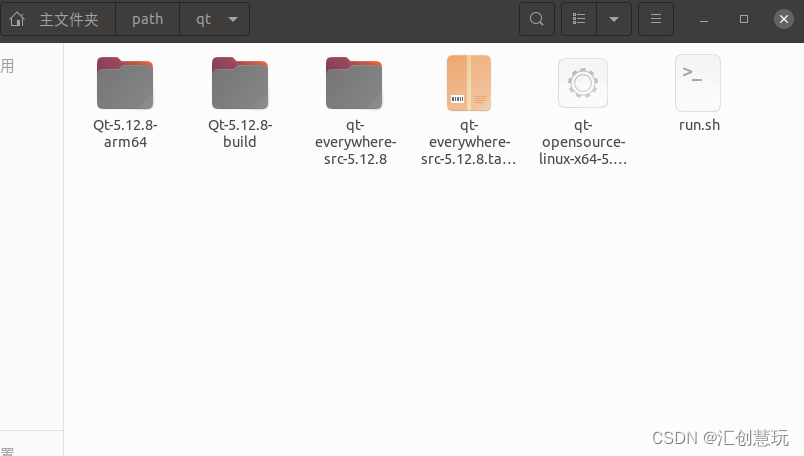
② Define the SDK installation path
强烈不建议在Qt源码的目录下直接进行编译,那样会污染源码所在目录。建议在Qt源码所在的同级目录下,新建一个文件夹用来存放编译过程中产生的临时文件。一定要注意源码路径不能含有中文!
and create the compilation process path:
mkdir Qt-5.12.8-build
Create the final installation path:
mkdir Qt-5.12.8-arm64
③Install
安装准备1)
Openqt-everywhere-src-5.12.8/qtbase/mkspecs/linux-aarch64-gnu-g++/qmake.confConfiguration file and modify it to the following content. Because we will use the content in this later, we need to modify the compiler here first.
Compile and modify according to your own cross-compiler. The cross-compiler of this machine is as aarch64-linux-gnu-
follows:
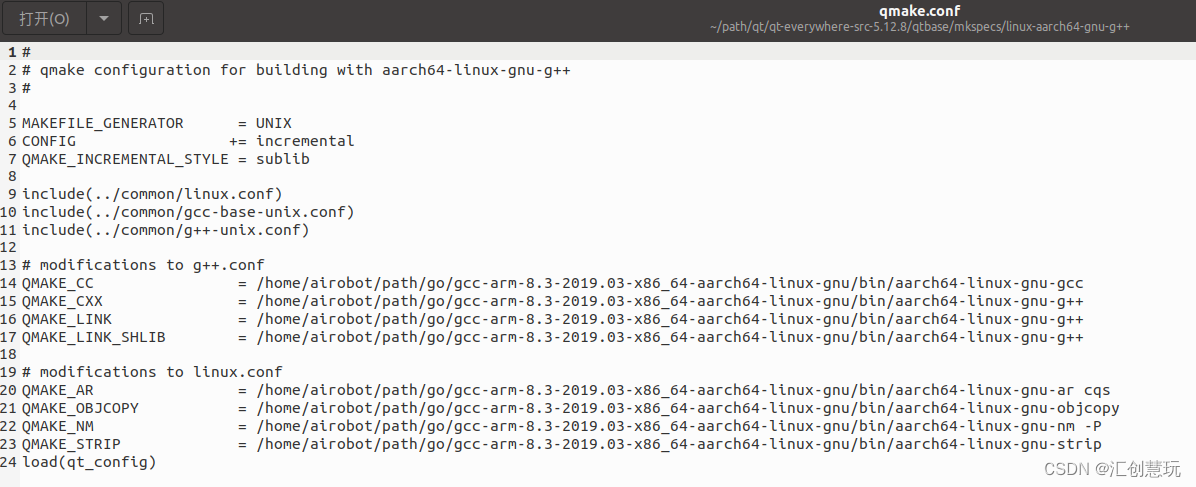
Note: In the above qmake.conf file, if Ubuntu has multiple cross-compilers, be sure to add the absolute path in front of the cross-compiler, otherwise errors like "not found" will appear when I first make, or The following errors occur
Makefile:51: recipe for target ‘sub-corelib-make_first’ failed
make[2]: *** [sub-corelib-make_first] Error 2
make[2]: Leaving directory ‘~/path/qt/qt-everywhere-opensource-src-5.12.8/qtbase/src’
Makefile:46: recipe for target ‘sub-src-make_first’ failed
make[1]: *** [sub-src-make_first] Error 2
make[1]: Leaving directory ‘~/path/qt/qt-everywhere-opensource-src-5.12.8/qtbase’
Makefile:77: recipe for target ‘module-qtbase-make_first’ failed
make: *** [module-qtbase-make_first] Error 2
安装准备2)
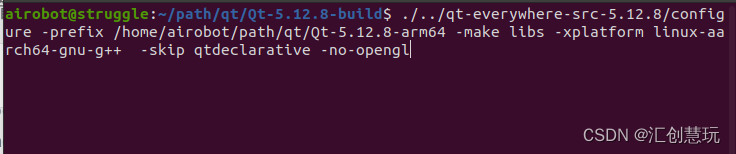
Enter the Qt-5.12.8-build folder to execute configure
./../qt-everywhere-src-5.12.8/configure -prefix /home/airobot/path/qt/Qt-5.12.8-arm64 -make libs -xplatform linux-aarch64-gnu-g++ -skip qtdeclarative -no-opengl
Note:
-prefix represents your installation folder, which is the final installation path defined above. Note that the directories must correspond;
-xplatform represents the compiler you specified;
-no-opengl -no means not to compile the module; skip compiling openGL (Because I have already installed Qt, I don’t need an interface);
-skip qtdeclarative skips qtdeclarative compilation;
other parameters:
-opensource compiles the open source version -commercial compiles the commercial version (optional parameters);
-static generates a static library .a file - shared generates dynamic library so files (optional parameters, the default is shared)注:静态库与动态库区别是在生成目标文件的链接方式上,静态库采用静态链接,在生成的目标文件(如执行文件)中会包含库文件代码,而动态库在程序编译时并不会被连接到目标代码中,而是在程序运行时才被载入。
-force-debug-info forces the generation of debugging information (optional parameters)这个参数是让Qt release版本也生成.pdb文件。这个文件有什么作用呢?它就是我们在release版本下设置了异常捕获信息函数,打印出错堆栈信息所必须的文件。如果程序没用开启异常捕获选项,是不需要开启这个参数的。
-opengl dynamic specifies the opengl library (optional parameters)
OpenGL(全写Open Graphics Library)是指定义了一个跨编程语言、跨平台的编程接口规格的专业的图形程序接口。它用于三维图像(二维的亦可),是一个功能强大,调用方便的底层图形库。 OpenGL™ 是行业领域中最为广泛接纳的 2D/3D 图形 API,其自诞生至今已催生了各种计算机平台及设备上的数千优秀应用程序。 OpenGL™ 是独立于视窗操作系统或其它操作系统的,亦是网络透明的。在包含CAD、内容创作、能源、娱乐、游戏开发、制造业、制药业及虚拟现实等行业领域中,OpenGL™ 帮助程序员实现在 PC、工作站、超级计算机等硬件设备上的高性能、极具冲击力的高视觉表现力图形处理软件的开发。
-skip skips the module
-nomake does not Compile the module
-mp to start multi-core compilation
Note: Both -skip and -nomake can be omitted, but the -skip qtdeclarative parameter cannot be omitted. The qtdeclarative module has libraries that it depends on. If you do not skip compilation here, it will fail.
If you have other needs, you can view specific commands with ./configure -help
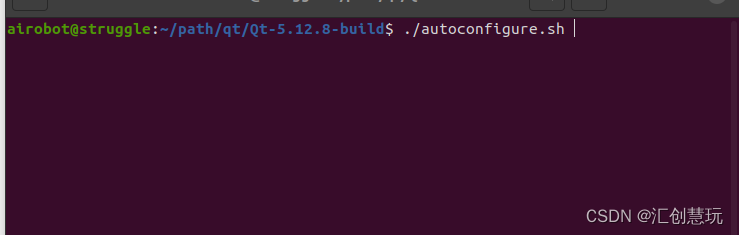
You can also use the "vim autoconfigure.sh" command to create a new "autoconfigure.sh" script, and then we need to use configure to generate the Makefile. Because the command is relatively long, we usually create a script and then execute our script to generate the Makefile.
autoconfigure.sh is as follows:
#!/bin/sh
#export PATH=$PATH:~/path/go/gcc-arm-8.3-2019.03-x86_64-aarch64-linux-gnu/bin
./../qt-everywhere-src-5.12.8/configure -prefix ~/path/qt/Qt-5.12.8-arm64 \
#-static \
#-release \
-opensource \
-make libs \
-xplatform linux-aarch64-gnu-g++ \
#-optimized-qmake \
#-pch \
#-qt-libjpeg \
#-qt-zlib \
-no-opengl \
#-skip qt3d \
#-skip qtcanvas3d \
#-skip qtpurchasing \
#-no-sse2 \
#-no-sse3 \
#-no-ssse3  \
#-no-sse4.1 \
#-no-sse4.2  \
#-no-avx \
#-no-avx2 \
#-no-mips_dsp \
#-no-mips_dspr2 \
#-qt-zlib \
#-no-openssl \
#-no-xcb 	\
#-no-cups \
#-no-iconv \
#-no-evdev  \
#-no-icu  \
#-no-fontconfig \
#-nomake examples \
#-nomake tools \
#-skip qtvirtualkeyboard \
#-qpa linuxfb	\
#-no-opengl \
#-no-libinput \
#-no-gstreamer \
#-no-system-proxies \
#-no-slog2  \
#-no-lgmon \
#-linuxfb \
#-v \
#-qt-libjpeg \
#-qt-libpng 	\
#-no-libproxy \
#-no-dbus	\
#-no-glib	\
#-no-compile-examples \
-skip qtdeclarative \
Modify permissions:
sudo chmod +x autoconfigure.sh
Execute the script:
./autoconfigure.sh
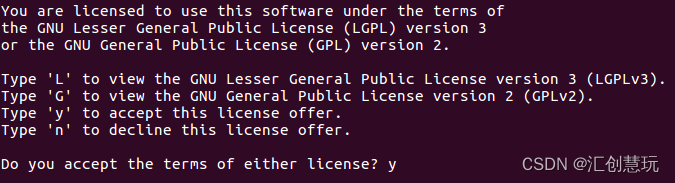
When prompted to select a version, enter o and press Enter.
Ask whether to accept the agreement, enter y and press Enter

安装准备3)
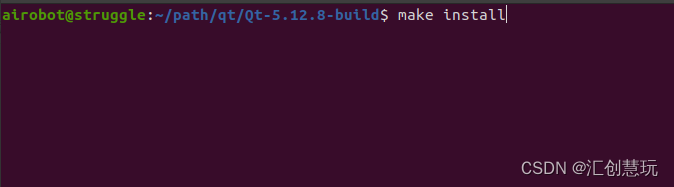
Compile and install
It takes about ten minutes to compile
make -j4 2>&1 | tee build.log

make install
After completion, enter the ~/path/qt/Qt-5.12.8-arm64/lib path to view the file properties. The system architecture is AArch64
readelf -h libQt5DBus.so
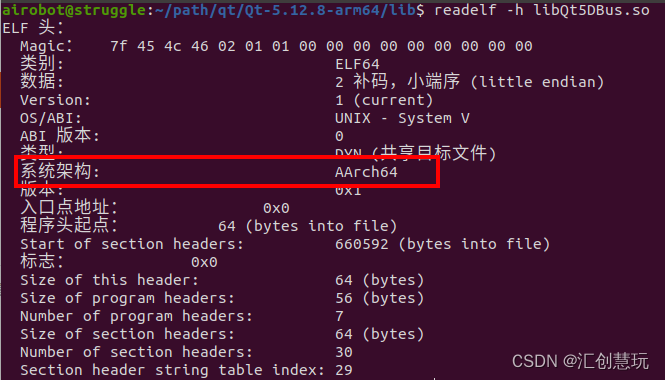
This is what we need, copy it to the development board when the time comes

4. Configure Qt’s native aarch64 cross-compiler
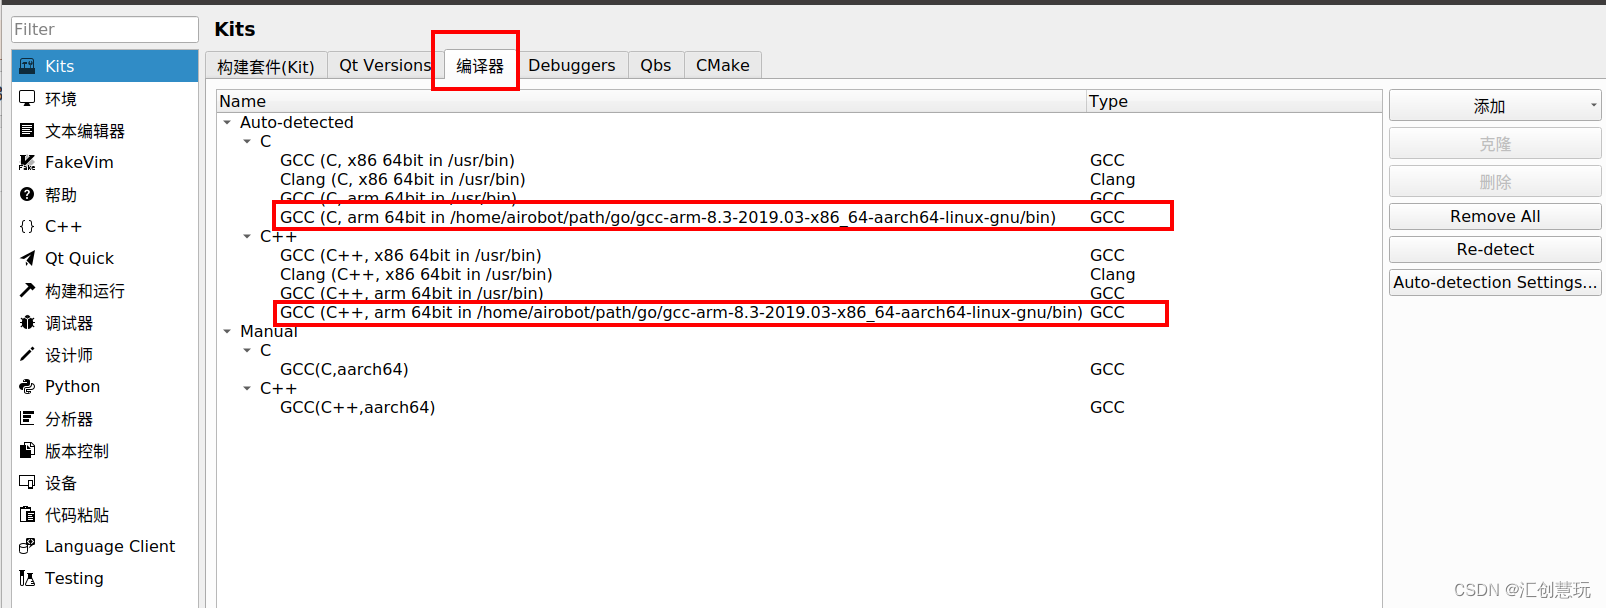
1) Compiler (Compliers) configuration:
Compilers (Compliers) After installing the cross-compilation tool, the system can automatically find it. If you can't find it, you need to add it yourself through the Add button.

which aarch64-linux-gnu-gcc
which aarch64-linux-gnu-g++
添加步骤:
C++ compiler


After the configuration is completed, click the Apply button to apply it.
C compiler


After the configuration is completed, click the Apply button to apply it.
2) Qt Versions configuration:
Qt Versions needs to add a customized version, qmake needs the newly compiled and installed qmake

After the configuration is completed, click the Apply button to apply it.
3) Build kit (Kit) configuration:
Kit needs to select its newly added Qt Version and compiler.

After the configuration is completed, press the Apply button to apply it and take effect, and press the OK button to complete the configuration.
5. Project establishment and compilation verification
Create a new project and select the build kit (Kit) configured above
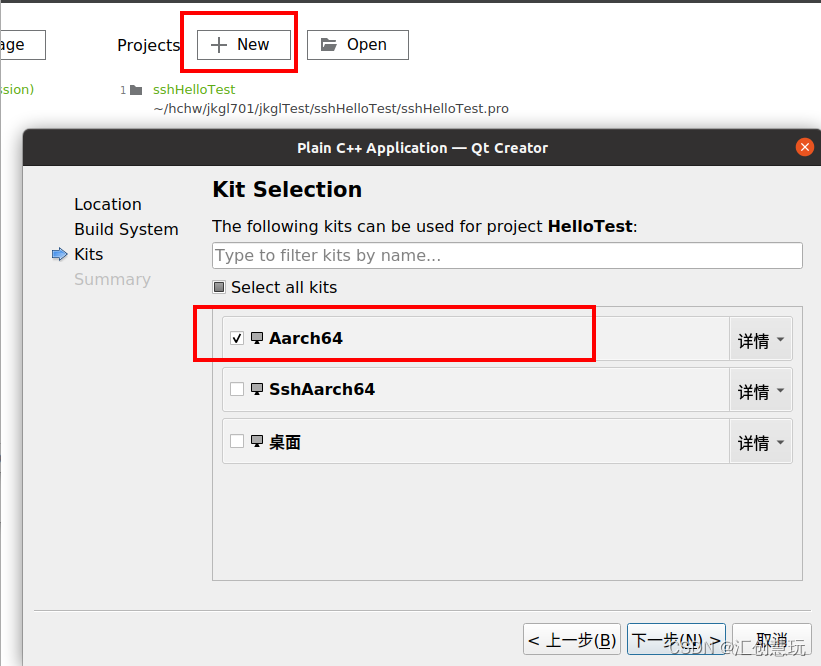
After compilation, you get the executable file:
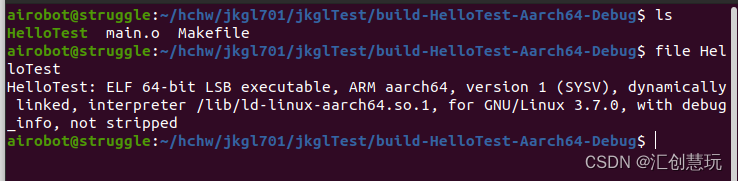
The executable file is ARM aarch64 architecture and the verification is successful!
At this point, congratulations! Qt's cross-compilation environment has been successfully installed and you can start using it! ! !
The next tutorial will talk about: Qt Tutorial 4-Use QEMU to build an arm64 (aarch64) simulation development environment on Ubuntu (x86_64) , so that your compiled ARM aarch64 architecture program can be run and verified on this machine!
Subsequent tutorials will also talk about: Qt Tutorial 5 - SSH cross-compiled QT program on Ubuntu (x86_64) is directly deployed to the remote domestic system (ARM aarch64 architecture) , allowing you to configure the ARM aarch64 architecture program developed by Qt on your local machine by configuring Qt SSH aarch64 cross-compiler to share the environment to be deployed to implement run verification directly on native Qt!
Thanks for reading. My name is Huichuang Huiwan. I hope the article can solve your problem.
Everything must be done to the extreme!