background
Through the previous two efforts, we have the ability to add, delete, check and modify the environment, as well as deploy and view logs. It is now in a makeshift state. But in fact, there is still a very important thing missing, which is the management of permissions. Because it cannot be said that every user can restart and delete the environment at will. It is too easy to cause accidents. So we want to have at least the most basic isolation.
Flask extension module
Last time we used Flask-WTF, an extension module for forms. In order to add permission management this time, we need to install the following extension modules.
- Flask-SQLAlchemy
- Flask-MySQLdb
- Flask-Security
- Flask-Login
When it comes to permissions, we need the concept of users. We need a database to store our user and environment information, so we need to use Flask-SQLAlchemy and Flask-MySQLdb (I use mysql). Flask-Login is introduced to solve the problem of user login, and Flask-Security is introduced to generate the concepts of roles and permissions. Here is an explanation of Flask-Security. It cannot be used alone, but is more like an extension of Flask-Login and Flask-SQLAlchemy. It exists to enhance their permission control capabilities. So after adding Flask-Security, the usage of Flask-SQLAlchemy and Flask-Login is a little different from before. Next I will introduce one by one
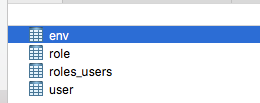
Create database
Let’s solve the database problem first. After installing all the above modules (note: all are indispensable), we first need to create a library named env in the database. for our use
![]()
Set the database parameters before starting the app:
# 连接mysql数据库的配置
app.config['SQLALCHEMY_DATABASE_URI'] = 'mysql://root:[email protected]:3306/env'
Then we create a models.py
from __init__ import *
from flask_security import RoleMixin, UserMixin

# Create database connection object
db = SQLAlchemy(app)

# Define models
roles_users = db.Table('roles_users',
                       db.Column('user_id', db.Integer(), db.ForeignKey('user.id')),
                       db.Column('role_id', db.Integer(), db.ForeignKey('role.id')))


class Role(db.Model, RoleMixin):
    id = db.Column(db.Integer(), primary_key=True)
    name = db.Column(db.String(80), unique=True)
    description = db.Column(db.String(255))


class User(db.Model, UserMixin):

    id = db.Column(db.Integer, primary_key=True)
    email = db.Column(db.String(255), unique=True)
    password = db.Column(db.String(255))
    active = db.Column(db.Boolean())
    confirmed_at = db.Column(db.DateTime())
    roles = db.relationship('Role', secondary=roles_users,
                            backref=db.backref('users', lazy='dynamic'))
    envs = db.relationship('Env', backref=db.backref('user'))


class Env(db.Model):

    def __init__(self, name, user_id):
        self.name = name
        self.user_id = user_id

    id = db.Column(db.Integer, primary_key=True)
    name = db.Column(db.String(255), unique=True)
    user_id = db.Column(db.Integer, db.ForeignKey('user.id'))
Seeing such a bunch of code may be a bit confusing. Let me explain. Flask-SQLAlchemy is an ORM framework that organizes the mapping of database tables to classes. So we can manage the database the same way we manage these class objects. You saw above that we created User, Env and Role classes, which correspond to users, environments and roles respectively. They all integrate db.Model. We assign SQLAlchemy(app) to db, which is how we initialize our database. Then you will find that User and Role inherit UserMixin and RoleMixin respectively. You can ignore it for the time being, this is a Flask-Security thing. I use foreign keys to define the relationships between tables, um, although I know the performance of foreign keys is not good. Developers almost never use it. But as a gadget like me, I don’t care about the presence or absence of these. There are only a few pieces of data in total. You may feel a little confused after seeing the definition of roles_users above. This is the way SQLAlchemy handles many-to-many relationships: it produces an intermediate table. The way SQLAlchemy handles table relationships is the relationship method. This part contains a lot~~ For detailed API definitions, please refer to the official documentation: Quick Start — Flask-SQLAlchemy 2.0 documentation
Next, we only need to call the following code to create these tables in the database.
db.create_all()
3 tables plus a roles_users table.
Database operations
Now that we have the table, we want to initialize some data. So let’s look at some basic operations first.
For example, if we want to create environment information, we can do this:
env = Env()
env.name = 'test01'
env.user_id = '1'
db.session.add(env)
db.session.commit()
This is how to add a piece of data. As long as it is an addition, deletion or modification operation, as long as db.session.commit() is not run, it will not be truly stored in the database. This is to ensure transactionality. After adding a piece of data, now we query the data:
env = Env.query.filter_by(name='test01').first()
Because our model classes all inherit db.Models. So we can use some methods to query. You can also use some more complex query methods, as follows:
Env.query.filter(name.endswith('01')).all()
Create User and Role using Flask-Security
OK, now let's take a look at UserMixin and RoleMixin, which were not explained at the beginning. As mentioned above, they are extensions of Flask-Security to Flask-SQLAlchemy. Through Flask-Security we can easily manage user permissions but it has certain requirements for our model. Please look at the picture below:
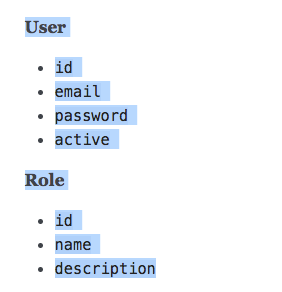
That is to say, we must have two tables, User and Role, and contain corresponding fields. In this way, Flask-Security can help us generate permission management solutions. As a simple example, by using Flask-Security, we can create users in the following way:
from urls import db, User,  Role
from flask_security import SQLAlchemyUserDatastore, Security
# Setup Flask-Security
user_datastore = SQLAlchemyUserDatastore(db, User, Role)
security = Security(app, user_datastore)
db.create_all()

admin = user_datastore.create_user(email='[email protected]', password='admin')
# 生成普通用户角色和admin用户角色
user_datastore.create_role(name='User', description='Generic user role')
admin_role = user_datastore.create_role(name='Admin', description='Admin user role')
# 为admin添加Admin角色
user_datastore.add_role_to_user(admin, admin_role)
db.session.commit()
Above is my code to initialize the database. In order to be able to use Flask-Security. We use SQLAlchemyUserDatastore to encapsulate the db and Security to encapsulate our web app. Next you can see that we create user and role in a very convenient way. And use add_role_to_user to add a role to a user. Flask-Security provides us with many useful methods. Please see the screenshot below:
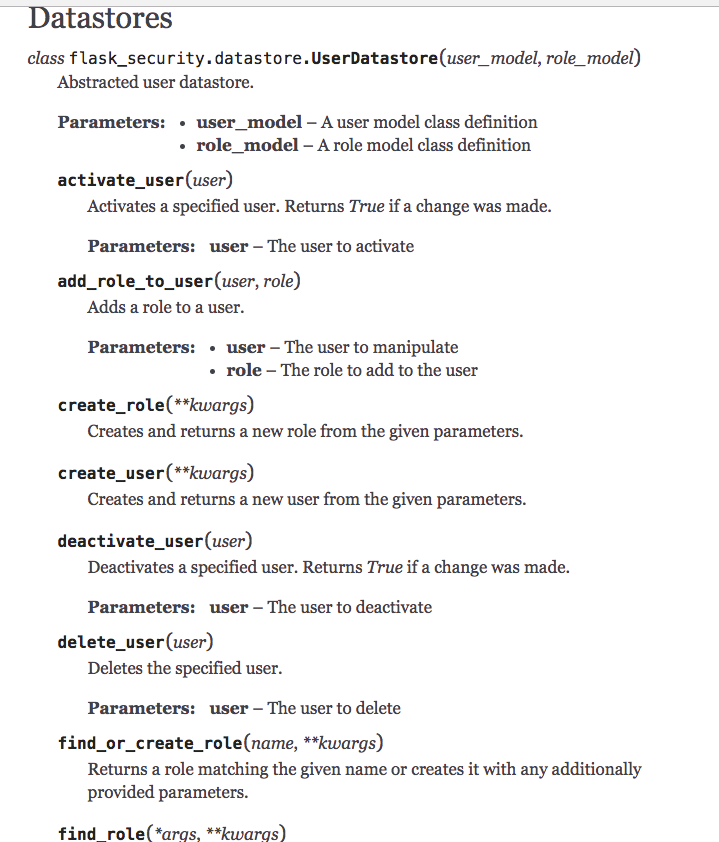
For more APIs, please check the official documentation: API — Flask-Security 3.0.0 documentation
To be continued
The methods mentioned above can effectively manage the relationship between User and Role in our database. In the next post, I will introduce in detail how to use Flask-Security for permission control. It's too late today~ Let's do this for now
In addition, everyone is welcome to join my knowledge planet. I am currently updating the step-by-step artificial intelligence test series.
