How to set up a test environment is also a question that is often asked in interviews. It is generally common in some start-up companies. Because the test environment is not perfect enough, you may encounter the problem of setting up the environment.
Generally speaking, building a test environment falls under the scope of operation and maintenance, but some startups may not have the position of operation and maintenance, so only testers can do it.
The first thing to figure out before setting up the environment is what kind of environment to build, whether it is a jmeter environment or a jenkins environment, or a database environment. The database is also divided into oracle or mysql, etc. . .
Therefore, everyone must first figure out what environment to build, but the most commonly built and most classic environment in daily work is the Tomcat+Mysql+Jdk environment based on the Linux operating system.
So next, I will give you a reference based on this set of environment construction methods:
【Linux environment】
I built a 64-bit centos version of linux system
1. Download and install a VMware workstation. This is the platform of the virtual machine, and the Linux system will be built in it later.
2. Download a centos installation package. There are many Linux versions, such as redhat, ubuntu, deepin, and BT3. I am more accustomed to using centos. Download a CentOS-6.4-i386-bin- DVD1.iso, version 6.4.
3. Create a new virtual machine and import the installation package into it. Remember that one of the steps is to create a user and set a password. The user here is an ordinary account in the Linux environment, but The password is the password shared by the root account root and this ordinary user
4. After the installation is completed, it is a graphical interface. Generally, we use the command line interface, so you can use the shortcut key CTRL here. +ALT+F2 to switch to the command interface.
5. Use the ifconfig command to check the IP address, and then consider using Xshell to connect to the virtual machine. This will make it more convenient to operate the command without having to switch out or out frequently.
[JDK installation]
1. First download a JDK version, the official website address: http://www.oracle.com/technetwork/java/javase/downloads/jdk8-downloads-2133151.html
Download version 1.8, marked with a red box:

Maybe some students saw that there is no 1.8 version, you can download any Linux version! Be sure to remember that it is the linux version! ! Many students make a mistake and download the Windows version directly!
2. After decompressing it locally, use xftp to upload it to the Linux environment. The upload path is: /usr/local

3. Give the JDK file the highest permissions, otherwise permission issues will block your operations when used or referenced later (remember to connect your xshell
![]()
It’s this tool. If you have any problems, you can check on Baidu how to connect to your Linux server). The detailed steps are as follows:
1) Switch to the top-level directory cd ~
2) Then switch to the upper-level directory cd…
3) Switch to the local path cd /usr /local
4) Grant the highest permissions to the JDK file chmod 777 -R jdk1.8.0_65
4. Configure JDK environment variables:
1) Switch to the top-level directory cd ~
2) Switch to the upper-level directory cd…
3) Switch to the etc path cd etc
4) Edit the profile file vi profile
5) Press the i key on the keyboard to enter the editing mode and navigate to the end of the profile document [Remember, you are asked to go to the end of the document. I’m not asking you to delete the document! ]!
6) Configure the JDK environment variables and enter the following content in the profile:
export JAVA_HOME=/usr/local/jdk1.8.0_65 [Special note: this It is the installation path of your jdk! ! ! Make no mistake! Follow your own path! 】
【Key point! Many students got the wrong place after decompressing. Remember that the JDK opening interface you uploaded should look like this! Until this interface is the location of your JDK environment variables! After making sure that the path /usr/local/jdk1.8.0_65 is opened, the interface shown in the screenshot below will appear! ! ! ! 】
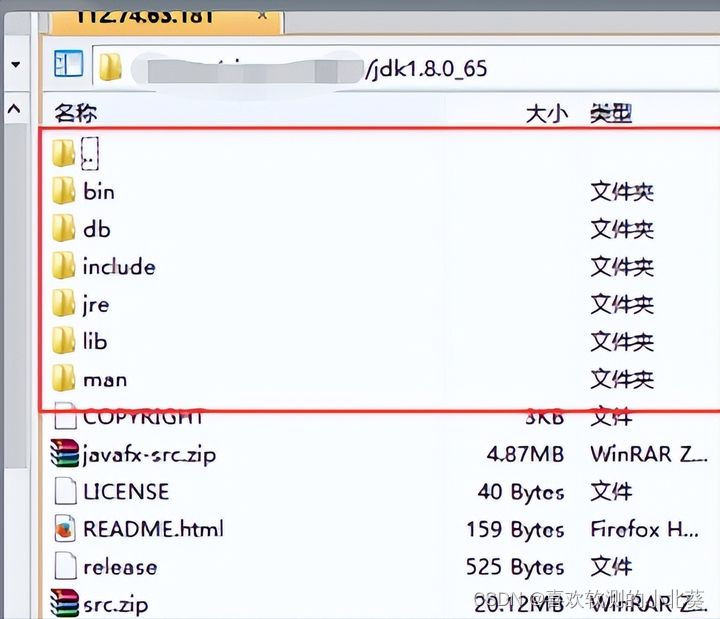
export CLASSPATH=CLASSPATH:JAVA_HOME/lib:$JAVA_HOME/jre/lib
export PATH=JAVAHOME/bin:JAVA_HOME/jre/bin:PATH:HOME/bin 9) How to check whether your JDK is configured? Enter the command java -version, and when you see the screenshot below explaining the JDK version, it means that your configuration is successful! 8) Make the environment variable you just set take effect source profile
7) Press and hold the ESC key on the keyboard, and then enter: wq to save the environment variable you just set

【Tomcat】
1. First download a tomcat version. I am using the apache-tomcat-6.0.35 version. apache-tomcat-6.0.35.zip is the corresponding compressed package and decompress it on your local machine;
2. You can use XFTP to directly upload the decompressed apache-tomcat-6.0.35 to the /usr/local path. After the upload is completed, you need to configure the environment variables here, and then the following Only then will tomcat start smoothly
3. Follow the steps to start tomcat:
1) Switch to the top-level directory cd ~
2) Switch Go to the upper-level directory cd...
3) Switch to the bin path where the startup command is located: cd /usr/local/apache-tomcat-6.0.37/bin
4 ) Enter the tomcat startup command ./startup.sh. If you encounter the following prompt, it means that you do not have enough permissions to operate the commands in the bin file, and you need to grant permissions:
![]()
5) Return to the upper-level directory of bin cd...
6) Give the highest permissions to the bin file chmod 777 -R bin
7) Switch to cd bin
under the bin path 8) Then execute the tomcat startup command again: ./startup.sh. If the following screenshot appears, it indicates that the startup is successful.

9) Generally, the default port is 8080, so directly enter your IP address and port number into the browser of your computer, and you can access the tomcat homepage. http://[Your Linux server IP address]:8080
Note: The IP address is the IP address of your Linux server. How to obtain it? —>Enter ifconfig in Linux to get it!
10) However, any configuration will not be successful so easily. There will be problems with the firewall being closed or the port being occupied. Here we can switch to the bin directory under tomcat and execute the following command , check the tomcat log: ./catalina.sh run, the general log format is as follows:
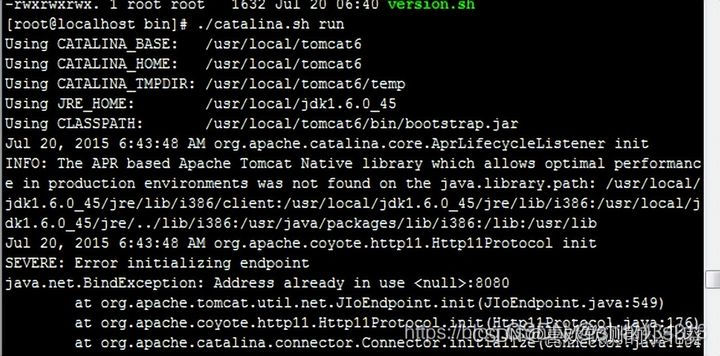
Note: If you cannot access it, you can try to turn off the firewall, enter the command under Linux: service iptables stop, and then access it again!
11) Enter the IP address and port number in the browser. If you see the tomcat homepage, it means success, as shown below:

[Mysql configuration]
1. Switch to the path where you need to install mysql cd /usr/local
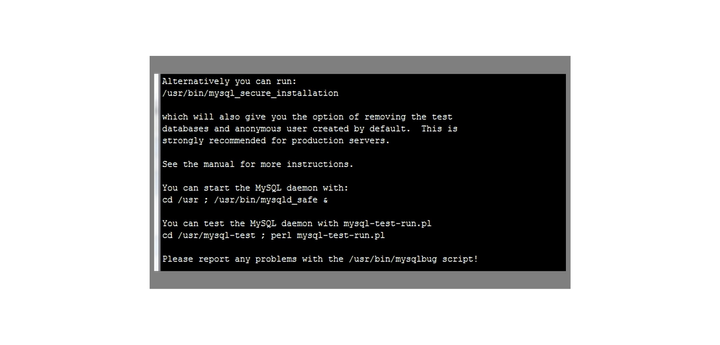
2. There are many installation methods on the Internet. We build a test environment here, you can choose directly For online installation, the command is as follows: yum install mysql-server. Wait for the installation to complete. During some steps, you need to ask whether to continue. Just enter Y.
3. After the installation is completed, start the mysql service. The command is: service mysqld start. If you see the screenshot below, it means that the installation of mysql is successful
4. Generally, mysql installed in this way defaults to the root user for login, and the password is empty by default, so enter the following command: mysql -u root -p, then enter the password and press Enter to log in to the database. As follows:
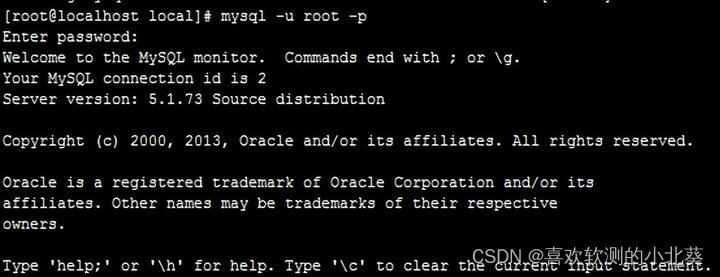
It means you have logged in to the database.
How to use local navicate to connect to the database of linux server? And operate on the database:
1) First create a new user, because general database users are accessed by Linux natively. If we want to access the Linux database from the outside, we must create a user with permissions of %< a i=1> 2) Log in to the database in xshell: mysql -u root -p and press Enter. When you are asked to enter the password, you can log in by pressing Enter again, because the default user of the database is root and the password is Empty
3) Switch to the mysql database use mysql
4) Create a user who can access the linux database server from the outside: grant all privileges on . to 'root'@'%' identified by '123456' with grant option;
5) Refresh privileges: flush privileges;
6) Then use navicate to log in! Use root user, the password is 123456. Please refer to Baidu for details on how to use navicate to connect to the database!
The above is the Tomcat+Mysql+Jdk environment based on the Linux system. Of course, this is just one of them, which is relatively common.
No matter what test environment you encounter at work, you can just go directly to Baidu. There are a lot of tutorials on the Internet, but the biggest difficulty is trial and error.
You will definitely encounter all kinds of strange errors during the construction process. Software development is like this. Every day is writing code, adjusting programs, and fixing bugs. Sometimes a problem may be stuck for a day, but in the end I find it is very simple.
Since everyone has chosen this path, you must adapt to this working environment. Your ability to solve problems depends largely on your original accumulation. If you step on many pitfalls, you will naturally become a great expert one day! mutual encouragement! !