In the previous QT project, there was a UI material for a dialog box, but the number of text in the dialog box was uncertain, and the dialog box needed to adapt according to the width and height of the text.
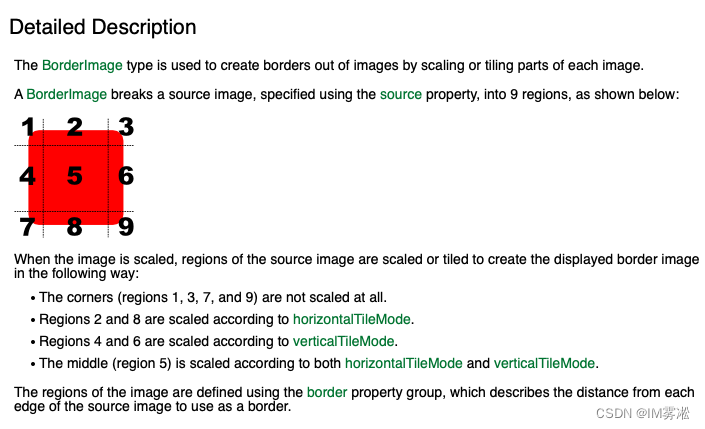
In this case, using BorderImage can save the size and quantity of certain UI materials. For example, a large rounded background plate can output a very small picture, and the width and height of the material can be stretched through the code to change the size of the material, so as to achieve the same goal. pieces of material, adaptable to all sizes.
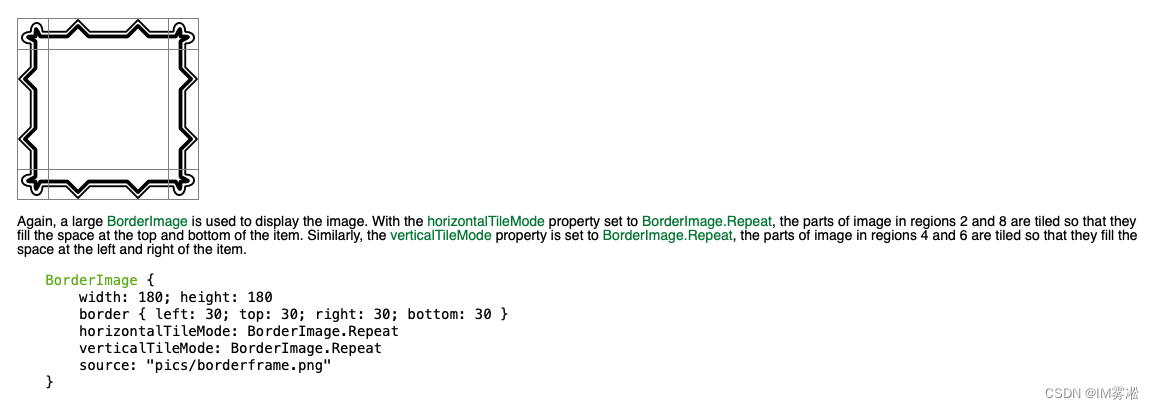
The principle is to divide a picture into 9 parts. The four corner parts 1, 3, 7, and 9 are not stretched and scaled, and only the middle area 2, 4, 5, 6, and 8 participates in stretching and scaling, which can effectively change The size of the material without affecting the four corner areas.
Case 1
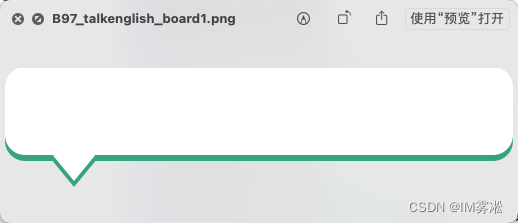
The art students gave a dialog box material, and the programmer students needed to stretch the dialog box material according to the dialogue content.
We need to divide the nine-square grid first and determine the size of the four corners, that is, the size of the part that we do not want to stretch.
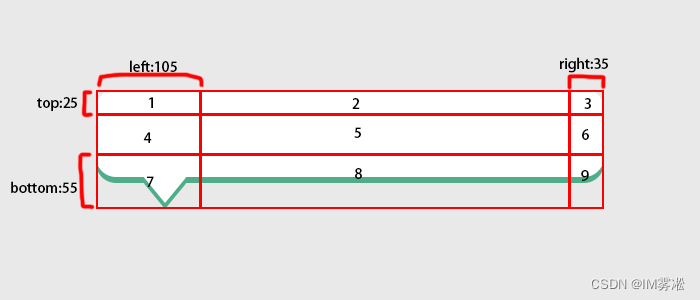
Because 1, 3, 7, and 9 correspond to The rounded corners of the material, 7 and the small arrow with a bubble, these are the parts that do not want to be stretched. The other parts 2, 4, 5, 6, and 8 are all solid color blocks and straight lines. It does not matter if they are stretched. Can't tell either.
BorderImage property setting code
BorderImage {


            id:borderImg
            source: "qrc:/resource/resource/B97_talkenglish_board1.png"
            border.left: 105; border.top: 25
            border.right: 35; border.bottom: 55
            //设置width 和 height即可拉伸图片
            //注意 width 不能小于border.left + border.right
            //height 不能小于border.top + border.bottom

            //如果拉伸部位是纯色块或者是直线线条,可以不设置平铺模式
            //此案例设置和不设置是一样的效果,可以不设置
            horizontalTileMode: BorderImage.Stretch
            verticalTileMode: BorderImage.Stretch
}
border: sets the four sides that divide the nine-square grid
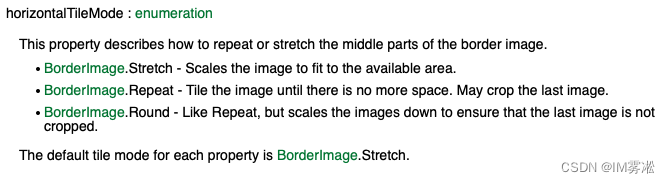
horizontalTileMode: horizontal tile mode
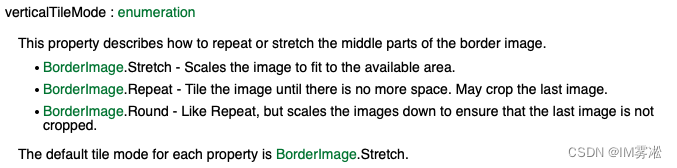
verticalTileMode: vertical tile mode
Set width and height to stretch the image
Note
width cannot be less than border.left + border.right
height cannot be less than border.top + border.bottom
Regarding the tiling mode, it is also explained in the official documents. You can do it by yourself
All code of the case
import QtQuick 2.12
import QtQuick.Window 2.12
Window {
id:root
width: 1400
height: 640
visible: true
title: qsTr("Hello World")
Rectangle{
anchors.fill: parent;
color:"#dcdcdc"
}
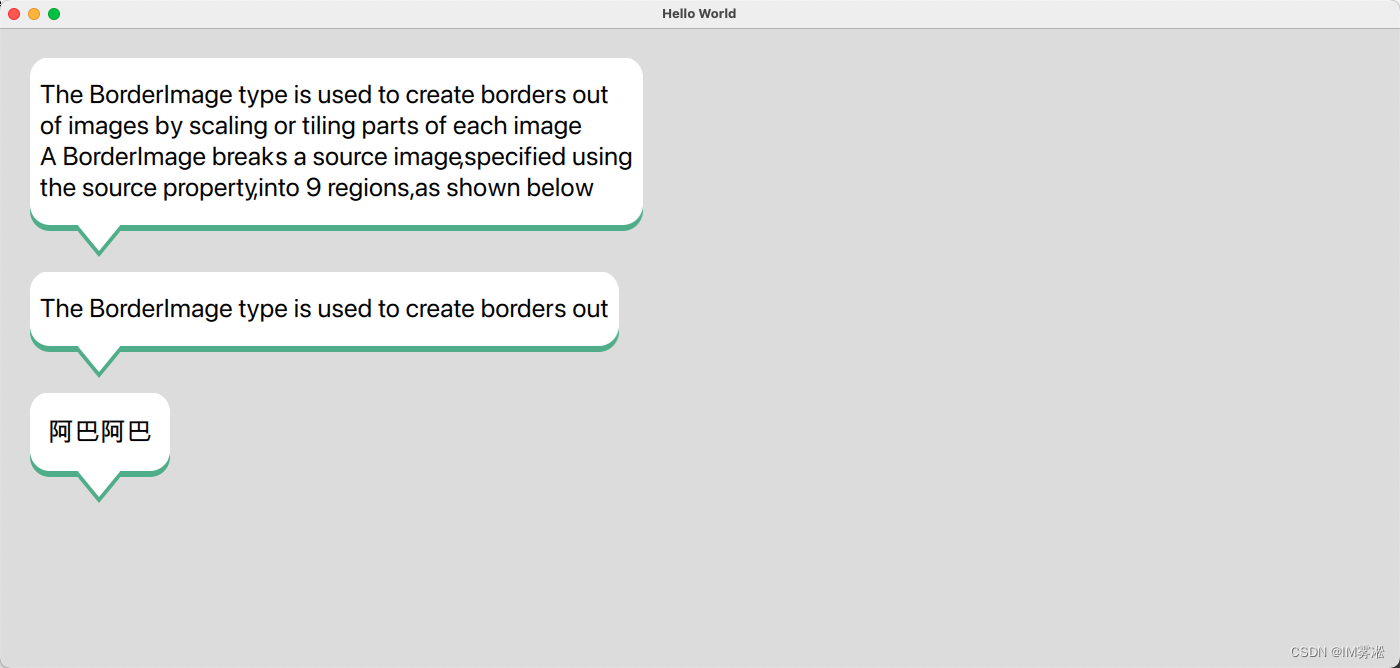
property var strArr:
["The BorderImage type is used to create borders out\nof images by scaling or tiling parts of each image\nA BorderImage breaks a source image, specified using\nthe source property, into 9 regions, as shown below",
"The BorderImage type is used to create borders out",
"阿巴阿巴"]
Column{
id:column
y:30
anchors.left: parent.left
anchors.leftMargin: 30
spacing: 15
Component.onCompleted: {
for(var i in strArr){
var obj = borderImgCom.createObject(column)
obj.infoText = strArr[i]
}
}
}
Component{
id:borderImgCom
BorderImage {
id:borderImg
source: "qrc:/resource/resource/B97_talkenglish_board1.png"
border.left: 105; border.top: 25
border.right: 35; border.bottom: 55
horizontalTileMode: BorderImage.Stretch
verticalTileMode: BorderImage.Stretch
property string infoText: ""
Text {
id:info
text: infoText
font.pixelSize: 26
anchors.horizontalCenter: parent.horizontalCenter
anchors.top: parent.top
anchors.topMargin: 20
onWidthChanged: {
borderImg.width = width + 20
}
onHeightChanged: {
borderImg.height = height + 20 + borderImg.border.bottom
}
}
onWidthChanged: {
if(width < border.left + border.right){
width = border.left + border.right;
}
}
onHeightChanged: {
if(height < border.top + border.bottom){
height = border.top + border.bottom;
}
}
}
}
}
Execution results:
The above is all the content of this article. This is a personal study record. If there is any mistake in the writing, please point it out. Thank you. I hope It will be helpful to all readers!