Table of contents
Import the project created by CubeMX into CubeIDE
Create ADD.c file and ADD.h file for demonstration
Method 1: Create in the IDE's project browser
Method 2: Create in the file window/copy and paste from other places
Add ADD.h to header file search path
Add ADD.c to source file search path
Advantages and disadvantages of relative paths and absolute paths
We will follow the steps below
- Create the simplest project in CubeMX
- Import the project created by CubeMX into CubeIDE
- Create ADD.c file and ADD.h file for demonstration
- Add ADD.h to header file search path
- Add ADD.c to source file search path
- Define an addition function in the ADD.c file, declare this function in the ADD.h file, call this function in main.c, and build the project. If there are no problems with the build, it means we are successful.
CubeMX create project
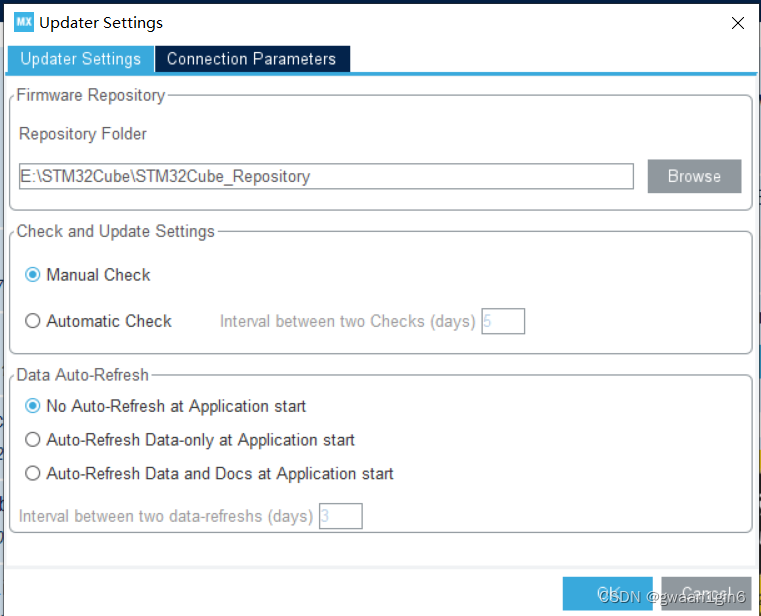
Open CubeMX, click Help -> Updater Settings, and a page will pop up. There is a content on the page, Firmware Repository, which is used to manage the download path of the firmware package. It should be noted that the path cannot contain Chinese characters and spaces.
Click Help -> Manage embedded software packages, a page will pop up where you can manage and download firmware packages.
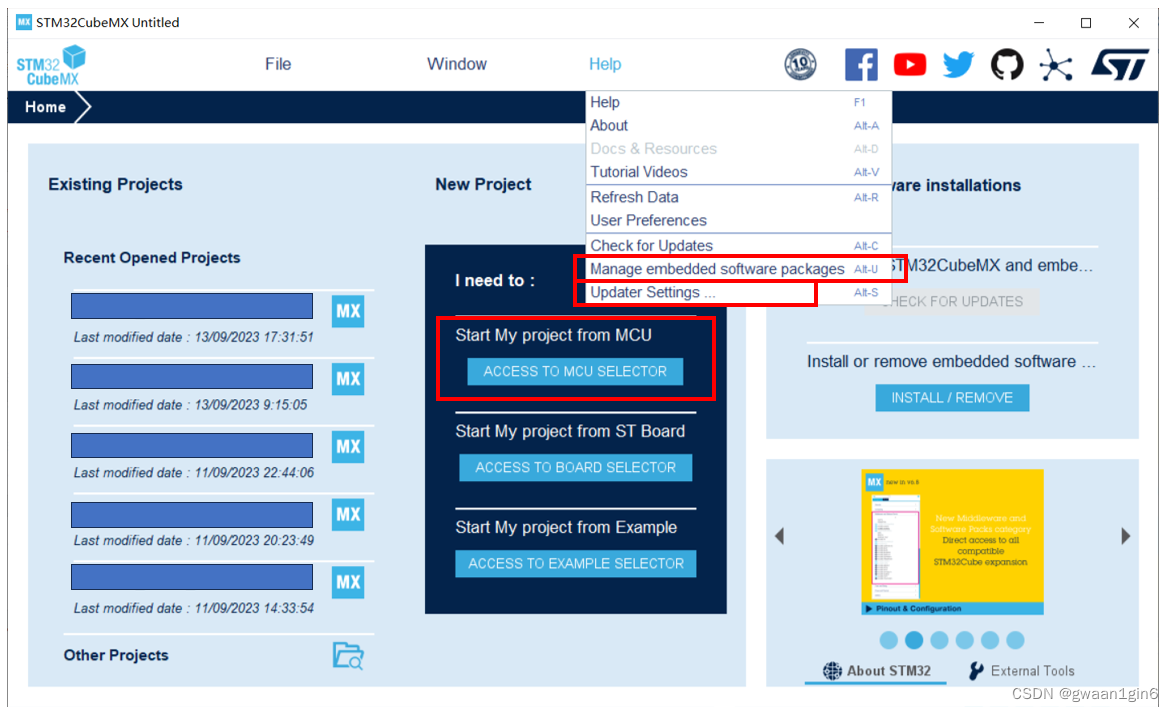
After completing the above settings, click ACCESS TO MCU SELECTOR on the main interface.
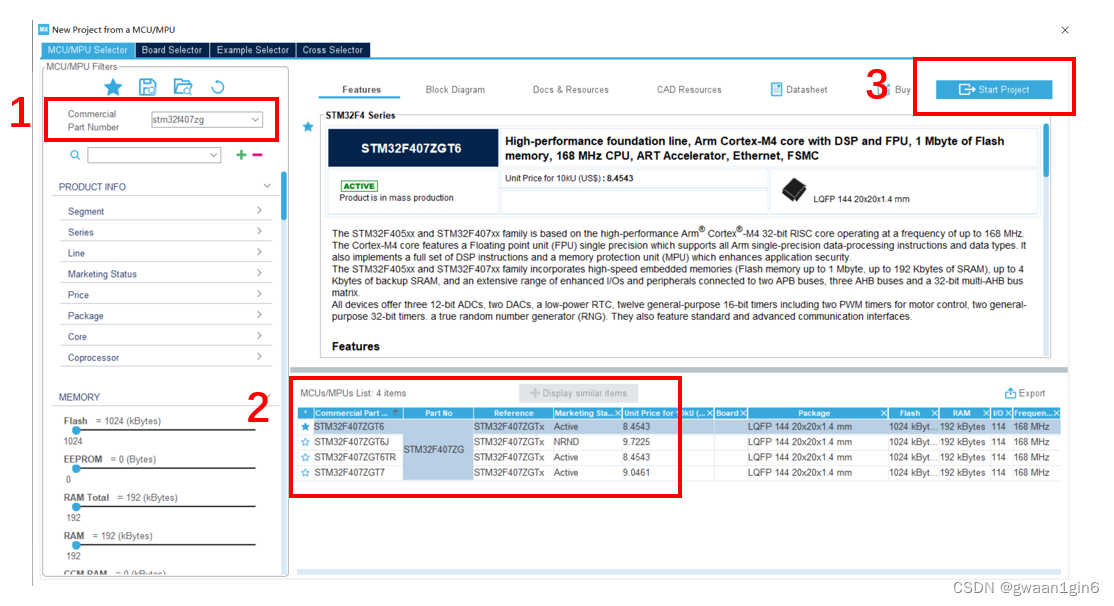
Enter your chip model at 1, select the specific model at 2, and after selecting, click 3 to start creating the project.
Then there is the interface below.
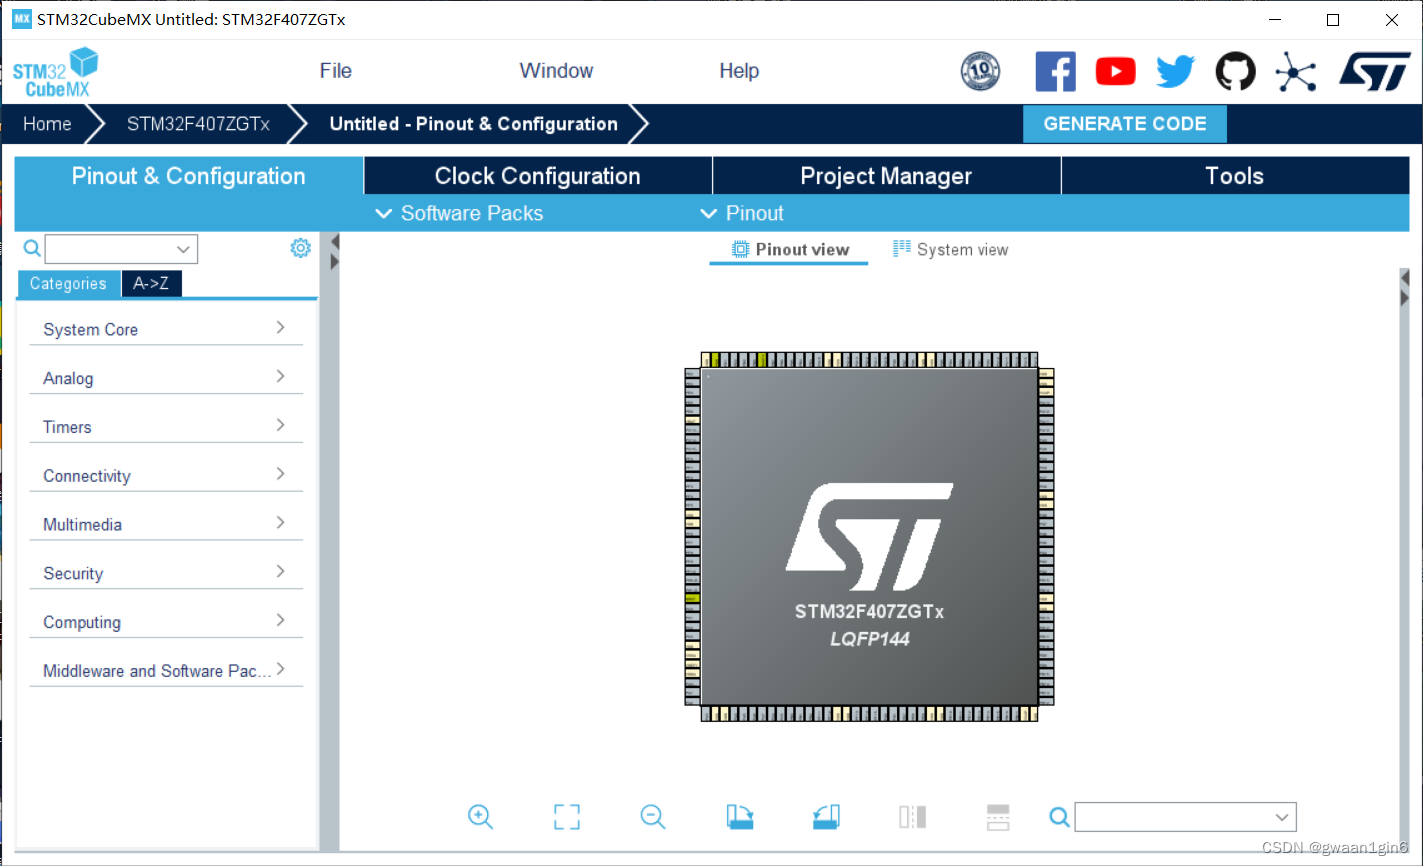
Since our project is only for demonstration, how to use CubeMX is not our focus, so it will be simpler for me to use CubeMX to configure the MCU.
Follow the figure below to activate the external crystal oscillator settings of HSE
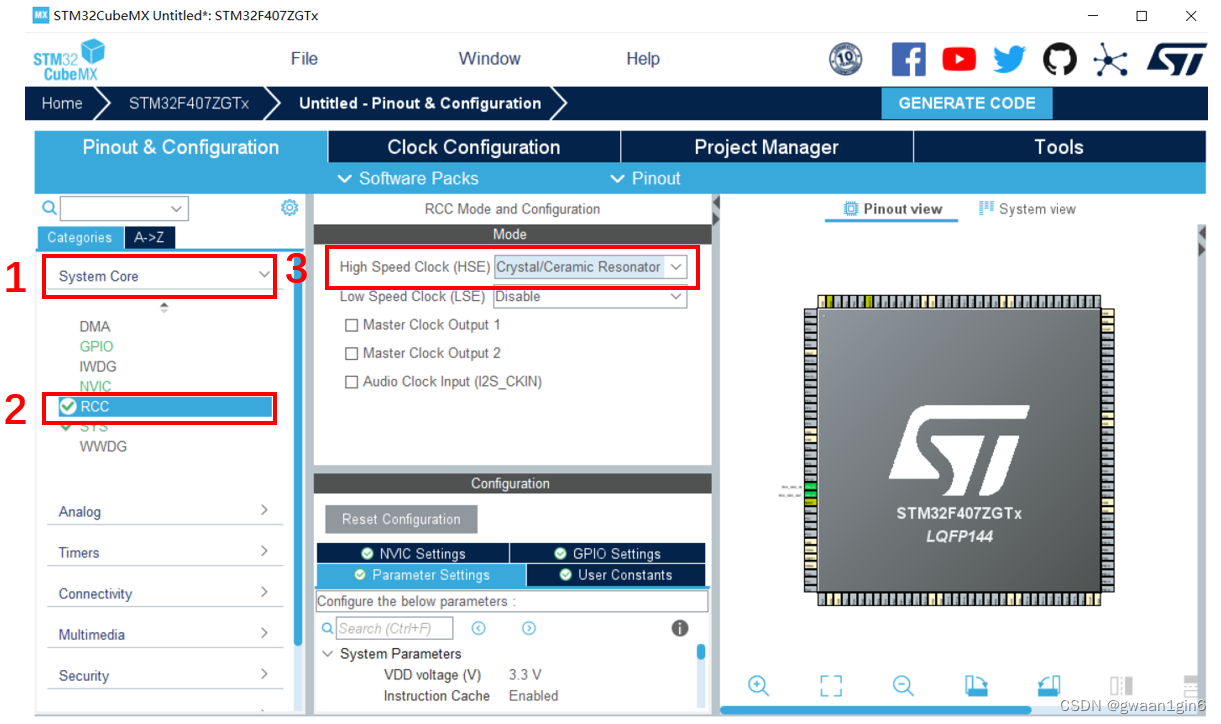
Follow the figure below to configure the clock tree and be sure to enter the correct external crystal oscillator frequency.

Follow the figure below, activate the debugging interface, and set it to SWD debugging

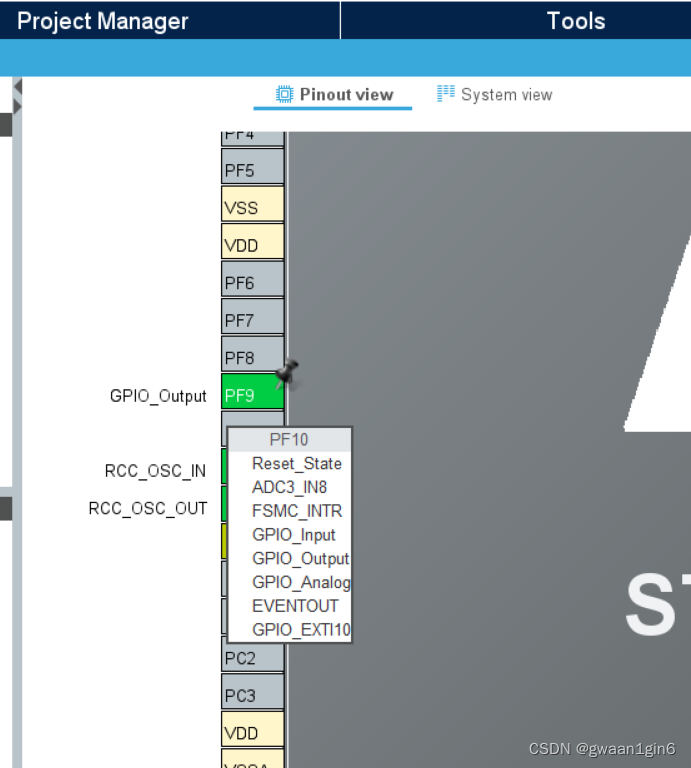
At this point the chip is ready to run, but in order to make this project less "virtual", set up two GPIOs.
On the pin view, set the pin function of PF9 and PF10 to GPIO_Output
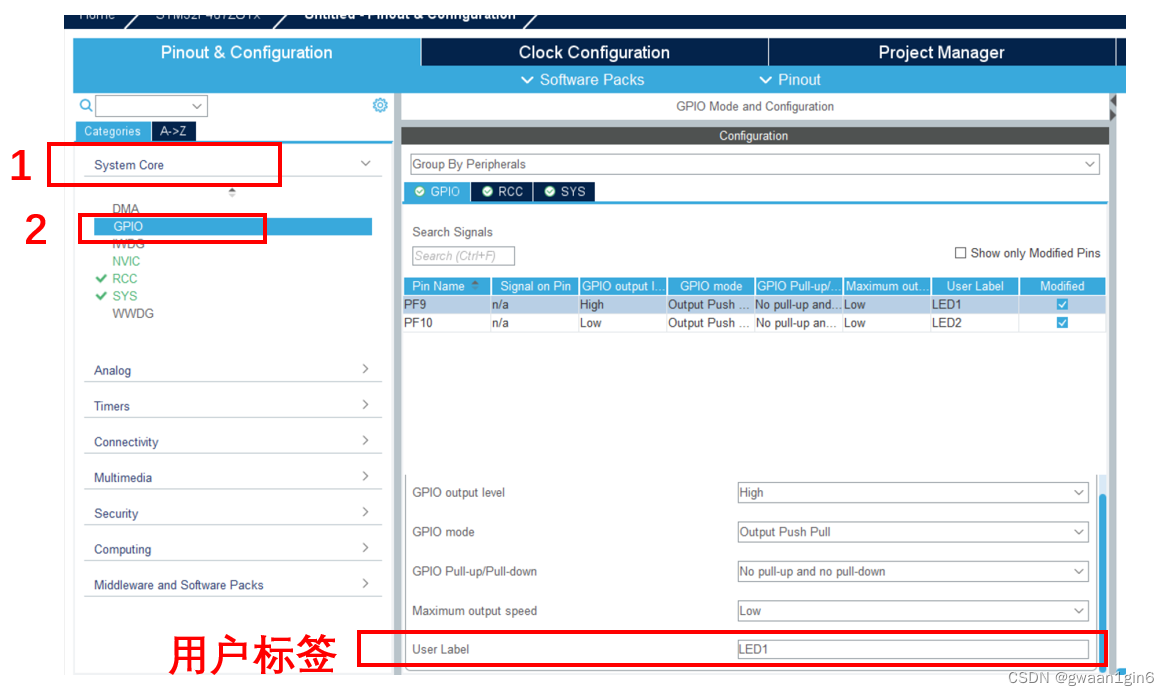
Follow the figure below to set the GPIO output level and user label.
Now the chip is configured.
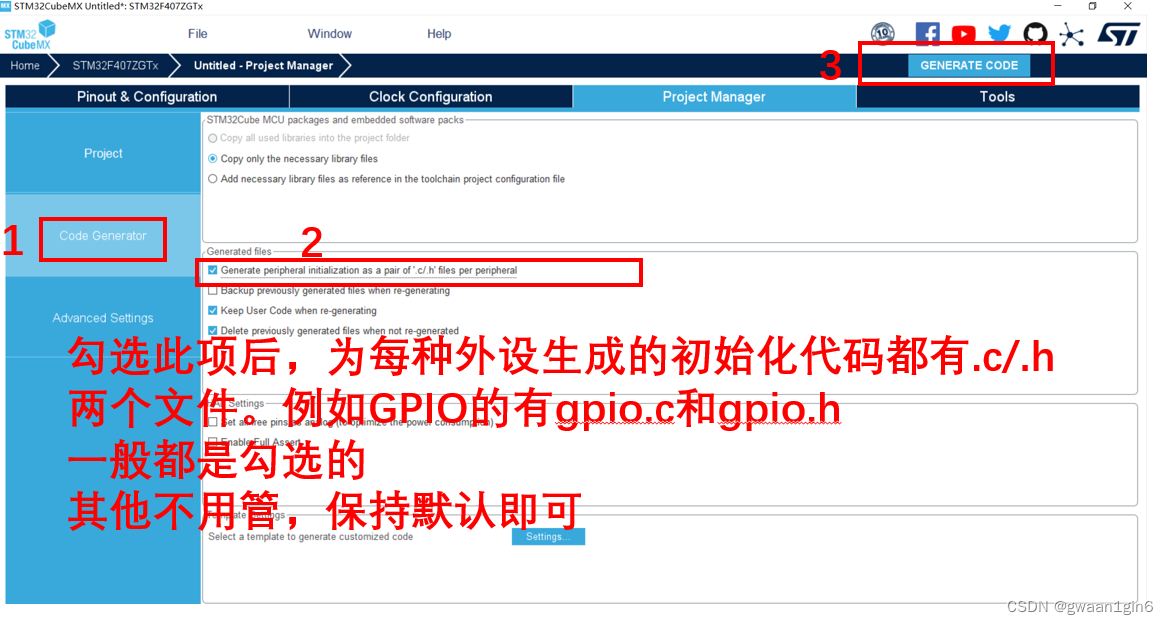
project management
The next step is to build project management.
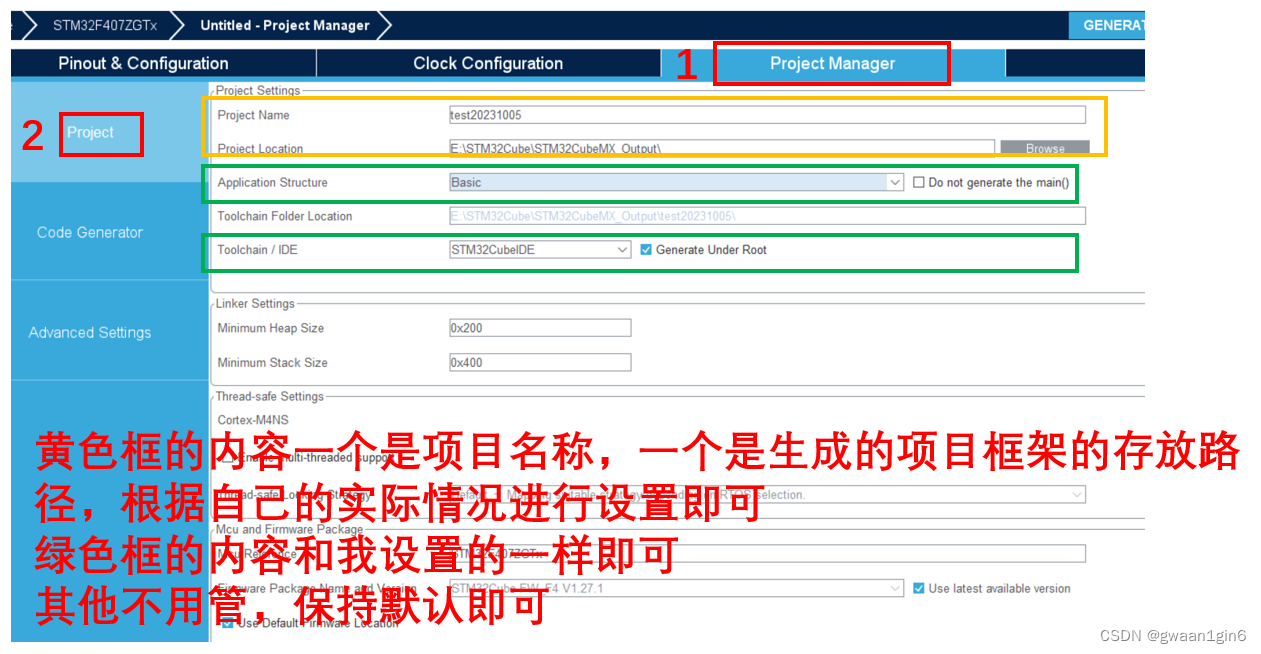
The generation path of my project framework is a separate folder. You can also set the path to CubeIDE's Workspace, but this is what I am used to.
In this way, we have successfully created a project framework using CubeMX.
Import the project created by CubeMX into CubeIDE
Description: Below, project == project
At this time we already have a project. Copy the project to the CubeIDE workspace.
Import the project into the IDE:
- Method 1: Open CubeIDE, click File -> Open projects from file system in the upper left corner of CubeIDE, click Direction, select the project folder you want to import under the workspace, and finally click Finish.
- Method 2: In the workspace folder, open the project folder, open the .project file, or open the .cproject file.
After the import is successful, build it and there will be no problem.
In the picture below, the left side is the project directory seen in the project browser in the IDE, and the right side is the project directory in the project file under the workspace.
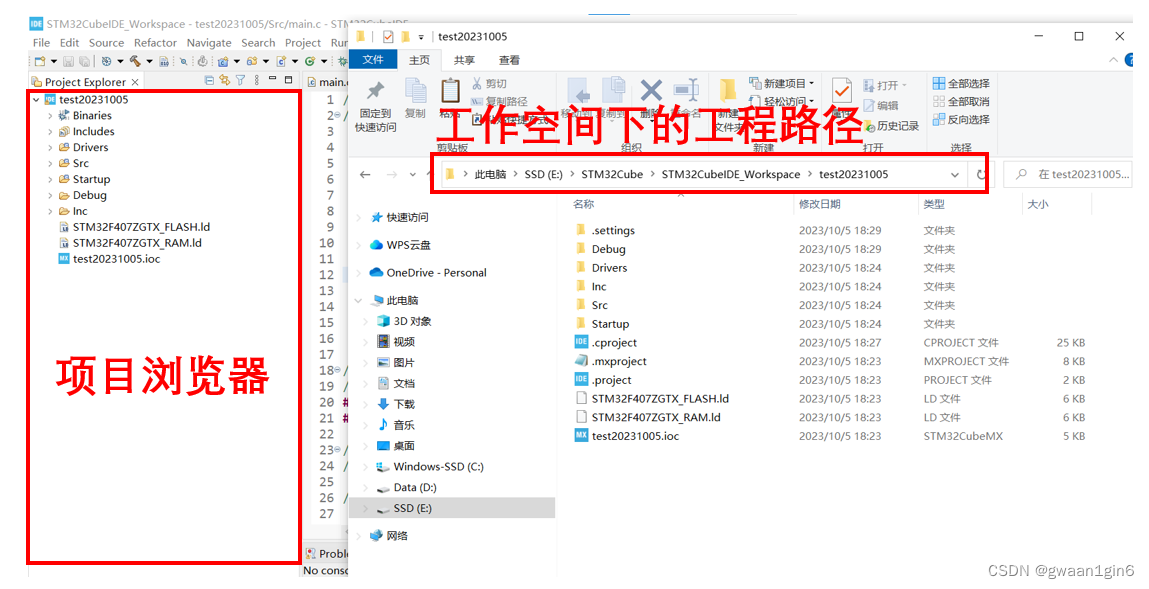
My workspace path: E:\STM32Cube\STM32CubeIDE_Workspace
My project path: E:\STM32Cube\STM32CubeIDE_Workspace\test20231005
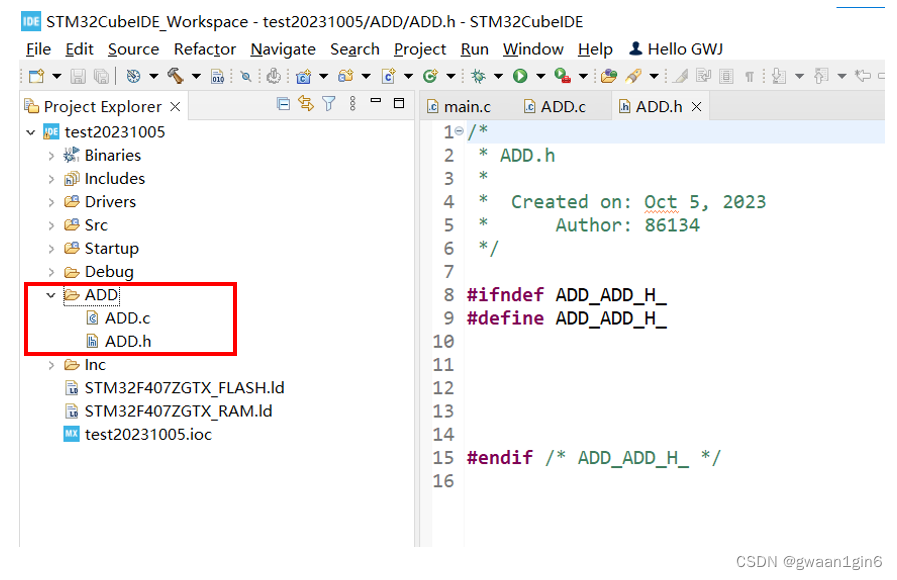
Create ADD.c file and ADD.h file for demonstration
Next, I will create an ADD folder in the project, and create the ADD.c file and ADD.h file in this folder
There are two ways to create folders and files:
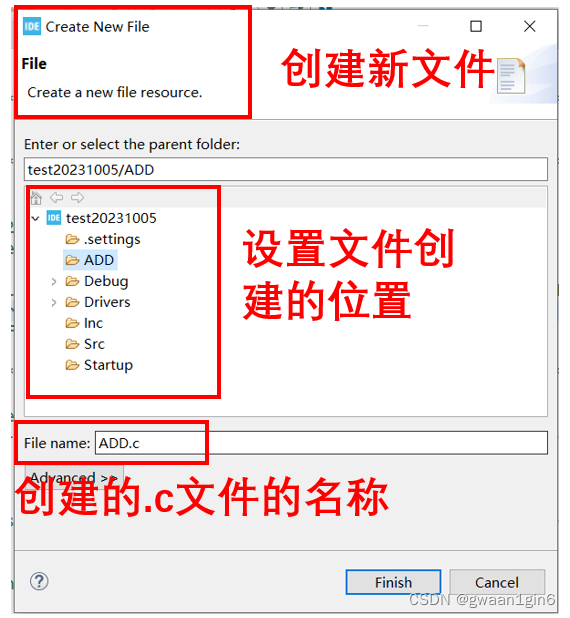
Method 1: Create in the IDE's project browser

In the IDE's project browser, select the project, right-click, and click "NEW" to see the above.
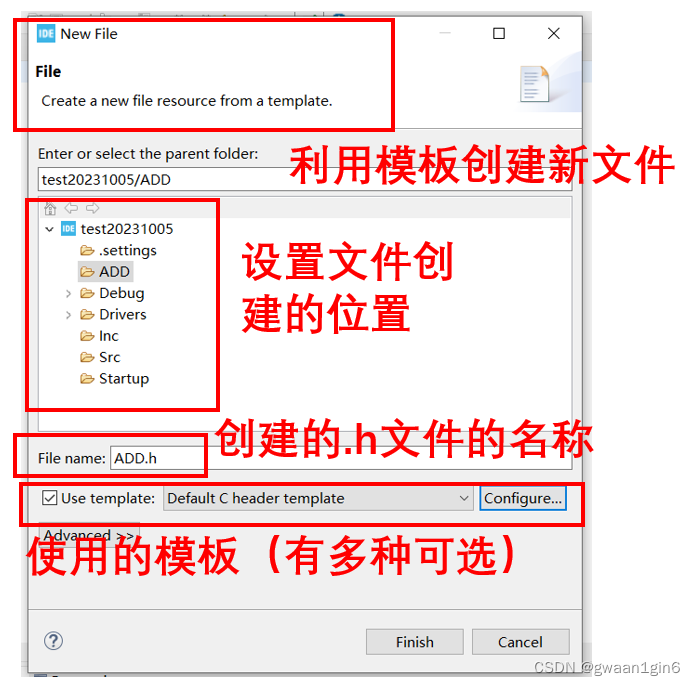
Click "File" or "File from Template" or "Folder", and the interface shown below will pop up, where you can set the location and name of the folder and file creation.
"File" and "File from Template" are essentially the same, except that the latter has a template.

After the creation is completed, you can see the folder and the files under the folder in the project browser.
The .h file created using the header file template is as shown in the figure.
Method 2: Create in the file window/copy and paste from other places

In the workspace, within the project file, create a folder in the file window and name it ADD. Open ADD and create two files, ADD.c and ADD.h, in this folder. You cannot find .c and .h in the new file. You can create a text document file (.txt file) and then modify its file suffix.
If you cannot see the file extension, you can click "View" above the folder and then check "File extension" so that you can see the file extension.
Createfolders and files in the file window, or your folders and files arecopied and pasted from elsewhere , then the IDE's project browser will not immediately display the folders and files just created. At this time, you need to right-click the IDE's project browser and click "Reflash" to refresh, or build the project, and you can see the folders and files you just created in the project browser.
Now we can see the folders and files we created in the IDE's project browser, but the project does not yet contain their search paths.
If we now include ADD.h in main.c and then build/compile, an error will occur, indicating that the file cannot be found. As shown below.

Add ADD.h to header file search path
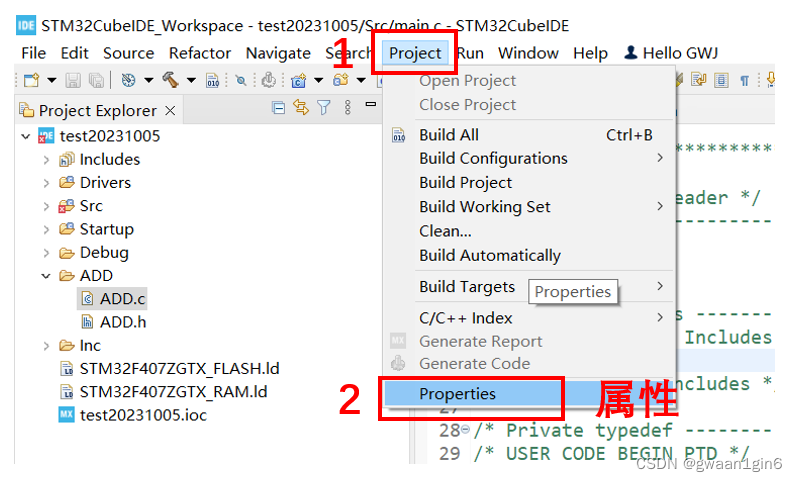
Click Project -> Properties
Click C/C++ General->Paths and Sybols
The interface shown in the figure appears, and the content in the middle part is the path of the included header file.
Currently, these paths are relative paths, and the base address isproject path.
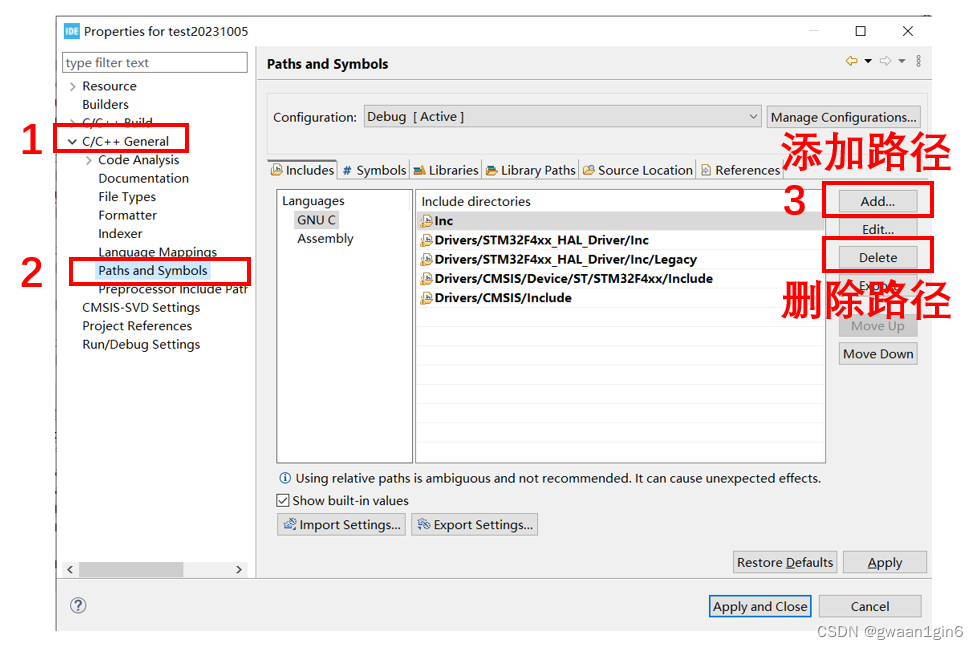
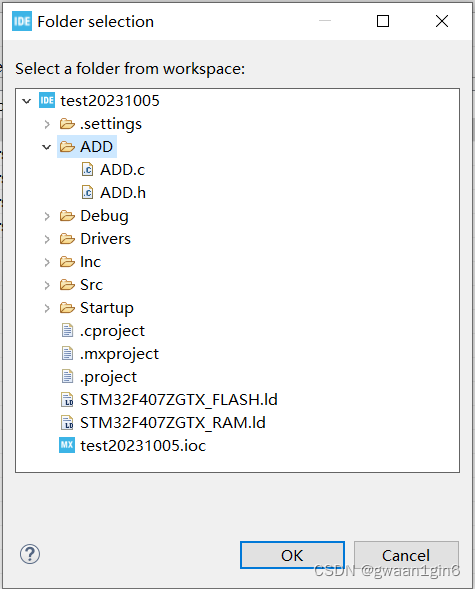
Click Add, and the interface shown in the figure will appear.

There are three ways to add the ADD folder to the header file search path.
- Method 1: Enter ADD in input box A and click OK. What is added in this way is the relative pathrelative to the project path.
- Method 2: Click Workspace, find ADD, and click OK. This method adds a relative path relative to the workspace path. When using this method, the option Is a workspace path needs to be checked. If it is not checked, it is relative to the project path , the build/compile will error.
- Method 3: Click File system, find ADD, and click OK. What is added in this way isabsolute path.
At the end of the article, there are advantages and disadvantages of relative paths and absolute paths (from GPT)
What I added here is the relative pathrelative to the workspace path
The path shown is relative to the workspace path.
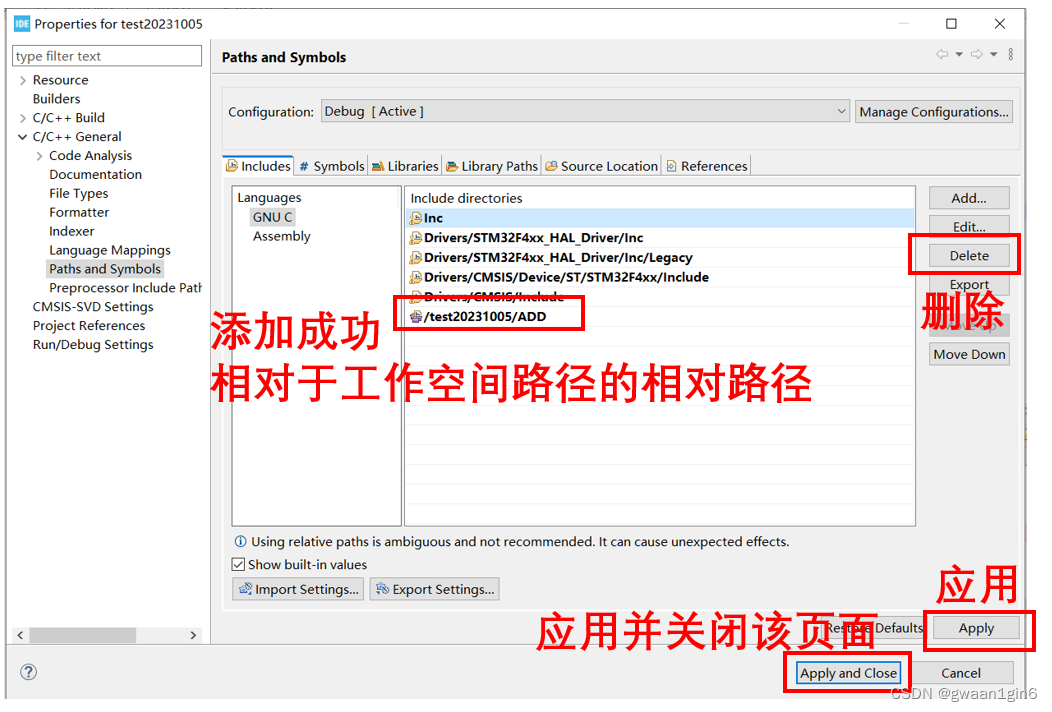
If you add the wrong one, you can select the path you want to delete and click Delete to delete the path.
Remember to click Apply to save.
Add ADD.c to source file search path
Click Source Location -> Add Folder, select the ADD folder, OK, and Apply.
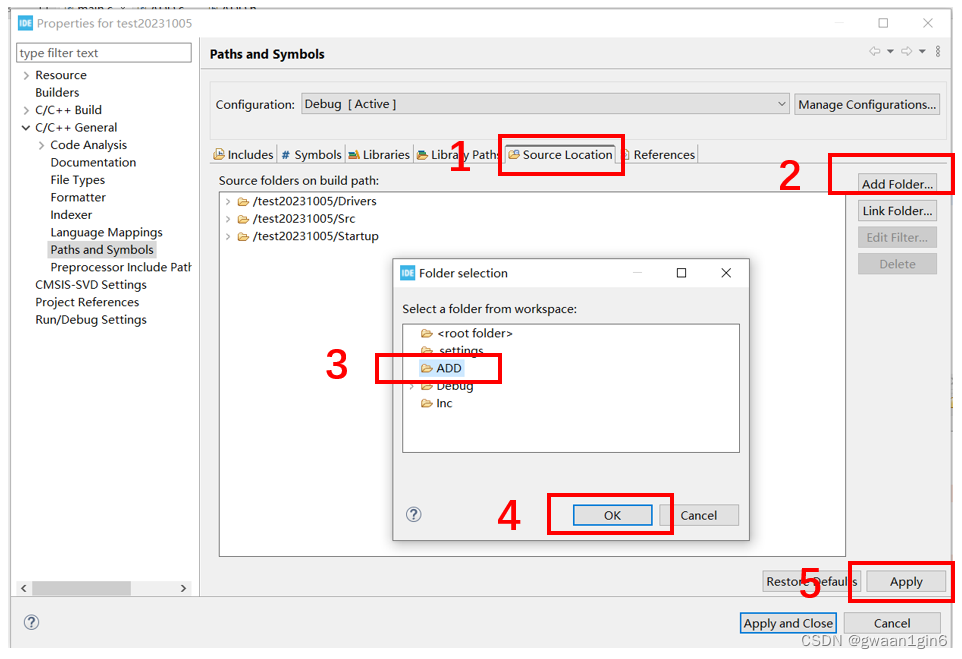
Remember to click Apply to save.
The difference between Add Folder and Link Folder:
Add Folder: add (add)Folder inside the project
Link Folder: link (reference)Folder outside the project
After successful addition:

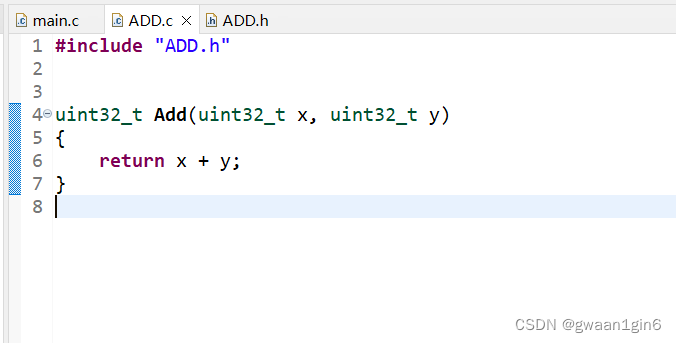
Define an addition function in the ADD.c file, declare this function in the ADD.h file, call this function in main.c, and build the project. If there are no problems with the build, it means we are successful.
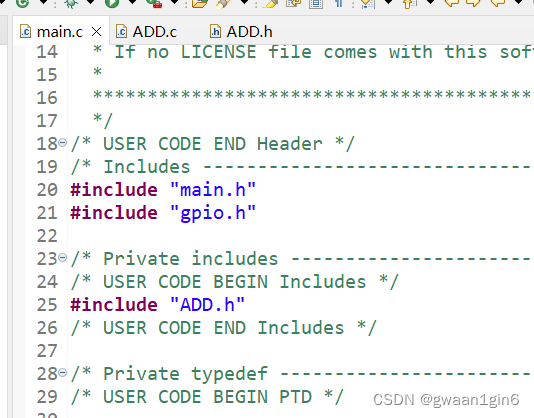
ADD.c
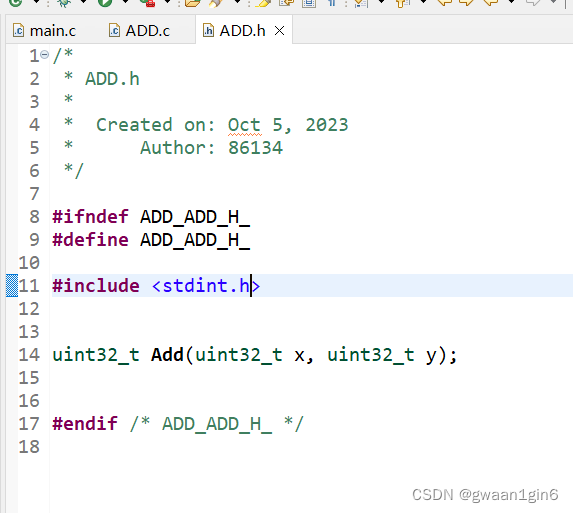
ADD.h
I don’t know why, but if <stdint.h> is not included, an error will be reported. The error message is as follows
unknown type name 'uint32_t'
It will be fine if you include <stdint.h>. In the past, I would not get an error if I did not include it (if anyone knows why, please tell me in the comment area, thank you very much)
main.c
Inclusion of header files
function call
There is a warning that the Result we defined is not used. Doesn't matter.
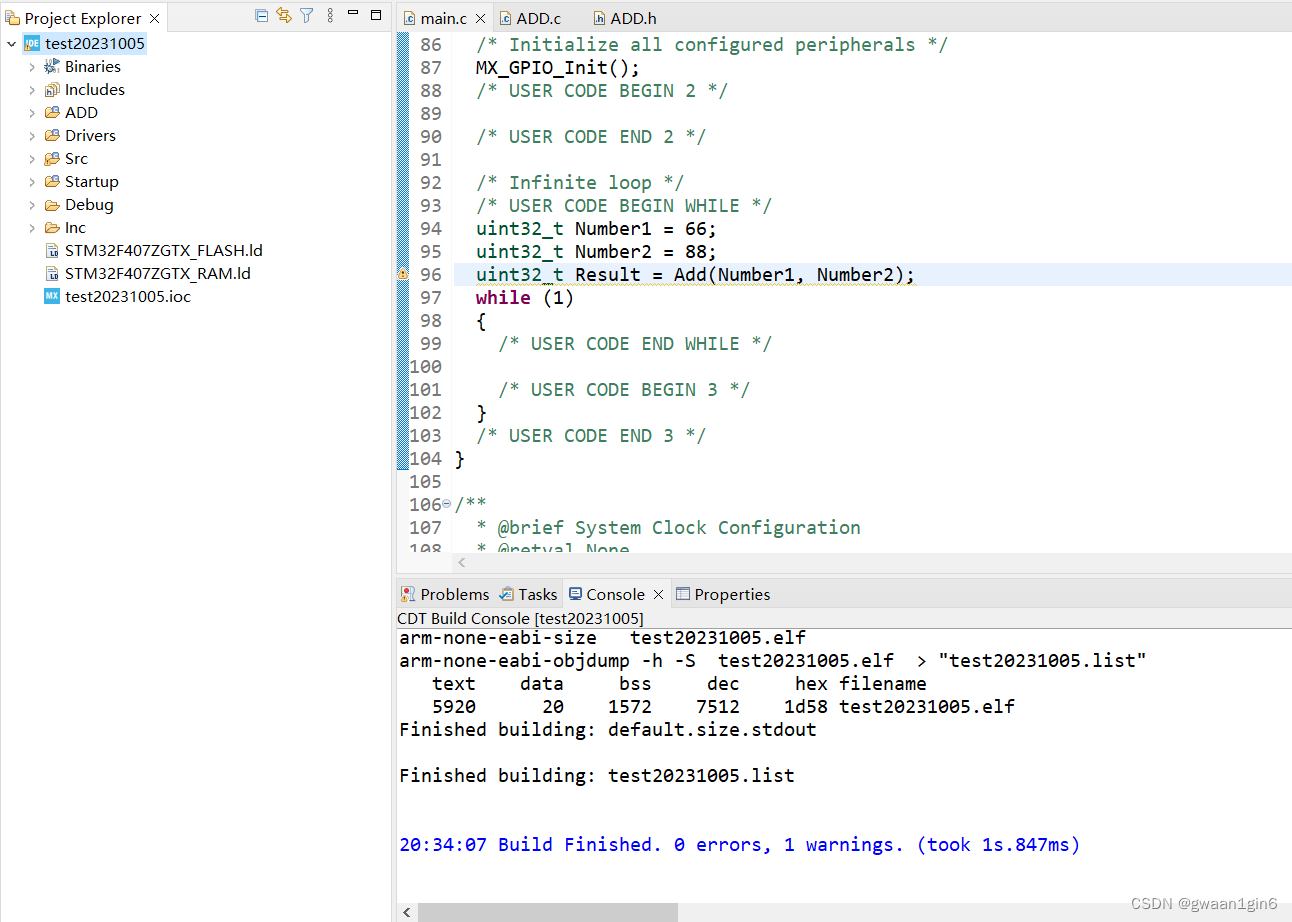
Now, we have successfully included the .c/.h search path and verified it.
If you still have any questions, please leave a message in the comment area.
Advantages and disadvantages of relative paths and absolute paths
(from GPT)
Advantages of relative paths:
1. Simplicity: Relative paths are parsed relative to the current working directory or the directory where the source file is located. A relatively short path can be used to specify the location of the header file.
2. Portability: Relative paths are relative to the directory structure of the current environment. When the project is transplanted to other locations or other machines, relative paths may make it easier to adapt to the new working environment.
Disadvantages of relative paths:
1. Reliability: Relative paths may depend on changes in the file structure and working directory. If the file structure changes, the relative path may not be able to find the header file correctly, causing compilation errors.
2. Readability: The relative path may not be clear enough, making it difficult for others to quickly understand the specific location of the header file.
Advantages of absolute paths:
1. Accuracy: The absolute path indicates the exact location of the header file and is not affected by the working directory and file structure. The header files are found exactly no matter where the current working directory is.
2. Readability: The absolute path provides clear and unambiguous information, making it easy for others to understand and track the location of the header file.
Disadvantages of absolute paths:
1. Not flexible enough: The absolute path is a fixed path. If the project needs to be transplanted to other locations or other machines, the absolute path settings need to be changed manually.
2. Lengthiness: Absolute paths are usually long and may be inconvenient to use, especially in large projects with multiple nested folders.
During project development, relative paths are usually the more common and recommended choice because of their simplicity and portability, which can better adapt to changes in different environments and project structures.
But in some cases, using an absolute path may be more appropriate, especially when the project's file structure is relatively fixed, or when you need to ensure that the code can accurately find the header file in different environments.
No matter which path is used, ensure the readability and maintainability of the code, and avoid compilation problems caused by incorrect header file paths.