[Linux v0.11 kernel source code analysis] Process initialization and creation
Time flies, and two years have passed since college. The time passed and the footsteps walked contain the footprints of growth. However, as a computer major student, I think carefully about the professional knowledge I have learned, but there are not many down-to-earth achievements. Late at night, my thoughts are wandering, and I always feel that I am just throwing a hammer here and there, without doing any detailed organization. I am just having fun for a while, and I leave behind half-finished things.
In this issue, I hope I can finish this series patiently. I can complete the source code analysis of the Linux operating system kernel before February next year. Since I have never systematically studied operating systems before, I am currently studying this professional course, combined with reading relevant books and consulting some information on the Internet. Work your way through this series step by step. There must be some problems or errors in this. Everyone is welcome to criticize and discuss.
In addition, I spent a lot of time to read some random thoughts, study the kernel source code, check various information, and explain the video. At the end of writing, I felt like I was going crazy, but I finally read it, woo woo woo. Maybe the more I go on, the more verbose I write, and I will correct my mistakes in the future. I welcome everyone’s criticisms and corrections. At the same time, I also hope that I can complete this series!
1. Why? How to get started?
Why should we analyze the operating system kernel source code?
I will extract this paragraph later and put it into the introduction of this series.
With the development of computer systems, operating systems are now constantly developing and improving, and can solve many problems. It can be said that the modern operating system is already an extremely complete and complex system software.
For those of us developers engaged in the computer and Internet industries, I think learning the operating system can help us better understand what kind of external model the operating system provides for user programs, and how we, as programmers, can make full use of it.
Analyzing the operating system kernel source code can help to understand how the early operating system was designed, its design philosophy and way of thinking. This actually contains some OOP ideas. Let’s see how c voice implements OOP.
How to better sort out the core code of the Linux operating system?
- First of all, before I started, I read the book "Modern Operating System" roughly once. Since this is the book for our course, and I also saw the book "Operating System Truth Restore" highly recommended online, I will also plan to start studying in the future.
- The current Linux source code is very large. Among them, the source code size of the Linux kernel is 1.6 million lines, involving a large number of very complex data structures and algorithms, so it is actually very troublesome to analyze and learn. I only focus on the core part here, and the selection is also the earliest. You can do it on the website https://elixir.bootlin.com/, which is very convenient. You can choose the corresponding version, and you can see all in the subsequent versions. The source code can also be easily indexed and navigated internally, and can quickly locate each code segment, where the function is used, etc.
- Here we also recommend "Operating System - Tsinghua University" taught by teachers Xiang Yong and Chen Yu of Tsinghua University and "< /span>》Operating System - Harbin Institute of Technology
Of course, you have to eat the meal one bite at a time. If you turn to me, you can take a small bite from me first. I will try my best to complete this "appetizer" clearly and concisely~
2. Process descriptor (the main abstraction of the process)
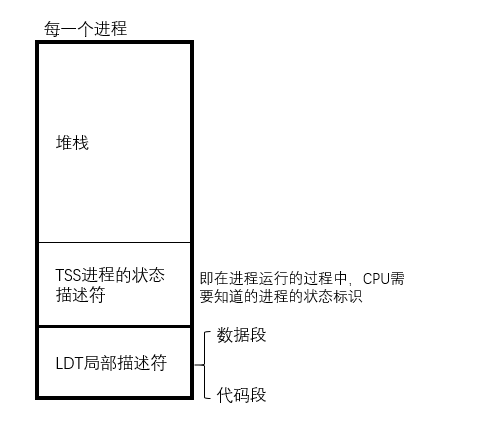
In the operating system, the actual process is abstracted into a task_struct structure, which encapsulates all elements that appear in the process, namelyProcess Control Block (PCB) . So every process has one of this member. The following is an introduction to task_truct (corresponds to the Linux-v0.11 version, and will not be prompted again)
/include/linux/sched.h
//....

struct task_struct {

    // 进程描述符
/* these are hardcoded - don't touch */
	long state;	/* -1 unrunnable, 0 runnable, >0 stopped */// 进程的运行状态
	long counter;// 时间片的计数值,检索链表的时候,最大的先运行
	long priority;// 优先级,牵扯到进程的调度方法,
	long signal;// 信号
	struct sigaction sigaction[32];// 信号位图
	long blocked;	/* bitmap of masked signals */ // 阻塞和非阻塞的状态
/* various fields */
	int exit_code; // 退出码
    // 开始码、结束码等。。(这里大家可以评论补充,,这里没有全部查阅到)
	unsigned long start_code,end_code,end_data,brk,start_stack;
	long pid,father,pgrp,session,leader;
    // 用户id,有效用户id,最终id
	unsigned short uid,euid,suid;
	unsigned short gid,egid,sgid;
    // 警告
	long alarm;
    // 用户态运行时间,内核态运行时间,子进程的用户态运行时间,子进程的内核态运行时间
	long utime,stime,cutime,cstime,start_time;
	unsigned short used_math;//是否使用了协处理器
/* file system info */
	int tty;		/* -1 if no tty, so it must be signed */// 是否打开了控制台
	unsigned short umask;
	struct m_inode * pwd;// 路径
	struct m_inode * root;// 根
	struct m_inode * executable;
	unsigned long close_on_exec;
	struct file * filp[NR_OPEN];// 打开哪些文件
/* ldt for this task 0 - zero 1 - cs 2 - ds&ss */
	struct desc_struct ldt[3];// LDT局部描述
/* tss for this task */
	struct tss_struct tss;// tss段,cpu在运行时,要保存的一些临时结果,在内核版本不断演化过程中也增加了很多功能
};
//...
Supplement: Time slice counter calculation method (x86): counter = counter/2+priority
The diagram below helps understand the process
3. Process status
In the Linux kernel, time-sharing technology is mainly used for multi-process scheduling. The following are the 5 process states defined in Linux, that is, the state in the second part of the task_struct structure is used to represent
#define TASK_RUNNING		0		//运行状态
#define TASK_INTERRUPTIBLE	1		//可中断睡眠状态
#define TASK_UNINTERRUPTIBLE	2	//不可中断睡眠状态
#define TASK_ZOMBIE		3			//僵死状态
#define TASK_STOPPED		4		//暂停状态
4. Initialization of the process (key points)
4.1 System startup
The initialization of the process described here refers to how process creation initially begins. We first need to pay attention tomain.c. Since there is a lot of content, I will omit most of the code here and only keep the parts related to this section
/init/main.c
// ...
void main(void)		/* This really IS void, no error here. */
{


	// ...各类初始化
	sched_init();// 进行进程调度初始化
	// ...缓冲区、硬盘、软皮初始化
	move_to_user_mode(); // 从内核的初始化状态切换到用户模式。
	// 创建0号进程,运行最初的应用程序
    if (!fork()) {


		init();
	}

	for(;;) pause();
}
// ...
4.2 Introduction to process scheduling initialization
I have retained the above line of codesched_init();. Here we will briefly analyze and introduce it. Please see the release, including personal explanation
/kernel/sched.c
// ...
void sched_init(void)
{
int i;
struct desc_struct * p;
if (sizeof(struct sigaction) != 16)//检查结构体大小
panic("Struct sigaction MUST be 16 bytes");
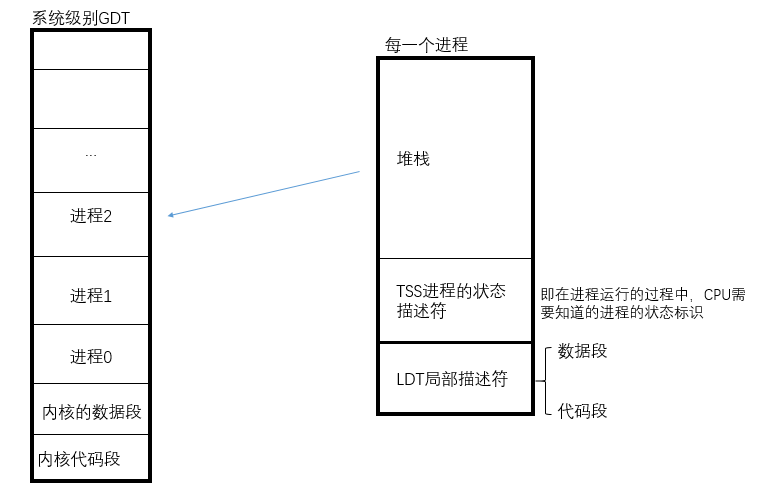
// 设置tss,ldt的描述符,并将其写入全局描述符表(GDT)
set_tss_desc(gdt+FIRST_TSS_ENTRY,&(init_task.task.tss));
set_ldt_desc(gdt+FIRST_LDT_ENTRY,&(init_task.task.ldt));
p = gdt+2+FIRST_TSS_ENTRY;
for(i=1;i<NR_TASKS;i++) {
//初始化GDT中的TSS和LDT条目,从1号进程到64号进程进行遍历
task[i] = NULL;// 清空task指针数组(即可以理解是)
p->a=p->b=0;
p++;
p->a=p->b=0;
p++;
}
/* Clear NT, so that we won't have troubles with that later on */
__asm__("pushfl ; andl $0xffffbfff,(%esp) ; popfl");// 清除 NT(Nested Task)标志
ltr(0);// 加载任务寄存器TR,指向GDT中第一个TSS的位置。
lldt(0);// 加载局部描述符表LDT,也指向GDT中第一个LDT的位置。
// 禁用中断,设置一些寄存器
outb_p(0x36,0x43); /* binary, mode 3, LSB/MSB, ch 0 */
outb_p(LATCH & 0xff , 0x40); /* LSB */
outb(LATCH >> 8 , 0x40); /* MSB */
// 设置时间的中断门
set_intr_gate(0x20,&timer_interrupt);
outb(inb_p(0x21)&~0x01,0x21);
// 设置系统调用中断门
set_system_gate(0x80,&system_call);
}
// ...
The tss and ldt mentioned here refer to the system level. You can refer to the following figure to understand:
**Key points:**Pay attention to the last line of the above codeset_system_gate(0x80,&system_call);, set the interrupt function, and pass in the system_call system call, because process switching, scheduling, and creation are all system calls Completed.
4.3 Create process No. 0
We can notice that inmain.c, there is a line before creating process No. 0, which is the code used to switch from the kernel initialization state to user mode,move_to_user_mode(); .
Before we understand why, we know:
-
Kernel state: not preemptible
-
User mode: can be preempted
Beforemone_to_user_mode(), when initializing, it belongs to the kernel state, because Linux wants to ensure that its own initialization is normal. After that, switch to user mode, and you can create a process after switching.
During the kernel initialization process, process No. 0 will be manually created. Process No. 0 is the parent process of all processes. All other processes are copied from this process No. 0.
After successfully creating process 0, executeinit(), its internal function:
- Open standard input output wrong console handle
- Create process No. 1. If the creation is successful, it will be in process No. 1.
- First open the "/etc/rc" file (Additional: etc is the configuration file directory. If you want to print some information when the system starts, you can put it in the rc file. For example, for secondary development of the operating system, the company logo, etc. can be put here. .)
- Execute the shell program "/bin/sh"
Because it would be too long to include the source code here, I did not include the source code ofinit(). Interested friends can check it out by themselves, and it is easier to understand
**Final note: **Process No. 0 cannot end. It will be called when there is no call from other processes and will only executefor(;;) pause();, that is, the above main.cLast line
5. Creation of Process (Key Points)
Our process creation is mainly fork.
5.1 Main steps of process creation
It can be mainly divided into the following steps:
- Find a process slot in the task list to store the current process
- Create a task_struct
- Set task_struct
5.2 Source code analysis
Please see belowVCR source code! (With personal note)
fork.c
#include <errno.h>
//头文件引用
#include <linux/sched.h>
#include <linux/kernel.h>
#include <asm/segment.h>
#include <asm/system.h>

extern void write_verify(unsigned long address);

long last_pid=0;// 用于保存上一个进程的PID,初始化为0,每次创建新进程时递增。

void verify_area(void * addr,int size)
{

    // 用于验证指定内存区域的可写性
	unsigned long start;

	start = (unsigned long) addr;// 将传入的地址转换为unsigned long类型
	size += start & 0xfff;// 将size加上start的低12位(页面内偏移),以确保size包含整个最后一页

	start &= 0xfffff000;// 将start的低12位清零,以获得页面的起始地址
	start += get_base(current->ldt[2]);// 将start加上当前进程的数据段基地址
	while (size>0) {

    // 循环处理每一页的内存区域
		size -= 4096;// 每次处理一页(4KB)
		write_verify(start);// 调用write_verify函数
		start += 4096;// 将start指向下一页
	}
}

int copy_mem(int nr,struct task_struct * p)
{

    // 复制父进程的内存空间到子进程中
    // 定义旧进程和新进程的数据段和代码段信息
	unsigned long old_data_base,new_data_base,data_limit;
	unsigned long old_code_base,new_code_base,code_limit;

    // 获取代码段和数据段的限制
	code_limit=get_limit(0x0f);
	data_limit=get_limit(0x17);
    // 获取当前进程的代码段和数据段的基地址
	old_code_base = get_base(current->ldt[1]);
	old_data_base = get_base(current->ldt[2]);
	if (old_data_base != old_code_base)// 如果数据段和代码段的基地址不相等,发生错误
		panic("We don't support separate I&D");
	if (data_limit < code_limit)// 小于
		panic("Bad data_limit");
	new_data_base = new_code_base = nr * 0x4000000; // 计算新进程的数据段和代码段的基地址
	p->start_code = new_code_base;
     设置新进程的LDT表中的代码段和数据段的基地址
	set_base(p->ldt[1],new_code_base);
	set_base(p->ldt[2],new_data_base);
	if (copy_page_tables(old_data_base,new_data_base,data_limit)) {

    // 将old_data_base数据拷贝到new_data_base,拷贝大小data_limit
		free_page_tables(new_data_base,data_limit);//拷贝失败,释放页
		return -ENOMEM;
	}
	return 0;//拷贝成功返回0
}

/*
 *  Ok, this is the main fork-routine. It copies the system process
 * information (task[nr]) and sets up the necessary registers. It
 * also copies the data segment in it's entirety.
 */
int copy_process(int nr,long ebp,long edi,long esi,long gs,long none,
		long ebx,long ecx,long edx,
		long fs,long es,long ds,
		long eip,long cs,long eflags,long esp,long ss)
{


	struct task_struct *p; // 声明创建新进程指针(分配地址)
	int i;
	struct file *f; // 声明文件

	p = (struct task_struct *) get_free_page();// 申请空间(申请内存)
	if (!p) // 申请失败返回错误码
		return -EAGAIN;
	task[nr] = p; // 将当前子进程放到整体进程链表中
	*p = *current;	/* NOTE! this doesn't copy the supervisor stack */
	p->state = TASK_UNINTERRUPTIBLE;// 设置进程状态为不可被中断
	p->pid = last_pid;// 即当前要创建进程的进程号
	p->father = current->pid; // 设置父进程
	p->counter = p->priority; // 设置该进程的时间片值等于其优先级的值
	p->signal = 0; // 信号位图置0
	p->alarm = 0;// 报警定时值(滴答数)
	p->leader = 0;		/* process leadership doesn't inherit */
	p->utime = p->stime = 0;// 初始化用户态时间和核心态时间
	p->cutime = p->cstime = 0; // 初始化子进程用户态和核心态时间
	p->start_time = jiffies; // 当前滴答数时间
    // 进行设置一些TSS相关的进程描述的值
	p->tss.back_link = 0;
	p->tss.esp0 = PAGE_SIZE + (long) p;
	p->tss.ss0 = 0x10;
	p->tss.eip = eip;
	p->tss.eflags = eflags;
	p->tss.eax = 0;
	p->tss.ecx = ecx;
	p->tss.edx = edx;
	p->tss.ebx = ebx;
	p->tss.esp = esp;
	p->tss.ebp = ebp;
	p->tss.esi = esi;
	p->tss.edi = edi;
	p->tss.es = es & 0xffff;
	p->tss.cs = cs & 0xffff;
	p->tss.ss = ss & 0xffff;
	p->tss.ds = ds & 0xffff;
	p->tss.fs = fs & 0xffff;
	p->tss.gs = gs & 0xffff;
	p->tss.ldt = _LDT(nr);
	p->tss.trace_bitmap = 0x80000000;
	if (last_task_used_math == current)// 如果当前进程使用了协处理器,那就设置创建进程的协处理器
		__asm__("clts ; fnsave %0"::"m" (p->tss.i387));
	if (copy_mem(nr,p)) {

    // 进行老进程向新进程代码段、数据段(LDT)的拷贝
		task[nr] = NULL;// 如果拷贝失败 释放
		free_page((long) p);// 释放空间
		return -EAGAIN; // 返回错误码
	}
	for (i=0; i<NR_OPEN;i++) // NR_OPEN
		if (f=p->filp[i]) //如果创建当前进程的父进程打开了文件
			f->f_count++; // 则子进程也打开了该文件,文件数+1
	if (current->pwd) //如果打开了当前路径
		current->pwd->i_count++;
	if (current->root) // 如果打开了根
		current->root->i_count++;
	if (current->executable)
		current->executable->i_count++;
	set_tss_desc(gdt+(nr<<1)+FIRST_TSS_ENTRY,&(p->tss)); // 设置TSS进程的状态描述符
	set_ldt_desc(gdt+(nr<<1)+FIRST_LDT_ENTRY,&(p->ldt)); // 设置LDT局部描述符
	p->state = TASK_RUNNING;	/* do this last, just in case */ // 给程序的状态标志位改为可运行状态
	return last_pid; // 返回创建的新进程进程号
}

int find_empty_process(void)
{


	int i;

	repeat://首先寻找一个pid值
		if ((++last_pid)<0) last_pid=1;// 自加再用
		for(i=0 ; i<NR_TASKS ; i++)// 遍历检索
			if (task[i] && task[i]->pid == last_pid) goto repeat;//如果为空并且到最后一位,就重新去找
	for(i=1 ; i<NR_TASKS ; i++)// 去task数组去寻找可用的位置
		if (!task[i])
			return i;
	return -EAGAIN;// 没有返回错误码
}
5.3 The nature of process creation
The creation of a process is a copy of process No. 0 or the current process.
-
Copy of process No. 0 -> Copy of structure -> Copy the task_struct corresponding to task[0] to the newly created task_struct
-
For the copy of the stack heap, the original stack heap must be copied when the process is created.
The essence of process creation is to makesystem calls, please see
/kernel/system_call.s
.align 2
_sys_fork:
	call _find_empty_process //调用find_empty_process  找一个进程空位
	// 测试以及用了一些通用寄存器
	testl %eax,%eax
	js 1f
	push %gs
	pushl %esi
	pushl %edi
	pushl %ebp
	pushl %eax
	call _copy_process // 从old进程中复制出一个新进程
	addl $20,%esp
1:	ret
Among themfind_empty_process is also located infork.c
Main process:
-
Assign a process number to the process currently being created (find_empty_process)
-
Create a task_struct structure of the child process
struct task_struct *p;//声明一个task_struct指针 p = (struct task_struct *) get_free_page();//分配一个空白页 ########下面给出现代操作系统写法,使用kallock动态内存分配函数################ struct task_struct *p;//声明一个task_struct指针 p = (struct task_struct *) kalloc(sizeof(task_struct));//分配一个空白页 -
Put the current child process into the overall process list
task[nr] = p;
-
Set the created task_struct structure
If the current process uses a coprocessor, set the coprocessor of the created process
if (last_task_used_math == current)
		__asm__("clts ; fnsave %0"::"m" (p->tss.i387));
int copy_mem(int nr,struct task_struct * p)Copy the code segment and data segment (LDT) of the old process to the new processIf the parent process opens a file, the child process also opens the file, so the file's open count is +1
	for (i=0; i<NR_OPEN;i++)
		if (f=p->filp[i])
			f->f_count++;
	if (current->pwd)
		current->pwd->i_count++;
	if (current->root)
		current->root->i_count++;
	if (current->executable)
		current->executable->i_count++;
Set up two segments of the process and assemble them into one process by combining the ones you just copied.
	set_tss_desc(gdt+(nr<<1)+FIRST_TSS_ENTRY,&(p->tss));
	set_ldt_desc(gdt+(nr<<1)+FIRST_LDT_ENTRY,&(p->ldt));
	//给程序的状态标志位改为可运行状态
	p->state = TASK_RUNNING;	/* do this last, just in case */
	//返回新创建进程的PID
	return last_pid;
5.4 Add a flow chart
6. Improvement suggestions for v0.11 version fork.c code
In fact, after reading and understanding the fork.c that created the process in the initial version 0.11 and other related parts, I think it is an easy-to-learn part.
Some small improvement suggestions
- I think the data in the TSS section of setting the process task status can be divided into structures and passed in for copying, which can improve readability to a certain extent (this paragraph is a bit long). In fact, after the subsequent major version, such changes were made to it
- The paging mechanism actually had limitations, but it was also due to the hardware environment at the time.
7. Reference materials
- https://elixir.bootlin.com/linux/0.11/source/kernel
- Linux kernel source code process principle analysis - Lion Long's article - Zhihu
https://zhuanlan.zhihu.com/p/609002496 - [Very good Linux kernel video - Linux kernel essence] https://www.bilibili.com/video/BV1tQ4y1d7mo/?share_source=copy_web&vd_source=4ff1f28ff03d2ec1a8c8585c750d8fcd