前言:Hello everyone, my name is Dream. Let’s learn todayHow to use OpenCV to implement gesture volume control, everyone is welcome to come and discuss and learn~
1. Introduction to required libraries and functions
This experiment requires the use of OpenCV and mediapipe libraries for gesture recognition, and uses gesture distance to control the computer volume.
Import library:
- cv2: OpenCV library for reading camera video streams and image processing.
- mediapipe: mediapipe library for hand key point detection and gesture recognition.
- ctypes and comtypes: used to interact with the operating system's audio interface.
- pycaw: pycaw library, used to control computer volume.
Function:
- Initialize the mediapipe and volume control module to obtain the volume range.
- Turn on the camera and read the video stream.
- Process each frame of image:
- Convert image to RGB format.
- Use mediapipe to detect hand key points.
- If hand keypoints are detected:
- Mark finger key points and gesture connections in the image.
- Analyze finger key point coordinates.
- Calculate the gesture distance based on the coordinates of the thumb and index finger tips.
- Convert gesture distance to volume and control computer volume.
- Display the processed image.
- Repeat the previous steps until you manually stop the program or turn off the camera.
Precautions:
- Before running the code, you need to install the relevant libraries (opencv, mediapipe, pycaw).
- The audio device needs to be connected and accessible.
- When multiple hands are detected, only the first detected hand is processed.
- When a finger key point is detected, use the key point with an index of 0 as the tip of the thumb, and the key point with an index of 1 as the tip of the index finger.
cv2.VideoCapture() function parameter problem

There is nothing wrong with this. But when calling on the Raspberry Pi, the parameters need to be changed to:
cap = cv2.VideoCapture(1)
When calling the computer camera:
When the computer is in usecv2.VideoCapture(0), an error will be reported after the program ends:
[ WARN:0] SourceReaderCB::~SourceReaderCB terminating async callback
Need to be changed to:
cv2.VideoCapture(0,cv2.CAP_DSHOW)
2. Import the required modules
# 导入OpenCV
import cv2
# 导入mediapipe
import mediapipe as mp
# 导入电脑音量控制模块
from ctypes import cast, POINTER
from comtypes import CLSCTX_ALL
from pycaw.pycaw import AudioUtilities, IAudioEndpointVolume

# 导入其他依赖包
import time
import math
import numpy as np
3. Initialize the HandControlVolume class
class HandControlVolume:
    def __init__(self):
        """
        初始化 HandControlVolume 类的实例

        初始化 mediapipe 对象,用于手部关键点检测和手势识别。
        获取电脑音量接口,并获取音量范围。
        """
        # 初始化 medialpipe
        self.mp_drawing = mp.solutions.drawing_utils
        self.mp_drawing_styles = mp.solutions.drawing_styles
        self.mp_hands = mp.solutions.hands

        # 获取电脑音量范围
        devices = AudioUtilities.GetSpeakers()
        interface = devices.Activate(
            IAudioEndpointVolume._iid_, CLSCTX_ALL, None)
        self.volume = cast(interface, POINTER(IAudioEndpointVolume))
        self.volume.SetMute(0, None)
        self.volume_range = self.volume.GetVolumeRange()
- Initialize the mediapipe object forhand key point detection and gesture recognition.
- Get the computer volume interface and get the volume range.
4. Main function
1. Calculate refresh rate
-
Initialize the refresh rate calculation and record the current time as the initial time.
-
Use
OpenCVto open the video stream. The camera device is read here. The default device ID is 0. -
Sets the resolution of the video stream to the specified
resize_w和resize_hsize and resizes the image to that size. -
Before using the hands object, use the
withstatement to create a context environment and set relevant parameters for hand detection and tracking, including minimum detection confidence, minimum tracking confidence, and maximum hand quantity. -
Enter a loop to determine whether the video stream is open. Use the
cap.read()function to read a frame of image from the video stream. The returnedsuccessindicates whether the reading is successful, andimageindicates whether the reading is successful. The image obtained. -
Perform
resizeon the read image and resize it to the specified size. If the read fails, a prompt message is printed and the cycle continues to the next time.
# 主函数
    def recognize(self):
        # 计算刷新率
        fpsTime = time.time()

        # OpenCV读取视频流
        cap = cv2.VideoCapture(0)
        # 视频分辨率
        resize_w = 640
        resize_h = 480

        # 画面显示初始化参数
        rect_height = 0
        rect_percent_text = 0

        with self.mp_hands.Hands(min_detection_confidence=0.7,
                                 min_tracking_confidence=0.5,
                                 max_num_hands=2) as hands:
            while cap.isOpened():
                success, image = cap.read()
                image = cv2.resize(image, (resize_w, resize_h))

                if not success:
                    print("空帧.")
                    continue
2. Improve performance
-
Set the image's writable flag image.flags.writeable to False for memory optimization.
-
Convert the image from BGR format to RGB format because the input processed by the MediaPipe model requires RGB format.
-
Flip the image horizontally, a mirroring operation, to make the image more consistent with common mirror displays.
-
Use the MediaPipe model to process the image and get the result.
-
Set the image's writable flag image.flags.writeable to True to re-enable writing to the image.
-
Convert images from RGB format back to BGR format for subsequent display and processing.
These optimization operations are designed to improve the performance and efficiency of your program. Among them, setting the writable flag of the image to False can reduce unnecessary memory copies, and converting the image format and mirroring operations are to comply with the input requirements of the MediaPipe model and to better perform gesture recognition. Finally, the image is converted back to BGR format for compatibility with OpenCV's display functions.
                # 提高性能
                image.flags.writeable = False
                # 转为RGB
                image = cv2.cvtColor(image, cv2.COLOR_BGR2RGB)
                # 镜像
                image = cv2.flip(image, 1)
                # mediapipe模型处理
                results = hands.process(image)

                image.flags.writeable = True
                image = cv2.cvtColor(image, cv2.COLOR_RGB2BGR)
3. Determine whether there is a palm
-
Judge whether
results.multi_hand_landmarksexists, that is, whether the palm is detected. If it exists, continue executing the code below. -
Traverse each hand_landmarks in
results.multi_hand_landmarks, that is, traverse each detected palm. -
Use
self.mp_drawing.draw_landmarksfunction to mark the detected palm on the image, including the key points of the fingers and the connecting lines between the fingers.
# 判断是否有手掌
                if results.multi_hand_landmarks:
                    # 遍历每个手掌
                    for hand_landmarks in results.multi_hand_landmarks:
                        # 在画面标注手指
                        self.mp_drawing.draw_landmarks(
                            image,
                            hand_landmarks,
                            self.mp_hands.HAND_CONNECTIONS,
                            self.mp_drawing_styles.get_default_hand_landmarks_style(),
                            self.mp_drawing_styles.get_default_hand_connections_style())
4. Analyze fingers and store the coordinates of each finger
First parse the coordinates of the finger and store them in the landmark_list list. Then, based on the coordinates of the fingers, the fingertip coordinates of the thumb and index finger are calculated, as well as the coordinates of their midpoint. Next, I drew my thumb, index finger, and the line connecting them, and used the Pythagorean Theorem to calculate the length between the two fingertips.
-
Create an empty landmark_list list to store finger coordinates.
-
Iterate through each element of the hand keypoints, store the id, x, y, and z coordinates of each keypoint in a list, and then add the list to the landmark_list.
-
Determine whether landmark_list is not empty. If not, continue executing the following code.
-
Get the list item of thumb tip coordinates from landmark_list, and then calculate the pixel coordinates on the image.
-
Get the list item of the index finger tip coordinates from landmark_list, and then calculate the pixel coordinates on the image.
-
Calculate the coordinates of the midpoint between the tip of the thumb and the tip of the index finger.
-
Draw the tip points of your thumb and index finger, as well as the midpoint.
-
Draw a line between your thumb and index finger.
-
Use the Pythagorean theorem to calculate the length between the tip of the thumb and the tip of the index finger, and save it in line_len.
 # 解析手指,存入各个手指坐标
                        landmark_list = []
                        for landmark_id, finger_axis in enumerate(
                                hand_landmarks.landmark):
                            landmark_list.append([
                                landmark_id, finger_axis.x, finger_axis.y,
                                finger_axis.z
                            ])
                        if landmark_list:
                            # 获取大拇指指尖坐标
                            thumb_finger_tip = landmark_list[4]
                            thumb_finger_tip_x = math.ceil(thumb_finger_tip[1] * resize_w)
                            thumb_finger_tip_y = math.ceil(thumb_finger_tip[2] * resize_h)
                            # 获取食指指尖坐标
                            index_finger_tip = landmark_list[8]
                            index_finger_tip_x = math.ceil(index_finger_tip[1] * resize_w)
                            index_finger_tip_y = math.ceil(index_finger_tip[2] * resize_h)
                            # 中间点
                            finger_middle_point = (thumb_finger_tip_x + index_finger_tip_x) // 2, (
                                    thumb_finger_tip_y + index_finger_tip_y) // 2
                            # print(thumb_finger_tip_x)
                            thumb_finger_point = (thumb_finger_tip_x, thumb_finger_tip_y)
                            index_finger_point = (index_finger_tip_x, index_finger_tip_y)
                            # 画指尖2点
                            image = cv2.circle(image, thumb_finger_point, 10, (255, 0, 255), -1)
                            image = cv2.circle(image, index_finger_point, 10, (255, 0, 255), -1)
                            image = cv2.circle(image, finger_middle_point, 10, (255, 0, 255), -1)
                            # 画2点连线
                            image = cv2.line(image, thumb_finger_point, index_finger_point, (255, 0, 255), 5)
                            # 勾股定理计算长度
                            line_len = math.hypot((index_finger_tip_x - thumb_finger_tip_x),
                                                  (index_finger_tip_y - thumb_finger_tip_y))
5. Get the maximum and minimum volume of the computer
Get the maximum and minimum volume of the computer, map the length of the fingertip to the volume range and rectangular display, and then set the mapped volume value to the volume of the computer. The specific process is as follows:
-
self.volume_range[0]和self.volume_range[1]Get the minimum volume and maximum volume of the computer respectively. -
np.interp函数Map the length of the fingertip line_len to the range from 50 to 300, and then map it to the range of the minimum volume and maximum volume to obtain the volume value vol. -
np.interp函数Map the length of the fingertip line_len to the range from 50 to 300, and then map it to the range from 0 to 200 to get the height of the rectangle rect_height. -
np.interp函数Map the length of the fingertip line_len to the range from 50 to 300, and then map it to the range from 0 to 100 to obtain the value rect_percent_text of the rectangular percentage display. -
self.volume.SetMasterVolumeLevel方法Set the volume value vol to the volume of the computer.
# 获取电脑最大最小音量
                            min_volume = self.volume_range[0]
                            max_volume = self.volume_range[1]
                            # 将指尖长度映射到音量上
                            vol = np.interp(line_len, [50, 300], [min_volume, max_volume])
                            # 将指尖长度映射到矩形显示上
                            rect_height = np.interp(line_len, [50, 300], [0, 200])
                            rect_percent_text = np.interp(line_len, [50, 300], [0, 100])

                            # 设置电脑音量
                            self.volume.SetMasterVolumeLevel(vol, None)
6.Display rectangle
cv2.putText函数 to display the percentage value of the rectangular frame on the image;
cv2.rectangle函数 to draw the rectangular frame and fill it with color;
cv2.putText函数 to display the percentage value of the current frame on the image Refresh rate FPS;
cv2.imshow函数 to display the processed image;
cv2.waitKey函数 wait for key input, and exit the program when the ESC key is pressed or the window is closed; < The recognize method of a i=5> class calls the gesture recognition function.
HandControlVolume
# 显示矩形
                cv2.putText(image, str(math.ceil(rect_percent_text)) + "%", (10, 350),
                            cv2.FONT_HERSHEY_PLAIN, 3, (255, 0, 0), 3)
                image = cv2.rectangle(image, (30, 100), (70, 300), (255, 0, 0), 3)
                image = cv2.rectangle(image, (30, math.ceil(300 - rect_height)), (70, 300), (255, 0, 0), -1)

                # 显示刷新率FPS
                cTime = time.time()
                fps_text = 1 / (cTime - fpsTime)
                fpsTime = cTime
                cv2.putText(image, "FPS: " + str(int(fps_text)), (10, 70),
                            cv2.FONT_HERSHEY_PLAIN, 3, (255, 0, 0), 3)
                # 显示画面
                cv2.imshow('MediaPipe Hands', image)
                if cv2.waitKey(5) & 0xFF == 27 or cv2.getWindowProperty('MediaPipe Hands', cv2.WND_PROP_VISIBLE) < 1:
                    break
            cap.release()


# 开始程序
control = HandControlVolume()
control.recognize()
5. Practical demonstration
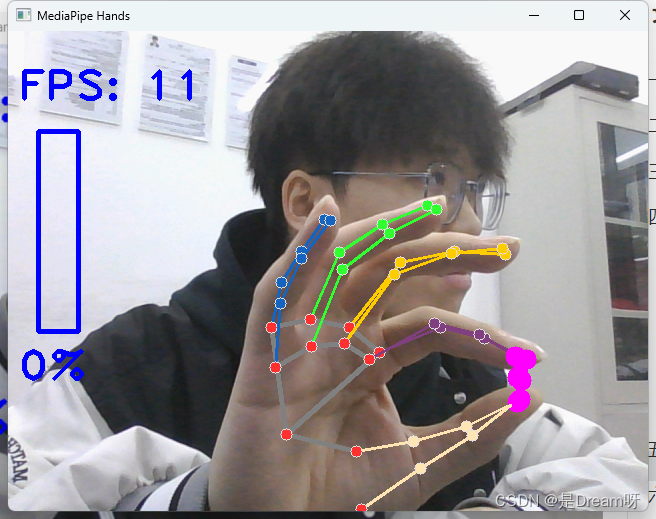

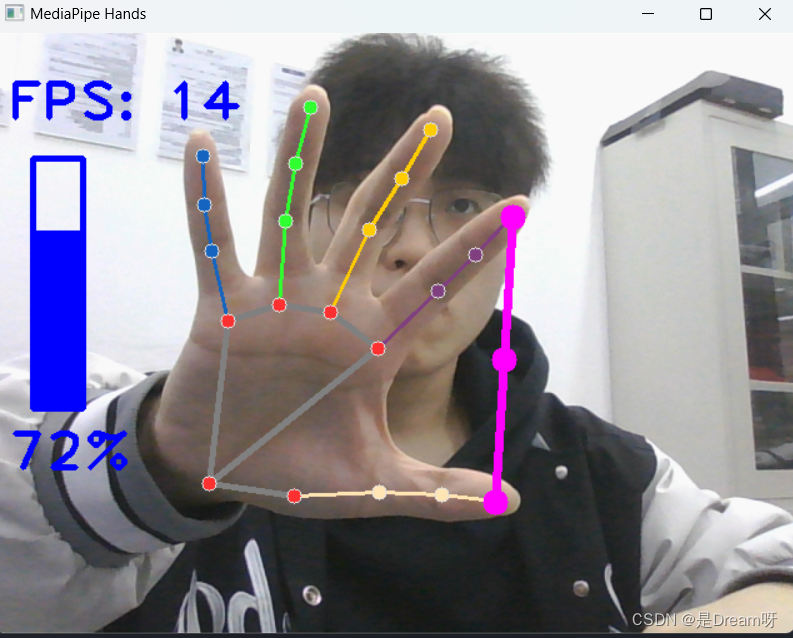
Through the demonstration, we can find that the farther the distance between the index finger and the thumbin the screen, the louder our volume will be. The larger it is, the smaller it is on the contrary, realizing the control of the volume through gestures.
6. Source code sharing
import cv2
import mediapipe as mp
from ctypes import cast, POINTER
from comtypes import CLSCTX_ALL
from pycaw.pycaw import AudioUtilities, IAudioEndpointVolume
import time
import math
import numpy as np


class HandControlVolume:
    def __init__(self):
        # 初始化medialpipe
        self.mp_drawing = mp.solutions.drawing_utils
        self.mp_drawing_styles = mp.solutions.drawing_styles
        self.mp_hands = mp.solutions.hands

        # 获取电脑音量范围
        devices = AudioUtilities.GetSpeakers()
        interface = devices.Activate(
            IAudioEndpointVolume._iid_, CLSCTX_ALL, None)
        self.volume = cast(interface, POINTER(IAudioEndpointVolume))
        self.volume.SetMute(0, None)
        self.volume_range = self.volume.GetVolumeRange()

    # 主函数
    def recognize(self):
        # 计算刷新率
        fpsTime = time.time()

        # OpenCV读取视频流
        cap = cv2.VideoCapture(0)
        # 视频分辨率
        resize_w = 640
        resize_h = 480

        # 画面显示初始化参数
        rect_height = 0
        rect_percent_text = 0

        with self.mp_hands.Hands(min_detection_confidence=0.7,
                                 min_tracking_confidence=0.5,
                                 max_num_hands=2) as hands:
            while cap.isOpened():
                success, image = cap.read()
                image = cv2.resize(image, (resize_w, resize_h))

                if not success:
                    print("空帧.")
                    continue

                # 提高性能
                image.flags.writeable = False
                # 转为RGB
                image = cv2.cvtColor(image, cv2.COLOR_BGR2RGB)
                # 镜像
                image = cv2.flip(image, 1)
                # mediapipe模型处理
                results = hands.process(image)

                image.flags.writeable = True
                image = cv2.cvtColor(image, cv2.COLOR_RGB2BGR)
                # 判断是否有手掌
                if results.multi_hand_landmarks:
                    # 遍历每个手掌
                    for hand_landmarks in results.multi_hand_landmarks:
                        # 在画面标注手指
                        self.mp_drawing.draw_landmarks(
                            image,
                            hand_landmarks,
                            self.mp_hands.HAND_CONNECTIONS,
                            self.mp_drawing_styles.get_default_hand_landmarks_style(),
                            self.mp_drawing_styles.get_default_hand_connections_style())

                        # 解析手指,存入各个手指坐标
                        landmark_list = []
                        for landmark_id, finger_axis in enumerate(
                                hand_landmarks.landmark):
                            landmark_list.append([
                                landmark_id, finger_axis.x, finger_axis.y,
                                finger_axis.z
                            ])
                        if landmark_list:
                            # 获取大拇指指尖坐标
                            thumb_finger_tip = landmark_list[4]
                            thumb_finger_tip_x = math.ceil(thumb_finger_tip[1] * resize_w)
                            thumb_finger_tip_y = math.ceil(thumb_finger_tip[2] * resize_h)
                            # 获取食指指尖坐标
                            index_finger_tip = landmark_list[8]
                            index_finger_tip_x = math.ceil(index_finger_tip[1] * resize_w)
                            index_finger_tip_y = math.ceil(index_finger_tip[2] * resize_h)
                            # 中间点
                            finger_middle_point = (thumb_finger_tip_x + index_finger_tip_x) // 2, (
                                    thumb_finger_tip_y + index_finger_tip_y) // 2
                            # print(thumb_finger_tip_x)
                            thumb_finger_point = (thumb_finger_tip_x, thumb_finger_tip_y)
                            index_finger_point = (index_finger_tip_x, index_finger_tip_y)
                            # 画指尖2点
                            image = cv2.circle(image, thumb_finger_point, 10, (255, 0, 255), -1)
                            image = cv2.circle(image, index_finger_point, 10, (255, 0, 255), -1)
                            image = cv2.circle(image, finger_middle_point, 10, (255, 0, 255), -1)
                            # 画2点连线
                            image = cv2.line(image, thumb_finger_point, index_finger_point, (255, 0, 255), 5)
                            # 勾股定理计算长度
                            line_len = math.hypot((index_finger_tip_x - thumb_finger_tip_x),
                                                  (index_finger_tip_y - thumb_finger_tip_y))

                            # 获取电脑最大最小音量
                            min_volume = self.volume_range[0]
                            max_volume = self.volume_range[1]
                            # 将指尖长度映射到音量上
                            vol = np.interp(line_len, [50, 300], [min_volume, max_volume])
                            # 将指尖长度映射到矩形显示上
                            rect_height = np.interp(line_len, [50, 300], [0, 200])
                            rect_percent_text = np.interp(line_len, [50, 300], [0, 100])

                            # 设置电脑音量
                            self.volume.SetMasterVolumeLevel(vol, None)

                # 显示矩形
                cv2.putText(image, str(math.ceil(rect_percent_text)) + "%", (10, 350),
                            cv2.FONT_HERSHEY_PLAIN, 3, (255, 0, 0), 3)
                image = cv2.rectangle(image, (30, 100), (70, 300), (255, 0, 0), 3)
                image = cv2.rectangle(image, (30, math.ceil(300 - rect_height)), (70, 300), (255, 0, 0), -1)

                # 显示刷新率FPS
                cTime = time.time()
                fps_text = 1 / (cTime - fpsTime)
                fpsTime = cTime
                cv2.putText(image, "FPS: " + str(int(fps_text)), (10, 70),
                            cv2.FONT_HERSHEY_PLAIN, 3, (255, 0, 0), 3)
                # 显示画面
                cv2.imshow('xyp', image)
                if cv2.waitKey(5) & 0xFF == 27 or cv2.getWindowProperty('MediaPipe Hands', cv2.WND_PROP_VISIBLE) < 1:
                    break
            cap.release()
control = HandControlVolume()
control.recognize()