
Article directory
Preface
We learned earlier what Spring is, so today I will share with you a framework that is widely used in daily website development-Spring Web MVC.
What is Spring Web MVC?
Let’s take a look at the official explanation first.

Spring Web MVC is a web component provided by Spring Framework. It is a framework of MVC design pattern and is mainly used to develop flexible and loosely coupled web applications. It provides a Model-View-Controller (MVC for short) architecture and components that can be used to develop Web applications.
Spring Web MVC is a lightweight Web framework based on Java that implements the request-driven type of Web MVC design pattern. It uses the idea of the MVC architectural pattern to decouple the responsibilities of the web layer. Request-driven refers to the use of the request-response model. The purpose of the framework is to help simplify daily web development. Spring Web MVC also aims to simplify our daily web development.
The MVC architectural pattern has been mentioned all the time, so what exactly is MVC?
What is MVC
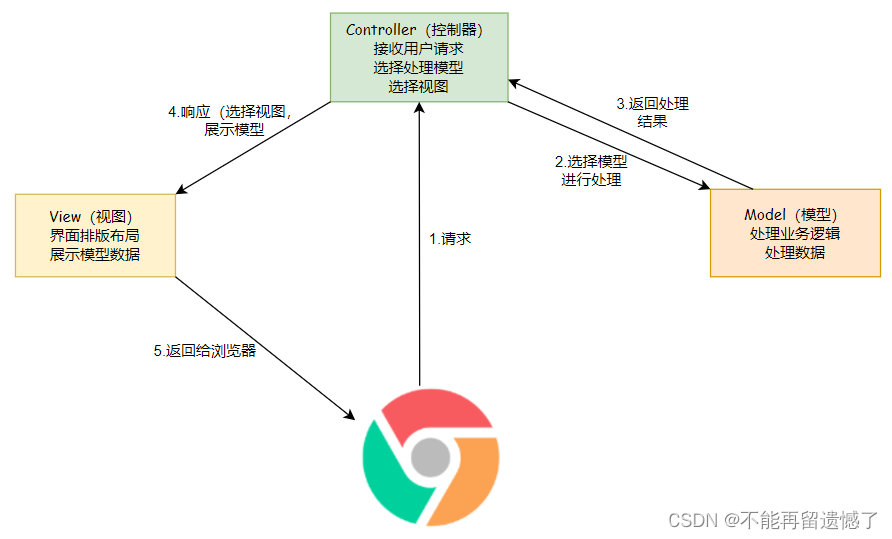
The MVC (Model-View-Controller) architectural model is a software design pattern used to separate the user interface, data model and controller. This architectural pattern can improve the maintainability, scalability and flexibility of the system. In the MVC architecture, the model is responsible for processing the data and business logic of the application, the view is responsible for displaying data to the user, and the controller is responsible for processing user requests and coordinating the interaction between the model and the view.
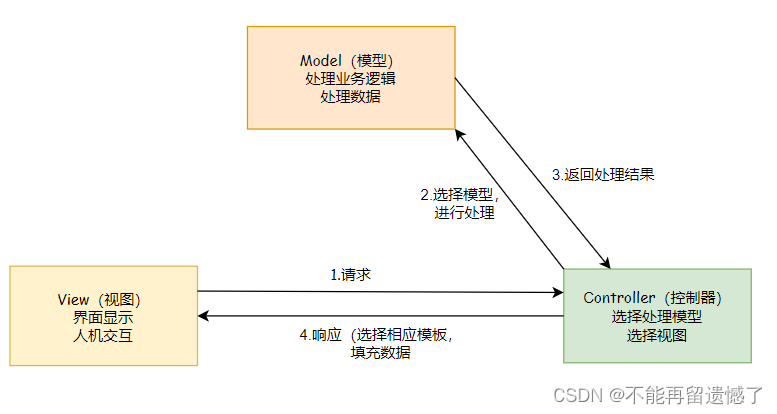
- View: refers to the resource used specifically in the application to interact with the browser and display data.
- Model: It is the main part of the application and is used to process the data logic in the program.
- Controller: It can be understood as a dispatcher, used to decide which model needs to be used to process requests from the view, and which view needs to jump back to after processing. Ready to use to connect views and models
The MVC architectural pattern is commonly used in desktop application and web application development. In web applications, controllers are usually implemented by Servlet or Controller classes, models are usually implemented by Java classes, and views are implemented by HTML or JSP pages. Through the MVC architecture pattern, each part of the program can be made more independent and easier to maintain and expand.
What is Spring MVC?
MVC is an architectural design pattern and an idea, and Spring MVC is a specific implementation of the MVC idea. In addition, Spring MVC is also a Web architecture.
In summary, Spring MVC is a web framework that implements the MVC architectural pattern.
When we created the Spring Boot project earlier, the checked Spring Web framework was actually the Spring MVC framework.
So there is Spring Boot and Spring MVC, so what is the difference between them?
The difference between Spring Boot and Spring MVC
What is Spring Boot?
Spring Boot is a new framework provided by the Pivotal team. It is designed to simplify the initial construction and development process of new Spring applications. The framework uses an ad hoc approach to configuration, eliminating the need for developers to define boilerplate configurations. In this way, Spring Boot strives to become a leader in the booming field of rapid application development. Spring Boot is a sub-project of the Spring family. Its original design is to simplify Spring configuration, so that independent running programs can be easily built and development efficiency can be greatly improved.
Relationships and Differences
Spring MVC is a framework for building Web applications. It is based on the MVC design pattern and separates business logic, data and interface display, reducing dependencies between components and improving code reusability. Spring MVC requires manual configuration of XML or other types of configuration files to manage the various components and dependencies of the application.
Spring Boot is a more modern framework that aims to simplify the initial construction and development process of Spring applications. Through the principle of convention over configuration, Spring Boot can automatically configure various components and dependencies of the application, avoiding the tedious manual configuration process. In addition, Spring Boot also provides many built-in functions and tools, such as embedded web servers, automated testing, security controls, etc., allowing developers to focus more on the implementation of business logic.
Therefore, it can be said that Spring Boot is an upgrade and optimization of Spring MVC. It simplifies the development process and improves development efficiency through automatic configuration and built-in tools. At the same time, Spring Boot also supports the use of other Spring components such as Spring MVC and can be seamlessly integrated with them.
To put it simply, Spring MVC implements web functions by adding Spring MVC dependencies through Spring Boot.
Although Spring MVC implements the MVC architectural pattern, Spring MVC also combines its own characteristics and makes some changes.
Spring MVC learning
After knowing what Spring MVC is, we can learn Spring MVC. The key to learning Spring MVC is to learn its annotations, because in Spring MVC, a lot of annotations are used.
Introduction to annotations
1. @SpringBootApplication
After we create a Spring MVC project, a "project name" + Application class will be automatically generated, and we can see the first annotation in this class.
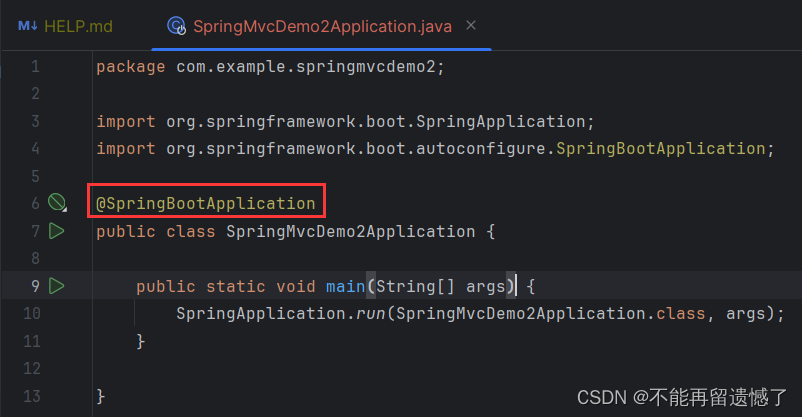
@SpringBootApplication is a convenience annotation that is a combination of @SpringBootConfiguration and @EnableAutoConfiguration. This annotation allows us to quickly start a Spring Boot project.
- @SpringBootConfiguration: This annotation indicates that the current class is a Spring Boot configuration class, which will contain some basic Spring Boot configuration.
- @EnableAutoConfiguration: This annotation is used to tell Spring Boot to automatically select and configure the required beans based on the class path and configured properties in the current project. This greatly simplifies the setup of new projects.
When you use the @SpringBootApplication annotation in a Spring Boot project, it automatically configures a development environment so that you can quickly start and test your application. At the same time, it also provides a basic directory structure so that you can manage your code more easily.
In other words, the class annotated with @SpringBootApplication is the startup class of the Spring MVC project, and the project is started from this class.
Let's first write a simple Spring MVC code.
package com.example.springmvcdemo2;

import org.springframework.web.bind.annotation.RequestMapping;
import org.springframework.web.bind.annotation.RestController;

@RestController
public class HelloController {


    @RequestMapping("/hi")
    public String hi() {


        return "你好,Spring MVC";
    }
}
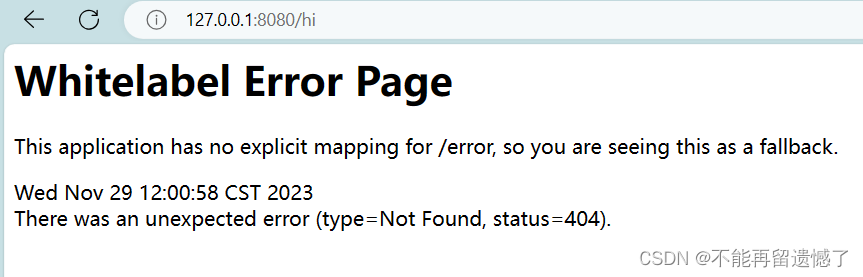
After writing this code and starting it, the following results will appear on the console.
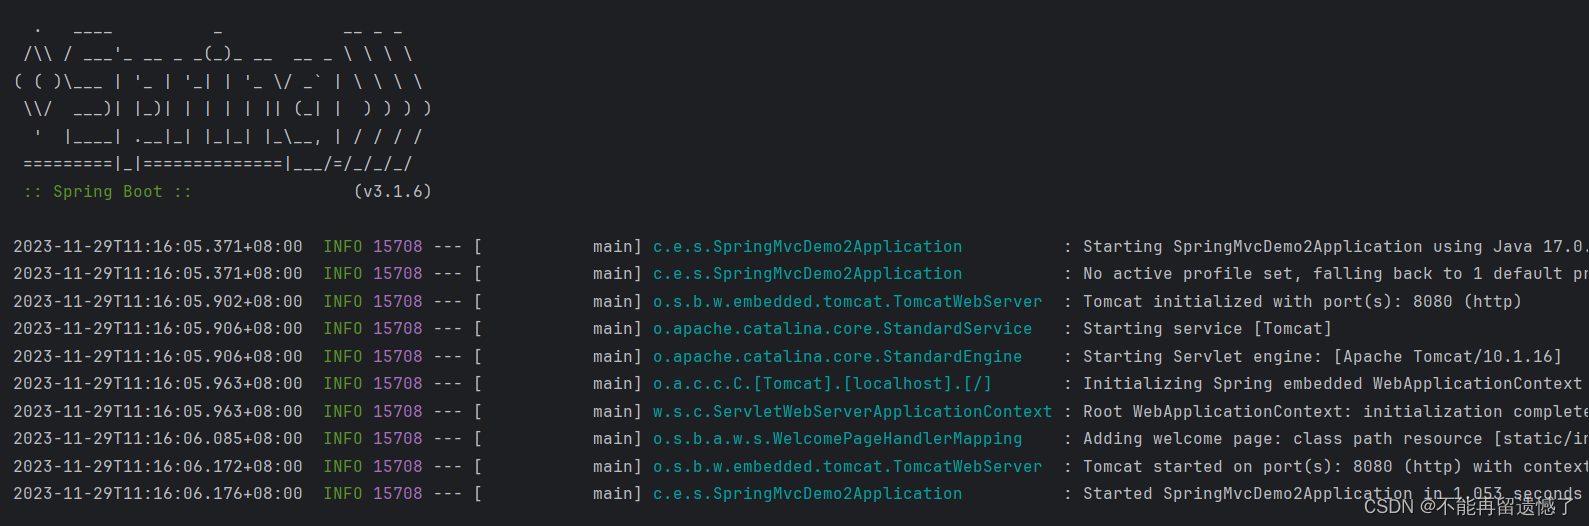
Such a result indicates that our Spring MVC project has been successfully launched.
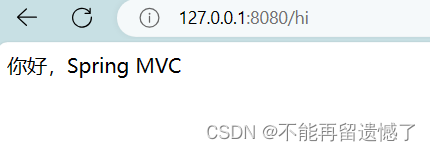
Then we can use the browser to access the current Spring MVC project and enterhttp"//127.0.0.1:8080/hi in the browser search bar. Why do we need to enter the URL like this? As we said before, Spring is developed on the basis of servlet, so Spring also uses the tomcat server. Tomcat is bound to the 8080 port and the 8005 management port by default, so accessing the Spring project also requires access to the 8080 port of our computer. But when we studied servlet earlier, we will find that in addition to /hi in the URL, there will also be a project name in the path, but why does it not need to be in the URL when accessing the Spring MVC project here? What about adding a project name? In the previous servlet, the relationship between tomcat and projects is: one tomcat server can have multiple projects, while in Spring MVC, the relationship between tomcat and projects is: one Spring MVC project contains one tomcat server, and One project corresponds to one tomcat server. In other words: Spring MVC allows multiple tomcat servers to be started at the same time. As long as the ports of these multiple tomcat servers do not conflict, we do not need to when accessing the Spring MVC project. Specify the project name.
Then /hi is the content in our @RequestMapping.
Two new annotations, @RestController and @RequestMapping, also appear in the simple code above. Let's take a look at the role of these two annotations.
2. @RestController
In a Spring MVC project, there will be many classes, and each class may have many methods. How does the Spring program know which method to execute?
Spring will scan all classes. If the class is annotated with @RestController, Spring will check whether the method in this class is annotated with @RequestMapping. Of course, its role is not limited to this. Let’s Use it first and explain it in detail later.
3. @RequestMapping
Use @RequestMapping in Spring MVC to implement URL routing mapping, which is the role of the browser connector.
Route mapping: When a user accesses a URL, the process of mapping the user's request to a method of a certain class in the program is called route mapping.
In the above code, when we access 127.0.0.1:8080, which is the local tomcat server, the following /hi indicates the method of accessing the /h1 routing map.
So can the / in this @RequestMapping be omitted? In fact, it is possible. When you omit this /, Spring will automatically add / for us, so it is recommended that you add this /.
package com.example.springmvcdemo2;

import org.springframework.web.bind.annotation.RequestMapping;
import org.springframework.web.bind.annotation.RestController;

@RestController
public class HelloController {


    @RequestMapping("hi")
    public String hi() {


        return "你好,Spring MVC";
    }
}
@RequestMapping is one of the most commonly used annotations in Spring MVC projects. Let’s learn the use of @RequestMapping in detail.
3.1 @RequestMapping usage
The @RequestMapping annotation can be used not only on methods, but also on classes.
package com.example.springmvcdemo2;
import org.springframework.web.bind.annotation.RequestMapping;
import org.springframework.web.bind.annotation.RestController;
@RestController
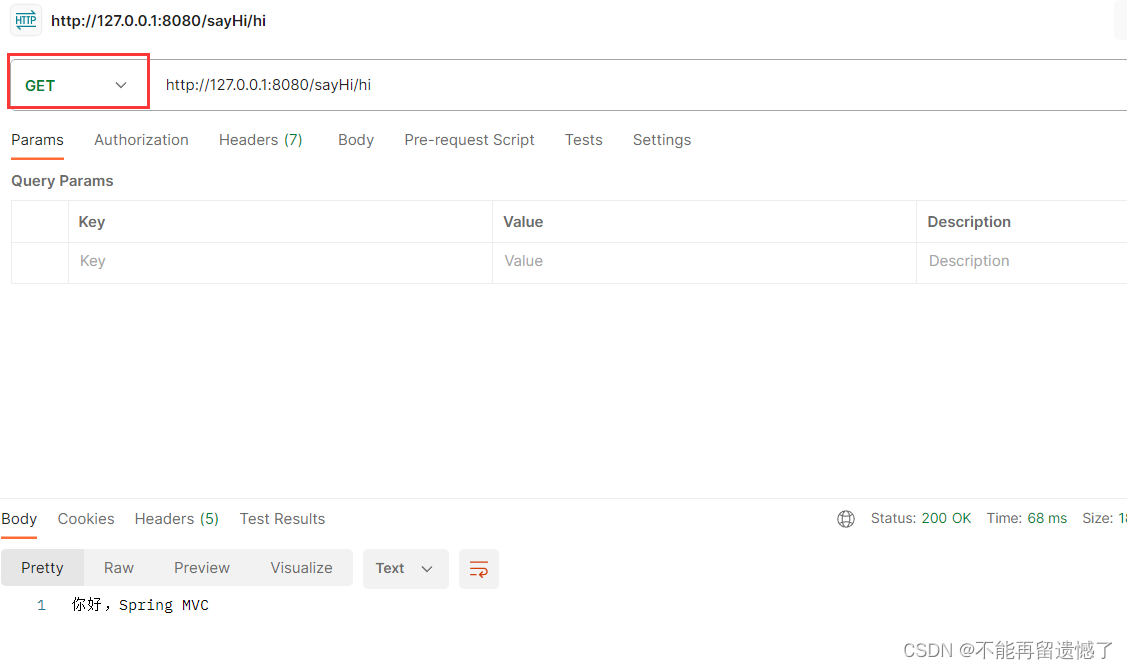
@RequestMapping("sayHi")
public class HelloController {
@RequestMapping("hi")
public String hi() {
return "你好,Spring MVC";
}
}
When @RequestMapping modifies the class, the accessed address is the class path + method path.
When accessing here, if the class path is not added, the access cannot be successful.

3.2 Can @RequestMapping accept GET method or POST method?
In order to solve this problem, we need to use postman to construct GET requests and POST requests respectively.

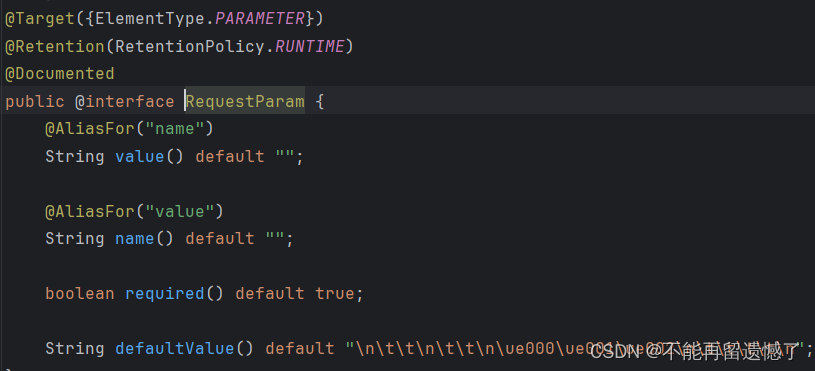
It can be seen from the GET request and POST request constructed by postman that this @RequestMapping supports the GET method and the POST method by default. So is there a way to make it only receive GET or POST requests? The answer is yes. We can take a look at the source code of @ReqeustMapping.
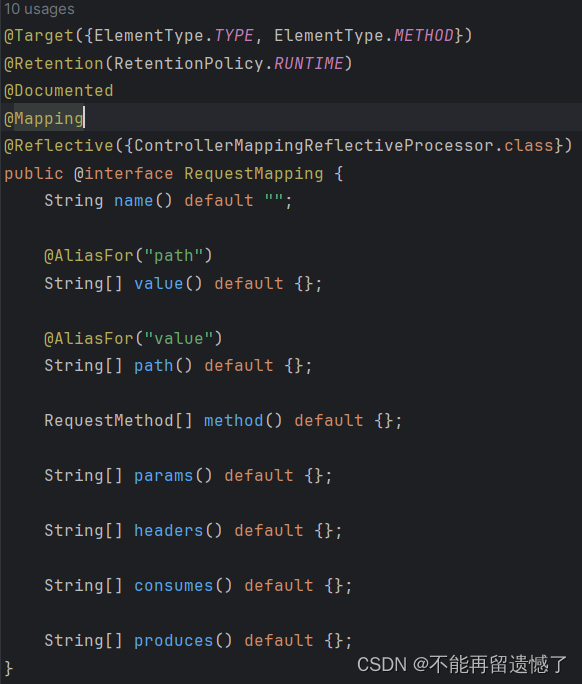
- @Target({ElementType.TYPE, ElementType.METHOD}): This annotation can be used at class level or method level.
- @Retention(RetentionPolicy.RUNTIME): This annotation is valid at runtime, that is, the runtime code can access the information of this annotation.
- @Documented: This is a standard JavaDoc annotation used to generate API documentation.
- @Mapping: This annotation is usually used with Spring's @Configuration class to map processing methods to URL paths.
- @Reflective({ControllerMappingReflectiveProcessor.class}): This annotation instructs Spring to parse and process classes and methods with this annotation at runtime.
Each element in the annotation:
- name(): Returns a string representing the name of this mapping. If not specified, defaults to the empty string.
- value(): Returns a string array representing the URL path that needs to be mapped. If not specified, defaults to an empty array. This path can contain placeholders, such as /users/{id}.
- path(): Another array used to specify the URL path. The value of this array is the same as the value returned by value(), and they are aliases for each other.
- method(): Returns a RequestMethod array indicating the HTTP method types accepted by this mapping. If not specified, it defaults to an empty array, indicating that all method types are accepted.
- params(): Returns a string array representing the request parameters. If the request parameter matches any one of the array, then this mapping will be triggered.
- headers(): Returns a string array representing the request headers. If the request header matches any one of the arrays, then this mapping will be triggered.
- consumes(): Returns an array of strings indicating the media types accepted by this map. If not specified, defaults to an empty array, indicating that all media types are accepted.
- produces(): Returns a string array indicating the media types that this mapping can produce. If not specified, it defaults to an empty array, indicating that all media types can be generated.
The method in @RequestMapping defaults to receiving requests from all methods. If we want to specify a method, we can explicitly specify the requested method.
@RequestMapping(value = "sayHi", method = RequestMethod.GET)
When there is only one parameter in @RequestMapping, this parameter will be considered value. If there are multiple parameters, the key of the parameter needs to be explicitly specified, similar to value="sayhi", method=RequestMethod.GET.
After changing the parameters in @RequestMapping to only allow receiving GET requests, we use postman to construct GET requests and POST requests to see the results.

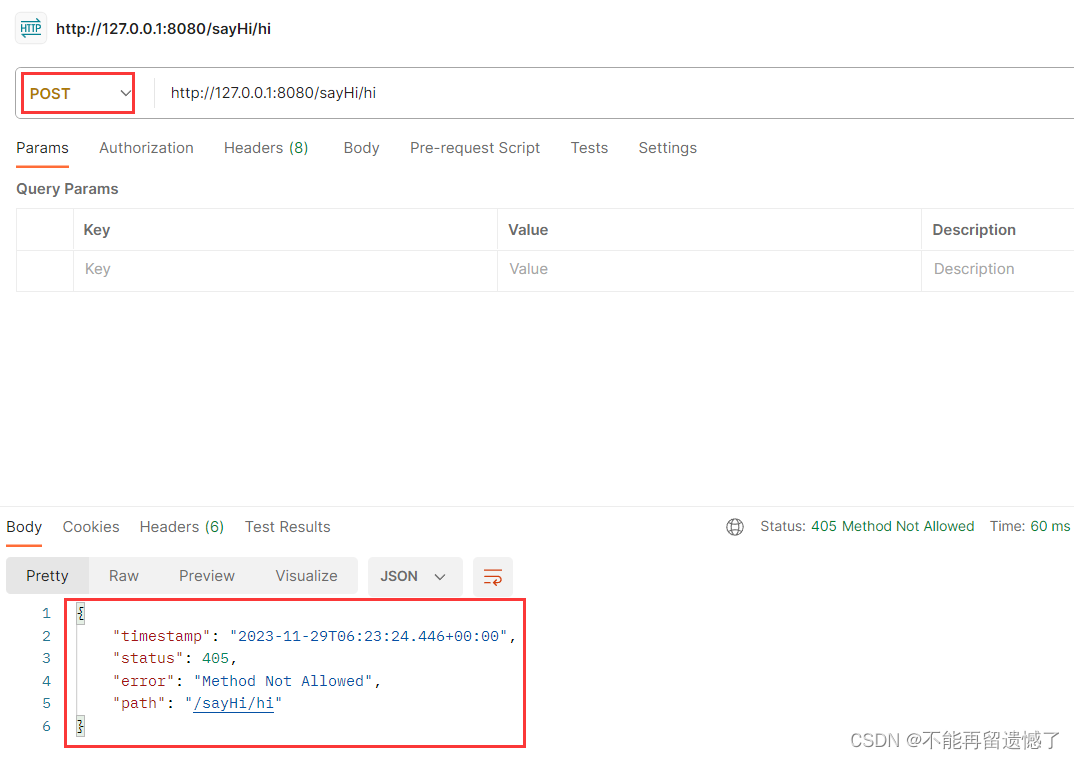
After the POST method is constructed, 405 is displayed and the method is not allowed.
4 requests
Accessing different paths means sending different requests. When sending a request, some parameters may be passed, and our backend needs to get these passed parameters to perform corresponding business processing.
4.1 Passing a single parameter
In Spring MVC, we can get this parameter by using the same name as the passed parameter. This is all done for us by the bottom layer of Spring MVC. In fact, the bottom layer of Spring MVC has done a lot of things for us. Send it When the request is forwarded from Controller to Mudel, some things we may need have been processed by the bottom layer of Spring MVC for us. If we want to use them, we only need to get them.
package com.example.springmvcdemo2;
import org.springframework.web.bind.annotation.RequestMapping;
import org.springframework.web.bind.annotation.RestController;
@RestController
@RequestMapping("/request")
public class UserController {
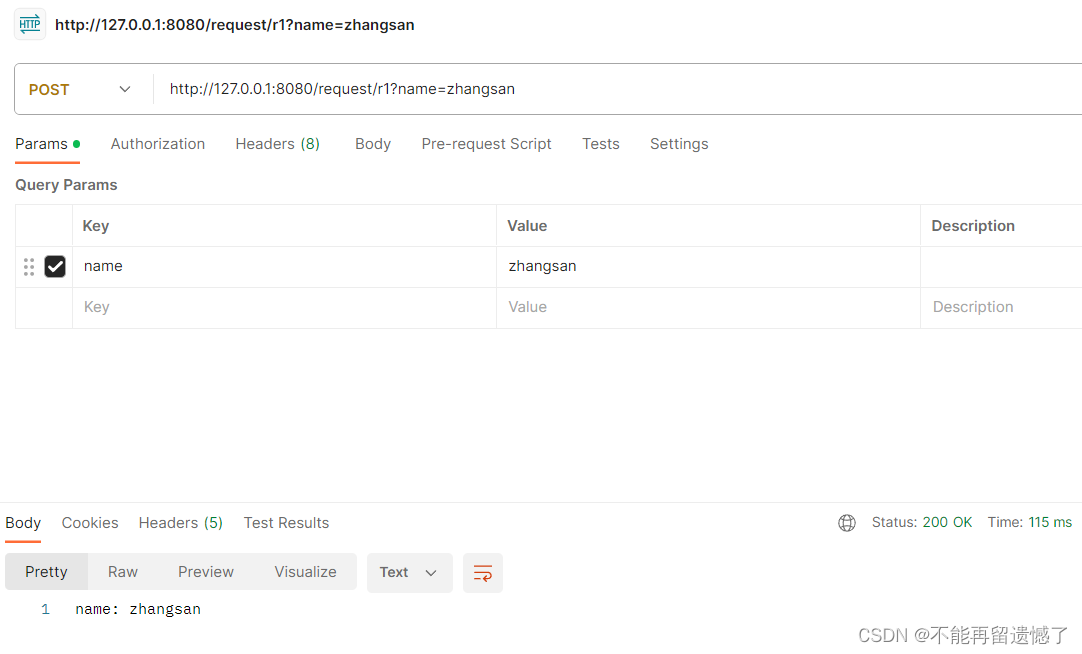
@RequestMapping("/r1")
public String r1(String name) {
return "name: " + name;
}
}
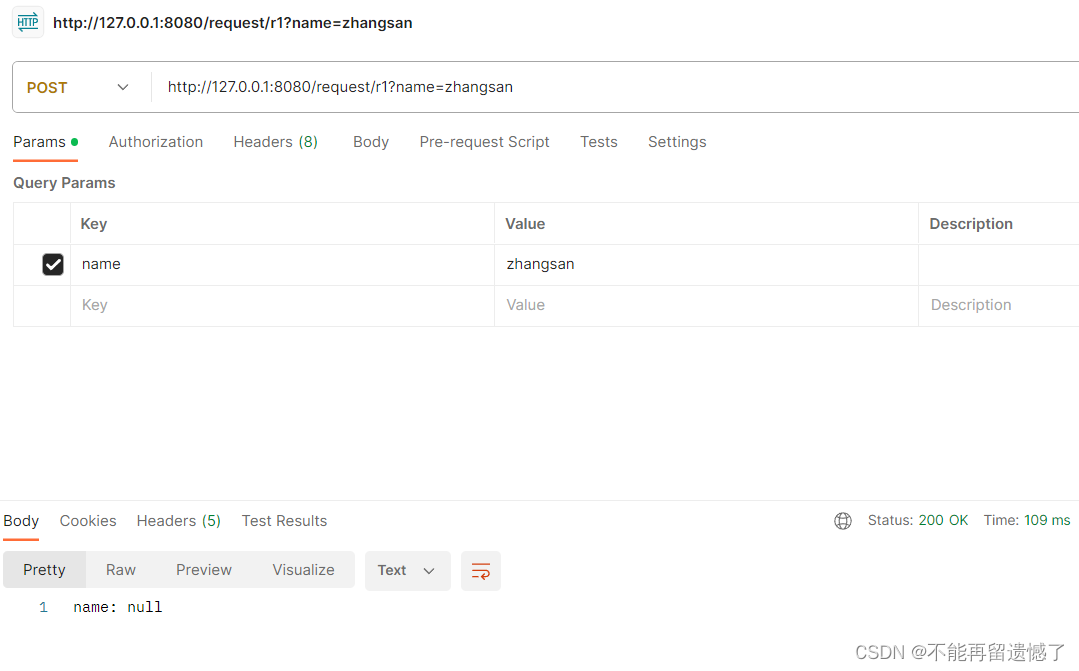
But if we set the parameter name to be different from the requested parameter name, then our backend will not be able to obtain this parameter.
package com.example.springmvcdemo2;

import org.springframework.web.bind.annotation.RequestMapping;
import org.springframework.web.bind.annotation.RestController;

@RestController
@RequestMapping("/request")
public class UserController {


    @RequestMapping("/r1")
    public String r1(String username) {


        return "name: " + username;
    }
}
4.2 Passing multiple parameters
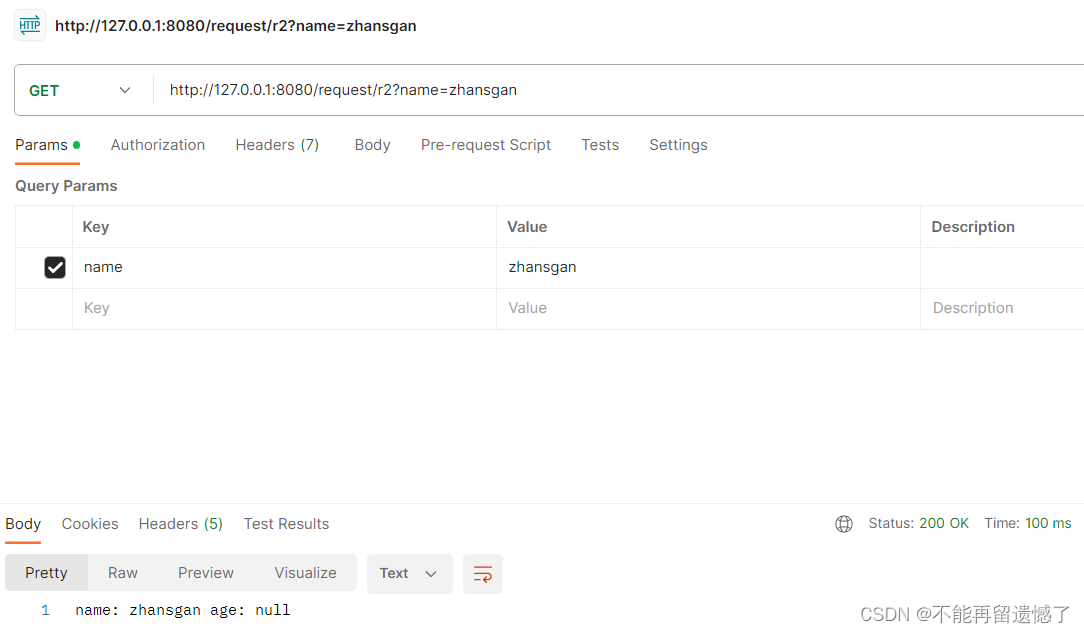
@RequestMapping("/r2")
public String r2(String name, int age) {


    return "name: " + name + " age: " + age;
}
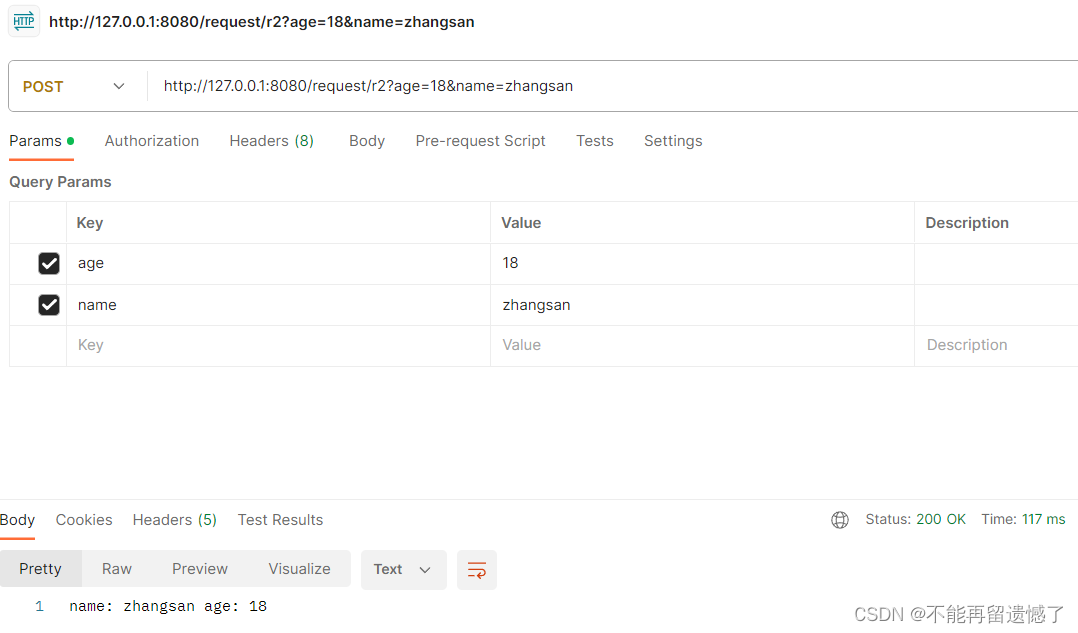
It can be found that the order of parameters in the request does not need to be consistent with the order in which our code obtains parameters.
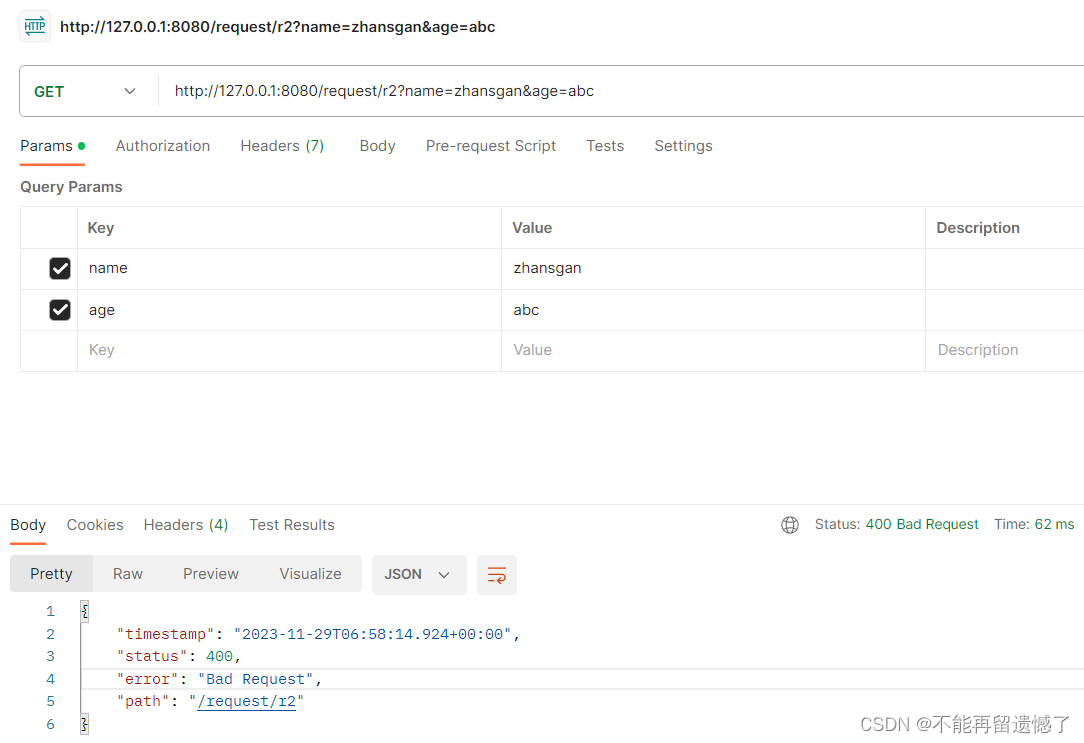
What happens if we pass no parameters for age here?
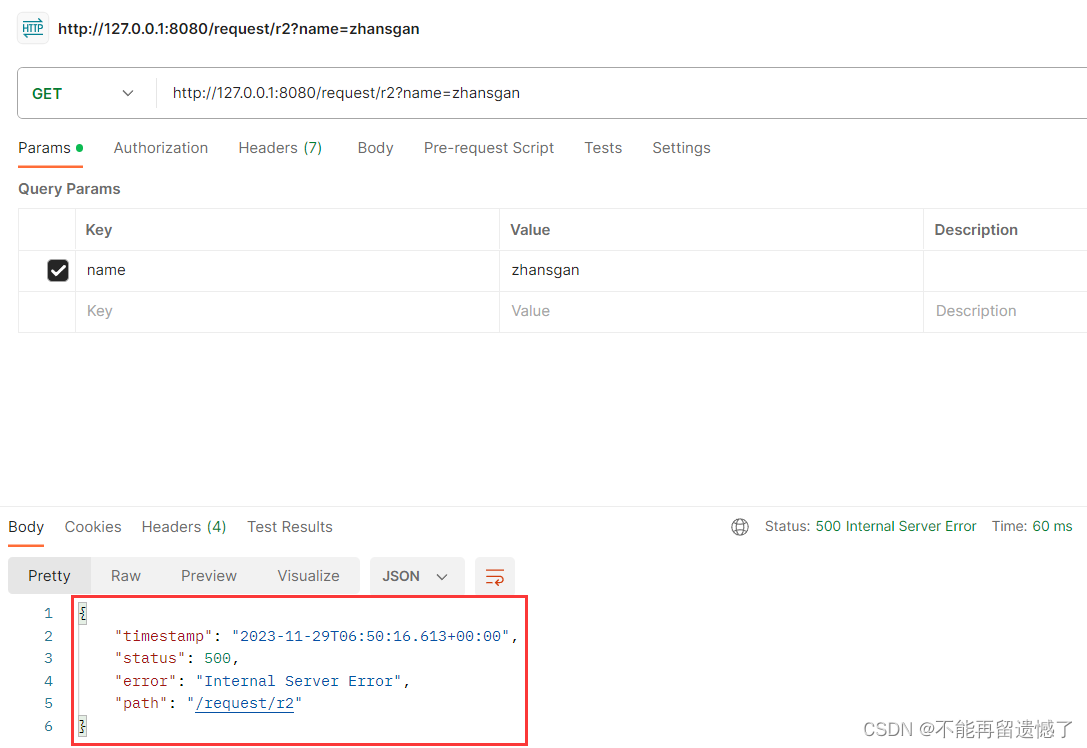
When the int type age parameter is passed, a 500 error will be reported here, that is, our server has an error in the Java code. At this time, we need to look at the code log to see what went wrong.

From the previous observation of the code, we can know that if the parameter is not passed, null will be returned by default. However, since we use the int type to receive the parameter, the int type cannot be converted to null, so an error will be reported to avoid this problem. The method is to use the int type wrapper class Integer, so that the returned null can be processed.
@RequestMapping("/r2")
public String r2(String name, Integer age) {


    return "name: " + name + " age: " + age;
}
Through the above example, we draw a conclusion: when receiving parameters, try to use wrapper classes of basic data types.
Another problem is that if our backend thinks that this parameter is of type Integer, so we use Integer to receive it, but the parameter passed in the request is of type String, what will happen? come and see.
The data type of the parameters obtained by the backend needs to be convertible with the requested parameter data type, otherwise problems will occur, which requires negotiation between the frontend and the backend.
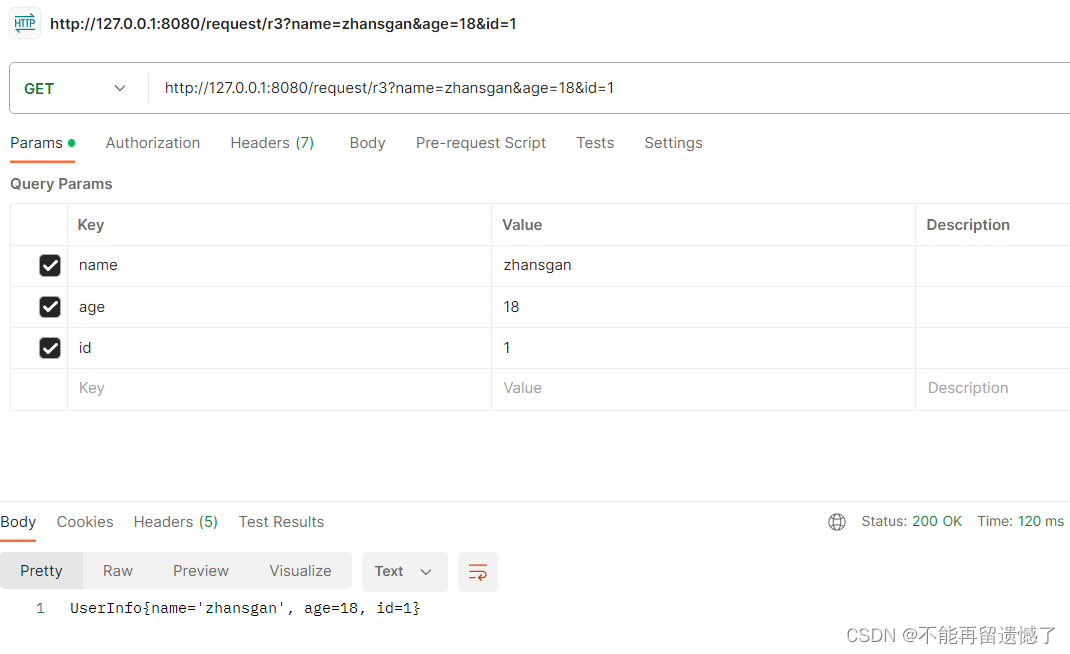
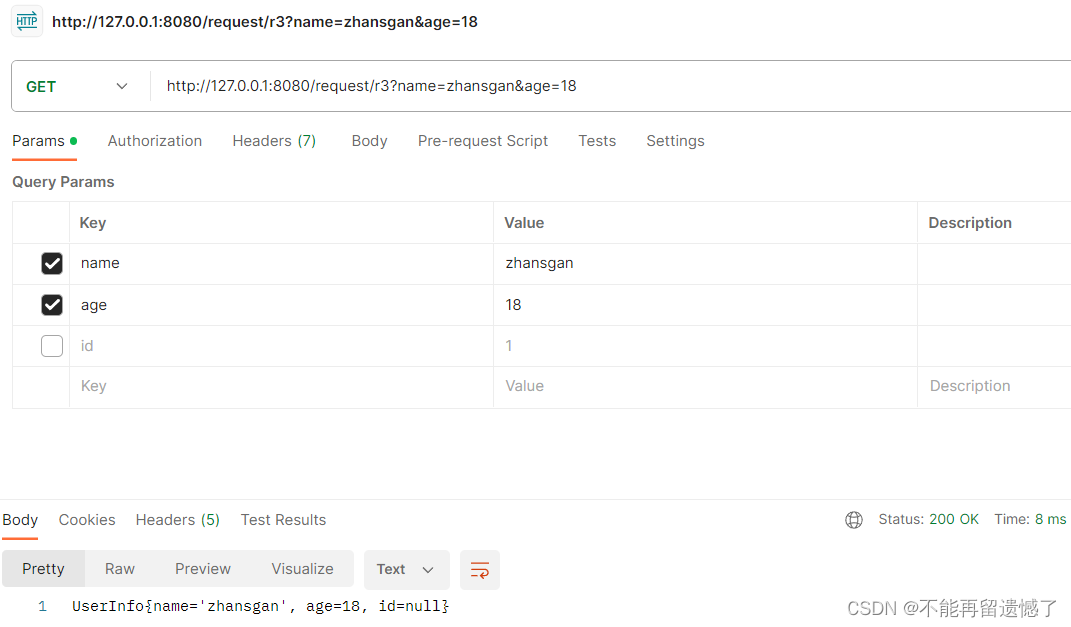
4.3 Passing objects
If there are many parameters passed, the method declaration will require a lot of formal parameters. When adding parameters later, the formal parameters in the method will also need to be changed, so this will be very troublesome, so we can put these parameters Encapsulated as an object, you can write all the parameters that may be used in this object at once. If there are no parameters passed in the request, they will be set to the default value. Even if you need to add parameters later, they will be Changes in this object we encapsulate. When the parameters received by Spring MVC are of object type, then Spring MVC will find the corresponding values in the request based on the attributes in the object, and assign these attributes to values, which greatly facilitates the work of our programmers. .
Encapsulates a UserInfo object.
package com.example.springmvcdemo2;

public class UserInfo {


    private String name;
    private Integer age;
    private Integer id;

    public String getName() {


        return name;
    }

    public void setName(String name) {


        this.name = name;
    }

    public Integer getAge() {


        return age;
    }

    public void setAge(Integer age) {


        this.age = age;
    }

    public Integer getId() {


        return id;
    }

    public void setId(Integer id) {


        this.id = id;
    }

    @Override
    public String toString() {


        return "UserInfo{" +
                "name='" + name + '\'' +
                ", age=" + age +
                ", id=" + id +
                '}';
    }
}
@RequestMapping("/r3")
public String r3(UserInfo user) {


    return user.toString();
}
4.4 Parameter renaming
Although the front-end and back-end must have negotiated the name of the parameter in the request before starting the project, my back-end programmer wrote it and felt that the name was not good. I want to change it. Can I change it? The answer is yes, you need to use the @RequestParam annotation to rename the parameters.
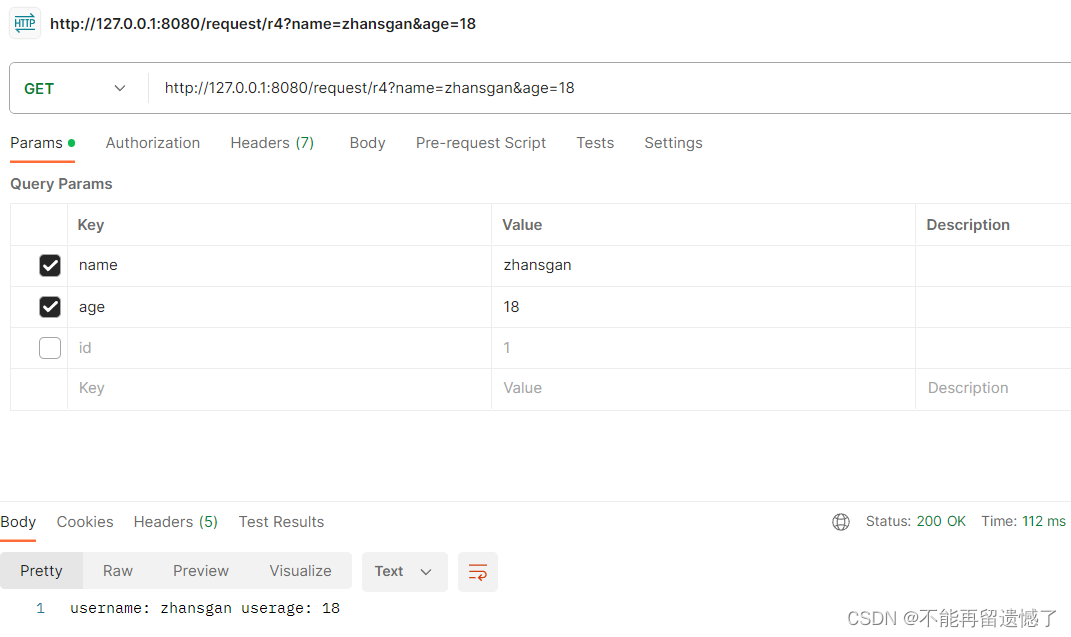
@RequestMapping("/r4")
public String r4(@RequestParam("name") String username, @RequestParam("age") Integer userage) {


    return "username: " + username + " userage: " + userage;
}
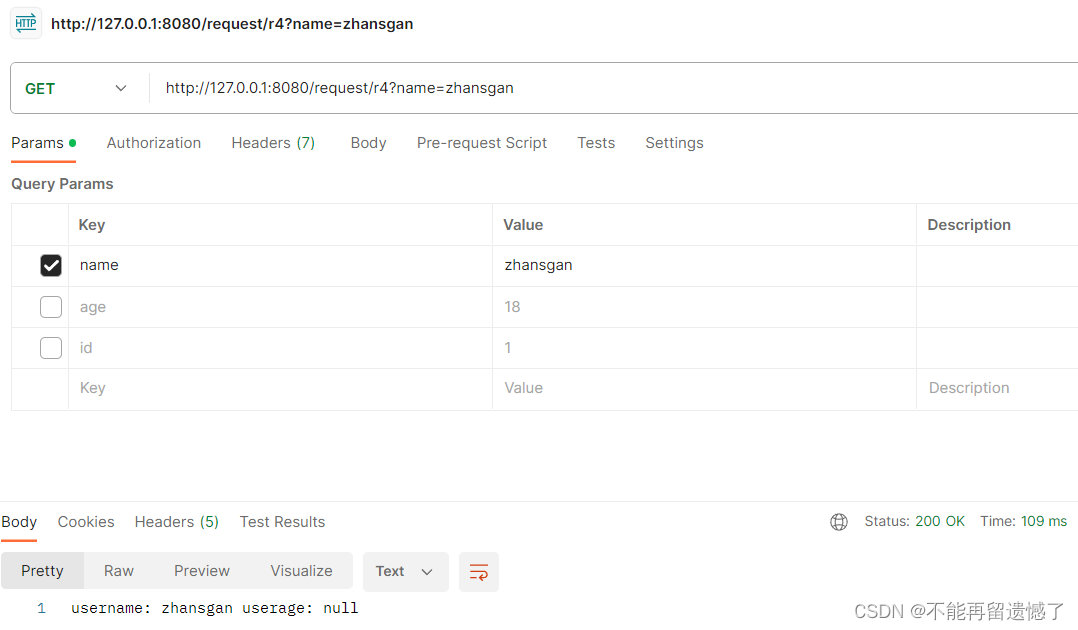
If we add this annotation, but there is no such parameter in the request, problems will arise.

This is because the annotation defaults that the parameter must be passed, so the default value needs to be set to not required.
@RequestMapping("/r4")
public String r4(@RequestParam("name") String username, @RequestParam(value = "age", required = false) Integer userage) {


    return "username: " + username + " userage: " + userage;
}
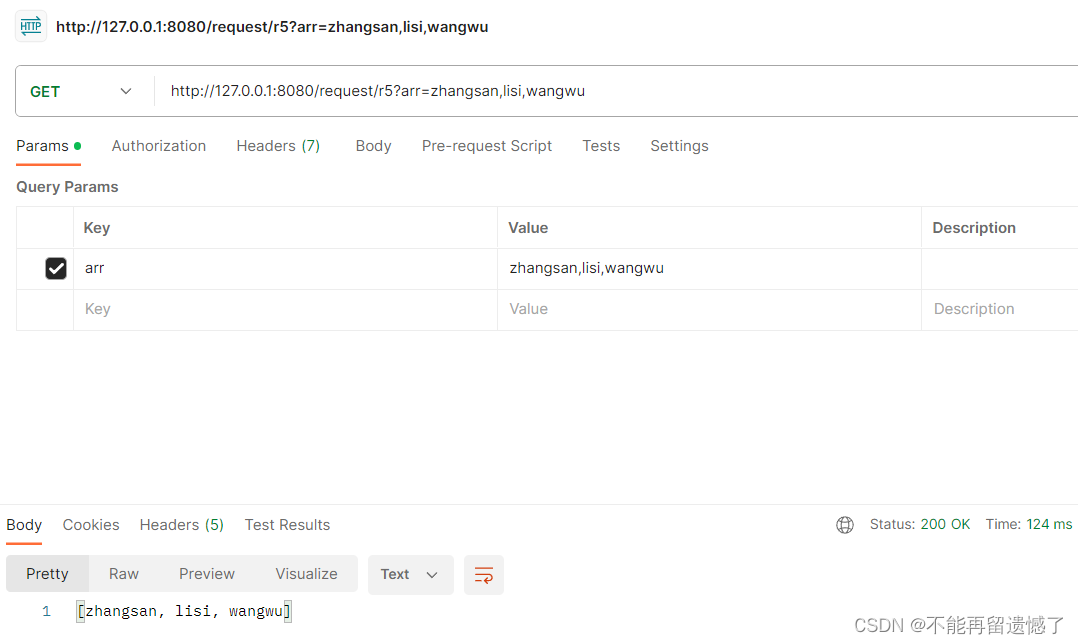
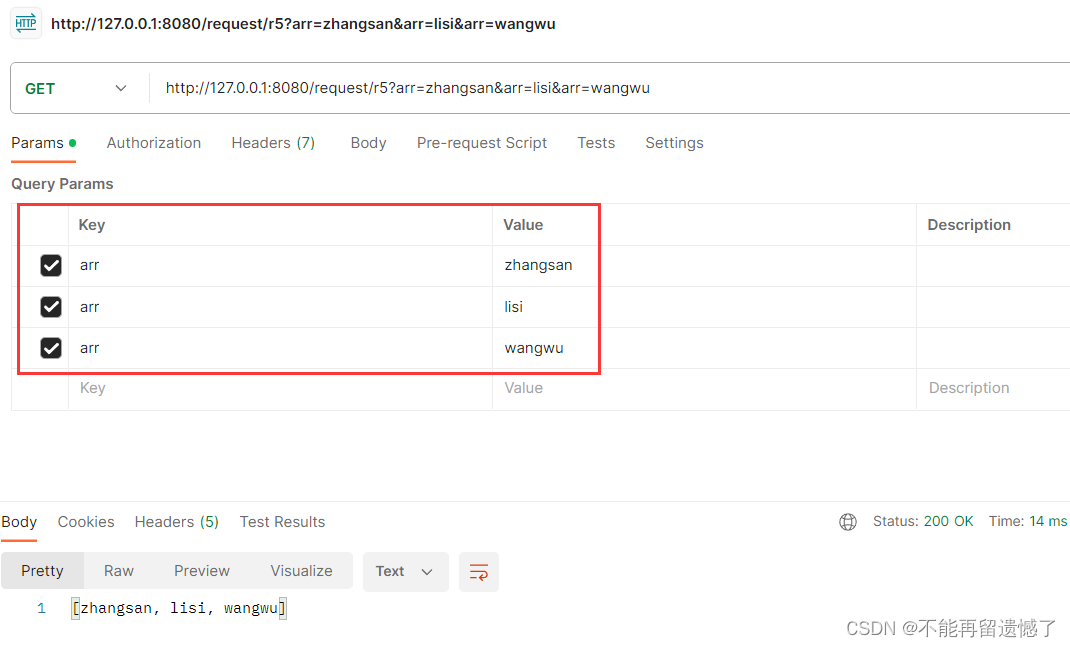
4.5 Passing arrays
Spring MVC can automatically bind the assignment of array parameters. In other words: Spring MVC will automatically help us handle the case where the request parameter is an array.
@RequestMapping("/r5")
public String r5(String[] arr) {


    return Arrays.toString(arr);
}
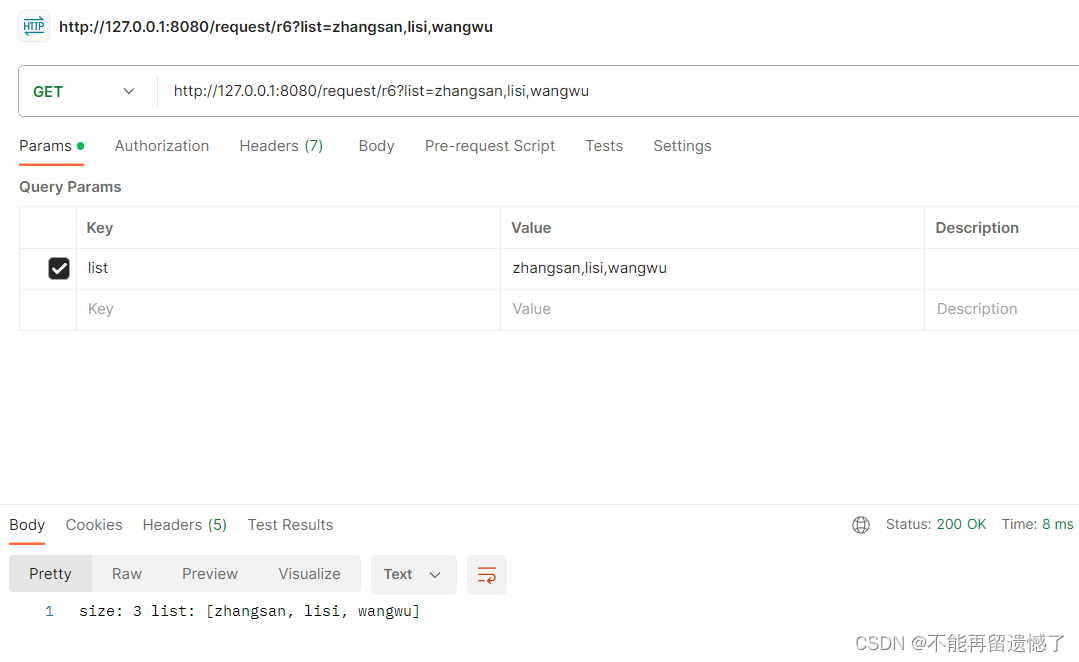
4.6 Passing collections
Similar to passing an array, when the parameters in the request have multiple identical names, they can also be regarded as a collection. However, if you regard it as a collection, you need to use @RequestParam to bind the parameter relationship. Because by default, if there are multiple parameters with the same name in the request, Spring MVC will encapsulate them as an array. If you want to encapsulate them as a collection, you need to use @RequestParam to bind the parameter relationship.
@RequestMapping("/r6")
public String r6(@RequestParam("list") List<String> list) {


    return "size: " + list.size() + " list: " + list;
}
4.6 Passing JSON data
The JSON data format is called the most commonly used data format in network transmission because of its advantages of being easy to read and write, cross-platform, cross-language, and lightweight. So how to receive the JSON passed in the request in Spring MVC? What about the data format?
Because the JSON data format is in the form of key-value pairs, we encapsulate the parameters that need to be received into Java objects, and then use them in Spring MVC parameters @RequestBody to modify this parameter, so that when Spring MVC receives the JSON data, it will search for the key-value pair with the same name in the JSON data based on the properties in the Java object, and assign the value to the Java object Attributes.
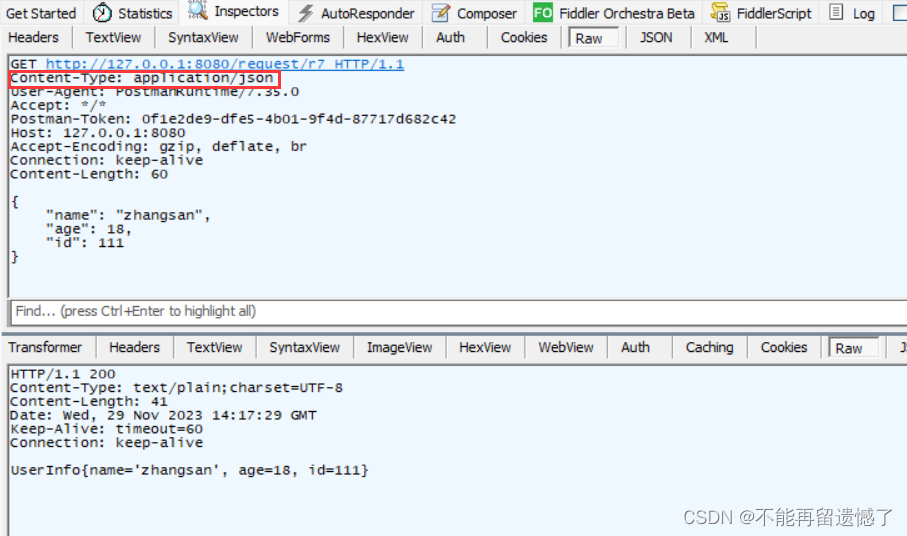
@RequestMapping("/r7")
public String r7(@RequestBody UserInfo user) {


    return user.toString();
}
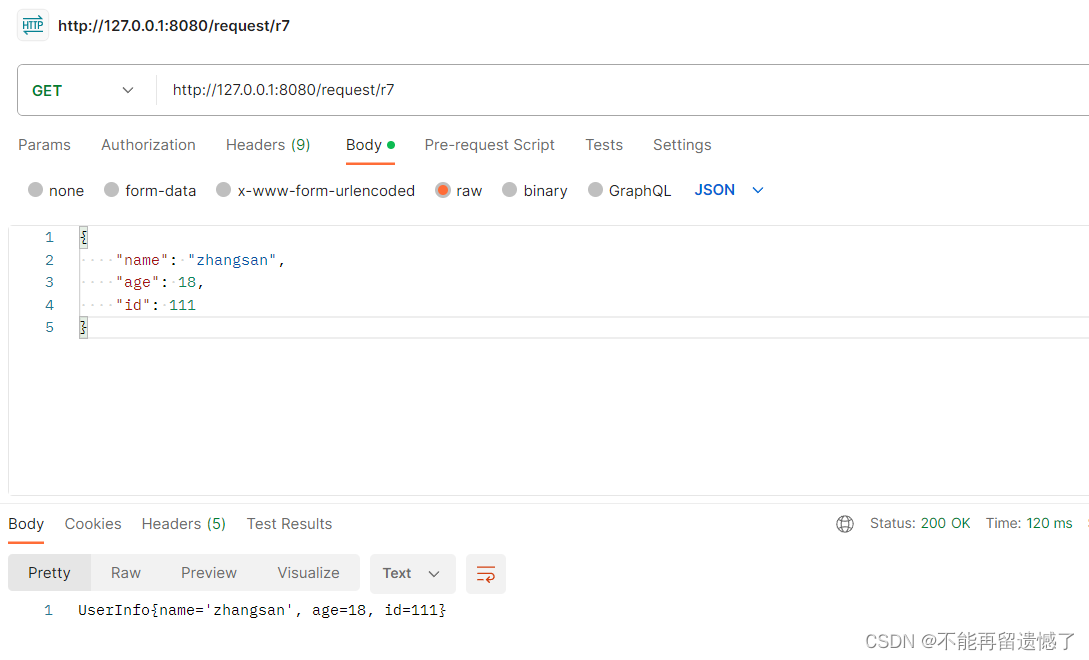
fiddler packet capture results.
4.7 Get parameters in URL
Data binding on URL paths can be achieved by using @PathVariable . Use {} on the path to indicate the data to be bound.
@RequestMapping("/r8/{name}/{age}")
public String r8(@PathVariable String name, @PathVariable Integer age) {


    return "name: " + name + " age: " + age;
}
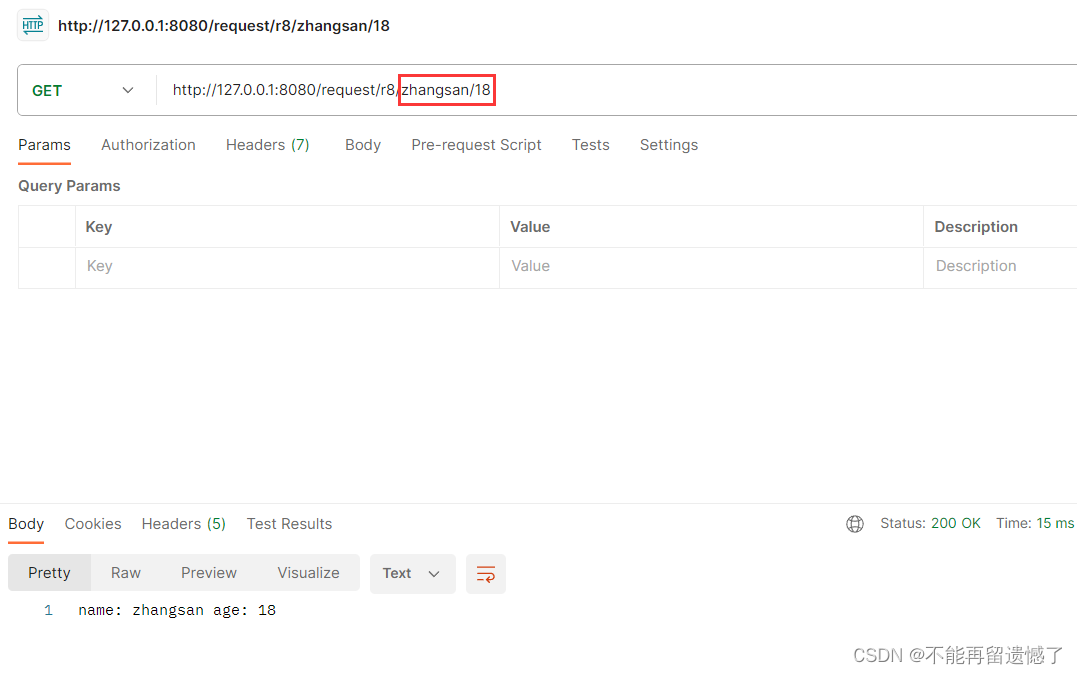
When Spring MVC receives the parameters of the bound data, it needs to ensure that the order of the parameters passed in the request is consistent, otherwise problems may occur.

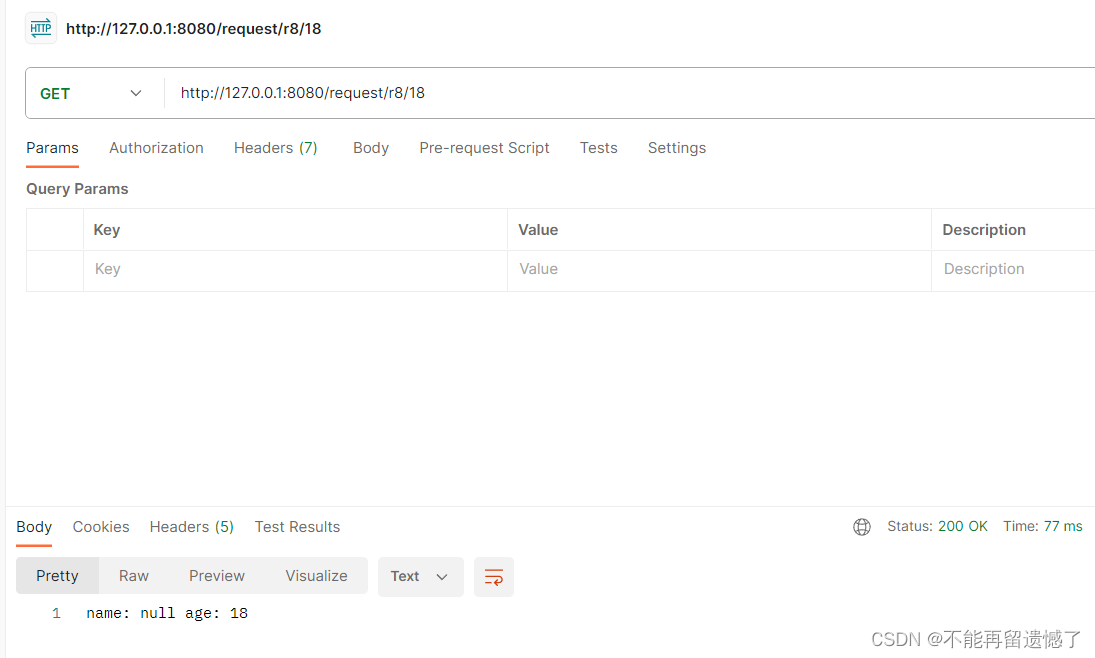
Parameters modified by @PathVariable are also required. If you want to set them as non-required, you not only need to change the default value of @PathVariable, but also make adjustments on the path.
Let's first just change the default settings of @PathVariable to see if it works.
@RequestMapping("/r8/{name}/{age}")
public String r8(@PathVariable(value = "name", required = false) String name, @PathVariable Integer age) {


    return "name: " + name + " age: " + age;
}

Obviously it cannot succeed, so you still need to make changes on the path.
@RequestMapping({

    "/r8/{name}/{age}", "r8/{age}"})
public String r8(@PathVariable(value = "name", required = false) String name, @PathVariable Integer age) {


    return "name: " + name + " age: " + age;
}
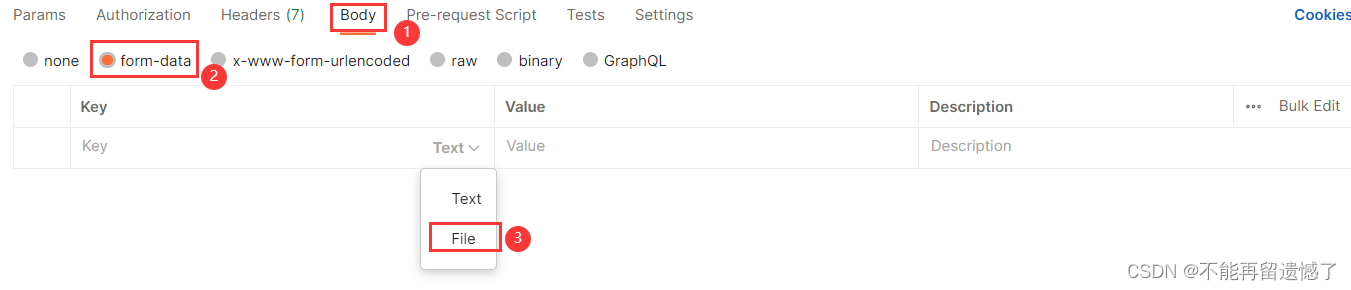
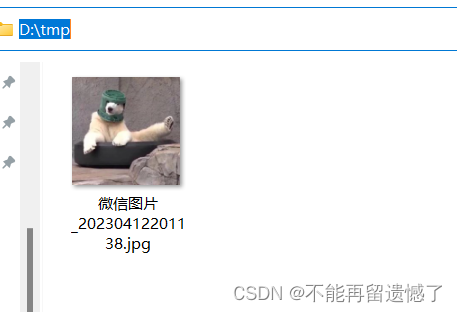
4.8 Upload files
Spring MVC can also receive the file sent by the request. Use @RequestPart to modify it to receive the file.
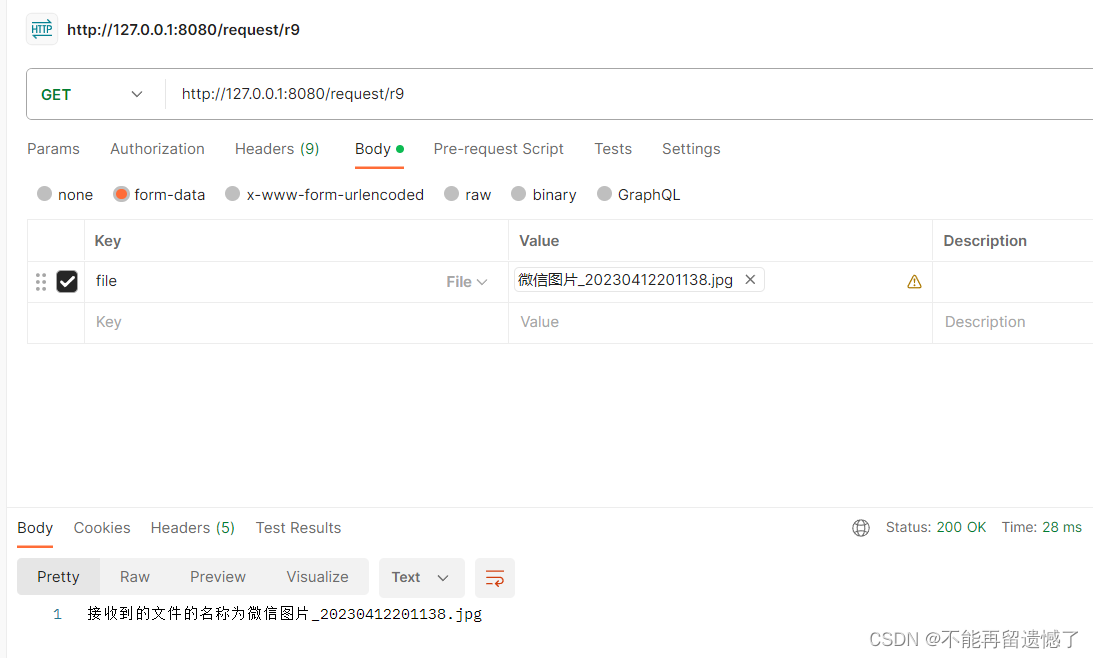
@RequestMapping("/r9")
public String r9(@RequestPart MultipartFile file) throws IOException {


    String fileName = file.getOriginalFilename();
    file.transferTo(new File("D:/tmp/" + fileName));
    return "接收到的文件的名称为" + fileName;
}
In Spring MVC, MultipartFile is required to represent this type of file.transferTo()The method is to copy the file to the specified directory.
postman passes files like this.
4.9 Get cookie and session
Get cookies
I have introduced you to the knowledge related to cookies and sessions. If you have forgotten, you can take a look.Cookies and sessions.
Since the cookie is brought by the browser when sending a request, we need to get the HttpServletRequest class, and then pass this class to get cookies.
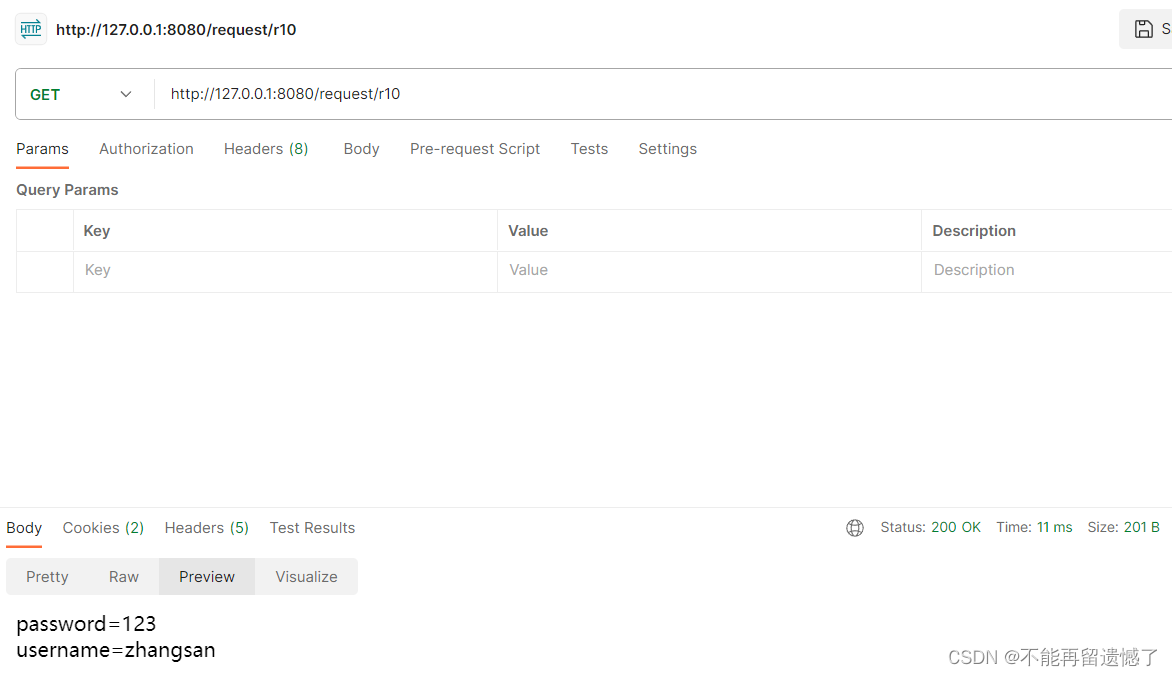
@RequestMapping("/r10")
public String r10(HttpServletRequest request) {


    Cookie[] cookies = request.getCookies();
    StringBuilder sb = new StringBuilder();
    for (Cookie cookie : cookies) {


        sb.append(cookie.getName());
        sb.append("=");
        sb.append(cookie.getValue());
        sb.append("<br>");
    }

    return sb.toString();
}
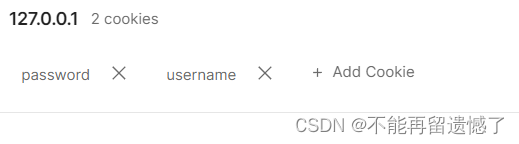
After writing the Spring MVC code, we need to construct the cookie in postman.
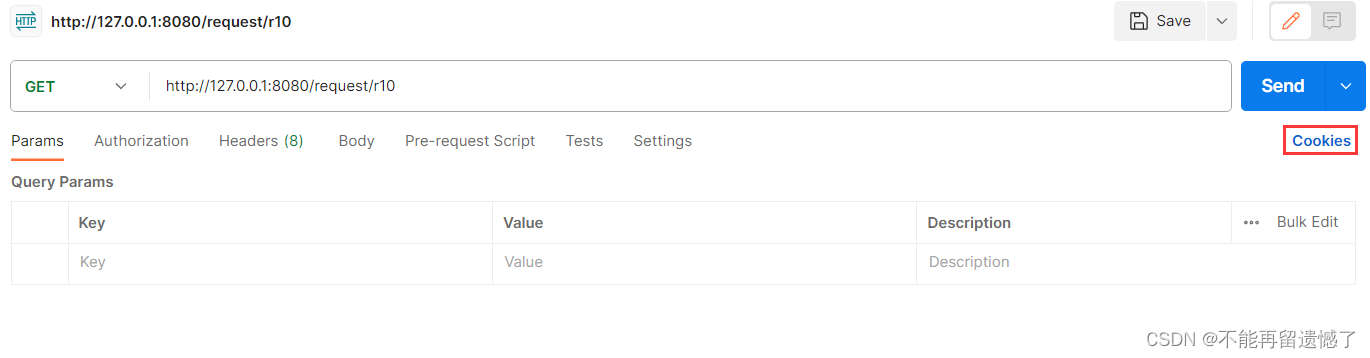
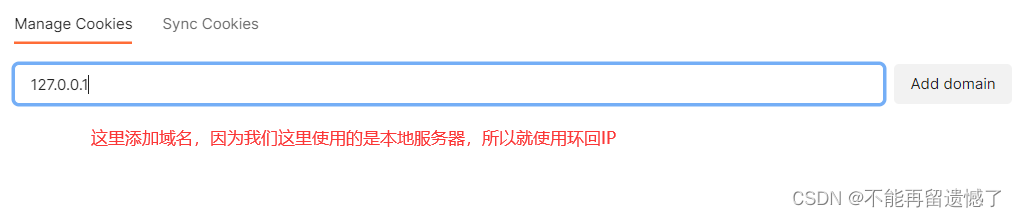
After clicking add domain, the following page will appear. Then we click add cookie to add cookies.
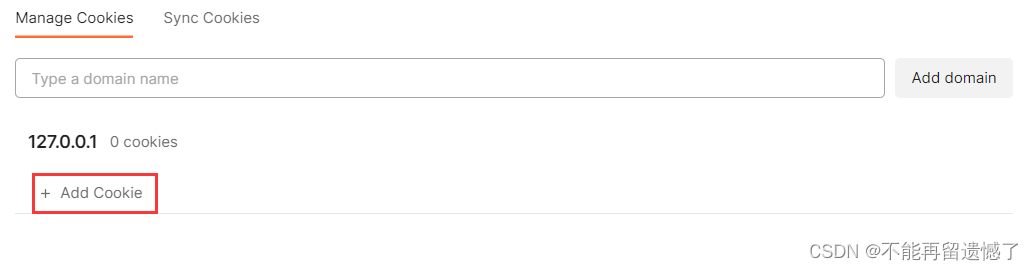
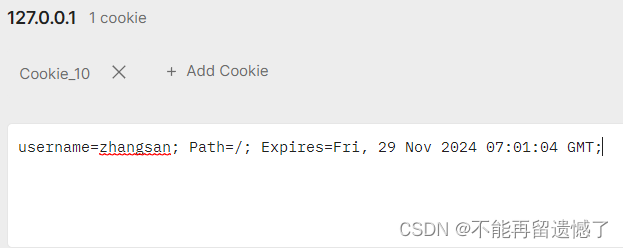
Here username represents the name of the cookie, and zhangsan represents the value of the cookie. Path defines the directory where the cookie can be accessed on the Web site. Here / represents all directories.
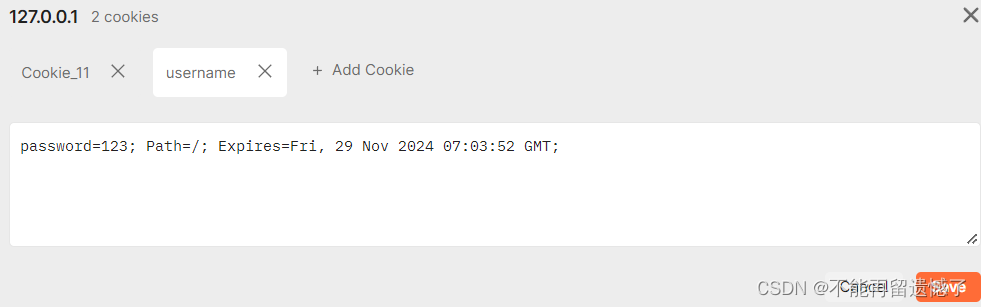
After the construction is completed, the cookies we set will be displayed explicitly in this part of postman.

The above is a way to obtain cookies. Spring MVC also provides us with a more convenient way to obtain cookies.
@RequestMapping("/r11")
public String r11(@CookieValue("username") String username) {


    return "username=" + username;
}
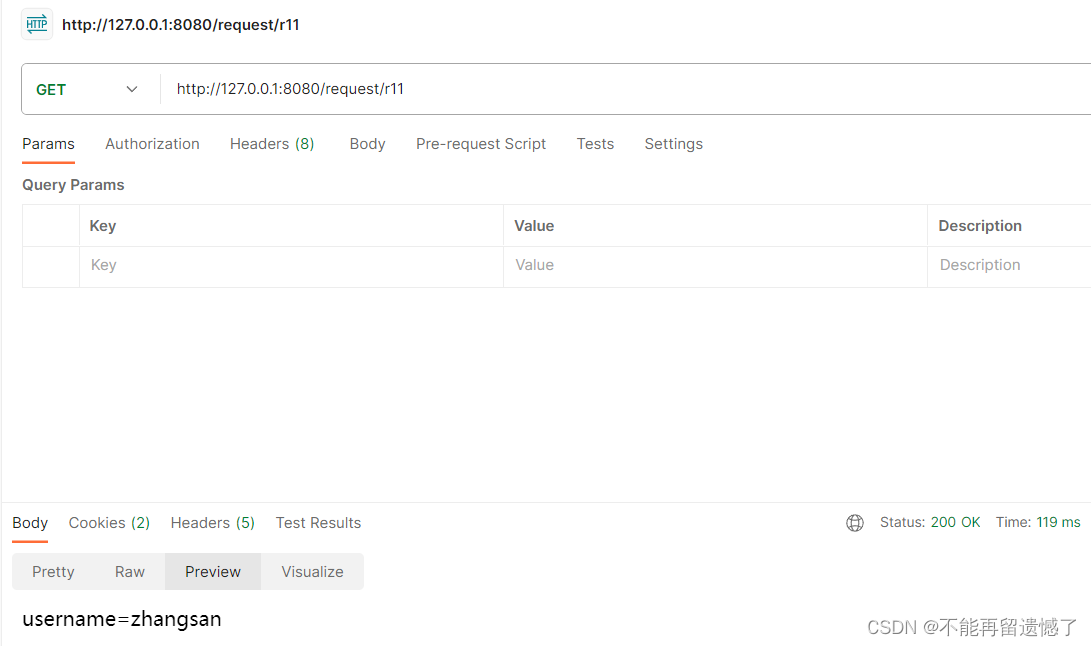
However, this method can only obtain one cookie at a time. If we need to obtain multiple cookies, we can use the first method of obtaining cookies.
Get session
If our server wants to obtain the session, it needs to rely on the sessionId carried in the cookie in the request. Then on the server, the server gets the session with the browser based on the obtained sessionId, so we still need Get the HttpServletRequest object.
Before obtaining the session, we need to manually set up a session and then set some attributes.
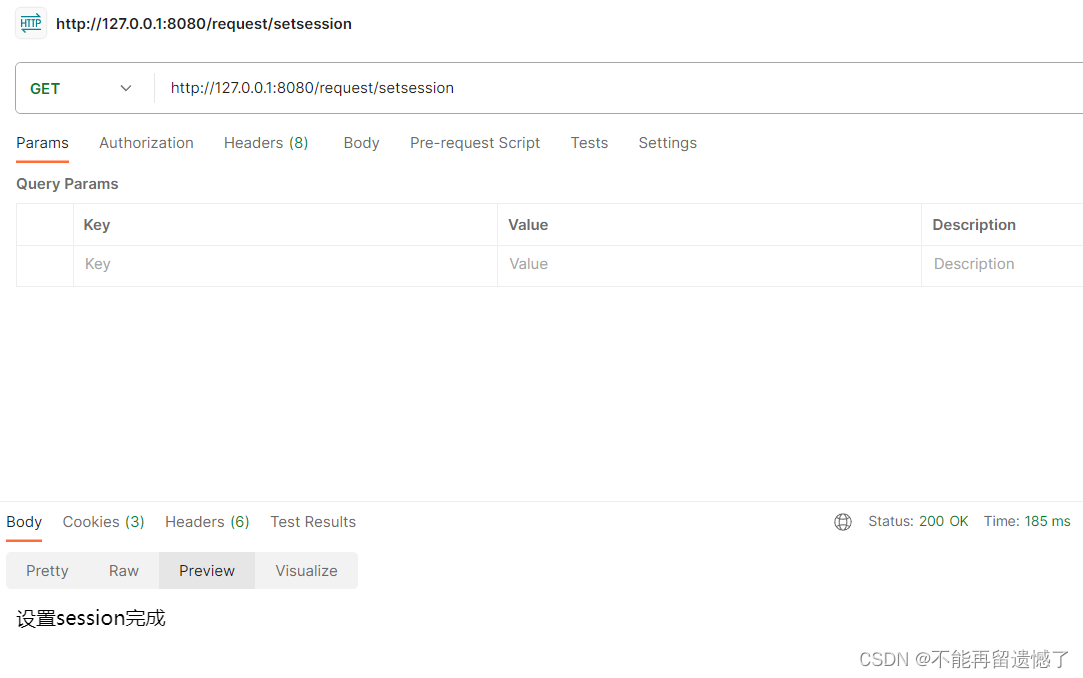
@RequestMapping("/setsession")
public String setSession(HttpServletRequest request) {
HttpSession session = request.getSession(true);
session.setAttribute("username", "zhangsan");
return "设置session完成";
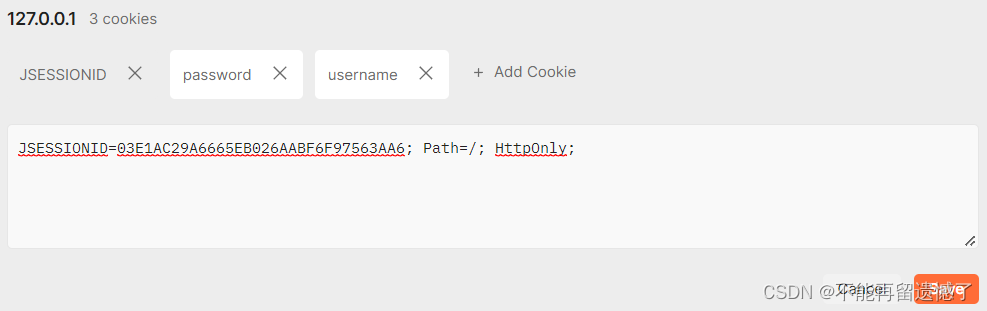
}
After setting up the session, we check the cookie and find that a cookie is automatically added to the cookie, and this cookie records the sessionId.
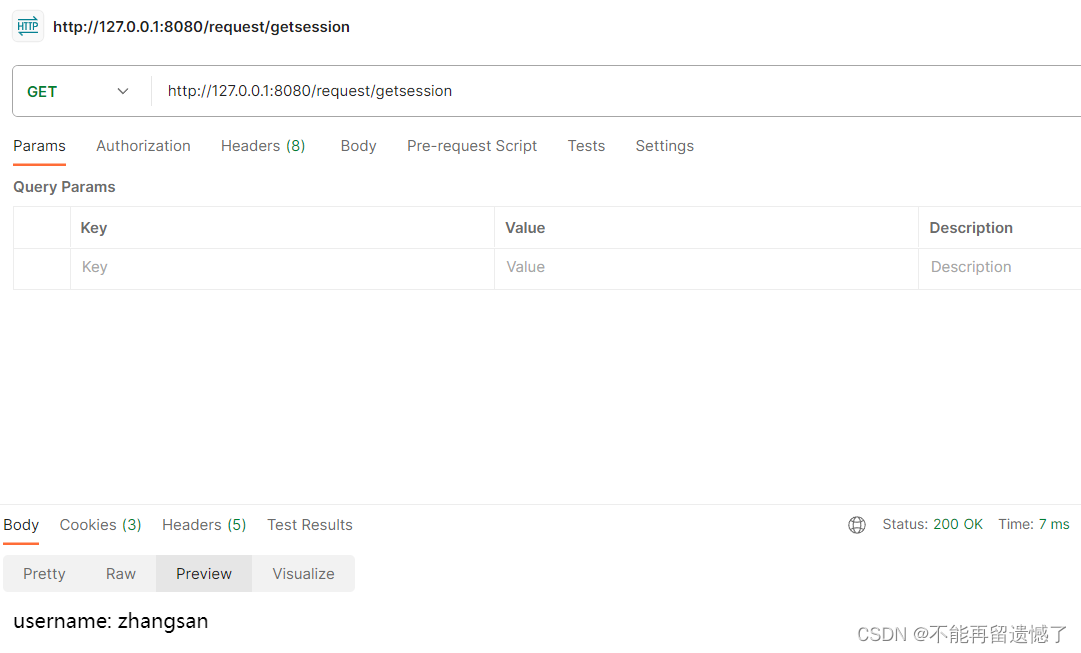
After setting up the session, we can obtain the session.
@RequestMapping("/getsession")
public String getSession(HttpServletRequest request) {


    HttpSession session = request.getSession(false);
    if (session != null) {


        return "username: " + (String)session.getAttribute("username");
    }

    return "session为null";
}
Spring MVC provides several simple ways to obtain sessions.
@RequestMapping("/getsession1")
public String getSession1(HttpSession session) {


    return "username: " + (String)session.getAttribute("username");
}
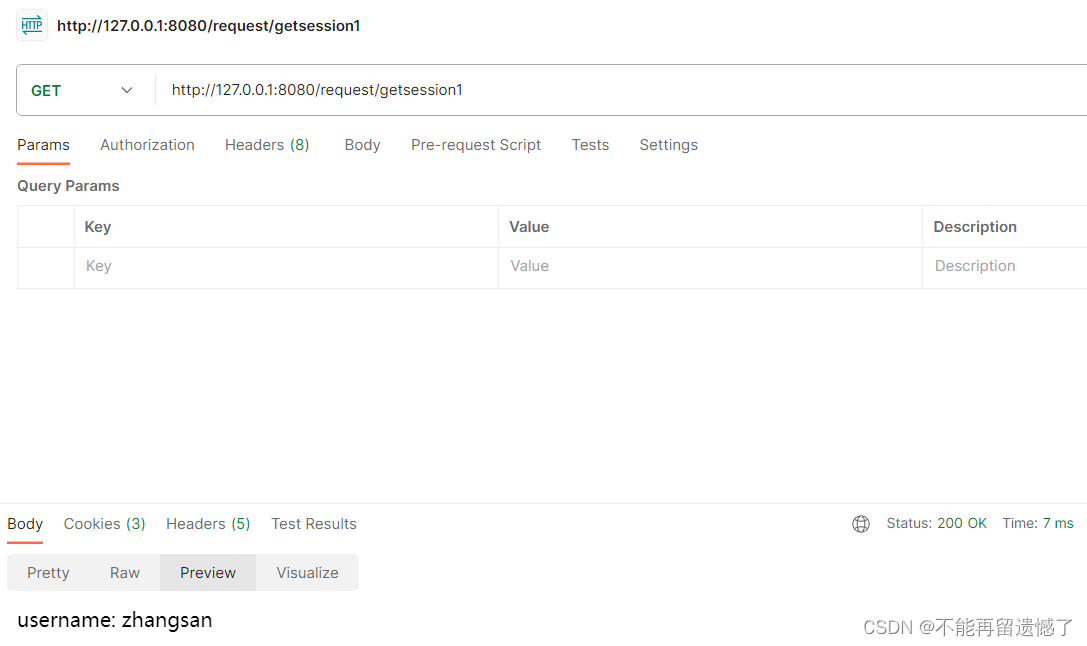
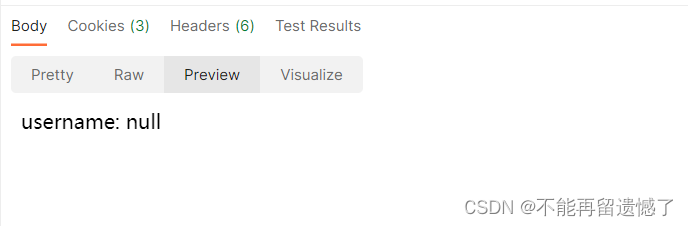
Not only that, if the browser and server establish a connection for the first time, there is no session, that is, when the session is null, session.getAtttribute() will not have a null pointer. This is It's because the underlying Spring MVC layer helps us solve this problem.
We delete the sessionId cookie and then send a request to the server.
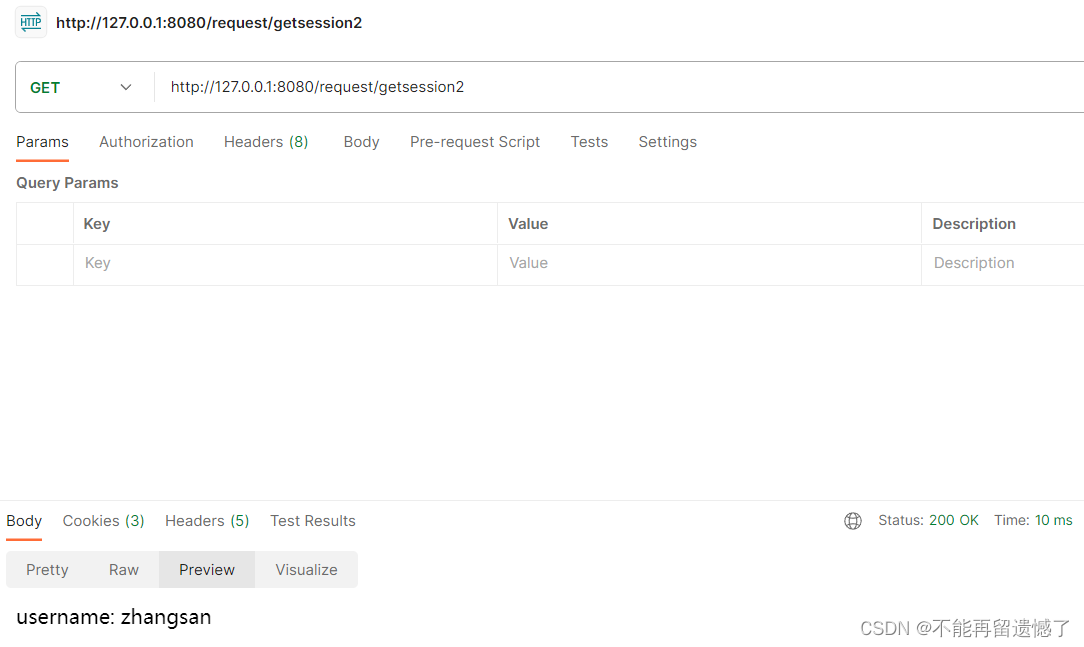
Another method provided by Spring MVC is simpler and can directly obtain the attribute values in the session.
@RequestMapping("/getsession2")
public String getSession2(@SessionAttribute("username") String username) {


    return "username: " + username;
}
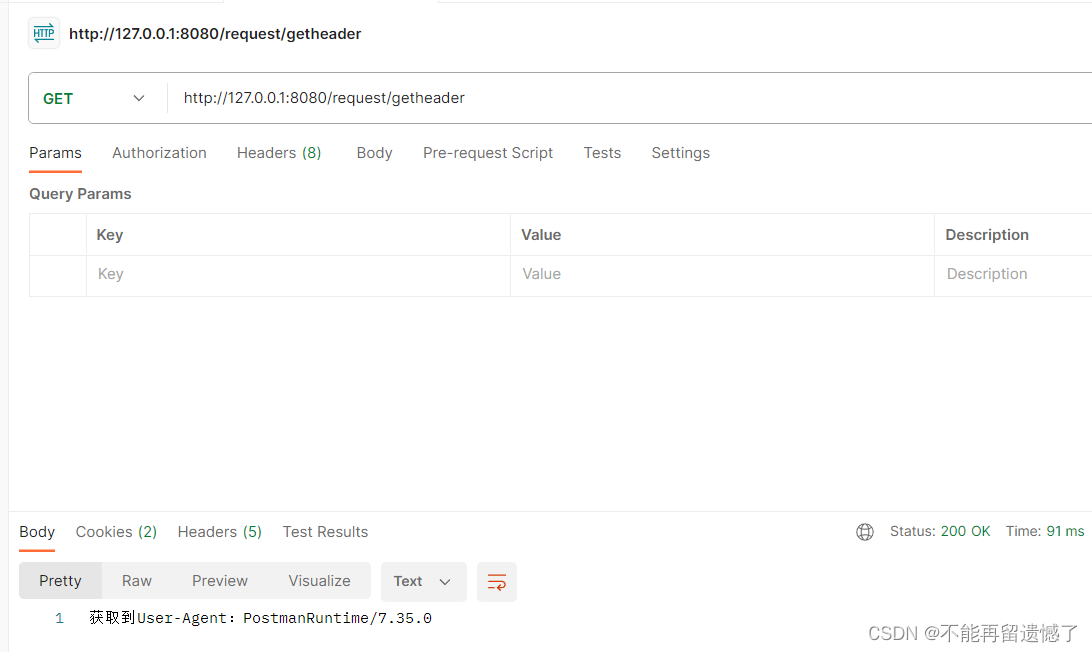
4.10 Get header
First, we still use the traditional method to obtain the header: through the HttpServletRequest class to obtain the header we need.
@RequestMapping("/getheader")
public String getHeader(HttpServletRequest request) {


    String ua = request.getHeader("User-Agent");
    return "获取到User-Agent:" + ua;
}
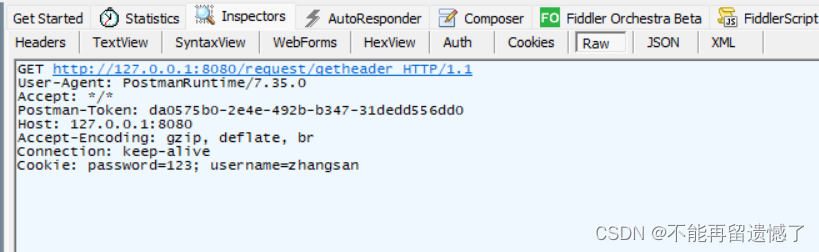
Use the @RequestHeader annotation provided by Spring MVC to obtain the header.
@RequestMapping("/getheader2")
public String getHeader1(@RequestHeader("User-Agent") String ua) {


    return "获取到User-Agent:" + ua;
}

5. Response
The responses returned by Spring MVC earlier are all data types. In fact, we can also return a static page, set headers, set status codes and other operations.
5.1 Return to static page
We write a static page here.
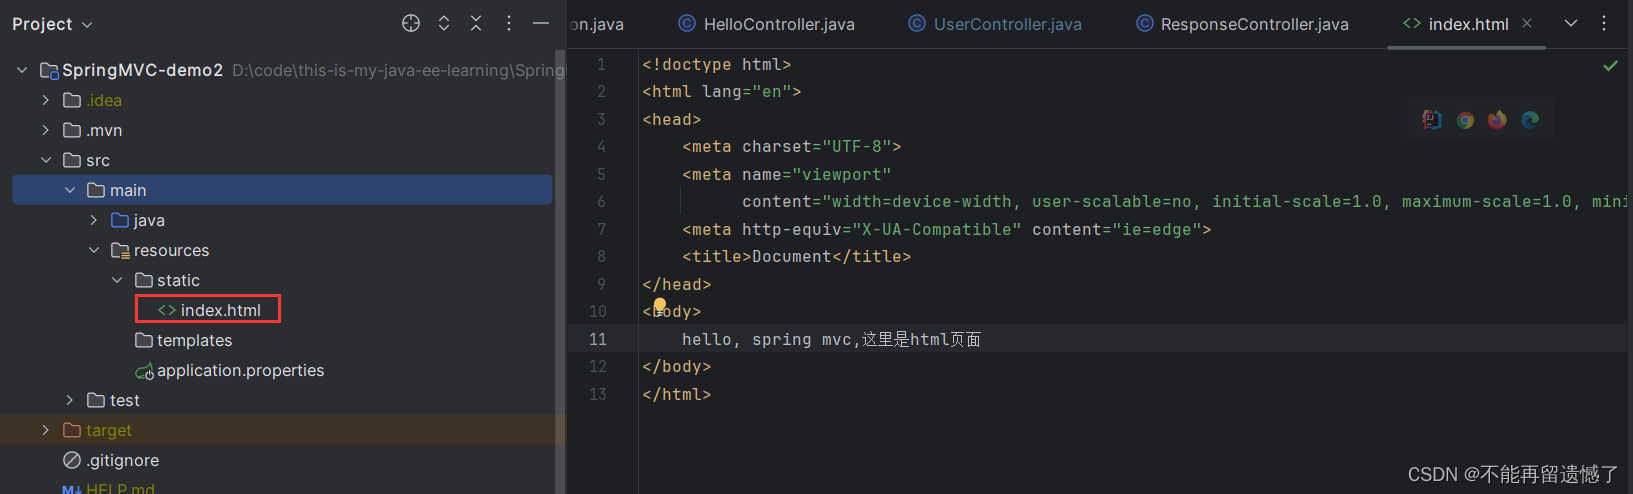
<!doctype html>
<html lang="en">
<head>
    <meta charset="UTF-8">
    <meta name="viewport"
          content="width=device-width, user-scalable=no, initial-scale=1.0, maximum-scale=1.0, minimum-scale=1.0">
    <meta http-equiv="X-UA-Compatible" content="ie=edge">
    <title>Document</title>
</head>
<body>
    hello, spring mvc,这里是html页面
</body>
</html>
package com.example.springmvcdemo2;


import org.springframework.stereotype.Controller;
import org.springframework.web.bind.annotation.RequestMapping;
import org.springframework.web.bind.annotation.ResponseBody;

import java.util.HashMap;
import java.util.Map;

@RequestMapping("/response")
@RestController
public class ResponseController {


    @RequestMapping("/index")
    public Object index() {


        return "/index.html";
    }
}
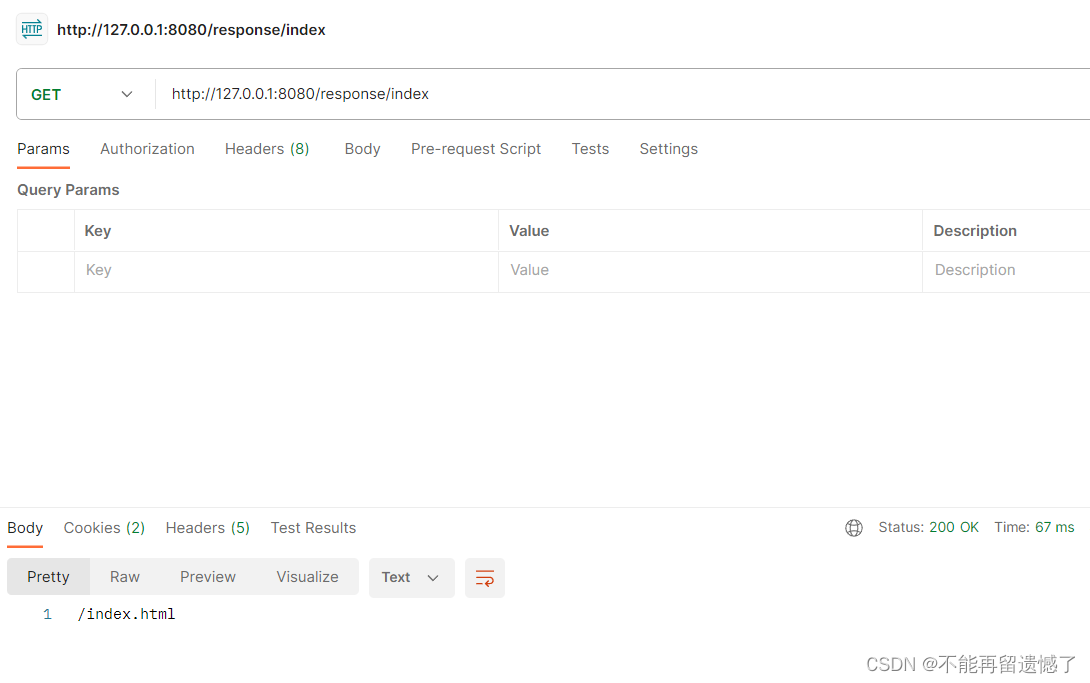

After constructing the request through postman and using fiddler to capture the packet, you can see that the returned data is text type data, not html, which means that our Spring MVC treats "/index.htnl" as a piece of data. So why is this?
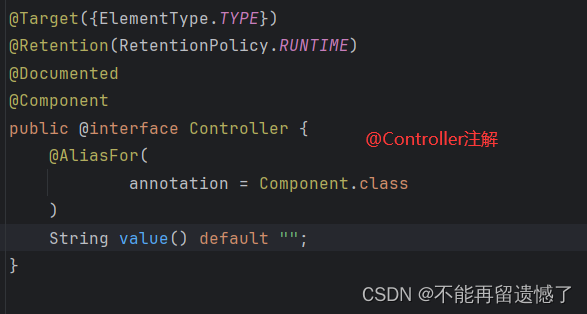
This is the result of @RestController. This annotation will treat everything returned as data by default. If you want to parse the returned type into html, you need to replace the @RestController annotation with < a i=1> @Controller .
package com.example.springmvcdemo2;


import org.springframework.stereotype.Controller;
import org.springframework.web.bind.annotation.RequestMapping;
import org.springframework.web.bind.annotation.ResponseBody;
import org.springframework.web.bind.annotation.RestController;

import java.util.HashMap;
import java.util.Map;

@RequestMapping("/response")
@Controller
public class ResponseController {


    @RequestMapping("/index")
    public Object index() {


        return "/index.html";
    }
}
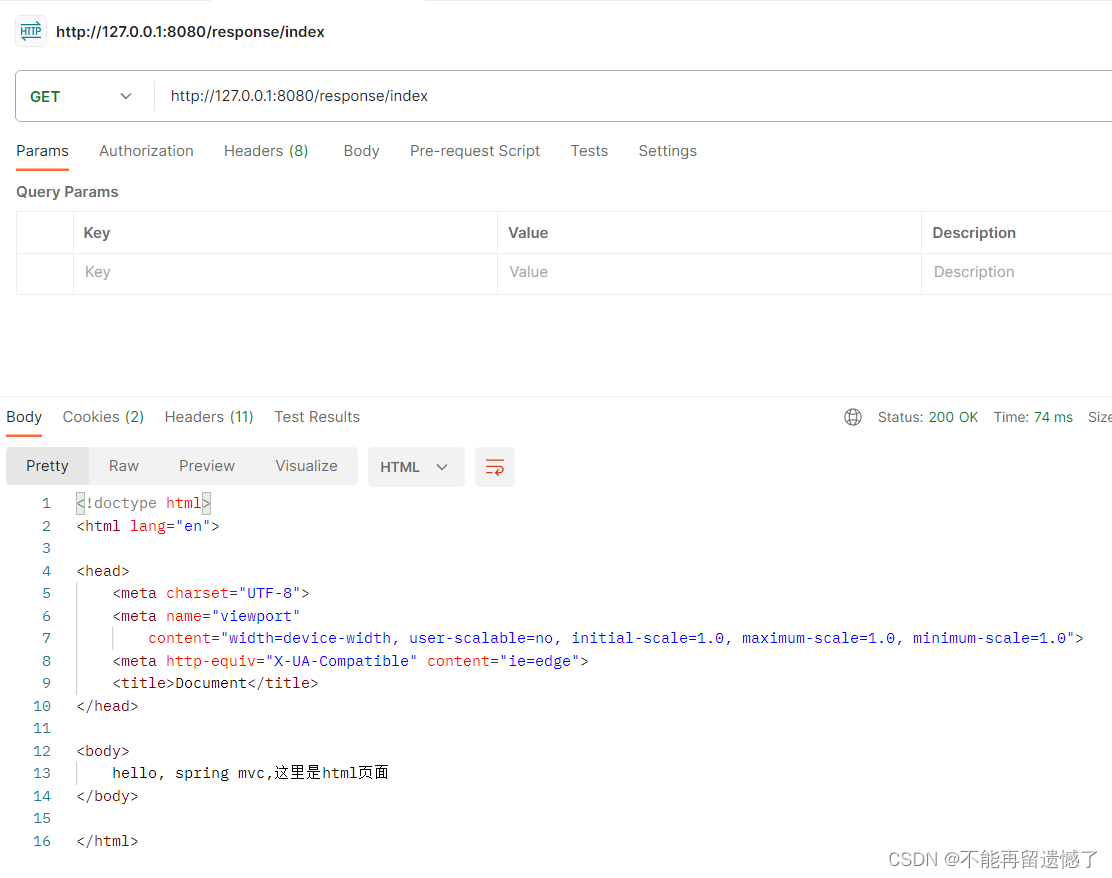
So what is the difference between this @RestController annotation and @Controller annotation? Let's take a look at the source code of the @RestController annotation.
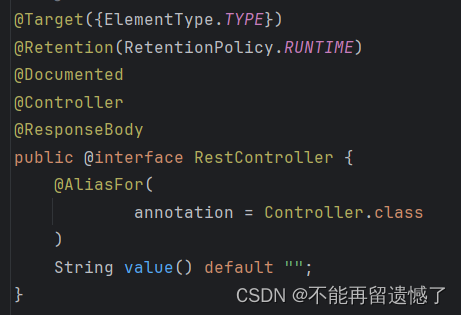
By observing the source code of @RestController, we can find that the @RestController annotation can be written as @Controller + @ResponseBody .
- @Controller: Define a controller, load it when the Spring framework starts, and hand this object over to Spring for management
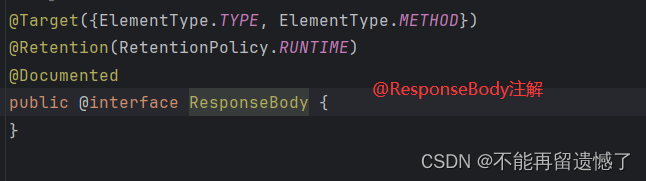
- @ResponseBody: Define the returned data format as non-view and return a text/html information
5.2 Return data
To return to a static page, we use the @Controller annotation. Then to return data, we only need to add the @ResponseBody annotation based on the @Controller annotation. So our code is actually better written this way, so that methods in a class can return both views and data.
@RequestMapping("/response")
@Controller
public class ResponseController {


    @RequestMapping("/getstatus")
    @ResponseBody
    public String getStatus() {


        return "这返回的是一个数据";
    }
}


5.3 Return HTML code snippet
If there is HTML code in the data returned in our Spring MVC, the browser will also parse this HTML code.
@RequestMapping("/returnhtml")
@ResponseBody
public String returnHtml() {


    return "<h1>Hello,HTML~</h1>";
}
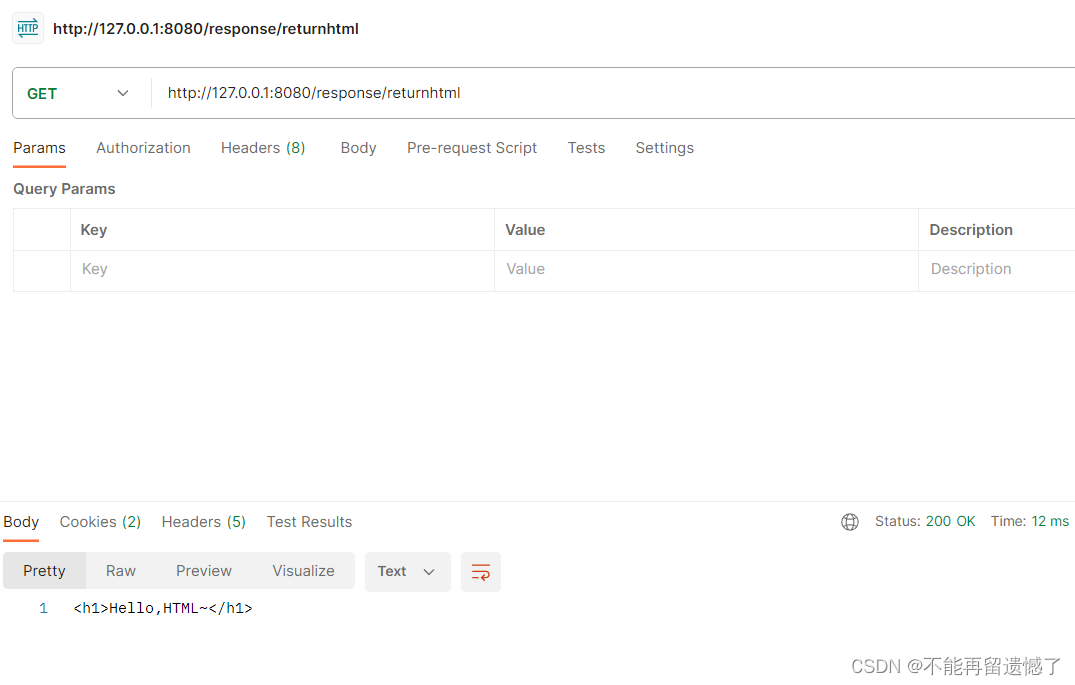
By grabbing the request sent by postman with Fiddler, we can find that the response data type is text/plain plain text type, not html type.
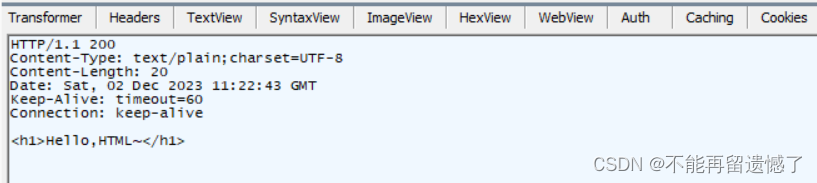
If we use a browser to access, we can use Fiddler to capture packets and we can observe that the response data type is html type.

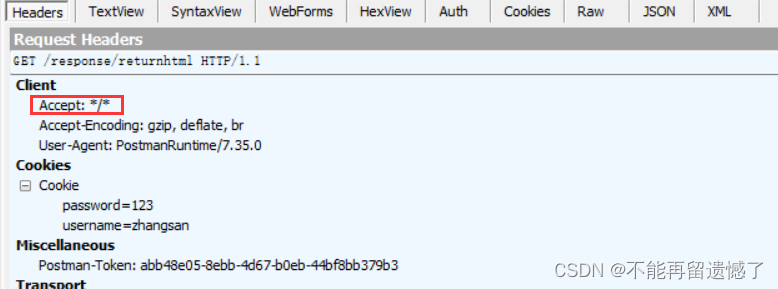
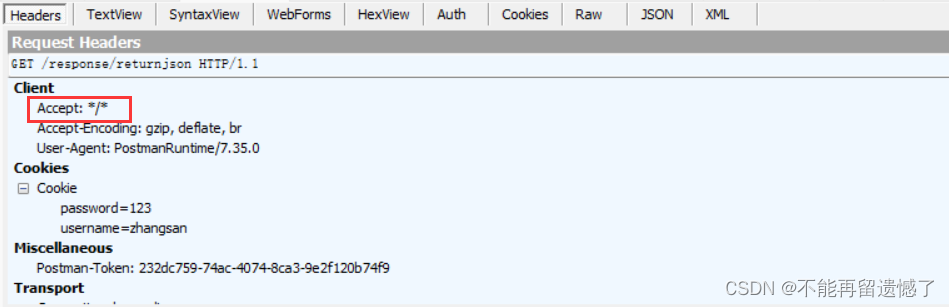
Why is this? In fact, this depends on the data type that the sender can receive. If you capture the data packet requested by postman, you can find that the accept in the header is /, which means that all types of data can be received.
And the return type in our Spring MVC code is String, which is the text data type, so if you use postman to send a request, the response data type will be text/plain type.
Looking at the data packet sent by the browser, we can find that accept is not /, but some types are specified.
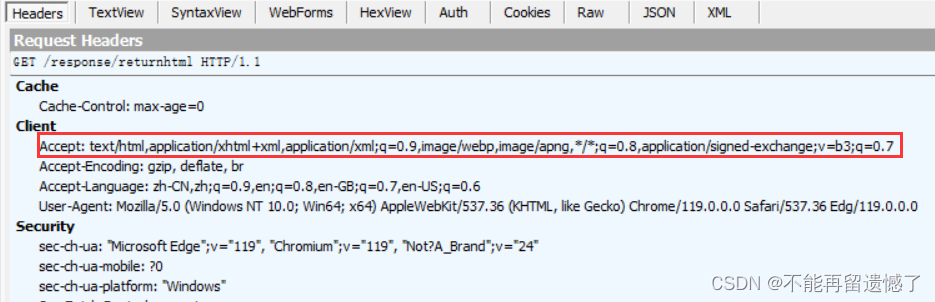
And there is no text/plain among the data types that the browser can receive, so the browser will parse the returned data to see which of the data types it can receive, because the string we return It is an html fragment, so it will be parsed as html type.
In this way, we can also use the same method to return CSS, JavaScript, json and other types.
5.4 Return JSON
Spring MVC can also return JSON data.
@RequestMapping("/returnjson")
@ResponseBody
public Map<String, String> returnJson() {


    Map<String, String> map = new HashMap<>();
    map.put("java", "java value");
    map.put("python", "python value");
    return map;
}
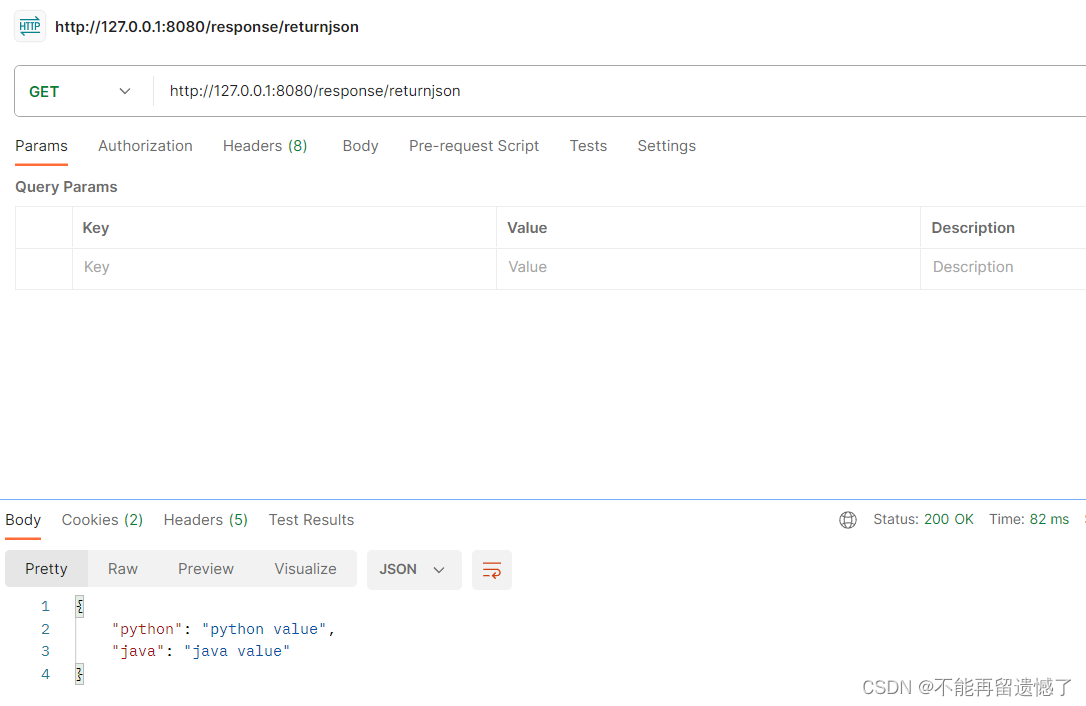
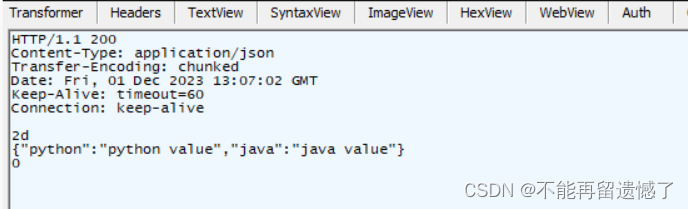
Why is the returned type here a Map type, and the data type of the response we captured in the end is still JSON?
From the Accept in the request packet captured by Fiddler, we can know that any type of response is currently received. In other words, the sender does not clearly indicate the data type of the received response, because the data type returned by our code is Map, which is a Object, then our Spring MVC annotation @ResponseBody will use the Jackson library by default to serialize/deserialize the returned data type, so the Map type we return will be converted into a JSON data type, and the receiving end can receive any type response, so the received data type is the JSON data type.
5.5 Set status code
To set the status code in Spring MVC, you need to use the setStatus() method in the HttpServletResponse class.
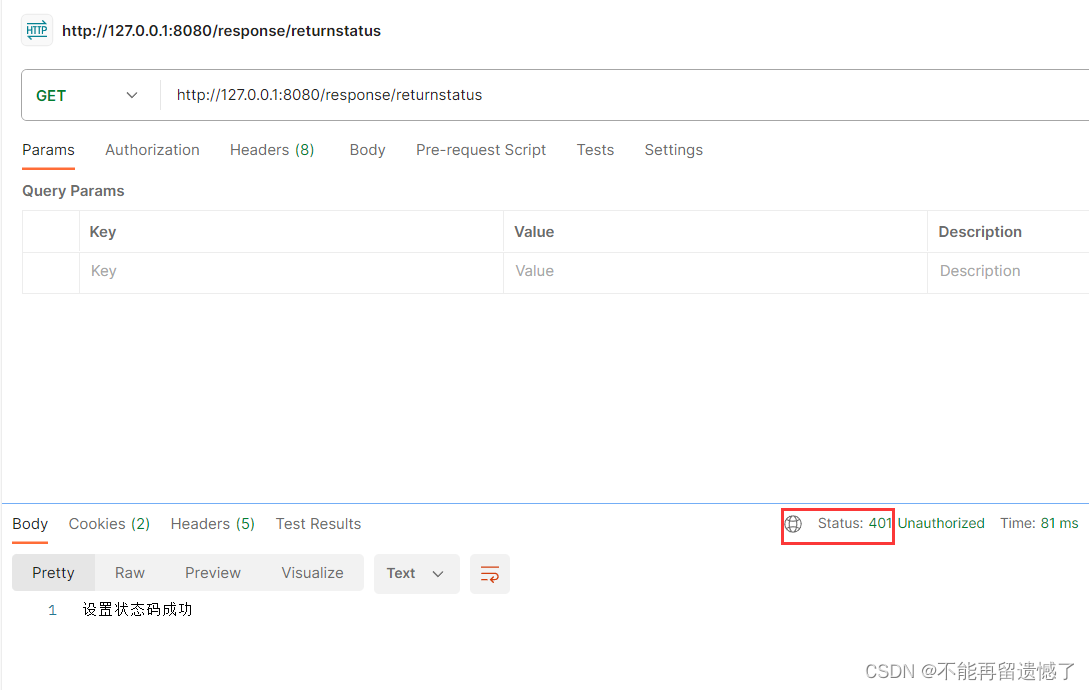
@RequestMapping("/returnstatus")
@ResponseBody
public String returnStatus(HttpServletResponse response) {


    response.setStatus(401);
    return "设置状态码成功";
}
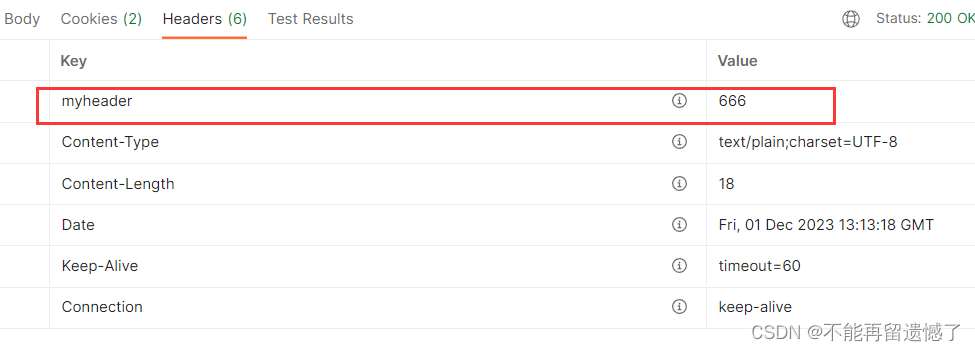
5.6 Set header
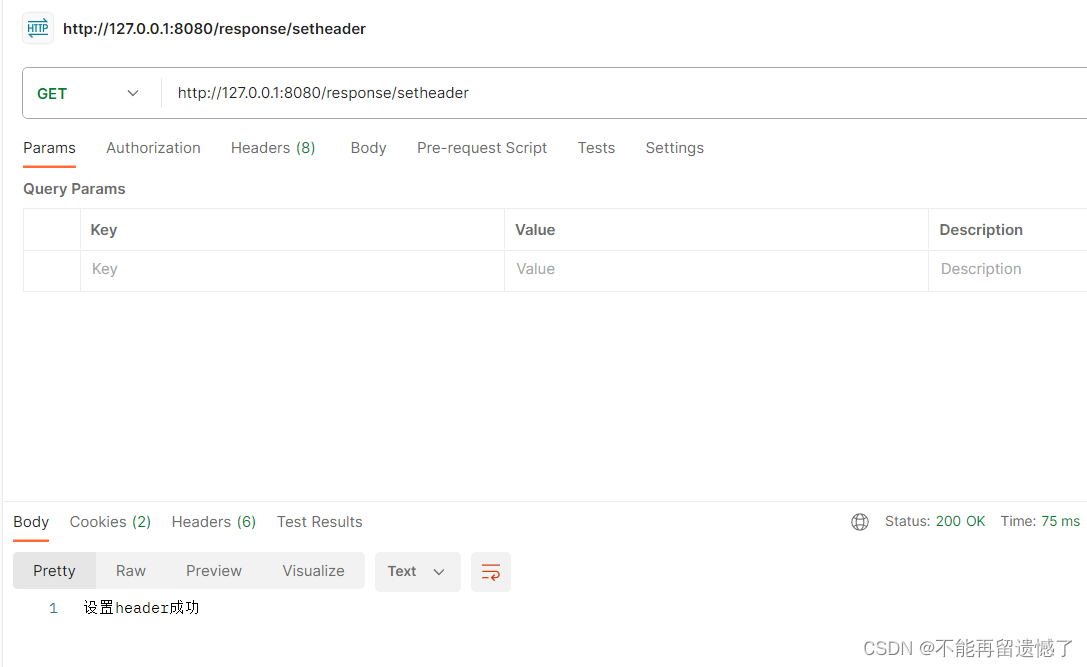
To set the status code in Spring MVC, you need to use the setHeader() method in the HttpServletResponse class.
@RequestMapping("/setheader")
@ResponseBody
public String setHeader(HttpServletResponse response) {


    response.setHeader("myheader", "666");
    return "设置header成功";
}
5.7 Set the Content-Type of the response
Spring MVC will automatically set the corresponding data type for us based on the data or view we return. Of course, we can also set the corresponding data type ourselves. In Spring MVC, setting the data type in the response needs to be changed @ReqeustMapping annotation produces The value of the parameter.
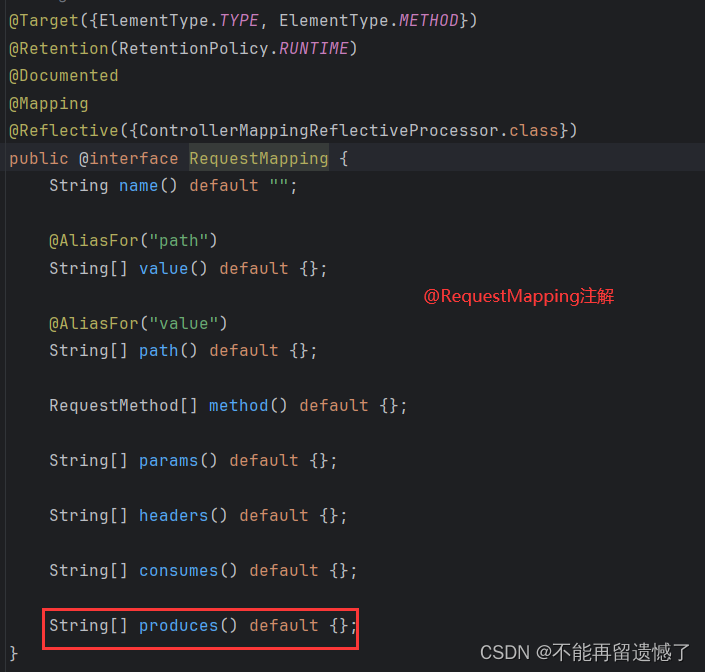
- name(): Specifies the name of the annotation. The default value is an empty string.
- value() and path(): These two properties are aliases for each other, and they specify the path to request mapping. If not specified, defaults to an empty array.
- method(): This attribute specifies the request method type, such as GET, POST, PUT, etc. Defaults to an empty array.
- params(): This attribute specifies the request parameters, which defaults to an empty array.
- headers(): This attribute specifies the request header information and defaults to an empty array.
- consumes(): This attribute specifies the request content type and defaults to an empty array.
- produces(): This attribute specifies the response content type and defaults to an empty array.
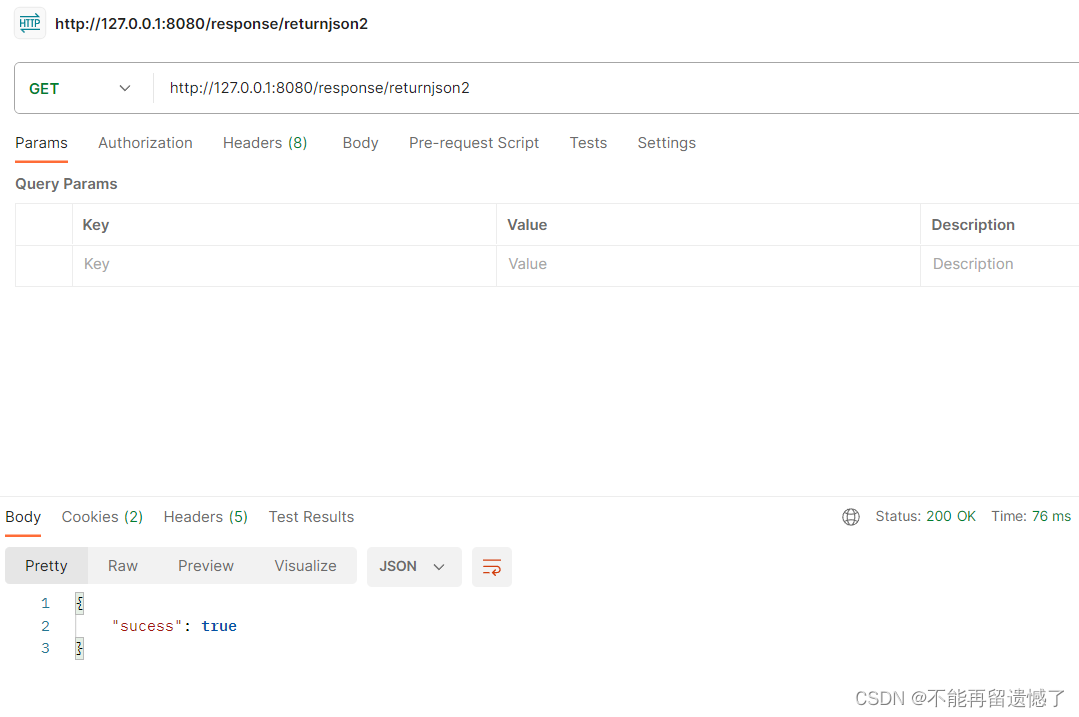
We return a string consisting of key-value pairs.
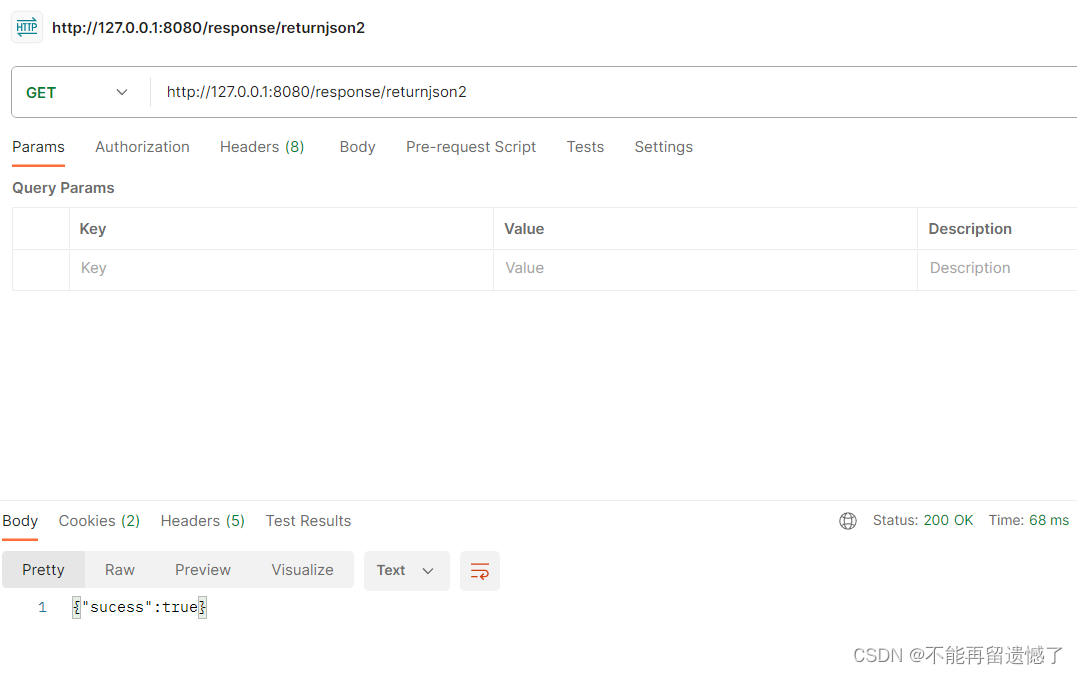
@RequestMapping(value = "/returnjson2", produces = "application/json; charset=utf8")
@ResponseBody
public String returnJson2() {


    return "{\"sucess\":true}";
}
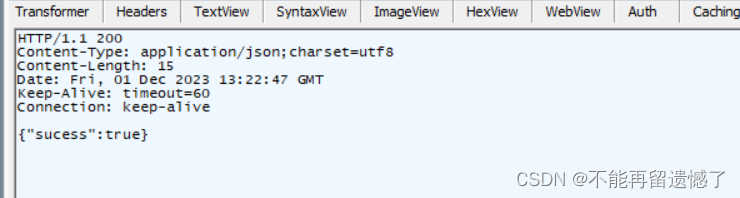
If we do not set the produces parameter, the response string will be parsed as text type.
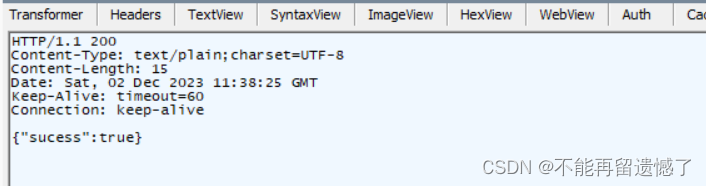
Spring MVC will actually determine the type of response based on the type of your return value, but for which types can be text types and can be parsed into HTML, JavaScript, CSS, etc., you can set produces Parameter to specify the response data type.