1. A brief introduction to setup
Setup is the entry function in the Composition API and is also the first function to be used. Setup is only executed once during initialization, and all Composition API functions are used here. The Composition API code organization is very flexible, and all the code can be written directly in the setup (to put it simply, it means that the data, methods, and computed in vue2 are all omitted, and all data methods are written in the setup )
It can be inferred that when setup is executed, the component object has not yet been created, and the component instance object this is not yet available. At this time, this is undefined, and data/computed/methods/props cannot be accessed through this.
1. setup函数执行于beforeCreate和created之前,也就是说setup函数里面无法使用data和methods方法中的数据
2. setup 有2个参数
    props 的父组件传递过来的参数
    ctx 上下文对象
        ctx.attrs
        ctx.slots
        ctx.parent
        ctx.root
        ctx.emit
        ctx.refs
3.在 setup() 函数中无法访问到 this
4. 在setup函数中定义的变量和方法最后都是需要 return 出去的 不然无法再模板中使用
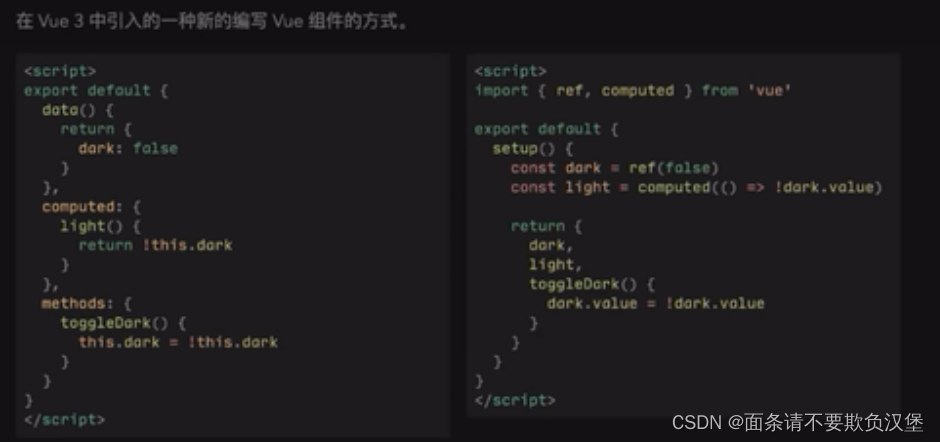
2.Setup tag single file component
Is compile-time syntactic sugar for using the composition API in a Single File Component (SFC). compared to ordinary
- Less boilerplate, cleaner code.
- Ability to declare props and throw events using pure TypeScript.
- Better runtime performance (its template will be compiled into a rendering function in the same scope as it, without any intermediate proxy).
- Better IDE type inference performance (less work for the language server to extract types from code)
basic grammar
<script setup name="Dict">
	1. name 表示组件的名称
	2. setup 放在script 上时,声明 变量,函数声明,以及 import 引入的内容,都能在模板中直接使用,不用rerun
	3. 访问props 使用defineProps
 	const props = defineProps({


	    //子组件接收父组件传递过来的值
	    info:{


	        type: Object
	    }
	})
	4. ctx.emit 触发事件=》defineEmits(['selected']) // defineEmits子组件向父组件事件传递值
	5. ctx.expose 暴露公共 函数 =》defineExpose({

    函数名称});
	6. useSlots 和 useAttrs:与 setupContext.slots 和 setupContext.attrs 等价的值
	import {

     useSlots, useAttrs } from 'vue'
	const slots = useSlots()
	const attrs = useAttrs()
	7. 状态驱动的动态 CSS【(<style> 中的 v-bind)】
	const theme = {


  		color: 'red'
	}
	<style scoped>
		p {


		  color: v-bind('theme.color');
		}
	</style>
	8. 更新dom后操作nextTick(()=>{

     //执行代码})
	9. a
</script>
dynamic components
 动态组件:由于组件被引用为变量而不是作为字符串键来注册的,在 <script setup> 中要使用动态组件的时候,就应该使用动态的 :is 来绑定:
	<template>
 		 <component :is="Foo" />
  		<component :is="someCondition ? Foo : Bar" />
	</template>
	<script setup>
import Foo from './Foo.vue'
import Bar from './Bar.vue'
</script>
recursive components
A single-file component can be referenced by itself via its filename. For example: a component named FooBar.vue can reference itself in its template.
Please note that components imported in this way have lower priority than import. If a named import conflicts with the component's inferred name, you can use the import alias:
import { FooBar as FooBarChild } from './components'
Namespace components
You can use dotted component tags, such as <Foo.Bar>, to reference components nested within object properties. This is useful when you need to import multiple components from a single file:
<script setup>
import * as Form from './form-components'
</script>

<template>
  <Form.Input>
    <Form.Label>label</Form.Label>
  </Form.Input>
</template>
Use custom directives
Globally registered custom directives will work as expected, and locally registered directives can be used directly in templates, just like the components mentioned above.
But there is a limitation to note: local custom directives must be named in the form vNameOfDirective so that they can be used directly in the template.
<script setup>
const vMyDirective = {


  beforeMount: (el) => {


    // 在元素上做些操作
  }
}
</script>
<template>
  <h1 v-my-directive>This is a Heading</h1>
</template>
或是
<script setup>
  // 导入的指令同样能够工作,并且能够通过重命名来使其符合命名规范
  import {

     myDirective as vMyDirective } from './MyDirective.js'
</script>
top-level await
<script setup> 中可以使用顶层 await。结果代码会被编译成 async setup():
<script setup>
const post = await fetch(`/api/post/1`).then(r => r.json())
</script>
注意:
async setup() 必须与 Suspense 组合使用,Suspense 目前还是处于实验阶段的特性。我们打算在将来的某个发布版本中开发完成并提供文档 - 如果你现在感兴趣,可以参照 tests 看它是如何工作的
Please pay attention to the vue3 version when using it. It is supported starting from 3.2 and is more concise. The defined variables and methods do not need to be returned and can be used in templates.
三.Composition API
A set of low-intrusive, functional APIs that allow us to "combine" component logic more flexibly .
Composition API is inspired by React Hooks and is more powerful than mixins. It can improve the reusability of code logic, thereby achieving independence from templates; at the same time, functional programming makes the code more compressible.
What is a composable API?
Problems with object-based API (vue2)
- Not conducive to reuse
- potential naming conflict
- context lost
- Limited type support
- Organize capabilities provided by combined APIs by API type
- Extremely easy to reuse (native js function)
- Can be flexibly combined (life cycle hooks can be used multiple times)
- Provide better context support
- Better typeScipt type support
5. Organized by function/logic
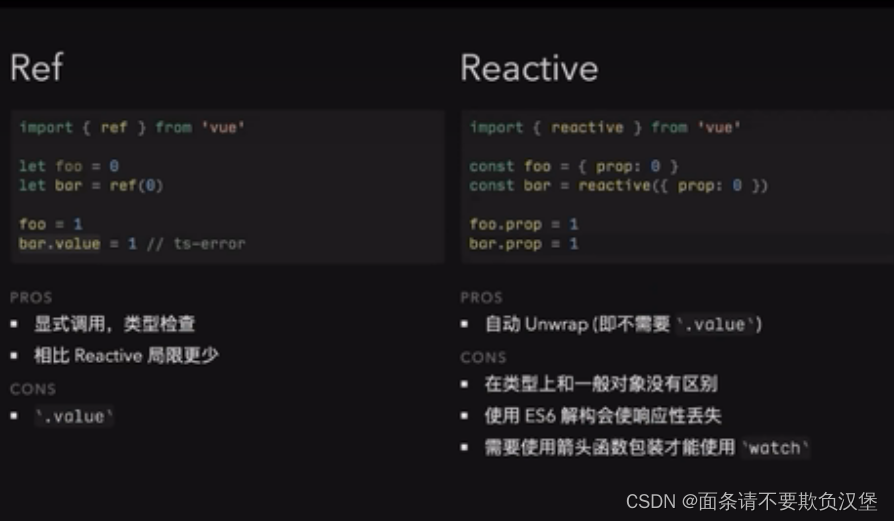
Responsive data
In the Vue2.x version, we only need to define a data in data() to turn it into responsive data. In Vue3.0, we need to use the reactive function or ref to create responsive data.
1. 简单数据类型(String、Number, bool 等)推荐使⽤ref
引入 import {

    ref} from 'vue'
使用: let num = ref(1)
获取/修改值:num.value
2. 复杂数据类型(Array、Object)推荐使⽤reactive
 import {

    reactive} from 'vue'
 let arr = reactive({

    age:1}) 传⼊⼀个对象,vue会封装成Proxy对象,使⽤⾥⾯的⽅法实现响应式数据
 直接修改数据: arr.age = 12
Note: If you don’t need to create responsive data, just declare the variables directly. For example, data obtained from the interface,
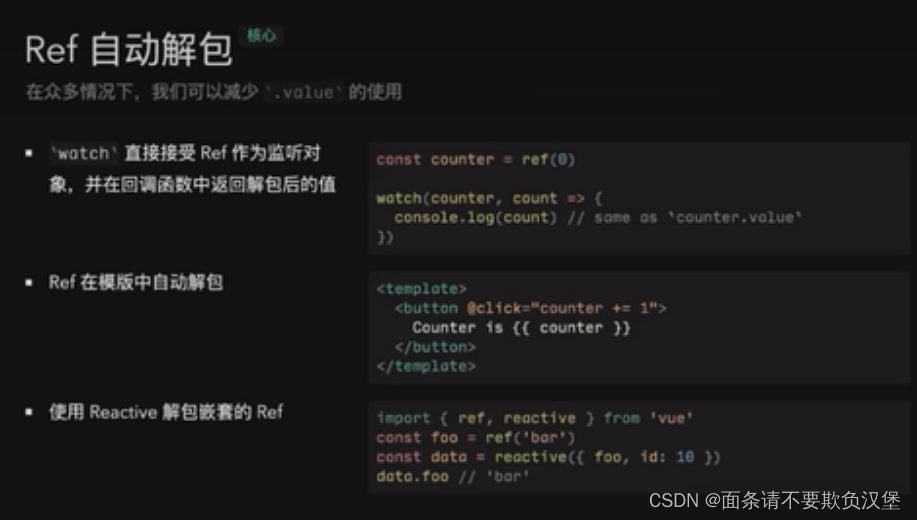
ref introduction
Introduction to ref and reactive, it is recommended to use ref
When ref is automatically unpacked, there is no need to use .value
unref - the reverse operation of Ref
If a ref is passed in, its value is returned, otherwise it is returned
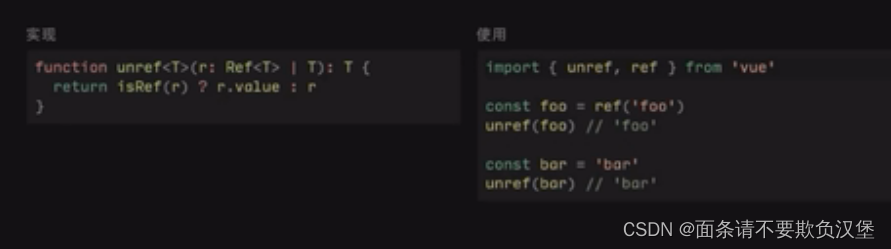
unchanged. The two can be used well together.
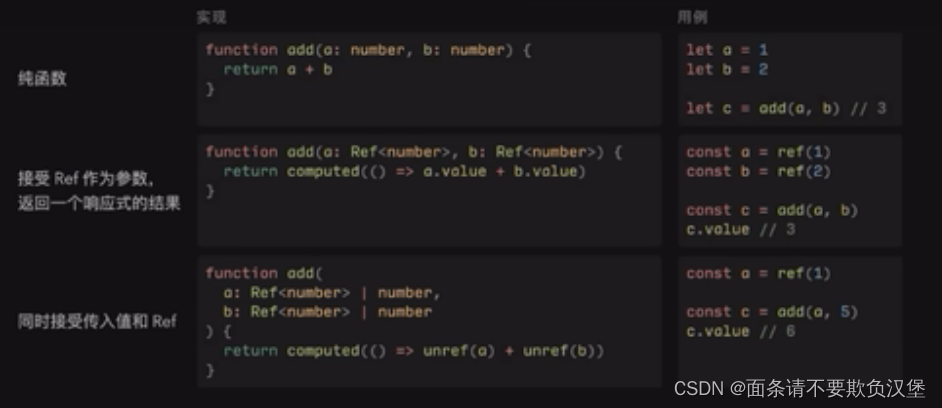
MaybeRef can work well with ref and unref.
Accept ref as function parameter
Judgment of responsive data
isRef: Checks whether a value is a ref object
isReactive: Checks whether an object is a reactive proxy created by reactive
isReadonly: Checks whether an object is a read-only proxy created by readonly
isProxy: Checks whether an object is created by reactive or readonly method Created proxy
computed() computed properties
computed() is used to create computed properties, and the return value is a ref() instance
computed creates a read-only computed property
By passing a function to computed(), you can get a read-only computed property:
const count = ref(1)

// 创建一个计算属性,使其值比 count 大 1
const bigCount = computed(() => count.value + 1)

console.log(bigCount.value) // 输出 2
bigCount.value++ // error 不可写
computed creates readable and writable computed properties
onst count = ref(1)

// 创建一个 computed 计算属性,传入一个对象
const bigCount = computed({


    // 取值函数
    get: () => (count.value + 1),
    // 赋值函数
    set: val => {


      count.value = val - 1
    }
})

// 给计算属性赋值的操作,会触发 set 函数
bigCount.value = 9
// 触发 set 函数后,count 的值会被更新
console.log(count.value) // 8
readonly()
Pass in a reactive object, ordinary object or ref, and return a read-only object proxy. This proxy is deep, and the data inside the object is also read-only.
const state = reactive({

     count: 0 })

const copy = readonly(state)

watchEffect(() => {


  // 依赖追踪
  console.log(copy.count)
})

// state 上的修改会触发 copy 上的侦听
state.count++

// 这里只读属性不能被修改
copy.count++ // warning!
watchEffect()
watchEffect() immediately executes the passed function and reactively listens for its dependencies and reruns the function when its dependencies change.
Basic usage
const count = ref(0)

// 初次直接执行,打印出 0
watchEffect(() => console.log(count.value))

setTimeout(() => {


  // 被侦听的数据发生变化,触发函数打印出 1
  count.value++
}, 1000)
Stop listening
watchEffect() returns a function when used. When the returned function is executed, listening will stop.
const stop = watchEffect(() => {


  /* ... */
})

// 停止侦听
stop()
watch()
Watch in composition-api is the same as in Vue2.x. Watch needs to listen to data and execute its listening callback. By default the first render is not performed.
The difference between watch and watchEffect
- watch initial rendering is not executed
- watch listens more specifically
- watch can access the values before and after listening to data changes
watch listens to a single data source
The data listened to can be responsive data created by reactive (getter function with return value), or it can be a ref
A single watch receives three attributes
- Parameter 1: A responsive object, such as a reactive object
- Parameter 2: The callback function regarding changes in the internal properties of the object, with two formal parameters: old and new.
- Parameter 3: Monitoring attribute control, deep means deep monitoring, immediate means starting monitoring as soon as the page is launched.
<script setup >
let message = reactive({


    name: 'helloworld'
})
watch(message, (newVal, oldVal) => {


    console.log(newVal);
    console.log(oldVal);
}, {


    deep: true,
    immediate: true
})
</script>
watch listens to multiple data sources
When listening to multiple data sources, give the parameters to watch in the form of an array. When there are multiple properties in the listening object, parameter one can be written in the form of an arrow function to specify the name of the property we want to monitor; if not If you do, then everything will be monitored.
 const loginForm = reactive({


    username: '',
    password: '',
  });
  const num = ref(0);
  // loginForm的每个值变化或num变化都会触发watch
  watch([loginForm, num], (val) => {


    console.log(val); // val[0]的数据是loginForm的数据,val[1]是num的数据
  });
  // loginForm.username值变化或num变化都会触发watch
    watch([() => loginForm.username, num], (val) => {


    console.log(val); // val[0]的是loginForm.username数据,val[1]是num的数据
  });
4. Composition-Api dependent tools
 1. toRef():当我们在模板中渲染数据时,不希望由前缀的时候可以使用组合-toRef()
 toRef()是函数,转换响应式对象中某个属性为单独响应式数据,并且值是关联的
 	//  数据响应式:
    const obj = reactive({


      msg: 'hello',
      info: 'hi'
    })
    const msg = toRef(obj, 'msg')
    const info = toRef(obj, 'info')
    const hClick = () => {


      msg.value = 'nihao'
      info.value= 'hihi'
    }
  可以直接访问: msg, info
2. toRefs():toRefs函数可以定义转换响应式中所有属性为 响应式数据,通常用于结构reactive定义的对象,转换响应式对象中所有属性(也可以是一部分)为单独响应式数据,对象成为普通对象,并且值是关联的
const {

     msg, info } = toRefs(obj);
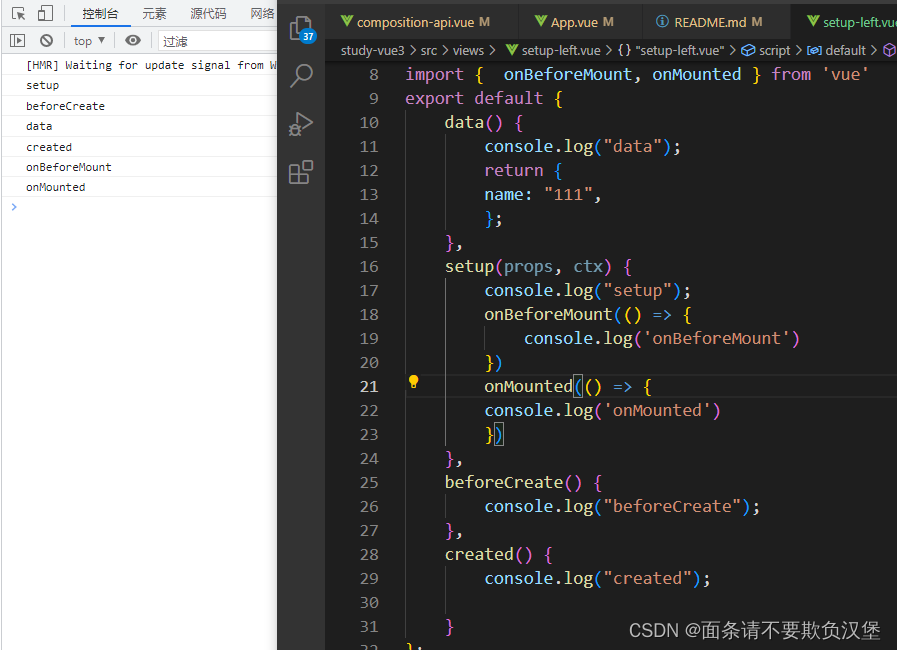
5. Life cycle
The life cycle functions are: onBeforeMount, onMounted, onBeforeUpdate, onUpdated, onBeforeUnmount, onUnmounted, onErrorCaptured, onRenderTracked, onRenderTriggered, onActivated, onDeactivated.
Different from vue2, vue3 adds an on based on the name of vue2's life cycle .
script>
import {


  onBeforeMount,
  onMounted,
  onBeforeUpdate,
  onUpdated,
  onBeforeUnmount,
  onUnmounted,
  onRenderTracked,
  onRenderTriggered,
} from "vue";
export default {


  components: {

    },
  data() {


    return {

    };
  },
  setup() {


    // setup里面存着两个生命周期创建前创建
    // beforeCreate
    // created
    onBeforeMount(() => {


      console.log("onBefore   ====>  vue2.0 x beforemount");
    });
    onMounted(() => {


      console.log("onMounted  ====>  vue2.0 x mount");
    });
    onBeforeUpdate(() => {


      console.log("onBeforeUpdate  ====>  vue2.0 x beforeUpdate");
    });
    onUpdated(() => {


      console.log("onUpdated  ====>  vue2.0 x update");
    });
    onBeforeUnmount(() => {


      //在卸载组件实例之前调用。在这个阶段,实例仍然是完全正常的。
      console.log("onBeforeUnmount ====>  vue2.0 x beforeDestroy");
    });
    onUnmounted(() => {


      //卸载组件实例后调用,调用此钩子时,组件实例的所有指令都被解除绑定,所有事件侦听器都被移除,所有子组件实例被卸载。
      console.log("onUnmounted ====>  vue2.0 x destroyed");
    });
    // 新增两个生命周期函数
    //每次渲染后重新收集响应式依赖
    onRenderTracked(({

     key, target, type }) => {


      // 跟踪虚拟DOM重新渲染时调用,钩子接收debugger event作为参数,此事件告诉你哪个操作跟踪了组件以及该操作的目标对象和键。
      // type:set/get操作
      // key:追踪的键
      // target:重新渲染后的键
      console.log("onRenderTracked");
    });
    //每次触发页面重新渲染时自动执行
    onRenderTriggered(({

     key, target, type }) => {


      //当虚拟DOM重新渲染被触发时调用,和renderTracked类似,接收debugger event作为参数,
      // 此事件告诉你是什么操作触发了重新渲染,以及该操作的目标对象和键
      console.log("onRenderTriggered");
    });
    return {

    };
  },
};
</script>
Compared with the execution of the life cycle in setup and the external life cycle function, it will first point to the life cycle function in setUp, and then execute the external life cycle function.
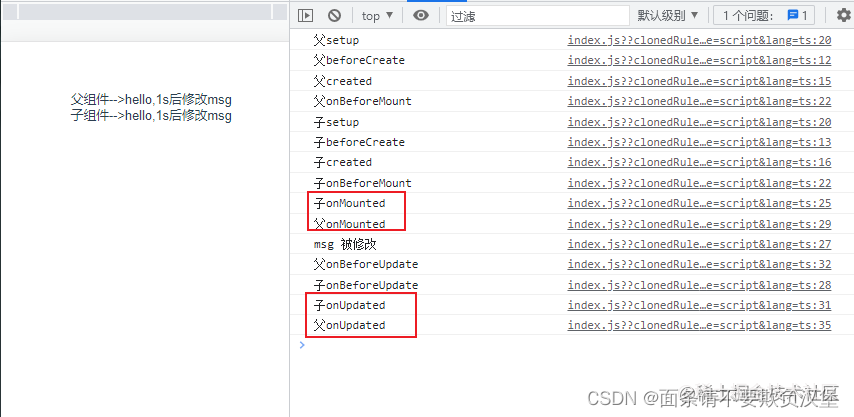
Parent-child component life cycle
Parent component:
<template>
<div class="container">
 父组件-->{

    {

    msg}}
 //子组件
<ChildItem :msg="msg" :msg1="msg1"></ChildItem>
</div>
</template>


<script lang="ts">
import {

     defineComponent,ref, onBeforeMount, onMounted, onBeforeUpdate, onUpdated } from 'vue'
import ChildItem from './components/base/Child.vue'
export default defineComponent({


  name: 'App',
  components: {


    ChildItem

  },
  beforeCreate () {


    console.log('父beforeCreate')
  },
  created () {


    console.log('父created')
  },
  setup () {


    console.log('父setup')
    onBeforeMount(() => {


      console.log('父onBeforeMount')
    })
    onMounted(() => {


    //更新数据
    setTimeout(() => {


        msg.value = 'hello,1s后修改msg'
        console.log('msg 被修改')
      }, 1000)
      console.log('父onMounted')
    })
    onBeforeUpdate(() => {


      console.log('父onBeforeUpdate')
    })
    onUpdated(() => {


      console.log('父onUpdated')
    })
  }
})
</script>
Child.vue
<template>
  <div>子组件-->{

    {

    msg}}</div>

</template>

<script lang="ts">
import {

     defineComponent, onBeforeMount, onMounted, onBeforeUpdate, onUpdated } from 'vue'

export default defineComponent({


  name: 'ChildItem',
  props: {


    msg: {


      type: String,
      required: true
    }
  },
  beforeCreate () {


    console.log('子beforeCreate')
  },
  created () {


    console.log('子created')
  },
  setup (props, {

     attrs, slots, emit }) {


    console.log('子setup')
    onBeforeMount(() => {


      console.log('子onBeforeMount')
    })
    onMounted(() => {


      console.log('子onMounted')
    })
    onBeforeUpdate(() => {


      console.log('子onBeforeUpdate')
    })
    onUpdated(() => {


      console.log('子onUpdated')
    })
  }

})
</script>